Operating Instructions
Page 1
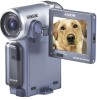
Owner's Record The model and serial numbers are located on the bottom. Model No. DCR-IP5/IP7BT ©2001 Sony Corporation AC- Record the serial number in the space provided below. Model No. Serial No. Serial No. 3-069-933-12 (1) Digital Video Camera Recorder Operating Instructions Before operating the unit, please read this product. Refer to these numbers whenever you call upon your Sony dealer regarding this manual thoroughly, and retain it for future reference.
Owner's Record The model and serial numbers are located on the bottom. Model No. DCR-IP5/IP7BT ©2001 Sony Corporation AC- Record the serial number in the space provided below. Model No. Serial No. Serial No. 3-069-933-12 (1) Digital Video Camera Recorder Operating Instructions Before operating the unit, please read this product. Refer to these numbers whenever you call upon your Sony dealer regarding this manual thoroughly, and retain it for future reference.

Operating Instructions
Page 6
... lamp also lights up . (2) Slide the POWER switch down while pressing the small green button, then release your finger. MEMORY/NETWORK (DCR-IP7BT only) MEMORY: Use this mode when you use the network function. Basic operations This section describes the basic operations used with the ...the power and select the mode To supply power for the camcorder, see "Step 1 Preparing the power supply" on , and then the camcorder turns to the supplied network function operating instructions. The camcorder is turned on page 18. 1,2 CAMERA MEMORY/ NETWORK VCR POWER (CHG) OFF ON MODE (1) Slide...
... lamp also lights up . (2) Slide the POWER switch down while pressing the small green button, then release your finger. MEMORY/NETWORK (DCR-IP7BT only) MEMORY: Use this mode when you use the network function. Basic operations This section describes the basic operations used with the ...the power and select the mode To supply power for the camcorder, see "Step 1 Preparing the power supply" on , and then the camcorder turns to the supplied network function operating instructions. The camcorder is turned on page 18. 1,2 CAMERA MEMORY/ NETWORK VCR POWER (CHG) OFF ON MODE (1) Slide...

Operating Instructions
Page 8
... AUTO with v/V/b/B on the control button, then press the center z. PAGE1 PAGE2 PAGE3 EXIT MENU FOCUS FADER SELF MEM EXPO- FN TIMER MIX SURE In CAMERA mode (2) To change the page, select PAGE1, PAGE2, or PAGE3 with v/V/b/B on the control button. The display returns to use the FN screen If FN...
... AUTO with v/V/b/B on the control button, then press the center z. PAGE1 PAGE2 PAGE3 EXIT MENU FOCUS FADER SELF MEM EXPO- FN TIMER MIX SURE In CAMERA mode (2) To change the page, select PAGE1, PAGE2, or PAGE3 with v/V/b/B on the control button. The display returns to use the FN screen If FN...

Operating Instructions
Page 9
... mode. Basic operations The screen buttons on /off the screen buttons Press DISPLAY. Getting started Introduction - To turn on the PAGE1/PAGE2/PAGE3 screen In CAMERA mode PAGE1 PAGE2 PAGE3 MENU, FADER, SELFTIMER, MEM MIX*, EXPOSURE, FOCUS LCD BRT, VOL, END SCH, TITLE DIG EFFT, COUNT RESET In VCR mode PAGE1... PAGE2 PAGE3 MENU, VOL, TITLE, MULTI SRCH, x/ PB*, m , BX *, M * LCD BRT, DIG EFFT, END SCH, x/ PB*, m *, BX *, M * DATA CODE, COUNT RESET, qREC CTRL, x/ PB*, m *, BX *, M * * (DCR-IP7BT only) See page 112 for the MEMORY/NETWORK mode...
... mode. Basic operations The screen buttons on /off the screen buttons Press DISPLAY. Getting started Introduction - To turn on the PAGE1/PAGE2/PAGE3 screen In CAMERA mode PAGE1 PAGE2 PAGE3 MENU, FADER, SELFTIMER, MEM MIX*, EXPOSURE, FOCUS LCD BRT, VOL, END SCH, TITLE DIG EFFT, COUNT RESET In VCR mode PAGE1... PAGE2 PAGE3 MENU, VOL, TITLE, MULTI SRCH, x/ PB*, m , BX *, M * LCD BRT, DIG EFFT, END SCH, x/ PB*, m *, BX *, M * DATA CODE, COUNT RESET, qREC CTRL, x/ PB*, m *, BX *, M * * (DCR-IP7BT only) See page 112 for the MEMORY/NETWORK mode...
Operating Instructions
Page 13
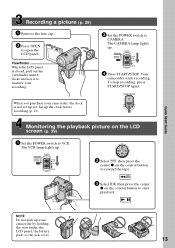
...1 Remove the lens cap. 2 Press OPEN to VCR. The CAMERA lamp lights up the clock before recording (p. 23). 3 Set the POWER switch to CAMERA. To stop recording, press START/STOP again. Set up . When you purchase your camcorder by holding the viewfinder, the LCD panel, the battery pack, ...or the jack cover. 13 Your camcorder starts recording. NOTE Do not pick up your camcorder, the clock is closed...
...1 Remove the lens cap. 2 Press OPEN to VCR. The CAMERA lamp lights up the clock before recording (p. 23). 3 Set the POWER switch to CAMERA. To stop recording, press START/STOP again. Set up . When you purchase your camcorder by holding the viewfinder, the LCD panel, the battery pack, ...or the jack cover. 13 Your camcorder starts recording. NOTE Do not pick up your camcorder, the clock is closed...
Operating Instructions
Page 14
...equal quality when compared to CAMERA. Any differences in operation are clearly indicated in this manual and operating your camcorder, check the model number by...copyright laws. 14 The camcorder can only use MICROMV cassettes with memory and network functions. See page 162 for DVD (digital video disc). Unauthorized ...recording of such materials may be contrary to the provision of difference DCRMEMORY/NETWORK mark1) (on the MICROMV format Your camcorder is provided with your camcorder (The DCR-IP7BT is the same as "DCR-IP7" on the MICROMV...
...equal quality when compared to CAMERA. Any differences in operation are clearly indicated in this manual and operating your camcorder, check the model number by...copyright laws. 14 The camcorder can only use MICROMV cassettes with memory and network functions. See page 162 for DVD (digital video disc). Unauthorized ...recording of such materials may be contrary to the provision of difference DCRMEMORY/NETWORK mark1) (on the MICROMV format Your camcorder is provided with your camcorder (The DCR-IP7BT is the same as "DCR-IP7" on the MICROMV...

Operating Instructions
Page 19
...the charge is completed, the CHG lamp goes out (full charge). 2 4 CAMERA MEMORY/ NETWORK VCR POWER (CHG) OFF ON MODE 1 CHG lamp After charging...jack on the "InfoLITHIUM" battery pack. (1) Open the jack cover and connect the AC power adaptor supplied with your camcorder to the DC IN jack with the plug's v mark facing the lens side. (2) Connect the power cord to ...Preparing the power supply Charging the battery pack Use the battery pack after charging it for details on your camcorder. Your camcorder operates only with the metal parts of the DC plug of the AC power adaptor. The CHG lamp ...
...the charge is completed, the CHG lamp goes out (full charge). 2 4 CAMERA MEMORY/ NETWORK VCR POWER (CHG) OFF ON MODE 1 CHG lamp After charging...jack on the "InfoLITHIUM" battery pack. (1) Open the jack cover and connect the AC power adaptor supplied with your camcorder to the DC IN jack with the plug's v mark facing the lens side. (2) Connect the power cord to ...Preparing the power supply Charging the battery pack Use the battery pack after charging it for details on your camcorder. Your camcorder operates only with the metal parts of the DC plug of the AC power adaptor. The CHG lamp ...
Operating Instructions
Page 23
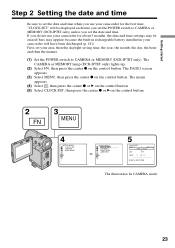
..." will be erased (bars may appear) because the built-in rechargeable battery installed in your camcorder for about 3 months, the date and time settings may be displayed each time you set the POWER switch to CAMERA or MEMORY (DCR-IP7BT only). The menu appears. (4) Select , then press the center z or B on the control...
..." will be erased (bars may appear) because the built-in rechargeable battery installed in your camcorder for about 3 months, the date and time settings may be displayed each time you set the POWER switch to CAMERA or MEMORY (DCR-IP7BT only). The menu appears. (4) Select , then press the center z or B on the control...

Operating Instructions
Page 24
... - 5.0 New York, Bogota DST OFF DATE Y M D 2 0 0 2 J A N 1 1 2 : 0 0 AM [EXEC] : NEXT ITEM SETUP MENU CLOCK SET LTR SIZE DEMO MODE RETURN JUL 4 2002 5 : 3 0 : 0 0 PM The illustration: In CAMERA mode The year changes as that in daylight saving time or not, then press the center z on the control button. 24 The clock starts to...
... - 5.0 New York, Bogota DST OFF DATE Y M D 2 0 0 2 J A N 1 1 2 : 0 0 AM [EXEC] : NEXT ITEM SETUP MENU CLOCK SET LTR SIZE DEMO MODE RETURN JUL 4 2002 5 : 3 0 : 0 0 PM The illustration: In CAMERA mode The year changes as that in daylight saving time or not, then press the center z on the control button. 24 The clock starts to...

Operating Instructions
Page 29
... Inserting a cassette" for more information (p. 18). (3) Insert a cassette. The camera recording lamp located on the front of your camcorder lights up and your camcorder is set to CAMERA. Recording a picture Your camcorder automatically focuses for more information (p. 27). (4) Press OPEN, then open the LCD... panel. (5) Set the POWER switch to the standby mode. (6) Press START/STOP. The CAMERA lamp lights up . Then, the REC indicator appears instead and the camcorder starts recording. Recording - The STBY indicator flashes. Recording - Basics - To stop recording, ...
... Inserting a cassette" for more information (p. 18). (3) Insert a cassette. The camera recording lamp located on the front of your camcorder lights up and your camcorder is set to CAMERA. Recording a picture Your camcorder automatically focuses for more information (p. 27). (4) Press OPEN, then open the LCD... panel. (5) Set the POWER switch to the standby mode. (6) Press START/STOP. The CAMERA lamp lights up . Then, the REC indicator appears instead and the camcorder starts recording. Recording - The STBY indicator flashes. Recording - Basics - To stop recording, ...
Operating Instructions
Page 30
...the battery pack, set it horizontally, then swing it into the 30 camcorder body. Wait until the camcorder returns to standby. (The recording is being carried out while the ... to prevent battery and tape wear. However, your camcorder. To display the recording data, press DATA CODE on the PAGE3 screen for 5 ... The START/STOP button does not work. When you turn off your camcorder does not turn off . To resume the standby mode, set the ...° OPEN When you leave your camcorder in microphone during recording. To enable unbroken transition Transition between the last scene you...
...the battery pack, set it horizontally, then swing it into the 30 camcorder body. Wait until the camcorder returns to standby. (The recording is being carried out while the ... to prevent battery and tape wear. However, your camcorder. To display the recording data, press DATA CODE on the PAGE3 screen for 5 ... The START/STOP button does not work. When you turn off your camcorder does not turn off . To resume the standby mode, set the ...° OPEN When you leave your camcorder in microphone during recording. To enable unbroken transition Transition between the last scene you...

Operating Instructions
Page 31
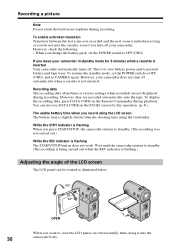
...panel and rotate it as illustrated below. Some indicators appear mirror-reversed and others are not displayed. The indicator appears in the viewfinder. In CAMERA or MEMORY (DCR-IP7BT only) mode. When you adjust the angle of the LCD panel Make sure the LCD panel is not displayed. 31 Pictures in ...recording mode. Shooting with the mirror mode This feature allows the camera subject to CAMERA, Xz appears in standby mode, and z appears in the mirror mode ...
...panel and rotate it as illustrated below. Some indicators appear mirror-reversed and others are not displayed. The indicator appears in the viewfinder. In CAMERA or MEMORY (DCR-IP7BT only) mode. When you adjust the angle of the LCD panel Make sure the LCD panel is not displayed. 31 Pictures in ...recording mode. Shooting with the mirror mode This feature allows the camera subject to CAMERA, Xz appears in standby mode, and z appears in the mirror mode ...

Operating Instructions
Page 32
... press the center z on the control button. When FN is not displayed on the control button after you select -/+. (5) Press DISPLAY to OFF. (1) In CAMERA, MEMORY (DCR-IP7BT only), playback, or playback pause mode, select FN, then press the center z on the control button. The screen used for adjusting the brightness of...
... press the center z on the control button. When FN is not displayed on the control button after you select -/+. (5) Press DISPLAY to OFF. (1) In CAMERA, MEMORY (DCR-IP7BT only), playback, or playback pause mode, select FN, then press the center z on the control button. The screen used for adjusting the brightness of...

Operating Instructions
Page 36
.... Recording a picture Recording data The recording data (date/time or various settings when recorded) are recorded automatically onto the tape. Press BACK LIGHT in CAMERA or MEMORY (DCR-IP7BT only) mode. While the FN screen is displayed The backlight function is activated The backlight function will be canceled when you shoot a subject...
.... Recording a picture Recording data The recording data (date/time or various settings when recorded) are recorded automatically onto the tape. Press BACK LIGHT in CAMERA or MEMORY (DCR-IP7BT only) mode. While the FN screen is displayed The backlight function is activated The backlight function will be canceled when you shoot a subject...

Operating Instructions
Page 39
... the control button. The PAGE1 screen appears. 4 5 6 OK FN - Playback - Playing back a tape You can also control playback using the Remote Commander supplied with your camcorder. (1) Install the power source and insert a recorded tape. (2) Press OPEN to open the LCD panel. (3) Set the POWER switch to start playback. (6) Adjust the volume... . (4) Select , then press the center z on the control button to rewind the tape. (5) Select , then press the center z on the control button. VOL + VOL bar 2 1 3 CAMERA MEMORY/ NETWORK VCR POWER (CHG) OFF ON MODE 39 Playback -
... the control button. The PAGE1 screen appears. 4 5 6 OK FN - Playback - Playing back a tape You can also control playback using the Remote Commander supplied with your camcorder. (1) Install the power source and insert a recorded tape. (2) Press OPEN to open the LCD panel. (3) Set the POWER switch to start playback. (6) Adjust the volume... . (4) Select , then press the center z on the control button to rewind the tape. (5) Select , then press the center z on the control button. VOL + VOL bar 2 1 3 CAMERA MEMORY/ NETWORK VCR POWER (CHG) OFF ON MODE 39 Playback -

Operating Instructions
Page 47
...the still image using the Remote Commander Press PHOTO on a "Memory Stick" (DCR-IP7BT only) (p. 118). (1) In standby mode, keep pressing PHOTO lightly until... cannot make a tape photo recording during normal CAMERA recording. •During tape photo recording, you want to print an image using a video printer (optional). Your camcorder immediately records an image on a tape - ...the operation described here, your camcorder. The still image is displayed on a 60-minute cassette. The CAPTURE indicator appears. Recording a still image on the screen. Digital effect If you record a ...
...the still image using the Remote Commander Press PHOTO on a "Memory Stick" (DCR-IP7BT only) (p. 118). (1) In standby mode, keep pressing PHOTO lightly until... cannot make a tape photo recording during normal CAMERA recording. •During tape photo recording, you want to print an image using a video printer (optional). Your camcorder immediately records an image on a tape - ...the operation described here, your camcorder. The still image is displayed on a 60-minute cassette. The CAPTURE indicator appears. Recording a still image on the screen. Digital effect If you record a ...

Operating Instructions
Page 49
... a 16:9 wide picture to OFF in 16:9WIDE mode [a]. Black bands appear on the control button. (5) Press DISPLAY to turn off the menu. 1 FN 2 MENU 3,4 CAMERA SET D ZOOM 16:9 WIDE ON STEADY SHOT RETURN 5 To cancel the wide mode Set 16:9WIDE to watch pictures of normal images [d]. [a] [b] 16:9WIDE [c] [d] (1) In...
... a 16:9 wide picture to OFF in 16:9WIDE mode [a]. Black bands appear on the control button. (5) Press DISPLAY to turn off the menu. 1 FN 2 MENU 3,4 CAMERA SET D ZOOM 16:9 WIDE ON STEADY SHOT RETURN 5 To cancel the wide mode Set 16:9WIDE to watch pictures of normal images [d]. [a] [b] 16:9WIDE [c] [d] (1) In...

Operating Instructions
Page 54
...PASTEL MOSAIC MANUAL SET PROGRAM AE P EFFECT WHT BAL AUTO SHTR RETURN NEG. SOLARIZE [b] : The light intensity is a mosaic. [a] [b] [c] [d] [e] [f] (1) In CAMERA mode, select FN, then press the center z on TV. MOSAIC [f] : The picture is clearer, and the picture looks like an animated cartoon. ART 54 B&W : ...The picture is sepia. Using special effects - Picture effect You can digitally process images to turn off the menu. 1 FN 5 2 MENU 3,4 MANUAL SET PROGRAM AE P EFFECT WHT BAL AUTO SHTR RETURN OFF NEG.
...PASTEL MOSAIC MANUAL SET PROGRAM AE P EFFECT WHT BAL AUTO SHTR RETURN NEG. SOLARIZE [b] : The light intensity is a mosaic. [a] [b] [c] [d] [e] [f] (1) In CAMERA mode, select FN, then press the center z on TV. MOSAIC [f] : The picture is clearer, and the picture looks like an animated cartoon. ART 54 B&W : ...The picture is sepia. Using special effects - Picture effect You can digitally process images to turn off the menu. 1 FN 5 2 MENU 3,4 MANUAL SET PROGRAM AE P EFFECT WHT BAL AUTO SHTR RETURN OFF NEG.

Operating Instructions
Page 57
...the still image you select -/+. Advanced Recording Operations Using special effects - The DIG EFFT screen used for selecting the desired digital effect mode appears. (4) Select the desired digital effect mode, then press the center z on the control button. The larger the shutter speed number, the slower the... shutter speed. Digital effect (1) In CAMERA mode, select FN, then press the center z on the control button. LUMI. + This bar appears when the STILL, FLASH, LUMI., ...
...the still image you select -/+. Advanced Recording Operations Using special effects - The DIG EFFT screen used for selecting the desired digital effect mode appears. (4) Select the desired digital effect mode, then press the center z on the control button. The larger the shutter speed number, the slower the... shutter speed. Digital effect (1) In CAMERA mode, select FN, then press the center z on the control button. LUMI. + This bar appears when the STILL, FLASH, LUMI., ...

Operating Instructions
Page 62
... z on the control button. This adjustment makes white subjects look white and allows more natural color balance. Normally white balance is automatically adjusted. (1) In CAMERA or MEMORY (DCR-IP7BT only) mode, select FN, then press the center z on the control button. The PAGE1 screen appears. The menu appears. (3) Select WHT BAL through...
... z on the control button. This adjustment makes white subjects look white and allows more natural color balance. Normally white balance is automatically adjusted. (1) In CAMERA or MEMORY (DCR-IP7BT only) mode, select FN, then press the center z on the control button. The PAGE1 screen appears. The menu appears. (3) Select WHT BAL through...


