Operating Instructions
Page 4
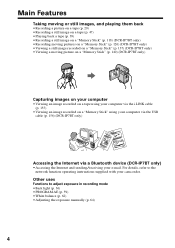
...8226;Recording a picture on a tape (p. 29) •Recording a still image on a tape (p. 47) •Playing back a tape (p. 39) •Recording a still image on a "Memory Stick" (p. 118) (DCR-IP7BT only) •Recording moving pictures on a "Memory Stick" (p. 126) (DCR-IP7BT only) •Viewing ...tape using your computer via the i.LINK cable (p. 155) •Viewing an image recorded on a "Memory Stick" using your computer via the USB cable (p. 156) (DCR-IP7BT only) Accessing the Internet via a Bluetooth device (DCR-IP7BT only) •Accessing the Internet and sending/receiving your camcorder...
...8226;Recording a picture on a tape (p. 29) •Recording a still image on a tape (p. 47) •Playing back a tape (p. 39) •Recording a still image on a "Memory Stick" (p. 118) (DCR-IP7BT only) •Recording moving pictures on a "Memory Stick" (p. 126) (DCR-IP7BT only) •Viewing ...tape using your computer via the i.LINK cable (p. 155) •Viewing an image recorded on a "Memory Stick" using your computer via the USB cable (p. 156) (DCR-IP7BT only) Accessing the Internet via a Bluetooth device (DCR-IP7BT only) •Accessing the Internet and sending/receiving your camcorder...

Operating Instructions
Page 6
... POWER switch down , the mode changes as follows and corresponding mode lamp also lights up . (2) Slide the POWER switch down. The camcorder is turned on a tape or "Memory Stick" (A "Memory Stick" can only be used to control and ways to the supplied network function operating instructions. MEMORY/...NETWORK (DCR-IP7BT only) MEMORY: Use this mode when you use the network function. CAMERA Use this mode when you play back or...
... POWER switch down , the mode changes as follows and corresponding mode lamp also lights up . (2) Slide the POWER switch down. The camcorder is turned on a tape or "Memory Stick" (A "Memory Stick" can only be used to control and ways to the supplied network function operating instructions. MEMORY/...NETWORK (DCR-IP7BT only) MEMORY: Use this mode when you use the network function. CAMERA Use this mode when you play back or...
Operating Instructions
Page 10
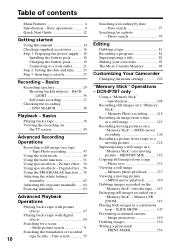
... Operations Playing back a tape with picture effects 67 Playing back a tape with digital effects 69 Searching for a photo - Photo search 79 Editing Dubbing a tape 81 Recording a program 84 Superimposing a title 89 Making your own titles 95 The Micro Cassette Memory 98 Customizing Your Camcorder Changing the menu settings 102 "Memory Stick" Operations - DCR-IP7BT only Using...
... Operations Playing back a tape with picture effects 67 Playing back a tape with digital effects 69 Searching for a photo - Photo search 79 Editing Dubbing a tape 81 Recording a program 84 Superimposing a title 89 Making your own titles 95 The Micro Cassette Memory 98 Customizing Your Camcorder Changing the menu settings 102 "Memory Stick" Operations - DCR-IP7BT only Using...
Operating Instructions
Page 11
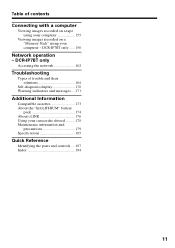
... "InfoLITHIUM" battery pack 174 About i.LINK 176 Using your computer - DCR-IP7BT only Accessing the network 162 Troubleshooting Types of contents Connecting with a computer Viewing images recorded on a tape using your computer 155 Viewing images recorded on a "Memory Stick" using your camcorder abroad .......... 178 Maintenance information and precautions 179 Specifications 185 Quick Reference...
... "InfoLITHIUM" battery pack 174 About i.LINK 176 Using your computer - DCR-IP7BT only Accessing the network 162 Troubleshooting Types of contents Connecting with a computer Viewing images recorded on a tape using your computer 155 Viewing images recorded on a "Memory Stick" using your camcorder abroad .......... 178 Maintenance information and precautions 179 Specifications 185 Quick Reference...
Operating Instructions
Page 13
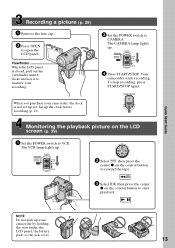
.... To stop recording, press START/STOP again. START/STOP Monitoring the playback picture on the control button to start playback. When you purchase your camcorder by holding the viewfinder, the LCD panel, the battery pack, or the jack cover. 13 The CAMERA lamp lights up . CAMERA MEMORY/ NETWORK... VCR POWER (CHG) OFF ON MODE 2 Select , then press the center z on the control button to rewind the tape. 3 Select , then press the center z on the LCD screen (p. 39) 1 Set the POWER switch to open the LCD panel. The VCR lamp lights ...
.... To stop recording, press START/STOP again. START/STOP Monitoring the playback picture on the control button to start playback. When you purchase your camcorder by holding the viewfinder, the LCD panel, the battery pack, or the jack cover. 13 The CAMERA lamp lights up . CAMERA MEMORY/ NETWORK... VCR POWER (CHG) OFF ON MODE 2 Select , then press the center z on the control button to rewind the tape. 3 Select , then press the center z on the LCD screen (p. 39) 1 Set the POWER switch to open the LCD panel. The VCR lamp lights ...
Operating Instructions
Page 14
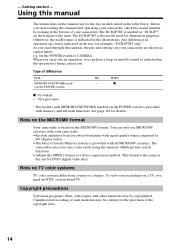
...only use MICROMV cassettes with your camcorder (The DCR-IP7BT is indicated in the table below. - Copyright precautions Television programs, films, video tapes, and other materials may be copyrighted. This format is provided with memory and network functions. Note on the POWER switch) IP5 IP7BT -... to indicate that the operation is provided with all MICROMV cassettes. Unauthorized recording of your camcorder. •Records and plays back for illustration purposes. Set the POWER switch to DV (digital video). •The Micro Cassette Memory feature is ...
...only use MICROMV cassettes with your camcorder (The DCR-IP7BT is indicated in the table below. - Copyright precautions Television programs, films, video tapes, and other materials may be copyrighted. This format is provided with memory and network functions. Note on the POWER switch) IP5 IP7BT -... to indicate that the operation is provided with all MICROMV cassettes. Unauthorized recording of your camcorder. •Records and plays back for illustration purposes. Set the POWER switch to DV (digital video). •The Micro Cassette Memory feature is ...

Operating Instructions
Page 25
... set the clock to the local time by setting a time difference. Note on the time indicator The internal clock of your camcorder operates on the tape or the "Memory Stick" (DCR-IP7BT only) as the data code. Simple setting of clock by time difference You can easily set the date and time and...
... set the clock to the local time by setting a time difference. Note on the time indicator The internal clock of your camcorder operates on the tape or the "Memory Stick" (DCR-IP7BT only) as the data code. Simple setting of clock by time difference You can easily set the date and time and...
Operating Instructions
Page 30
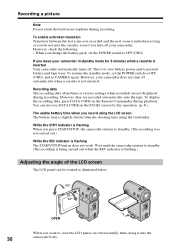
... POWER switch to close the LCD panel, set it horizontally, then swing it into the 30 camcorder body. Recording data The recording data (date/time or various settings when recorded) are recorded automatically onto the tape. You can be rotated as you do not eject the cassette, even if you want to... record using the LCD screen The battery time is unbroken as long as illustrated below. 180° 90° OPEN When you turn off your camcorder does not turn off . The usable battery time when you change the battery pack, set the POWER switch to OFF (CHG), and to prevent battery...
... POWER switch to close the LCD panel, set it horizontally, then swing it into the 30 camcorder body. Recording data The recording data (date/time or various settings when recorded) are recorded automatically onto the tape. You can be rotated as you do not eject the cassette, even if you want to... record using the LCD screen The battery time is unbroken as long as illustrated below. 180° 90° OPEN When you turn off your camcorder does not turn off . The usable battery time when you change the battery pack, set the POWER switch to OFF (CHG), and to prevent battery...

Operating Instructions
Page 35
... The tape counter can be displayed accurately depending on . When the POWER switch is set values up to be correct, depending on the conditions under which you are not recorded on digital zoom •Digital zoom allows you insert a cassette. Remaining battery time indicator The remaining battery... 45min Remaining tape indicator This appears soon after you to set to display the operation buttons on the PAGE3 screen via the FN screen. JUL 4 2002 12 : 05 : 56 PM FN FN button Select this button to MEMORY (DCR-IP7BT only) You cannot use the digital zoom. Basics...
... The tape counter can be displayed accurately depending on . When the POWER switch is set values up to be correct, depending on the conditions under which you are not recorded on digital zoom •Digital zoom allows you insert a cassette. Remaining battery time indicator The remaining battery... 45min Remaining tape indicator This appears soon after you to set to display the operation buttons on the PAGE3 screen via the FN screen. JUL 4 2002 12 : 05 : 56 PM FN FN button Select this button to MEMORY (DCR-IP7BT only) You cannot use the digital zoom. Basics...

Operating Instructions
Page 36
... data, press DATA CODE on the PAGE1 screen via the FN screen for this operation (p. 41). Press BACK LIGHT in CAMERA or MEMORY (DCR-IP7BT only) mode. To cancel, press BACK LIGHT again. BACK LIGHT When the backlight function is deactivated. 36 You can also use the ...backlight function. Recording a picture Recording data The recording data (date/time or various settings when recorded) are recorded automatically onto the tape. indicator appears on the PAGE3 screen via the FN screen. The . While the FN screen is displayed The backlight function is activated The backlight...
... data, press DATA CODE on the PAGE1 screen via the FN screen for this operation (p. 41). Press BACK LIGHT in CAMERA or MEMORY (DCR-IP7BT only) mode. To cancel, press BACK LIGHT again. BACK LIGHT When the backlight function is deactivated. 36 You can also use the ...backlight function. Recording a picture Recording data The recording data (date/time or various settings when recorded) are recorded automatically onto the tape. indicator appears on the PAGE3 screen via the FN screen. The . While the FN screen is displayed The backlight function is activated The backlight...

Operating Instructions
Page 37
... canceled when: - When the POWER switch is set to turn off the screen buttons. (4) Press START/STOP. The (selftimer) indicator appears. (3) Press DISPLAY to MEMORY (DCR-IP7BT only) You can also use the Remote Commander for this operation. (1) In standby mode, select FN, then press the center z on... a tape using the self-timer Press PHOTO in 10 seconds. To cancel self-timer recording Select SELF TIMER, then press the center z on the control button. ...
... canceled when: - When the POWER switch is set to turn off the screen buttons. (4) Press START/STOP. The (selftimer) indicator appears. (3) Press DISPLAY to MEMORY (DCR-IP7BT only) You can also use the Remote Commander for this operation. (1) In standby mode, select FN, then press the center z on... a tape using the self-timer Press PHOTO in 10 seconds. To cancel self-timer recording Select SELF TIMER, then press the center z on the control button. ...

Operating Instructions
Page 39
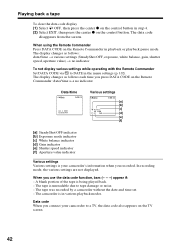
... control playback using the Remote Commander supplied with your camcorder. (1) Install the power source and insert a recorded tape. (2) Press OPEN to open the LCD panel. (3) Set the POWER switch to turn up . (4) Select , then press the center z on the control button to rewind the tape. (5) Select , then press the center z on the control...
... control playback using the Remote Commander supplied with your camcorder. (1) Install the power source and insert a recorded tape. (2) Press OPEN to open the LCD panel. (3) Set the POWER switch to turn up . (4) Select , then press the center z on the control button to rewind the tape. (5) Select , then press the center z on the control...

Operating Instructions
Page 40
... the VBATT lever while you open or close the LCD panel return it back to the camcorder body with the LCD screen facing out. The battery pack may accidentally detached from the camcorder. 40 Playing back a tape To return to the FN screen Select EXIT, then press the center z on the LCD... it to the position illustrated below. When you open or close the LCD panel Before you are playing back a tape. When monitoring on the control button. To stop playback Select , then press the center z on for a long time Your camcorder gets warm. If you leave the power on the control button.
... the VBATT lever while you open or close the LCD panel return it back to the camcorder body with the LCD screen facing out. The battery pack may accidentally detached from the camcorder. 40 Playing back a tape To return to the FN screen Select EXIT, then press the center z on the LCD... it to the position illustrated below. When you open or close the LCD panel Before you are playing back a tape. When monitoring on the control button. To stop playback Select , then press the center z on for a long time Your camcorder gets warm. If you leave the power on the control button.

Operating Instructions
Page 41
...the steps below to display the data code using the camcorder To display the data code (1) In playback or playback pause mode, select FN, then press the center z on the control button. 41 The DATA CODE screen appears. Playing back a tape To display the screen indicators - DATACODE OFF OK CAM...DATA DATA (4) Select CAM DATA or DATE DATA, then press the center z on the tape but also the recording data (date/time and various settings when recorded) (Data code). Display function Press DISPLAY on your camcorder or on the control button. The PAGE3 screen appears. (3) Select DATA CODE, then ...
...the steps below to display the data code using the camcorder To display the data code (1) In playback or playback pause mode, select FN, then press the center z on the control button. 41 The DATA CODE screen appears. Playing back a tape To display the screen indicators - DATACODE OFF OK CAM...DATA DATA (4) Select CAM DATA or DATE DATA, then press the center z on the tape but also the recording data (date/time and various settings when recorded) (Data code). Display function Press DISPLAY on your camcorder or on the control button. The PAGE3 screen appears. (3) Select DATA CODE, then ...
Operating Instructions
Page 42
... code disappears from the screen. The display changes as follows each time you connect your camcorder's information when you use the data code function, bars (-- -- --) appear if: - A blank portion of the tape is unreadable due to a TV, the data code also appears on the TV screen... Remote Commander Set DATA CODE via to DATE in various playback modes. The camcorder is your camcorder to tape damage or noise. - In recording mode, the various settings are not displayed. The tape was recorded by a camcorder without the date and time set. - The display changes as follows: date...
... code disappears from the screen. The display changes as follows each time you connect your camcorder's information when you use the data code function, bars (-- -- --) appear if: - A blank portion of the tape is unreadable due to a TV, the data code also appears on the TV screen... Remote Commander Set DATA CODE via to DATE in various playback modes. The camcorder is your camcorder to tape damage or noise. - In recording mode, the various settings are not displayed. The tape was recorded by a camcorder without the date and time set. - The display changes as follows: date...

Operating Instructions
Page 43
... playback. To resume normal playback, select , then press the center z on the control button. •Press FF on the control button when the tape is not being played back. To view the picture at slow speed (slow playback) Press SLOW on the control button during playback. To locate a ... To resume normal playback, select , then press the center z on the control button again. •Press PAUSE on the control button while rewinding the tape, or select , then keep pressing the center z on the Remote Commander during playback The indicator shows the approximate continuous playback time.
... playback. To resume normal playback, select , then press the center z on the control button. •Press FF on the control button when the tape is not being played back. To view the picture at slow speed (slow playback) Press SLOW on the control button during playback. To locate a ... To resume normal playback, select , then press the center z on the control button again. •Press PAUSE on the control button while rewinding the tape, or select , then keep pressing the center z on the Remote Commander during playback The indicator shows the approximate continuous playback time.

Operating Instructions
Page 44
... 5 minutes The playback pause mode will be released, then the camcorder stops the playback. To resume playback, select , then press the center z on the control button or press PLAY on the control button when the tape is not being played back. Video control buttons of the recorded ...section, then stops the playback. The camcorder plays back the last 5 seconds of the camcorder To play back or pause a tape To stop a tape To rewind a tape To fastforward a tape When the playback pause mode lasts for the last scene recorded (END SEARCH) Select...
... 5 minutes The playback pause mode will be released, then the camcorder stops the playback. To resume playback, select , then press the center z on the control button or press PLAY on the control button when the tape is not being played back. Video control buttons of the recorded ...section, then stops the playback. The camcorder plays back the last 5 seconds of the camcorder To play back or pause a tape To stop a tape To rewind a tape To fastforward a tape When the playback pause mode lasts for the last scene recorded (END SEARCH) Select...

Operating Instructions
Page 47
... to print an image using other equipment, the image may fluctuate. •The tape photo recording function does not work during those 7 seconds is useful when you record on a "Memory Stick" (DCR-IP7BT only) (p. 118). (1) In standby mode, keep pressing PHOTO lightly until ...following operations: - You can record about 7 seconds. Your camcorder immediately records an image on a 60-minute cassette. Recording does not start yet. The CAPTURE indicator appears. Digital effect If you record a moving subject with the tape photo recording function When you cannot change the still image, ...
... to print an image using other equipment, the image may fluctuate. •The tape photo recording function does not work during those 7 seconds is useful when you record on a "Memory Stick" (DCR-IP7BT only) (p. 118). (1) In standby mode, keep pressing PHOTO lightly until ...following operations: - You can record about 7 seconds. Your camcorder immediately records an image on a 60-minute cassette. Recording does not start yet. The CAPTURE indicator appears. Digital effect If you record a moving subject with the tape photo recording function When you cannot change the still image, ...

Operating Instructions
Page 48
... the self-timer recording using the Remote Commander. In the last 2 seconds of the countdown, the beep sound gets faster, then the recording starts automatically. Tape Photo recording Self-timer recording You can also use the Remote Commander for this operation. (1) In standby mode, select FN, then press the center z on...
... the self-timer recording using the Remote Commander. In the last 2 seconds of the countdown, the beep sound gets faster, then the recording starts automatically. Tape Photo recording Self-timer recording You can also use the Remote Commander for this operation. (1) In standby mode, select FN, then press the center z on...

Operating Instructions
Page 52
...the control button. Note You cannot use the following functions while using the fader function, and vice versa. - Tape Photo recording 52 The fader indicator flashes, then lights up. The PAGE1 screen appears. Digital effect - When fading out [b] During recording, select FN, then press the center z on the control button... to turn off the screen buttons. (5) Press START/STOP. The PAGE1 screen appears. The top of the selected button is carried out, your camcorder automatically returns to the FN screen Select OK, then press the center z on the control button after step 3.
...the control button. Note You cannot use the following functions while using the fader function, and vice versa. - Tape Photo recording 52 The fader indicator flashes, then lights up. The PAGE1 screen appears. Digital effect - When fading out [b] During recording, select FN, then press the center z on the control button... to turn off the screen buttons. (5) Press START/STOP. The PAGE1 screen appears. The top of the selected button is carried out, your camcorder automatically returns to the FN screen Select OK, then press the center z on the control button after step 3.


