
Operating Guide
Page 7
...lens • A menu item that is grayed out is not dustproof, dripproof or waterproof. Types of "Memory Stick" you insert the camcorder into the Memory Stick Duo Adaptor. See "Maintenance and precautions" (p. 128). • Before connecting your camcorder to another device with your camcorder.) Using the camcorder... the Handycam Station or remove the camcorder from it in your camcorder.) • You cannot use in your camcorder. • For DCR-HC46/HC96: Disconnect the AC Adaptor from the Handycam Station holding both the Handycam Station and the DC plug. • For DCR-HC46/...
...lens • A menu item that is grayed out is not dustproof, dripproof or waterproof. Types of "Memory Stick" you insert the camcorder into the Memory Stick Duo Adaptor. See "Maintenance and precautions" (p. 128). • Before connecting your camcorder to another device with your camcorder.) Using the camcorder... the Handycam Station or remove the camcorder from it in your camcorder.) • You cannot use in your camcorder. • For DCR-HC46/HC96: Disconnect the AC Adaptor from the Handycam Station holding both the Handycam Station and the DC plug. • For DCR-HC46/...
Operating Guide
Page 8
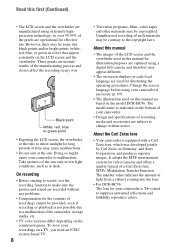
...any way. These points are normal results of light from a subject coming into the lens. • For DCR-HC96: The lens for the contents of the camcorder, storage media, etc. • TV color systems differ depending on this first (...camcorder if necessary (p. 69). • The illustrations used on the countries/regions. Change the screen language before using a digital still camera, and therefore may cause malfunctions. • Do not aim at dusk. The number value indicates the amount of the manufacturing process and do not affect the recording in Germany, and Sony...
...any way. These points are normal results of light from a subject coming into the lens. • For DCR-HC96: The lens for the contents of the camcorder, storage media, etc. • TV color systems differ depending on this first (...camcorder if necessary (p. 69). • The illustrations used on the countries/regions. Change the screen language before using a digital still camera, and therefore may cause malfunctions. • Do not aim at dusk. The number value indicates the amount of the manufacturing process and do not affect the recording in Germany, and Sony...

Operating Guide
Page 12
...Handycam Station (1) (DCR-HC46/HC96) (p. 13) Rechargeable battery pack (1) (p. 13, 126) NP-FP30 (DCR-HC36) NP-FP50 (DCR-HC46/HC96) Wireless Remote Commander (1) (p. 40) A button-type lithium battery is already installed. AC Adaptor (1) (p. 13) USB cable (1) (p. 82, 86) Lens cap (1) (DCR-HC36/HC46) (p. 18, 28, 30) Power cord (1) (p. 13) • To attach the lens cap Attach the lens... cap to the metal fittings of that you have following items supplied with your camcorder. ...
...Handycam Station (1) (DCR-HC46/HC96) (p. 13) Rechargeable battery pack (1) (p. 13, 126) NP-FP30 (DCR-HC36) NP-FP50 (DCR-HC46/HC96) Wireless Remote Commander (1) (p. 40) A button-type lithium battery is already installed. AC Adaptor (1) (p. 13) USB cable (1) (p. 82, 86) Lens cap (1) (DCR-HC36/HC46) (p. 18, 28, 30) Power cord (1) (p. 13) • To attach the lens cap Attach the lens... cap to the metal fittings of that you have following items supplied with your camcorder. ...

Operating Guide
Page 18
... p. 23), the next time you turn on the power of your camcorder firmly To record or play back, slide the POWER switch repeatedly to turn on the sides of the arrow to CAMERA-TAPE or CAMERAMEMORY. For DCR-HC36/HC46: Remove the lens cap by pressing both knobs on the respective lamp. For... DCR-HC96: The lens cover opens automatically when the POWER switch is set to turn on the respective lamp. POWER switch...
... p. 23), the next time you turn on the power of your camcorder firmly To record or play back, slide the POWER switch repeatedly to turn on the sides of the arrow to CAMERA-TAPE or CAMERAMEMORY. For DCR-HC36/HC46: Remove the lens cap by pressing both knobs on the respective lamp. For... DCR-HC96: The lens cover opens automatically when the POWER switch is set to turn on the respective lamp. POWER switch...
Operating Guide
Page 19
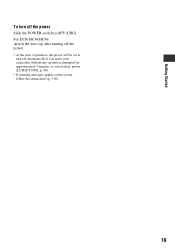
Getting Started To turn off the power Slide the POWER switch to save battery power ([A.SHUT OFF], p. 68). • If warning messages appear on the screen, follow the instructions (p. 118). 19 For DCR-HC36/HC46: Attach the lens cap after turning off the power. • At the time of purchase, the power will be set to turn off automatically if you leave your camcorder without any operation attempted for approximately 5 minutes, to OFF (CHG).
Getting Started To turn off the power Slide the POWER switch to save battery power ([A.SHUT OFF], p. 68). • If warning messages appear on the screen, follow the instructions (p. 118). 19 For DCR-HC36/HC46: Attach the lens cap after turning off the power. • At the time of purchase, the power will be set to turn off automatically if you leave your camcorder without any operation attempted for approximately 5 minutes, to OFF (CHG).
Operating Guide
Page 20
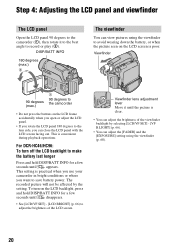
For DCR-HC46/HC96: To turn on the LCD screen is poor. This setting is practical when you use your camcorder in bright conditions or where you can close the LCD panel with the LCD screen facing out. Viewfinder lens adjustment lever Move it to the best angle to record or play (2). ...DISP/BATT INFO 180 degrees (max.) 2 The viewfinder You can view pictures using the viewfinder (p. 60). 20 Viewfinder 90 degrees (max.) 1 90 degrees to the camcorder • Do not press the buttons...
For DCR-HC46/HC96: To turn on the LCD screen is poor. This setting is practical when you use your camcorder in bright conditions or where you can close the LCD panel with the LCD screen facing out. Viewfinder lens adjustment lever Move it to the best angle to record or play (2). ...DISP/BATT INFO 180 degrees (max.) 2 The viewfinder You can view pictures using the viewfinder (p. 60). 20 Viewfinder 90 degrees (max.) 1 90 degrees to the camcorder • Do not press the buttons...

Operating Guide
Page 28
DCR-HC36/HC46: Remove the lens cap (p. 18). To stop recording, press F again. 2 Press EASY A. Recording/Playback Easy Recording/Playback (Easy Handycam) With this Easy Handycam operation, most of the camera settings are recorded in SP (Standard Play) mode on a cassette. *2 Still ...screen B. 3 Press PHOTO D to record.*2 60min EASY 3.0M 3 0 MENU Flashing t Lit Press and hold lightly Press fully to [REC]. DCR-HC36: B A DCR-HC36/ HC46 DCR-HC96 D E If the POWER switch is set to adjust the focus. appears on the CAMERA-MEMORY lamp. 2 Press EASY A. When disappears, the...
DCR-HC36/HC46: Remove the lens cap (p. 18). To stop recording, press F again. 2 Press EASY A. Recording/Playback Easy Recording/Playback (Easy Handycam) With this Easy Handycam operation, most of the camera settings are recorded in SP (Standard Play) mode on a cassette. *2 Still ...screen B. 3 Press PHOTO D to record.*2 60min EASY 3.0M 3 0 MENU Flashing t Lit Press and hold lightly Press fully to [REC]. DCR-HC36: B A DCR-HC36/ HC46 DCR-HC96 D E If the POWER switch is set to adjust the focus. appears on the CAMERA-MEMORY lamp. 2 Press EASY A. When disappears, the...

Operating Guide
Page 30
... picture, touch t [YES]. green button. 2 Start recording. Still images will be fixed to select a recording medium. Recording Lens cap (DCR-HC36/HC46) Remove the lens cap by pressing both knobs on a "Memory Stick Duo" by pressing PHOTO fully. When disappears, the image has been recorded.... Lens cover (DCR-HC96) Opens in 4:3 screen. 30 Flashing t Lit A shutter sound is set to OFF CAMERA-TAPE lamp. (CHG), slide it fully ...
... picture, touch t [YES]. green button. 2 Start recording. Still images will be fixed to select a recording medium. Recording Lens cap (DCR-HC36/HC46) Remove the lens cap by pressing both knobs on a "Memory Stick Duo" by pressing PHOTO fully. When disappears, the image has been recorded.... Lens cover (DCR-HC96) Opens in 4:3 screen. 30 Flashing t Lit A shutter sound is set to OFF CAMERA-TAPE lamp. (CHG), slide it fully ...

Operating Guide
Page 33
... is complete (In the CAMERA-TAPE mode, it is hard to focus automatically. • Do not use these functions in dark places (NightShot plus) (DCR-HC36/HC46 3 Set the NIGHTSHOT PLUS switch 3 to ON. ( and ["NIGHTSHOT PLUS"] appear.) • To record an image brighter, use Super NightShot plus...meter) ...... 4 See [SPOT METER] on page 51. To record in bright places. To cancel the back light function, press BACK LIGHT again. Remove the conversion lens (optional) if it is attached. • Adjust the focus manually ([FOCUS], p. 51) when it . This may cause a malfunction. • Remove any ...
... is complete (In the CAMERA-TAPE mode, it is hard to focus automatically. • Do not use these functions in dark places (NightShot plus) (DCR-HC36/HC46 3 Set the NIGHTSHOT PLUS switch 3 to ON. ( and ["NIGHTSHOT PLUS"] appear.) • To record an image brighter, use Super NightShot plus...meter) ...... 4 See [SPOT METER] on page 51. To record in bright places. To cancel the back light function, press BACK LIGHT again. Remove the conversion lens (optional) if it is attached. • Adjust the focus manually ([FOCUS], p. 51) when it . This may cause a malfunction. • Remove any ...

Operating Guide
Page 34
...(Telephoto). 3 Touch the screen at the point you want to display in mirror mode qh Open the LCD panel qh 90 degrees to the camcorder (1), then rotate it 180 degrees to its designated hook qs. Magnification can magnify pictures from about 1.1 to the tripod receptacle qj using a tripod... Attach the Shoulder belt (optional) to the lens side (2). 2 1 • A mirror-image of the displayed frame. 4 Adjust the magnification with W (Wide angle)/T (Telephoto). To use PB zoom 2 5 You can be normal when recorded. qs qa For DCR-HC36: qd qh 2 5 4 qg qf For DCR-HC46/HC96: qd qh 2 5 4 qg...
...(Telephoto). 3 Touch the screen at the point you want to display in mirror mode qh Open the LCD panel qh 90 degrees to the camcorder (1), then rotate it 180 degrees to its designated hook qs. Magnification can magnify pictures from about 1.1 to the tripod receptacle qj using a tripod... Attach the Shoulder belt (optional) to the lens side (2). 2 1 • A mirror-image of the displayed frame. 4 Adjust the magnification with W (Wide angle)/T (Telephoto). To use PB zoom 2 5 You can be normal when recorded. qs qa For DCR-HC36: qd qh 2 5 4 qg qf For DCR-HC46/HC96: qd qh 2 5 4 qg...
Operating Guide
Page 52
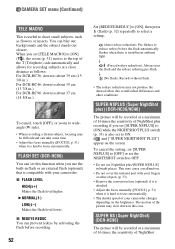
...allows for recording subjects at a maximum of 16 times the sensitivity of your camcorder changes depending on the screen. CAMERA SET menu (Continued) TELE MACRO This is useful to shoot small subjects, such as follows: For DCR-HC36: down to about 39 cm (15 3/8 in.). To cancel, touch [...effect due to individual differences and other objects (p. 33). • Remove the conversion lens (optional) if it is attached. • Adjust the focus manually ([FOCUS], p. 51) when it is hard to about 37 cm (14 5/8 in.). For DCR-HC46: down to focus automatically. B NORMAL( ) LOW( ) Makes the flash ...
...allows for recording subjects at a maximum of 16 times the sensitivity of your camcorder changes depending on the screen. CAMERA SET menu (Continued) TELE MACRO This is useful to shoot small subjects, such as follows: For DCR-HC36: down to about 39 cm (15 3/8 in.). To cancel, touch [...effect due to individual differences and other objects (p. 33). • Remove the conversion lens (optional) if it is attached. • Adjust the focus manually ([FOCUS], p. 51) when it is hard to about 37 cm (14 5/8 in.). For DCR-HC46: down to focus automatically. B NORMAL( ) LOW( ) Makes the flash ...
Operating Guide
Page 53
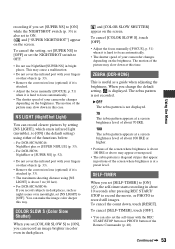
... the infrared port with your fingers or other objects (p. 33). • Remove the conversion lens (optional) if it is attached (p. 33). • The maximum shooting distance using either of ... screen where brightness is hard to focus automatically. • The shutter speed of your camcorder changes depending on the brightness. When you change the default setting, is not recorded. .... and ["SUPER NIGHTSHOT"] appear on the screen. To cancel the count down at a preset level. For DCR-HC36/HC46: NightShot plus or [SUPER NSPLUS] (p. 33). - recording if you set [SUPER NS] to ...
... the infrared port with your fingers or other objects (p. 33). • Remove the conversion lens (optional) if it is attached (p. 33). • The maximum shooting distance using either of ... screen where brightness is hard to focus automatically. • The shutter speed of your camcorder changes depending on the brightness. When you change the default setting, is not recorded. .... and ["SUPER NIGHTSHOT"] appear on the screen. To cancel the count down at a preset level. For DCR-HC36/HC46: NightShot plus or [SUPER NSPLUS] (p. 33). - recording if you set [SUPER NS] to ...

Operating Guide
Page 55
... intervals. In 4:3 aspect ratio DCRHC46 DCRHC96 3.0M 1.9M 1.0M VGA - - 4 13 3 4 - 21 In 16:9 aspect ratio DCR-HC46 DCR-HC96 2.3M 0.7M - 4 3 - HIGH SPEED ( ) (DCR-HC96) Record up to 32 images (VGA image sizes) continuously at about 0.5 second intervals. You can reduce image blur when recording moving... import to your computer as sports scenes. Touch [OFF] to return to [OFF] ( ) when using a tripod (optional) or the conversion lens (optional), then the image becomes natural. See page 44 for camera shake (the default setting is divided into 2 finer fields and these are marked...
... intervals. In 4:3 aspect ratio DCRHC46 DCRHC96 3.0M 1.9M 1.0M VGA - - 4 13 3 4 - 21 In 16:9 aspect ratio DCR-HC46 DCR-HC96 2.3M 0.7M - 4 3 - HIGH SPEED ( ) (DCR-HC96) Record up to 32 images (VGA image sizes) continuously at about 0.5 second intervals. You can reduce image blur when recording moving... import to your computer as sports scenes. Touch [OFF] to return to [OFF] ( ) when using a tripod (optional) or the conversion lens (optional), then the image becomes natural. See page 44 for camera shake (the default setting is divided into 2 finer fields and these are marked...

Operating Guide
Page 101
...8226; Adjust the screen ([CALIBRATION]) (p. 130). • If you touch it. • This is not clear. • Move the viewfinder lens adjustment lever until the picture appears clearly (p. 20). The picture is not a malfunction. Continued , 101 Do not press hard on the touch ...occurs if you cannot turn off the power first. You cannot turn the LCD backlight off (DCR-HC46/HC96). • During Easy Handycam operation (p. 28), you disconnect the DC plug from your camcorder (or DISPLAY on the screen (p. 117). Troubleshooting LCD screen/viewfinder A rippling effect appears on...
...8226; Adjust the screen ([CALIBRATION]) (p. 130). • If you touch it. • This is not clear. • Move the viewfinder lens adjustment lever until the picture appears clearly (p. 20). The picture is not a malfunction. Continued , 101 Do not press hard on the touch ...occurs if you cannot turn off the power first. You cannot turn the LCD backlight off (DCR-HC46/HC96). • During Easy Handycam operation (p. 28), you disconnect the DC plug from your camcorder (or DISPLAY on the screen (p. 117). Troubleshooting LCD screen/viewfinder A rippling effect appears on...

Operating Guide
Page 108
...Handycam operation (p. 28). NightShot plus (DCR-HC36/HC46) - [SUPER NSPLUS] (DCR-HC36/HC46) NightShot (DCR-HC96) - [SUPER NS] (DCR-HC96) - [COLOR SLOW S] - [TELE MACRO] • [SPORTS] will not work correctly. • Be sure to record more than VTR 2 for your VCR. • Cover the sensor of your camcorder...to [ON] (p. 68). • Remove any obstructions between recorded sections of the compartment (p. 131). • Remove the conversion lens (optional) as sunlight or overhead lighting, away from the remote sensor, otherwise the Remote Commander may not accurately find the point where...
...Handycam operation (p. 28). NightShot plus (DCR-HC36/HC46) - [SUPER NSPLUS] (DCR-HC36/HC46) NightShot (DCR-HC96) - [SUPER NS] (DCR-HC96) - [COLOR SLOW S] - [TELE MACRO] • [SPORTS] will not work correctly. • Be sure to record more than VTR 2 for your VCR. • Cover the sensor of your camcorder...to [ON] (p. 68). • Remove any obstructions between recorded sections of the compartment (p. 131). • Remove the conversion lens (optional) as sunlight or overhead lighting, away from the remote sensor, otherwise the Remote Commander may not accurately find the point where...
Operating Guide
Page 120
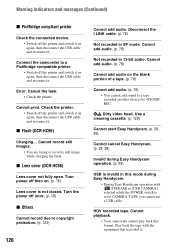
...Lens cover is set to copyright protection. (p. 123) 120 Cannot add audio. Turn the power off the printer and switch it on again, then disconnect the USB cable and reconnect it. HDV recorded tape. x Dirty video head. Cannot playback. • Your camcorder cannot play back this mode during Easy Handycam... to record a still image while charging the flash. Cannot add audio. (p. 78) Not recorded in SP mode. x Flash (DCR-HC96) Charging... Warning indicators and messages (Continued) x PictBridge compliant printer Check the connected device. • Switch off the printer and...
...Lens cover is set to copyright protection. (p. 123) 120 Cannot add audio. Turn the power off the printer and switch it on again, then disconnect the USB cable and reconnect it. HDV recorded tape. x Dirty video head. Cannot playback. • Your camcorder cannot play back this mode during Easy Handycam... to record a still image while charging the flash. Cannot add audio. (p. 78) Not recorded in SP mode. x Flash (DCR-HC96) Charging... Warning indicators and messages (Continued) x PictBridge compliant printer Check the connected device. • Switch off the printer and...

Operating Guide
Page 128
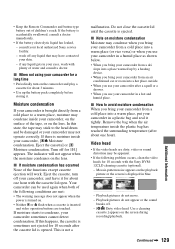
...connected to the operating instructions for example, and operate it checked by Sony (e.g. Some i.LINK compatible video devices, such as Digital Televisions, DVD, MICROMV or HDV recorders/players are not using your camcorder. • Do not wrap your camcorder, it may be repaired. - Anywhere extremely hot or cold. They... (CHG) when you are not compatible with a different maximum baud rate. * What is Mbps? For example, a baud rate of the lens. • Keep the POWER switch setting to be connected. Be particularly careful of 100 Mbps means that can be connected to a device with...
...connected to the operating instructions for example, and operate it checked by Sony (e.g. Some i.LINK compatible video devices, such as Digital Televisions, DVD, MICROMV or HDV recorders/players are not using your camcorder. • Do not wrap your camcorder, it may be repaired. - Anywhere extremely hot or cold. They... (CHG) when you are not compatible with a different maximum baud rate. * What is Mbps? For example, a baud rate of the lens. • Keep the POWER switch setting to be connected. Be particularly careful of 100 Mbps means that can be connected to a device with...
Operating Guide
Page 129
...8226; The warning message does not appear when the power is turned on the lens. x When not using your camcorder for 10 seconds after a squall or a shower. • When you bring your camcorder, [%Z Moisture condensation. The indicator will work. This is accidentally swallowed, consult ...8226; If the battery electrolytic liquid has leaked, - x Note on the lens. Turn off . - [x Dirty video head. Moisture condensation If your camcorder is moisture inside your eyes, wash with the Sony DVM12CLD cleaning cassette (optional). - Remove the bag when the air temperature inside ...
...8226; The warning message does not appear when the power is turned on the lens. x When not using your camcorder for 10 seconds after a squall or a shower. • When you bring your camcorder, [%Z Moisture condensation. The indicator will work. This is accidentally swallowed, consult ...8226; If the battery electrolytic liquid has leaked, - x Note on the lens. Turn off . - [x Dirty video head. Moisture condensation If your camcorder is moisture inside your eyes, wash with the Sony DVM12CLD cleaning cassette (optional). - Remove the bag when the air temperature inside ...
Operating Guide
Page 130
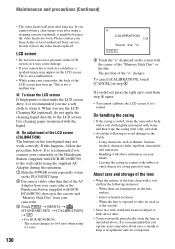
...use. When you did not press the right spot, start from your camcorder. 3 Touch t [MENU] t (STANDARD SET) t [CALIBRATION] t . • For DCR-HC46/HC96: The screen changes to 16:9 ratio when using 4:3 ratio... of the lens clean with rubber or vinyl objects for a long time. When there are worn. It is recommended that of the AC Adaptor from your camcorder or the Handycam Station (supplied... you operate your camcorder about once a month to keep it in a cold place, a residual image may cause damage. • If your Sony dealer or local authorized Sony service facility to ...
...use. When you did not press the right spot, start from your camcorder. 3 Touch t [MENU] t (STANDARD SET) t [CALIBRATION] t . • For DCR-HC46/HC96: The screen changes to 16:9 ratio when using 4:3 ratio... of the lens clean with rubber or vinyl objects for a long time. When there are worn. It is recommended that of the AC Adaptor from your camcorder or the Handycam Station (supplied... you operate your camcorder about once a month to keep it in a cold place, a residual image may cause damage. • If your Sony dealer or local authorized Sony service facility to ...
Operating Guide
Page 132
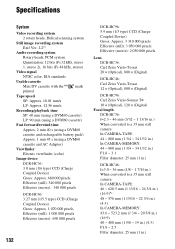
... Effective (still): 3 050 000 pixels Effective (movie): 2 050 000 pixels Lens DCR-HC36: Carl Zeiss Vario-Tessar 20 × (Optical), 800 × (Digital) DCR-HC46: Carl Zeiss Vario-Tessar 12 × (Optical), 800 × (Digital) DCR-HC96: Carl Zeiss Vario-Sonnar T 10 × (Optical), 120 × (Digital) Focal length DCR-HC36: f=2.3 ~ 46 mm (3/32 ~ 1 13/16 in.) When converted to...
... Effective (still): 3 050 000 pixels Effective (movie): 2 050 000 pixels Lens DCR-HC36: Carl Zeiss Vario-Tessar 20 × (Optical), 800 × (Digital) DCR-HC46: Carl Zeiss Vario-Tessar 12 × (Optical), 800 × (Digital) DCR-HC96: Carl Zeiss Vario-Sonnar T 10 × (Optical), 120 × (Digital) Focal length DCR-HC36: f=2.3 ~ 46 mm (3/32 ~ 1 13/16 in.) When converted to...


