
Operating Guide
Page 12
...Lens cap (1) (DCR-HC36/HC46) (p. 18, 28, 30) Power cord (1) (p. 13) • To attach the lens cap Attach the lens cap to the metal fittings of that you have following items supplied with your camcorder. See page 6, 123, 124, for compatible cassettes and "Memory Stick Duo" for your camcorder. ... indicates the number of the Grip belt, as illustrated below, using the strap. Handycam Station (1) (DCR-HC46/HC96) (p. 13) Rechargeable battery pack (1) (p. 13, 126) NP-FP30 (DCR-HC36) NP-FP50 (DCR-HC46/HC96) Wireless Remote Commander (1) (p. 40) A button-type lithium battery is...
...Lens cap (1) (DCR-HC36/HC46) (p. 18, 28, 30) Power cord (1) (p. 13) • To attach the lens cap Attach the lens cap to the metal fittings of that you have following items supplied with your camcorder. See page 6, 123, 124, for compatible cassettes and "Memory Stick Duo" for your camcorder. ... indicates the number of the Grip belt, as illustrated below, using the strap. Handycam Station (1) (DCR-HC46/HC96) (p. 13) Rechargeable battery pack (1) (p. 13, 126) NP-FP30 (DCR-HC36) NP-FP50 (DCR-HC46/HC96) Wireless Remote Commander (1) (p. 40) A button-type lithium battery is...

Operating Guide
Page 18
...for a few seconds. 2 Hold the camcorder correctly. 1 Slide the POWER switch repeatedly in the direction of the cap. 3 Ensure a good grip, then fasten the Grip belt. If the POWER switch is set to CAMERA-TAPE or CAMERAMEMORY. For DCR-HC36/HC46: Remove the lens cap by pressing both knobs on a "Memory ...Stick Duo." CAMERA-MEMORY: To record on the sides of the arrow to turn on the respective lamp. Step 3: Turning the power on and holding your camcorder firmly To record or play...
...for a few seconds. 2 Hold the camcorder correctly. 1 Slide the POWER switch repeatedly in the direction of the cap. 3 Ensure a good grip, then fasten the Grip belt. If the POWER switch is set to CAMERA-TAPE or CAMERAMEMORY. For DCR-HC36/HC46: Remove the lens cap by pressing both knobs on a "Memory ...Stick Duo." CAMERA-MEMORY: To record on the sides of the arrow to turn on the respective lamp. Step 3: Turning the power on and holding your camcorder firmly To record or play...
Operating Guide
Page 19
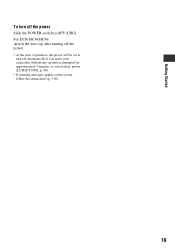
For DCR-HC36/HC46: Attach the lens cap after turning off the power. • At the time of purchase, the power will be set to turn off automatically if you leave your camcorder without any operation attempted for approximately 5 minutes, to OFF (CHG). Getting Started To turn off the power Slide the POWER switch to save battery power ([A.SHUT OFF], p. 68). • If warning messages appear on the screen, follow the instructions (p. 118). 19
For DCR-HC36/HC46: Attach the lens cap after turning off the power. • At the time of purchase, the power will be set to turn off automatically if you leave your camcorder without any operation attempted for approximately 5 minutes, to OFF (CHG). Getting Started To turn off the power Slide the POWER switch to save battery power ([A.SHUT OFF], p. 68). • If warning messages appear on the screen, follow the instructions (p. 118). 19

Operating Guide
Page 28
to OFF (CHG), slide it while pressing the green button. Recording/Playback Easy Recording/Playback (Easy Handycam) With this Easy Handycam operation, most of the camera settings are recorded in [FINE] quality on a "Memory Stick Duo." 28 appears on the screen ... cassette. *2 Still images are automatically optimally adjusted, which frees you from detailed adjustments. To stop recording, press F again. 2 Press EASY A. DCR-HC36/HC46: Remove the lens cap (p. 18). appears on the screen B. 3 Press PHOTO D to record.*2 60min EASY 3.0M 3 0 MENU Flashing t Lit Press and hold ...
to OFF (CHG), slide it while pressing the green button. Recording/Playback Easy Recording/Playback (Easy Handycam) With this Easy Handycam operation, most of the camera settings are recorded in [FINE] quality on a "Memory Stick Duo." 28 appears on the screen ... cassette. *2 Still images are automatically optimally adjusted, which frees you from detailed adjustments. To stop recording, press F again. 2 Press EASY A. DCR-HC36/HC46: Remove the lens cap (p. 18). appears on the screen B. 3 Press PHOTO D to record.*2 60min EASY 3.0M 3 0 MENU Flashing t Lit Press and hold ...

Operating Guide
Page 30
... it fully (B). 3.0M The indicator (A) changes [STBY] (tape only) to [REC]. • The sound of the cap. When disappears, the image has been recorded. Lens cover (DCR-HC96) Opens in standby mode, you can record a still image on a "Memory Stick Duo" by pressing both knobs on... direction of the POWER switch. If the POWER To record on a "Memory Stick Duo" will be monaural. Recording Lens cap (DCR-HC36/HC46) Remove the lens cap by pressing PHOTO fully. PHOTO DCR-HC36: POWER switch REC START/STOP B REC START/STOP A 1 Slide the POWER switch in 4:3 screen. 30 Flashing t ...
... it fully (B). 3.0M The indicator (A) changes [STBY] (tape only) to [REC]. • The sound of the cap. When disappears, the image has been recorded. Lens cover (DCR-HC96) Opens in standby mode, you can record a still image on a "Memory Stick Duo" by pressing both knobs on... direction of the POWER switch. If the POWER To record on a "Memory Stick Duo" will be monaural. Recording Lens cap (DCR-HC36/HC46) Remove the lens cap by pressing PHOTO fully. PHOTO DCR-HC36: POWER switch REC START/STOP B REC START/STOP A 1 Slide the POWER switch in 4:3 screen. 30 Flashing t ...
Operating Guide
Page 138
... .........59 FORMAT 58, 124 FRAME REC (Frame recording 62 Frame-by-frame Playback ....64 G Getting Started 12 Grip belt 18 GUIDEFRAME 67 H Handycam Station ..........13, 84 Help 87 Holding the camcorder .........18 I i.LINK 127 i.LINK cable .......72, 75, 94, 97 Icon .......See Display indicators ID-1/ID-2 43, 54 Image delete button 37... (LCD back light level) ......... 66 LCD BRIGHT 66 LCD COLOR 66 LCD PANEL 68 LCD panel 20 LCD screen 20 LCD/VF SET 66 Lens cap 12, 30 Lens cover 18, 30 LETTER BOX 66 Lid 24 LP (Long Play 65 LUMI. KEY (Luminance key 61 M Macintosh 88, 92 Main...
... .........59 FORMAT 58, 124 FRAME REC (Frame recording 62 Frame-by-frame Playback ....64 G Getting Started 12 Grip belt 18 GUIDEFRAME 67 H Handycam Station ..........13, 84 Help 87 Holding the camcorder .........18 I i.LINK 127 i.LINK cable .......72, 75, 94, 97 Icon .......See Display indicators ID-1/ID-2 43, 54 Image delete button 37... (LCD back light level) ......... 66 LCD BRIGHT 66 LCD COLOR 66 LCD PANEL 68 LCD panel 20 LCD screen 20 LCD/VF SET 66 Lens cap 12, 30 Lens cover 18, 30 LETTER BOX 66 Lid 24 LP (Long Play 65 LUMI. KEY (Luminance key 61 M Macintosh 88, 92 Main...