
Camera Operations Guide
Page 3
...Sony dealer or an experienced radio/TV technician for effective use Title search (p. 40), Date search (p. 41), Photo search (p. 41), [TITLE] (p. 52), [TAPE TITLE] (p. 54). Note on using a digital still camera, and thus may cause a malfunction of the camcorder...as you can be sure to insert the connector plug in the proper direction. DCR-HC Serial No. These limits are located on a TV, you insert the connector...the copyright laws. Use of the FCC Rules. Be careful when placing the camera near a window or outdoors. • Do not aim at dusk. Refer to these numbers whenever you ...
...Sony dealer or an experienced radio/TV technician for effective use Title search (p. 40), Date search (p. 41), Photo search (p. 41), [TITLE] (p. 52), [TAPE TITLE] (p. 54). Note on using a digital still camera, and thus may cause a malfunction of the camcorder...as you can be sure to insert the connector plug in the proper direction. DCR-HC Serial No. These limits are located on a TV, you insert the connector...the copyright laws. Use of the FCC Rules. Be careful when placing the camera near a window or outdoors. • Do not aim at dusk. Refer to these numbers whenever you ...
Camera Operations Guide
Page 8
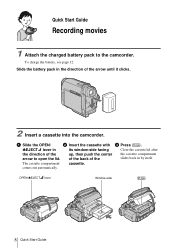
... of the up, then push the center the cassette compartment arrow to the camcorder. Quick Start Guide Recording movies 1 Attach the charged battery pack to open the lid. ZEJECT lever in its window-side facing Close the cassette lid after the direction of the arrow until it... clicks. 2 Insert a cassette into the camcorder. OPEN/ZEJECT lever Window-side 8 Quick Start Guide a Slide the OPEN/ b Insert the cassette with...
... of the up, then push the center the cassette compartment arrow to the camcorder. Quick Start Guide Recording movies 1 Attach the charged battery pack to open the lid. ZEJECT lever in its window-side facing Close the cassette lid after the direction of the arrow until it... clicks. 2 Insert a cassette into the camcorder. OPEN/ZEJECT lever Window-side 8 Quick Start Guide a Slide the OPEN/ b Insert the cassette with...
Camera Operations Guide
Page 19
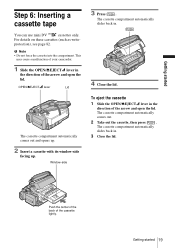
Getting started Step 6: Inserting a cassette tape You can use mini DV cassettes only. Window-side 3 Press . The cassette compartment automatically comes out. 2 Take out the cassette, then press . This may cause a malfunction of your camcorder. 1 Slide the OPEN/ZEJECT lever in the direction of the arrow and open the lid. The cassette ... For details on these cassettes (such as write- OPEN/ZEJECT lever Lid The cassette compartment automatically comes out and opens up. 2 Insert a cassette with its window-side facing up. Push the center of the back of the cassette lightly.
Getting started Step 6: Inserting a cassette tape You can use mini DV cassettes only. Window-side 3 Press . The cassette compartment automatically comes out. 2 Take out the cassette, then press . This may cause a malfunction of your camcorder. 1 Slide the OPEN/ZEJECT lever in the direction of the arrow and open the lid. The cassette ... For details on these cassettes (such as write- OPEN/ZEJECT lever Lid The cassette compartment automatically comes out and opens up. 2 Insert a cassette with its window-side facing up. Push the center of the back of the cassette lightly.
Camera Operations Guide
Page 28
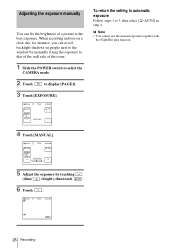
... to automatic exposure Follow steps 1 to 3, then select [ AUTO] in step 4. Adjusting the exposure manually You can avoid backlight shadows on people next to the window by touching (dim)/ (bright), then touch . 6 Touch . 60min STBY 0:00:00 FN 28 Recording
... to automatic exposure Follow steps 1 to 3, then select [ AUTO] in step 4. Adjusting the exposure manually You can avoid backlight shadows on people next to the window by touching (dim)/ (bright), then touch . 6 Touch . 60min STBY 0:00:00 FN 28 Recording
Camera Operations Guide
Page 30
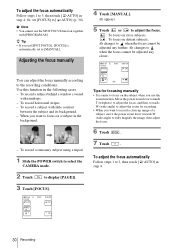
... image, then adjust the focus. 6 Touch . 7 Touch . Adjusting the focus manually You can adjust the focus manually according to [ AUTO] (p. 30). To record a subject behind a window covered with [PROGRAM AE]. To record a subject with little contrast between the subject and its background. - AL STBY 0:00:00 OK 4 Touch [MANUAL]. 9 appears. 5 Touch...
... image, then adjust the focus. 6 Touch . 7 Touch . Adjusting the focus manually You can adjust the focus manually according to [ AUTO] (p. 30). To record a subject behind a window covered with [PROGRAM AE]. To record a subject with little contrast between the subject and its background. - AL STBY 0:00:00 OK 4 Touch [MANUAL]. 9 appears. 5 Touch...
Camera Operations Guide
Page 44
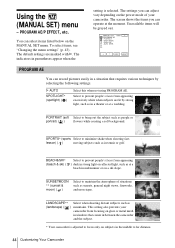
... LVL AUTO SHTR STBY EXEC RET. Select to prevent people's faces from appearing excessively white when subjects are marked with G. This setting also prevents your camcorder. G AUTO SPOTLIGHT* (spotlight) ( ) Select this when not using PROGRAM AE. lesson) ( ) moving subjects such as (landscape) ( ) mountains. ...subject such as sunsets, general night views, fireworks, and neon signs. You can record pictures easily in a situation that comes in windows that requires various techniques by strong light, such as at a beach in a theater or at the moment. PROGRAM AE You ...
... LVL AUTO SHTR STBY EXEC RET. Select to prevent people's faces from appearing excessively white when subjects are marked with G. This setting also prevents your camcorder. G AUTO SPOTLIGHT* (spotlight) ( ) Select this when not using PROGRAM AE. lesson) ( ) moving subjects such as (landscape) ( ) mountains. ...subject such as sunsets, general night views, fireworks, and neon signs. You can record pictures easily in a situation that comes in windows that requires various techniques by strong light, such as at a beach in a theater or at the moment. PROGRAM AE You ...
Camera Operations Guide
Page 86
...176;C (140°F), such as under direct sunlight, near heaters or in a car parked in your camcorder, it may malfunction. Never leave them exposed to condense, your local authorized Sony service facility. - Sandy beach or anywhere dusty. Sometimes this malfunction cannot be repaired. - Sometimes this... and be exposed to record properly. - Your camcorder can be able to direct sunlight. The camcorder may not operate correctly. Near windows or outdoors, where the LCD screen, the viewfinder, or the lens may be damaged or your camcorder may not be used again if % or Z...
...176;C (140°F), such as under direct sunlight, near heaters or in a car parked in your camcorder, it may malfunction. Never leave them exposed to condense, your local authorized Sony service facility. - Sandy beach or anywhere dusty. Sometimes this malfunction cannot be repaired. - Sometimes this... and be exposed to record properly. - Your camcorder can be able to direct sunlight. The camcorder may not operate correctly. Near windows or outdoors, where the LCD screen, the viewfinder, or the lens may be damaged or your camcorder may not be used again if % or Z...
Computer Applications Guide
Page 2
... faster (800 MHz or faster recommended) • Application: DirectX 9.0b or later (This product is required. Operation is required. Operation is running Windows 98. To copy pictures, connect your camcorder to play back movies.) • Others: USB port (this must be provided as standard), disc drive 2 Read this first • For camera...
... faster (800 MHz or faster recommended) • Application: DirectX 9.0b or later (This product is required. Operation is required. Operation is running Windows 98. To copy pictures, connect your camcorder to play back movies.) • Others: USB port (this must be provided as standard), disc drive 2 Read this first • For camera...
Computer Applications Guide
Page 3
...each case in this manual. On trademarks • Picture Package is a trademark of Sony Corporation. • "Memory Stick" and are registered trademarks of Sony Corporation. • Microsoft, Windows, and Windows Media are either registered trademarks or trademarks of Microsoft Corporation in the United States and... works, sound recording or other third party musical contents you are not permitted to the separate Camera Operations Guide supplied with your camcorder for details. • The screens shown in the United States and / or other countries. • Macintosh, iMac, Mac...
...each case in this manual. On trademarks • Picture Package is a trademark of Sony Corporation. • "Memory Stick" and are registered trademarks of Sony Corporation. • Microsoft, Windows, and Windows Media are either registered trademarks or trademarks of Microsoft Corporation in the United States and... works, sound recording or other third party musical contents you are not permitted to the separate Camera Operations Guide supplied with your camcorder for details. • The screens shown in the United States and / or other countries. • Macintosh, iMac, Mac...
Computer Applications Guide
Page 4
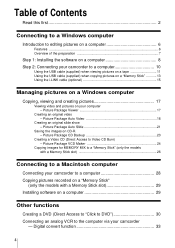
... computer via your computer - Digital convert function 33 4 Picture Package Auto Video 18 Creating an original slide show - Table of Contents Read this first 2 Connecting to a Windows computer Introduction to editing pictures on a computer 6 Features ...6 Overview of the preparation 7 Step 1: Installing the software on a computer 8 Step 2: Connecting your camcorder to a computer 10 Using...
... computer via your computer - Digital convert function 33 4 Picture Package Auto Video 18 Creating an original slide show - Table of Contents Read this first 2 Connecting to a Windows computer Introduction to editing pictures on a computer 6 Features ...6 Overview of the preparation 7 Step 1: Installing the software on a computer 8 Step 2: Connecting your camcorder to a computer 10 Using...
Computer Applications Guide
Page 6
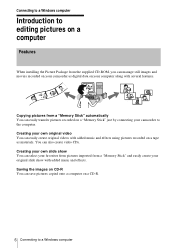
... from pictures imported from a "Memory Stick" automatically You can easily transfer pictures recorded on a "Memory Stick" just by connecting your camcorder to the computer. Saving the images on CD-R You can save pictures copied onto a computer on your original slide show with added... still images and movies recorded on your camcorder as materials. Copying pictures from a "Memory Stick" and easily create your computer along with added music and effects using pictures recorded on a tape as digital data on a CD-R. 6 Connecting to a Windows computer You can easily create original videos ...
... from pictures imported from a "Memory Stick" automatically You can easily transfer pictures recorded on a "Memory Stick" just by connecting your camcorder to the computer. Saving the images on CD-R You can save pictures copied onto a computer on your original slide show with added... still images and movies recorded on your camcorder as materials. Copying pictures from a "Memory Stick" and easily create your computer along with added music and effects using pictures recorded on a tape as digital data on a CD-R. 6 Connecting to a Windows computer You can easily create original videos ...

Computer Applications Guide
Page 7
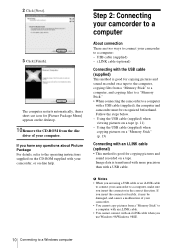
... below to a Windows computer 7 For models with an i.LINK cable (optional) See "Step 2: Connecting your camcorder to the computer. On your computer (for details. Now, start from Step1 ! * These illustrations are two ways to connect your camcorder to a computer. • Connecting with a USB cable (supplied) • Connecting with a Handycam Station, place your camcorder to a computer...
... below to a Windows computer 7 For models with an i.LINK cable (optional) See "Step 2: Connecting your camcorder to the computer. On your computer (for details. Now, start from Step1 ! * These illustrations are two ways to connect your camcorder to a computer. • Connecting with a USB cable (supplied) • Connecting with a Handycam Station, place your camcorder to a computer...
Computer Applications Guide
Page 8
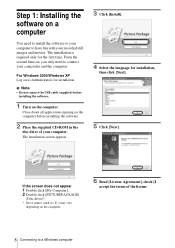
...) before installing the software. 2 Place the supplied CD-ROM in the disc drive of the license 8 Connecting to have fun with your camcorder and the computer. If the screen does not appear 1 Double-click [My Computer]. 2 Double-click [PICTUREPACKAGE] (Disc drive)*. * Drive... names (such as Administrators for installation. For Windows 2000/Windows XP Log on a computer You need to connect your recorded still images and movies. The installation screen appears. 3 Click [Install]. 4 Select...
...) before installing the software. 2 Place the supplied CD-ROM in the disc drive of the license 8 Connecting to have fun with your camcorder and the computer. If the screen does not appear 1 Double-click [My Computer]. 2 Double-click [PICTUREPACKAGE] (Disc drive)*. * Drive... names (such as Administrators for installation. For Windows 2000/Windows XP Log on a computer You need to connect your recorded still images and movies. The installation screen appears. 3 Click [Install]. 4 Select...
Computer Applications Guide
Page 9
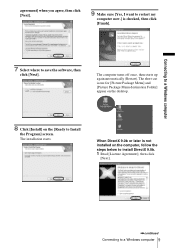
... Install the Program] screen. When DirectX 9.0b or later is checked, then click [Finish]. 7 Select where to save the software, then click [Next]. Connecting to a Windows computer agreement] when you agree, then click [Next]. 9 Make sure [Yes, I want to restart my computer now.] is not installed on the [Ready to...
... Install the Program] screen. When DirectX 9.0b or later is checked, then click [Finish]. 7 Select where to save the software, then click [Next]. Connecting to a Windows computer agreement] when you agree, then click [Next]. 9 Make sure [Yes, I want to restart my computer now.] is not installed on the [Ready to...
Computer Applications Guide
Page 10
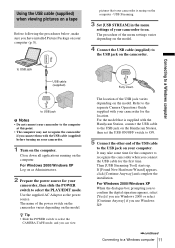
... Stick" to a computer, and copying files to a "Memory Stick." • When connecting the camcorder to a computer with a USB cable (supplied), the computer and camcorder must be damaged, and causes a malfunction of your camcorder to a computer, make sure you use Windows 98/Windows 98SE. 10 Connecting to a computer with an i.LINK cable. • You cannot connect...
... Stick" to a computer, and copying files to a "Memory Stick." • When connecting the camcorder to a computer with a USB cable (supplied), the computer and camcorder must be damaged, and causes a malfunction of your camcorder to a computer, make sure you use Windows 98/Windows 98SE. 10 Connecting to a computer with an i.LINK cable. • You cannot connect...
Computer Applications Guide
Page 11
...the POWER switch to the USB jack on the camcorder. For Windows 2000/Windows XP When the dialogue box prompting you to confirm the digital signature appears, select [Yes] if you use Windows 2000 or select [Continue Anyway] if you use Windows XP. ,continued Connecting to the separate Camera Operations... (supplied) before turning on your camcorder to USB jack USB cable (supplied) Fully insert. Refer to a Windows computer 11 to USB jack b Notes • Do not connect your camcorder to the USB jack on your camcorder is supplied with the Handycam Station, connect the USB cable to...
...the POWER switch to the USB jack on the camcorder. For Windows 2000/Windows XP When the dialogue box prompting you to confirm the digital signature appears, select [Yes] if you use Windows 2000 or select [Continue Anyway] if you use Windows XP. ,continued Connecting to the separate Camera Operations... (supplied) before turning on your camcorder to USB jack USB cable (supplied) Fully insert. Refer to a Windows computer 11 to USB jack b Notes • Do not connect your camcorder to the USB jack on your camcorder is supplied with the Handycam Station, connect the USB cable to...
Computer Applications Guide
Page 12
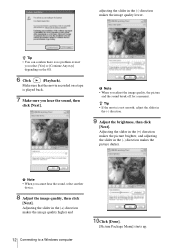
... is not smooth, adjust the slider in the (+) direction makes the image quality higher and 10Click [Done]. [Picture Package Menu] starts up. 12 Connecting to a Windows computer Adjusting the slider in the (-) direction. 9 Adjust the brightness, then click [Next]. Adjusting the slider in the (+) direction makes the picture brighter, and adjusting...
... is not smooth, adjust the slider in the (+) direction makes the image quality higher and 10Click [Done]. [Picture Package Menu] starts up. 12 Connecting to a Windows computer Adjusting the slider in the (-) direction. 9 Adjust the brightness, then click [Next]. Adjusting the slider in the (+) direction makes the picture brighter, and adjusting...
Computer Applications Guide
Page 13
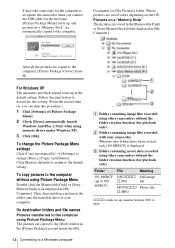
... Connect the USB cable (supplied) to the computer after the second time, select [Start], [Programs] ([All Programs] for Windows XP), [Picture Package], [Handycam Tools], and [USB Streaming Tool], then start up after pictures are automatically copied to on a "Memory Stick" When you have... installed Picture Package on your camcorder, then slide the POWER switch to a Windows computer 13 The name of the power switch on the camcorder varies ...
... Connect the USB cable (supplied) to the computer after the second time, select [Start], [Programs] ([All Programs] for Windows XP), [Picture Package], [Handycam Tools], and [USB Streaming Tool], then start up after pictures are automatically copied to on a "Memory Stick" When you have... installed Picture Package on your camcorder, then slide the POWER switch to a Windows computer 13 The name of the power switch on the camcorder varies ...
Computer Applications Guide
Page 14
...in the [Picture Package] created inside the [My 14 Connecting to a Windows computer A B C A Folder containing image files recorded using other camcorders without using memory device under Windows XP). 3 Click [OK]. For Windows XP The automatic playback wizard starts up to 999 MSDCF) DSC0sss Still image... onto the hard disk drive of [Picture Package Menu]. 2 Check [Do not automatically launch Windows AutoPlay.] (Only when using Picture Package Menu Double-click the [Removable Disk] or [Sony MemoryStick] icon displayed in a "Memory Stick" are copied to the computer, [Picture Package ...
...in the [Picture Package] created inside the [My 14 Connecting to a Windows computer A B C A Folder containing image files recorded using other camcorders without using memory device under Windows XP). 3 Click [OK]. For Windows XP The automatic playback wizard starts up to 999 MSDCF) DSC0sss Still image... onto the hard disk drive of [Picture Package Menu]. 2 Check [Do not automatically launch Windows AutoPlay.] (Only when using Picture Package Menu Double-click the [Removable Disk] or [Sony MemoryStick] icon displayed in a "Memory Stick" are copied to the computer, [Picture Package ...

Computer Applications Guide
Page 15
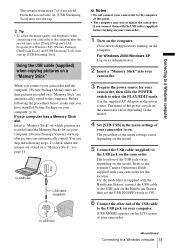
... not disconnect the USB cable while the access lamp is lit. • Make sure to a Windows computer task tray 2 Click [Safely remove Sony Camcorder] ([Unplug or eject hardware] in Windows 2000/Windows Me. 4 Disconnect the USB cable from the camcorder and computer. b Notes • Operation is not guaranteed if you connect two or more USB devices...
... not disconnect the USB cable while the access lamp is lit. • Make sure to a Windows computer task tray 2 Click [Safely remove Sony Camcorder] ([Unplug or eject hardware] in Windows 2000/Windows Me. 4 Disconnect the USB cable from the camcorder and computer. b Notes • Operation is not guaranteed if you connect two or more USB devices...


