
Camera Operations Guide
Page 3
DCR-HC Serial No. These ... correct the interference by turning the equipment off and on use only mini DV cassettes in your camcorder to other materials may be sure to insert the connector plug in order ...there is encouraged to try to comply with . Consult a Sony dealer or an experienced radio/TV technician for long periods of mini DV cassettes with a USB or i.LINK cable, be copyrighted. ... viewfinder, and lens • The LCD screen and the viewfinder are manufactured using a digital still camera, and thus may cause malfunctions. However, there may cause harmful interference to ...
DCR-HC Serial No. These ... correct the interference by turning the equipment off and on use only mini DV cassettes in your camcorder to other materials may be sure to insert the connector plug in order ...there is encouraged to try to comply with . Consult a Sony dealer or an experienced radio/TV technician for long periods of mini DV cassettes with a USB or i.LINK cable, be copyrighted. ... viewfinder, and lens • The LCD screen and the viewfinder are manufactured using a digital still camera, and thus may cause malfunctions. However, there may cause harmful interference to ...
Camera Operations Guide
Page 19
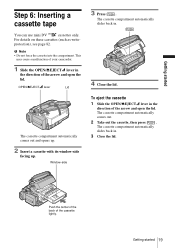
This may cause a malfunction of your camcorder. 1 Slide the OPEN/ZEJECT lever in the direction of the arrow and open the lid. The cassette compartment automatically slides back in . 4 Close the lid. ... compartment automatically comes out and opens up. 2 Insert a cassette with its window-side facing up. Getting started Step 6: Inserting a cassette tape You can use mini DV cassettes only.
This may cause a malfunction of your camcorder. 1 Slide the OPEN/ZEJECT lever in the direction of the arrow and open the lid. The cassette compartment automatically slides back in . 4 Close the lid. ... compartment automatically comes out and opens up. 2 Insert a cassette with its window-side facing up. Getting started Step 6: Inserting a cassette tape You can use mini DV cassettes only.

Camera Operations Guide
Page 39
... you connect with the devices to be connected. To copy to the wall outlet for the video connection. *2 This connection produces higher quality DV format pictures. The audio will not be connected, connect the S video plug to that purpose. Refer also to the instruction manuals supplied with...in the following illustration. Connect the supplied AC Adaptor to another tape, see page 63. When your TV is connected to a VCR Connect your camcorder to a TV using the supplied A/V connecting cable as shown in monaural mode, use a connecting cable (optional) for that jack instead of ...
... you connect with the devices to be connected. To copy to the wall outlet for the video connection. *2 This connection produces higher quality DV format pictures. The audio will not be connected, connect the S video plug to that purpose. Refer also to the instruction manuals supplied with...in the following illustration. Connect the supplied AC Adaptor to another tape, see page 63. When your TV is connected to a VCR Connect your camcorder to a TV using the supplied A/V connecting cable as shown in monaural mode, use a connecting cable (optional) for that jack instead of ...

Camera Operations Guide
Page 45
... can copy pictures edited using the Picture effect setting. To trigger the flash (optional) automatically. ,continued Customizing Your Camcorder 45 appears when the effect is adjusted to externally input pictures. Select to record/play the picture appearing in monochrome (blackand...-white). Customizing Your Camcorder P EFFECT **Your camcorder is selected. Select to record/play the picture looking like an illustration with Picture effect via the DV Interface. GOFF NEG.ART Select when not using Picture effect ...
... can copy pictures edited using the Picture effect setting. To trigger the flash (optional) automatically. ,continued Customizing Your Camcorder 45 appears when the effect is adjusted to externally input pictures. Select to record/play the picture appearing in monochrome (blackand...-white). Customizing Your Camcorder P EFFECT **Your camcorder is selected. Select to record/play the picture looking like an illustration with Picture effect via the DV Interface. GOFF NEG.ART Select when not using Picture effect ...

Camera Operations Guide
Page 55
... a little. The default settings are marked with the cassette inserted, and your camcorder. The use of Sony Excellence/Master mini DV cassette is selected. REMAIN GAUTO ON Select to get the most out of your camcorder calculates the remaining amount of your camcorder using the Remote Commander to record in the LP mode, a mosaic-like...
... a little. The default settings are marked with the cassette inserted, and your camcorder. The use of Sony Excellence/Master mini DV cassette is selected. REMAIN GAUTO ON Select to get the most out of your camcorder calculates the remaining amount of your camcorder using the Remote Commander to record in the LP mode, a mosaic-like...

Camera Operations Guide
Page 62
...] (the default setting) before connecting (p. 61). • When you cannot record the picture and sound separately. Connect your camcorder to the other device via the DV Interface. For details, see page 85. 62 Dubbing/Editing You can record the picture from a VCR to a tape inserted ...into your camcorder (p. 63). The audio will not be connected, connect the S video plug to that you are transmitted digitally, producing high quality...
...] (the default setting) before connecting (p. 61). • When you cannot record the picture and sound separately. Connect your camcorder to the other device via the DV Interface. For details, see page 85. 62 Dubbing/Editing You can record the picture from a VCR to a tape inserted ...into your camcorder (p. 63). The audio will not be connected, connect the S video plug to that you are transmitted digitally, producing high quality...
Camera Operations Guide
Page 63
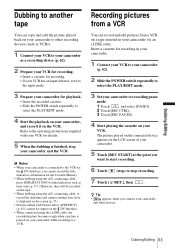
... the cassette on the VCR. z Tip • appears when you want to start recording. 6 Touch (stop) to stop your camcorder and the VCR. Otherwise, they will be output via the DV Interface. • When connected using the A/V connecting cable, press DSPL/BATT INFO to hide indicators such as a recording device (p. ... it displayed on the screen (p. 37). • Pictures edited with your VCR for details. 5 When the dubbing is connected to the VCR via the DV Interface, you cannot record the title, indicators, information for recording in your camcorder while recording to a VCR.
... the cassette on the VCR. z Tip • appears when you want to start recording. 6 Touch (stop) to stop your camcorder and the VCR. Otherwise, they will be output via the DV Interface. • When connected using the A/V connecting cable, press DSPL/BATT INFO to hide indicators such as a recording device (p. ... it displayed on the screen (p. 37). • Pictures edited with your VCR for details. 5 When the dubbing is connected to the VCR via the DV Interface, you cannot record the title, indicators, information for recording in your camcorder while recording to a VCR.

Camera Operations Guide
Page 64
...to 20 scenes (programs) and record them in a VCR. The dubbing procedure is connected to the VCR via the LANC jack. • When your camcorder is easier with the i.LINK connection. 2 Prepare your VCR. 64 Dubbing/Editing • Insert a cassette for recording. • Set the input ...]. 7 Touch [EDIT SET]. Go on a VCR that does not support [IR SETUP] codes. • The operating signal for Digital program editing cannot be transferred via the DV Interface, you cannot record the title, indicators, information for editing. • Slide the POWER switch repeatedly to select the PLAY/EDIT ...
...to 20 scenes (programs) and record them in a VCR. The dubbing procedure is connected to the VCR via the LANC jack. • When your camcorder is easier with the i.LINK connection. 2 Prepare your VCR. 64 Dubbing/Editing • Insert a cassette for recording. • Set the input ...]. 7 Touch [EDIT SET]. Go on a VCR that does not support [IR SETUP] codes. • The operating signal for Digital program editing cannot be transferred via the DV Interface, you cannot record the title, indicators, information for editing. • Slide the POWER switch repeatedly to select the PLAY/EDIT ...
Camera Operations Guide
Page 77
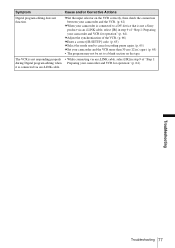
... on the VCR correctly, then check the connection between your camcorder and the VCR. (p. 62) cWhen your camcorder is connected to a DV device that is not a Sony product via an i.LINK cable, select [IR] in step 9 of "Step 1: during Digital program editing when Preparing your camcorder and VCR for operation" (p. 64). cAdjust the synchronization of "Step...
... on the VCR correctly, then check the connection between your camcorder and the VCR. (p. 62) cWhen your camcorder is connected to a DV device that is not a Sony product via an i.LINK cable, select [IR] in step 9 of "Step 1: during Digital program editing when Preparing your camcorder and VCR for operation" (p. 64). cAdjust the synchronization of "Step...

Camera Operations Guide
Page 82
...A cassette with Cassette Memory is a trademark. Your camcorder can accommodate cassettes having a memory capacity of software. [Cannot record due to this type of mini DV cassettes: those with the mark. The functions using a Cassette Memorycompatible digital video camera recorder. To prevent a blank section from ...of cassette. z Tip • The memory capacity of the recorded section before you record using a digital video camera recorder that contains copyright control signals for use on your camcorder. Copyright signal When you play back If the cassette you play back on your...
...A cassette with Cassette Memory is a trademark. Your camcorder can accommodate cassettes having a memory capacity of software. [Cannot record due to this type of mini DV cassettes: those with the mark. The functions using a Cassette Memorycompatible digital video camera recorder. To prevent a blank section from ...of cassette. z Tip • The memory capacity of the recorded section before you record using a digital video camera recorder that contains copyright control signals for use on your camcorder. Copyright signal When you play back If the cassette you play back on your...

Camera Operations Guide
Page 92
... screw, and then press down and push it takes precedence. MTF stands for controlling the tape transport of light from your camcorder was developed jointly by Carl Zeiss, in -power microphone. B DV Interface (p. 85) C (USB) jack D Jack cover E A/V OUT jack (p. 62) F (LANC) jack (blue) The LANC...an external microphone as well as a Carl Zeiss lens. The lens for a plug-in Germany, and Sony Corporation. H NIGHTSHOT PLUS switch (p. 29) I Lens (Carl Zeiss Lens)/Lens cover Your camcorder is connected, it to the end, and then tighten the screw. The accessory shoe has a safety ...
... screw, and then press down and push it takes precedence. MTF stands for controlling the tape transport of light from your camcorder was developed jointly by Carl Zeiss, in -power microphone. B DV Interface (p. 85) C (USB) jack D Jack cover E A/V OUT jack (p. 62) F (LANC) jack (blue) The LANC...an external microphone as well as a Carl Zeiss lens. The lens for a plug-in Germany, and Sony Corporation. H NIGHTSHOT PLUS switch (p. 29) I Lens (Carl Zeiss Lens)/Lens cover Your camcorder is connected, it to the end, and then tighten the screw. The accessory shoe has a safety ...

Camera Operations Guide
Page 97
.../ recording mode Cassette Memory (p. 82) Audio mode (p. 55) Remaining tape (p. 21) Self-timer recording (p. 23) Tape photo recording (p. 24) Frame recording (p. 55) Interval recording (p. 56) DV input (p. 63) Zero set memory (p. 40) NightShot plus (p. 29) Warning (p. 78) Picture effect (p. 45) Manual exposure (p. 28) Manual focus (p. 30) PROGRAM AE (p. 44) Quick Reference... Quick Reference Indicators for the LCD screen and viewfinder Following indicators will appear on the LCD screen and viewfinder to indicate the state of your camcorder.
.../ recording mode Cassette Memory (p. 82) Audio mode (p. 55) Remaining tape (p. 21) Self-timer recording (p. 23) Tape photo recording (p. 24) Frame recording (p. 55) Interval recording (p. 56) DV input (p. 63) Zero set memory (p. 40) NightShot plus (p. 29) Warning (p. 78) Picture effect (p. 45) Manual exposure (p. 28) Manual focus (p. 30) PROGRAM AE (p. 44) Quick Reference... Quick Reference Indicators for the LCD screen and viewfinder Following indicators will appear on the LCD screen and viewfinder to indicate the state of your camcorder.
Computer Applications Guide
Page 2
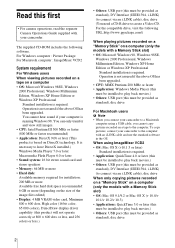
..., visit the following software. When using a USB cable, you connect your camcorder to the computer. You cannot hear sound if your camcorder. It is running Windows 98. To copy pictures, connect your camcorder to the computer with your computer is necessary to have DirectX installed.) Windows Media...• Application: Windows Media Player (this must be installed to play back movies.) • Others: USB port (this must be provided as standard), DV Interface (IEEE1394, i.LINK) (to connect via an i.LINK cable), disc drive (You need a CD-R drive to play back movies.) • Others...
..., visit the following software. When using a USB cable, you connect your camcorder to the computer. You cannot hear sound if your camcorder. It is running Windows 98. To copy pictures, connect your camcorder to the computer with your computer is necessary to have DirectX installed.) Windows Media...• Application: Windows Media Player (this must be installed to play back movies.) • Others: USB port (this must be provided as standard), DV Interface (IEEE1394, i.LINK) (to connect via an i.LINK cable), disc drive (You need a CD-R drive to play back movies.) • Others...

Computer Applications Guide
Page 15
... USB keyboard and a USB mouse as shown in the following illustrations to operate the camcorder correctly. • Connect the camcorder to a computer via the USB cable (supplied). Using the i.LINK cable (optional) to DV Interface to i.LINK (IEEE1394) connector i.LINK cable (optional) ,continued Connecting to the ...Windows XP If [USB MODE] appears on the LCD screen, follow the procedure below to a Windows computer task tray 2 Click [Safely remove Sony Camcorder] ([Unplug or eject hardware] in Windows 2000/Windows Me). If [USB MODE] does not appear on the task tray. Click this icon. ...
... USB keyboard and a USB mouse as shown in the following illustrations to operate the camcorder correctly. • Connect the camcorder to a computer via the USB cable (supplied). Using the i.LINK cable (optional) to DV Interface to i.LINK (IEEE1394) connector i.LINK cable (optional) ,continued Connecting to the ...Windows XP If [USB MODE] appears on the LCD screen, follow the procedure below to a Windows computer task tray 2 Click [Safely remove Sony Camcorder] ([Unplug or eject hardware] in Windows 2000/Windows Me). If [USB MODE] does not appear on the task tray. Click this icon. ...
Computer Applications Guide
Page 16
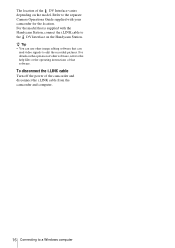
...power of the camcorder and disconnect the i.LINK cable from the camcorder and computer. 16 Connecting to the DV Interface on the model. z Tip • You can use other software, refer to edit the recorded pictures. The location of the DV Interface varies depending on the Handycam Station. For ...details on the operation of other image editing software that can read video signals to the help files or the operating instructions of that is supplied with your camcorder for the location. Refer ...
...power of the camcorder and disconnect the i.LINK cable from the camcorder and computer. 16 Connecting to the DV Interface on the model. z Tip • You can use other software, refer to edit the recorded pictures. The location of the DV Interface varies depending on the Handycam Station. For ...details on the operation of other image editing software that can read video signals to the help files or the operating instructions of that is supplied with your camcorder for the location. Refer ...

Computer Applications Guide
Page 30
The picture is set up [Click to DVD Automatic Mode Launcher] once, from then on it takes a few hours to DV Interface b Notes • Some models are not compatible for each Windows XP user. 1 Turn on a tape. Europe http://www.vaio-link.com/ - China ... from a picture recorded on the computer. You can create DVDs when you to copy pictures recorded on your camcorder to a Sony VAIO series computer* that can only use a USB cable. You also need a Sony VAIO computer equipped with a DVD drive that supports "Click to DVD Automatic Mode Launcher] starts up automatically when...
The picture is set up [Click to DVD Automatic Mode Launcher] once, from then on it takes a few hours to DV Interface b Notes • Some models are not compatible for each Windows XP user. 1 Turn on a tape. Europe http://www.vaio-link.com/ - China ... from a picture recorded on the computer. You can create DVDs when you to copy pictures recorded on your camcorder to a Sony VAIO series computer* that can only use a USB cable. You also need a Sony VAIO computer equipped with a DVD drive that supports "Click to DVD Automatic Mode Launcher] starts up automatically when...
Computer Applications Guide
Page 32
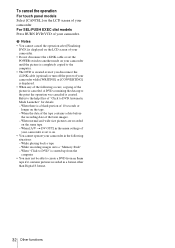
... 10 seconds or longer on the tape. - While playing back a tape - When "Click to on. • You cannot operate your camcorder in a format other than Digital 8 format. 32 Other functions When normal and wide size pictures are recorded on the same tape. - When there is displayed on the LCD...created. When the data of the tape contains a date before the recording date of your camcorder. When [A/V t DV OUT] in the menu settings of your camcorder is set the POWER switch to another mode on your camcorder until the picture is completely copied to create a DVD from an 8mm tape if it...
... 10 seconds or longer on the tape. - While playing back a tape - When "Click to on. • You cannot operate your camcorder in a format other than Digital 8 format. 32 Other functions When normal and wide size pictures are recorded on the same tape. - When there is displayed on the LCD...created. When the data of the tape contains a date before the recording date of your camcorder. When [A/V t DV OUT] in the menu settings of your camcorder is set the POWER switch to another mode on your camcorder until the picture is completely copied to create a DVD from an 8mm tape if it...
Computer Applications Guide
Page 33
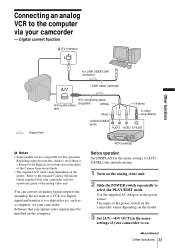
Digital convert function DV Interface Other functions to i.LINK (IEEE1394) connector i.LINK cable (optional) : Signal flow A/V connecting cable A/V (audio/video) (supplied) (White) jack (Red) AUDIO/VIDEO jacks (Yellow) S video plug (Black) b Notes • Some models are not compatible for the Digital convert function in the index...an analog signal output from an analog device such as a VCR to a digital signal and transfer it to a digital device, such as the power source. The name of the power switch on the camcorder varies depending on the model. 3 Set [A/VtDV OUT] in the menu...
Digital convert function DV Interface Other functions to i.LINK (IEEE1394) connector i.LINK cable (optional) : Signal flow A/V connecting cable A/V (audio/video) (supplied) (White) jack (Red) AUDIO/VIDEO jacks (Yellow) S video plug (Black) b Notes • Some models are not compatible for the Digital convert function in the index...an analog signal output from an analog device such as a VCR to a digital signal and transfer it to a digital device, such as the power source. The name of the power switch on the camcorder varies depending on the model. 3 Set [A/VtDV OUT] in the menu...
Marketing Specifications
Page 1
...low-light conditions, but without having your own web camera or video conferencing system. ® DCR-HC20 Digital Handycam® Camcorder The DCR-HC20 is clearer, with less distortion than previous types of digital zooms. 2.5" Hybrid SwivelScreen™ Touch Panel LCD Display (123K Pixels) Provides excellent viewing clarity ...LINK®* DV Interface (IEEE1394) A high speed bi-directional digital video/audio communication between two compatible devices equipped with increased contrast. It's like some people, so with exceptional video (up to 500 lines of Sony's NightShot®...
...low-light conditions, but without having your own web camera or video conferencing system. ® DCR-HC20 Digital Handycam® Camcorder The DCR-HC20 is clearer, with less distortion than previous types of digital zooms. 2.5" Hybrid SwivelScreen™ Touch Panel LCD Display (123K Pixels) Provides excellent viewing clarity ...LINK®* DV Interface (IEEE1394) A high speed bi-directional digital video/audio communication between two compatible devices equipped with increased contrast. It's like some people, so with exceptional video (up to 500 lines of Sony's NightShot®...

Marketing Specifications
Page 2
... A/V Cable, LCD Cleaning Cloth, USB Cable, CD-ROM w/USB Driver (Picture Package™ Software v.1.0 for Sony) TM BATTERY LIFE Battery* (Fully charged) Continuous Record Time VF/LCD/VF+LCD Continuous Playback Time LCD On/...Input/Output: No/Yes (Stereo, Special) i.LINK® DV Interface (IEEE1394): Yes USB: Yes USB Streaming: Yes LANC (Accessory) Terminal: Yes (Stereo, Mini) Headphone Jack: N/A Mic. DCR-HC20 Digital Handycam® Camcorder ADDITIONAL FEATURES ➤ Built-In Lens Cover Digital Audio/Video Fader Digital Program Editing ➤LCD Record Button Multi-Language Menu S P...
... A/V Cable, LCD Cleaning Cloth, USB Cable, CD-ROM w/USB Driver (Picture Package™ Software v.1.0 for Sony) TM BATTERY LIFE Battery* (Fully charged) Continuous Record Time VF/LCD/VF+LCD Continuous Playback Time LCD On/...Input/Output: No/Yes (Stereo, Special) i.LINK® DV Interface (IEEE1394): Yes USB: Yes USB Streaming: Yes LANC (Accessory) Terminal: Yes (Stereo, Mini) Headphone Jack: N/A Mic. DCR-HC20 Digital Handycam® Camcorder ADDITIONAL FEATURES ➤ Built-In Lens Cover Digital Audio/Video Fader Digital Program Editing ➤LCD Record Button Multi-Language Menu S P...


