
Camera Operations Guide
Page 21
.../STOP. Date/time and the camera settings data (p. 37) will not be displayed during recording The indicators will be correct depending on your camcorder for recording from a low angle or recording yourself in "Getting started" (p. 11 - Camera recording lamp POWER switch LENS COVER switch REC ...START/STOP REC START/STOP z Tip • Performing Easy Handycam operation, even first time users can also record movies by pressing REC START/STOP beside the LCD screen. Press REC START/STOP again to ...
.../STOP. Date/time and the camera settings data (p. 37) will not be displayed during recording The indicators will be correct depending on your camcorder for recording from a low angle or recording yourself in "Getting started" (p. 11 - Camera recording lamp POWER switch LENS COVER switch REC ...START/STOP REC START/STOP z Tip • Performing Easy Handycam operation, even first time users can also record movies by pressing REC START/STOP beside the LCD screen. Press REC START/STOP again to ...

Camera Operations Guide
Page 25
Before recording, follow steps 1 to 7 in blue. EASY lights up to OFF (CHG), then set to your camcorder. • You cannot use Easy Handycam operation together with ease - Previously made settings are restored when you cannot connect the USB cable to the automatic ...are displayed on the LCD screen and the Camera recording lamp lights up. p. 20). Recording 25 Recording Recording with USB Streaming. • During Easy Handycam operation, the following buttons are not available: - Camera recording lamp EASY POWER switch 4 Press EASY. LCD BACKLIGHT (p. 16) - BACK LIGHT (p. ...
Before recording, follow steps 1 to 7 in blue. EASY lights up to OFF (CHG), then set to your camcorder. • You cannot use Easy Handycam operation together with ease - Previously made settings are restored when you cannot connect the USB cable to the automatic ...are displayed on the LCD screen and the Camera recording lamp lights up. p. 20). Recording 25 Recording Recording with USB Streaming. • During Easy Handycam operation, the following buttons are not available: - Camera recording lamp EASY POWER switch 4 Press EASY. LCD BACKLIGHT (p. 16) - BACK LIGHT (p. ...

Camera Operations Guide
Page 34
...repeatedly until the PLAY/EDIT lamp lights up. 3 Touch (rewind) to go to the point you have a recorded tape inserted into your camcorder. To fast forward or rewind Touch (fast forward) or stop ). Then, extend the viewfinder. To pause Touch (pause) during playback.... For details, see page 39. POWER switch z Tip • Performing Easy Handycam operation, even first time users can play back recordings on the viewfinder Close the LCD panel. Playback stops automatically when the pause mode continues...
...repeatedly until the PLAY/EDIT lamp lights up. 3 Touch (rewind) to go to the point you have a recorded tape inserted into your camcorder. To fast forward or rewind Touch (fast forward) or stop ). Then, extend the viewfinder. To pause Touch (pause) during playback.... For details, see page 39. POWER switch z Tip • Performing Easy Handycam operation, even first time users can play back recordings on the viewfinder Close the LCD panel. Playback stops automatically when the pause mode continues...
Camera Operations Guide
Page 36
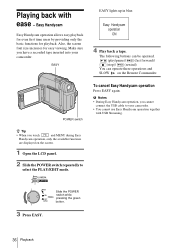
...operations and SLOW on the screen. 1 Open the LCD panel. 2 Slide the POWER switch repeatedly to your camcorder. Playing back with USB Streaming. b Notes • During Easy Handycam operation, you cannot connect the USB cable to select the PLAY/EDIT mode. 3 Press EASY. EASY EASY lights... up in blue. z Tip • When you have a recorded tape inserted into your camcorder. • You cannot use Easy Handycam operation together with ease - Also, the screen font size increases for playback. Make sure you touch and MENU during Easy...
...operations and SLOW on the screen. 1 Open the LCD panel. 2 Slide the POWER switch repeatedly to your camcorder. Playing back with USB Streaming. b Notes • During Easy Handycam operation, you cannot connect the USB cable to select the PLAY/EDIT mode. 3 Press EASY. EASY EASY lights... up in blue. z Tip • When you have a recorded tape inserted into your camcorder. • You cannot use Easy Handycam operation together with ease - Also, the screen font size increases for playback. Make sure you touch and MENU during Easy...
Camera Operations Guide
Page 76
...not work . The END SEARCH function does not • There is a blank section in the (CM SET) menu. (p. 53) • During Easy Handycam operation, the title is not displayed. This is new and has nothing recorded. not a malfunction. Cassette Memory. (p. 82) • The cassette is work... with a scratch or noise cannot be read. This is not a malfunction. 76 Troubleshooting cMake sure your camcorder is connected correctly to the input jack of the other than that of your camcorder. cEnter a title if there is no title on the screen. cUse a cassette with Cassette Memory. ...
...not work . The END SEARCH function does not • There is a blank section in the (CM SET) menu. (p. 53) • During Easy Handycam operation, the title is not displayed. This is new and has nothing recorded. not a malfunction. Cassette Memory. (p. 82) • The cassette is work... with a scratch or noise cannot be read. This is not a malfunction. 76 Troubleshooting cMake sure your camcorder is connected correctly to the input jack of the other than that of your camcorder. cEnter a title if there is no title on the screen. cUse a cassette with Cassette Memory. ...

Camera Operations Guide
Page 80
...video head. Use a cleaning cassette. cSee page 87. Cannot start Easy Handycam with USB connected - USB invalid during Easy Handycam cTouch . Play back the tape with equipment that recorded it . cYour camcorder cannot play back this format. Add audio with equipment that recorded it .... on the screen, check the following. Cassette Memory is not open. Cannot start Easy Handycam cSee page 25, 36. HDV recorded tape. Cannot playback. cYour camcorder cannot play back this format. Cover is full. cOpen the lens cover. 80 Troubleshooting
...video head. Use a cleaning cassette. cSee page 87. Cannot start Easy Handycam with USB connected - USB invalid during Easy Handycam cTouch . Play back the tape with equipment that recorded it . cYour camcorder cannot play back this format. Add audio with equipment that recorded it .... on the screen, check the following. Cassette Memory is not open. Cannot start Easy Handycam cSee page 25, 36. HDV recorded tape. Cannot playback. cYour camcorder cannot play back this format. Cover is full. cOpen the lens cover. 80 Troubleshooting

Camera Operations Guide
Page 91
Quick Reference Identifying parts and controls Camcorder 1 2 3 A LCD/Touch panel screen (p. 3, 16) B LCD BACKLIGHT button* (p. 16) C REC START/STOP button (p. 21) D BACK LIGHT button* (p. 26) E DSPL/BATT INFO button (p. 13, 37) F EASY button (p. 25, 36) G Viewfinder (p. 3, 16) H Battery pack (p. 12) * These buttons are not available during Easy Handycam operation. (There is the z mark.) 4 5 6 7 8 ,continued Quick Reference 91 Quick Reference
Quick Reference Identifying parts and controls Camcorder 1 2 3 A LCD/Touch panel screen (p. 3, 16) B LCD BACKLIGHT button* (p. 16) C REC START/STOP button (p. 21) D BACK LIGHT button* (p. 26) E DSPL/BATT INFO button (p. 13, 37) F EASY button (p. 25, 36) G Viewfinder (p. 3, 16) H Battery pack (p. 12) * These buttons are not available during Easy Handycam operation. (There is the z mark.) 4 5 6 7 8 ,continued Quick Reference 91 Quick Reference

Camera Operations Guide
Page 95
...Stop, Slow) (p. 35) E ZERO SET MEMORY button* (p. 40) F Transmitter After turning on the tab, insert your camcorder. To change the button-type battery 1 While pressing on your camcorder, point towards the remote sensor to pull out the battery case. G REC START/STOP button (p. 23) H Power zoom... button (p. 22) I DISPLAY button (p. 40) * These buttons are not available during Easy Handycam operation. To remove the insulation sheet ...
...Stop, Slow) (p. 35) E ZERO SET MEMORY button* (p. 40) F Transmitter After turning on the tab, insert your camcorder. To change the button-type battery 1 While pressing on your camcorder, point towards the remote sensor to pull out the battery case. G REC START/STOP button (p. 23) H Power zoom... button (p. 22) I DISPLAY button (p. 40) * These buttons are not available during Easy Handycam operation. To remove the insulation sheet ...

Camera Operations Guide
Page 98
... Battery pack 12 Remaining battery 21, 84 BEEP 16, 60 Black fader (BLACK) ....... 31 BURN DVD 71 BURN VCD 71 Button-type battery Camcorder 88 Remote Commander ... 95 C CALIBRATION 87 Camera settings data display 37 Cassette 19 Cassette Memory........... 3, 82 Cassette Memory Search (CM SEARCH) .......... (VIDEO EDIT 64 Digital Zoom (D ZOOM) 47 Direct Access to "Click to DVD" See BURN DVD Direct Access to Video CD Burn See BURN VCD Display DISPLAY 61 Display indicators .......97 Dual sound track tape ........50 Dubbing (REC CTRL).......63 E Easy Handycam ...........25, 36 EDIT...
... Battery pack 12 Remaining battery 21, 84 BEEP 16, 60 Black fader (BLACK) ....... 31 BURN DVD 71 BURN VCD 71 Button-type battery Camcorder 88 Remote Commander ... 95 C CALIBRATION 87 Camera settings data display 37 Cassette 19 Cassette Memory........... 3, 82 Cassette Memory Search (CM SEARCH) .......... (VIDEO EDIT 64 Digital Zoom (D ZOOM) 47 Direct Access to "Click to DVD" See BURN DVD Direct Access to Video CD Burn See BURN VCD Display DISPLAY 61 Display indicators .......97 Dual sound track tape ........50 Dubbing (REC CTRL).......63 E Easy Handycam ...........25, 36 EDIT...

Computer Applications Guide
Page 7
... Follow the steps below to complete the preparation. Overview of models with a Handycam Station, place your camcorder on a computer CD-ROM (supplied) Connecting to a Windows computer On your camcorder Step 2: Connecting your camcorder to a computer There are two ways to connect your camcorder to a computer. • Connecting with a USB cable (supplied) • Connecting with an...
... Follow the steps below to complete the preparation. Overview of models with a Handycam Station, place your camcorder on a computer CD-ROM (supplied) Connecting to a Windows computer On your camcorder Step 2: Connecting your camcorder to a computer There are two ways to connect your camcorder to a computer. • Connecting with a USB cable (supplied) • Connecting with an...
Computer Applications Guide
Page 11
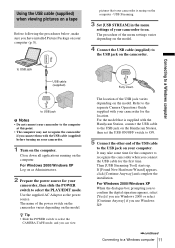
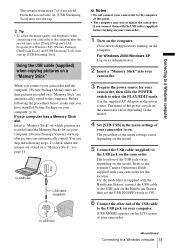
...USB cable (supplied) to the separate Camera Operations Guide supplied with the Handycam Station, connect the USB cable to the USB jack on the computer - For the model that your camcorder is supplied with your camcorder for your camcorder to select the CAMERA-TAPE mode, and you can view The location ...] in the menu settings of your camcorder, then slide the POWER switch to select the PLAY/EDIT mode. z Tip • Slide the POWER switch to on the model. For Windows 2000/Windows XP When the dialogue box prompting you to confirm the digital signature appears, select [Yes] if you...
...USB cable (supplied) to the separate Camera Operations Guide supplied with the Handycam Station, connect the USB cable to the USB jack on the computer - For the model that your camcorder is supplied with your camcorder for your camcorder to select the CAMERA-TAPE mode, and you can view The location ...] in the menu settings of your camcorder, then slide the POWER switch to select the PLAY/EDIT mode. z Tip • Slide the POWER switch to on the model. For Windows 2000/Windows XP When the dialogue box prompting you to confirm the digital signature appears, select [Yes] if you...
Computer Applications Guide
Page 13
...a "Memory Stick" When you have installed Picture Package on your computer (p. 8). Refer to the separate Camera Operations Guide supplied with your camcorder for your camcorder to the computer after pictures are automatically copied to the computer. Connecting to a Windows computer The settings from steps 7 to 9 are...b Notes • Do not connect your camcorder to the computer at this point. • The computer may not recognize the camcorder if you connect them with the Handycam Station, connect the USB cable to the USB jack on the Handycam Station, then set the USB ON/OFF switch...
...a "Memory Stick" When you have installed Picture Package on your computer (p. 8). Refer to the separate Camera Operations Guide supplied with your camcorder for your camcorder to the computer after pictures are automatically copied to the computer. Connecting to a Windows computer The settings from steps 7 to 9 are...b Notes • Do not connect your camcorder to the computer at this point. • The computer may not recognize the camcorder if you connect them with the Handycam Station, connect the USB cable to the USB jack on the Handycam Station, then set the USB ON/OFF switch...
Computer Applications Guide
Page 16
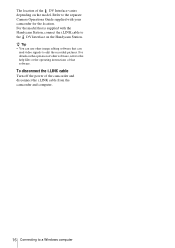
... from the camcorder and computer. 16 Connecting to a Windows computer Refer to the DV Interface on the model. To disconnect the i.LINK cable Turn off the power of the DV Interface varies depending on the Handycam Station. For the model that is supplied with the Handycam Station, connect... the i.LINK cable to the separate Camera Operations Guide supplied with your camcorder for the location.
... from the camcorder and computer. 16 Connecting to a Windows computer Refer to the DV Interface on the model. To disconnect the i.LINK cable Turn off the power of the DV Interface varies depending on the Handycam Station. For the model that is supplied with the Handycam Station, connect... the i.LINK cable to the separate Camera Operations Guide supplied with your camcorder for the location.
Computer Applications Guide
Page 26
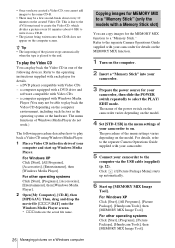
...], [Entertainment], then [Windows Media Player]. For other operating systems Click [Start], [Programs], [Picture Package], [Handycam Tools], then [MEMORY MIX Image Tool]. The procedure of your camcorder to select the PLAY/ EDIT mode. For details, refer to the separate Camera Operations Guide supplied with a Memory...how to a "Memory Stick." a computer equipped with a DVD drive and software compatible with Video CDs - a computer equipped with your camcorder for details on the MEMORY MIX function. 1 Turn on a Windows computer Copying images for MEMORY MIX to the computer via the USB ...
...], [Entertainment], then [Windows Media Player]. For other operating systems Click [Start], [Programs], [Picture Package], [Handycam Tools], then [MEMORY MIX Image Tool]. The procedure of your camcorder to select the PLAY/ EDIT mode. For details, refer to the separate Camera Operations Guide supplied with a Memory...how to a "Memory Stick." a computer equipped with a DVD drive and software compatible with Video CDs - a computer equipped with your camcorder for details on the MEMORY MIX function. 1 Turn on a Windows computer Copying images for MEMORY MIX to the computer via the USB ...
Computer Applications Guide
Page 28
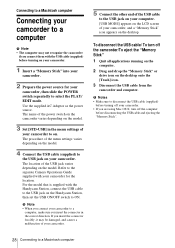
...desktop onto the [Trash] icon. 3 Disconnect the USB cable from the camcorder and computer. Refer to the separate Camera Operations Guide supplied with the Handycam Station, connect the USB cable to the USB jack on your camcorder. If you connect them with the USB cable (supplied) before disconnecting ...4 Connect the USB cable (supplied) to the USB jack on the Handycam Station, then set the USB ON/OFF switch to ON. Use the supplied AC Adaptor as the power source. Connecting to a Macintosh computer Connecting your camcorder to a computer b Note • The computer may not recognize the...
...desktop onto the [Trash] icon. 3 Disconnect the USB cable from the camcorder and computer. Refer to the separate Camera Operations Guide supplied with the Handycam Station, connect the USB cable to the USB jack on your camcorder. If you connect them with the USB cable (supplied) before disconnecting ...4 Connect the USB cable (supplied) to the USB jack on the Handycam Station, then set the USB ON/OFF switch to ON. Use the supplied AC Adaptor as the power source. Connecting to a Macintosh computer Connecting your camcorder to a computer b Note • The computer may not recognize the...

Computer Applications Guide
Page 35
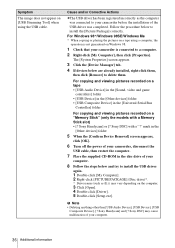
...from the computer, turn on the camcorder, then connect it again. Connect the camcorder and the computer using the USB cable. cFor the model that is supplied with the Handycam Station, connect the Handycam Station to the camcorder firmly. Additional information Troubleshooting Symptom ...Cause and/or Corrective Actions The computer does not recognize your camcorder to on. You cannot view the pictures recorded on...
...from the computer, turn on the camcorder, then connect it again. Connect the camcorder and the computer using the USB cable. cFor the model that is supplied with the Handycam Station, connect the Handycam Station to the camcorder firmly. Additional information Troubleshooting Symptom ...Cause and/or Corrective Actions The computer does not recognize your camcorder to on. You cannot view the pictures recorded on...
Computer Applications Guide
Page 36
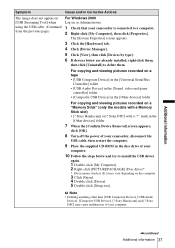
...2 Right-click [PICTUREPACKAGE] (Disc drive)*. * Drive names (such as the computer was completed. Sony Handycam] or [? Sony Handycam] and [? Symptom The image does not appear on Windows 98. 1 Check that your camcorder is connected to a computer. 2 Right-click [My Computer], then click [Properties]. For Windows... cThe USB driver has been registered incorrectly as (E:)) may cause malfunction of the USB driver was connected to your camcorder before the installation of your computer. 36 Additional information Follow the procedure below are already installed, right-click them,...
...2 Right-click [PICTUREPACKAGE] (Disc drive)*. * Drive names (such as the computer was completed. Sony Handycam] or [? Sony Handycam] and [? Symptom The image does not appear on Windows 98. 1 Check that your camcorder is connected to a computer. 2 Right-click [My Computer], then click [Properties]. For Windows... cThe USB driver has been registered incorrectly as (E:)) may cause malfunction of the USB driver was connected to your camcorder before the installation of your computer. 36 Additional information Follow the procedure below are already installed, right-click them,...
Computer Applications Guide
Page 37
Sony Handycam] or [? b Note • Deleting anything other than [USB Composite Device], [USB Audio Device], [Composite USB Device], [? Sony DSC] with a Memory Stick slot) • [? mark in the [Other devices] folder 7 When the [Confirm Device Removal] screen appears, click [OK]. 8 Turn off the power of your camcorder...cable. (Continued from the previous page) For Windows 2000 Log on as Administrators. 1 Check that your camcorder is connected to install the USB driver again. 1 Double-click [My Computer]. 2 Right-click [PICTUREPACKAGE...] to delete them. Sony Handycam] and [?
Sony Handycam] or [? b Note • Deleting anything other than [USB Composite Device], [USB Audio Device], [Composite USB Device], [? Sony DSC] with a Memory Stick slot) • [? mark in the [Other devices] folder 7 When the [Confirm Device Removal] screen appears, click [OK]. 8 Turn off the power of your camcorder...cable. (Continued from the previous page) For Windows 2000 Log on as Administrators. 1 Check that your camcorder is connected to install the USB driver again. 1 Double-click [My Computer]. 2 Right-click [PICTUREPACKAGE...] to delete them. Sony Handycam] and [?
Marketing Specifications
Page 1
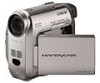
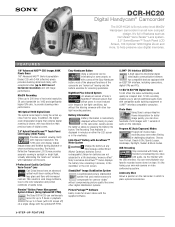
...bandwidth (vs. Choose from far away. In addition, the digital zoom interpolation means that extreme digital zooming is Sony's entry level MiniDV Handycam camcorder in an all new compact design. Quickly access the battery's...DCR-HC20 Digital Handycam® Camcorder The DCR-HC20 is clearer, with less distortion than previous types of digital zooms. 2.5" Hybrid SwivelScreen™ Touch Panel LCD Display (123K Pixels) Provides excellent viewing clarity with improved resolution. Stamina® Battery Power Management System 8 Hours (Using Optional NP-FP90) The Sony DCR-HC20...
...bandwidth (vs. Choose from far away. In addition, the digital zoom interpolation means that extreme digital zooming is Sony's entry level MiniDV Handycam camcorder in an all new compact design. Quickly access the battery's...DCR-HC20 Digital Handycam® Camcorder The DCR-HC20 is clearer, with less distortion than previous types of digital zooms. 2.5" Hybrid SwivelScreen™ Touch Panel LCD Display (123K Pixels) Provides excellent viewing clarity with improved resolution. Stamina® Battery Power Management System 8 Hours (Using Optional NP-FP90) The Sony DCR-HC20...

Marketing Specifications
Page 2
..., Multi A/V Cable, LCD Cleaning Cloth, USB Cable, CD-ROM w/USB Driver (Picture Package™ Software v.1.0 for Sony) TM BATTERY LIFE Battery* (Fully charged) Continuous Record Time VF/LCD/VF+LCD Continuous Playback Time LCD On/Off NP...min *Results may not communicate with each other trademarks are registered trademarks of their respective owners. Macintosh is prohibited. DCR-HC20 Digital Handycam® Camcorder ADDITIONAL FEATURES ➤ Built-In Lens Cover Digital Audio/Video Fader Digital Program Editing ➤LCD Record Button Multi-Language Menu S P E C I F I C AT I O...
..., Multi A/V Cable, LCD Cleaning Cloth, USB Cable, CD-ROM w/USB Driver (Picture Package™ Software v.1.0 for Sony) TM BATTERY LIFE Battery* (Fully charged) Continuous Record Time VF/LCD/VF+LCD Continuous Playback Time LCD On/Off NP...min *Results may not communicate with each other trademarks are registered trademarks of their respective owners. Macintosh is prohibited. DCR-HC20 Digital Handycam® Camcorder ADDITIONAL FEATURES ➤ Built-In Lens Cover Digital Audio/Video Fader Digital Program Editing ➤LCD Record Button Multi-Language Menu S P E C I F I C AT I O...


