
Camera Operations Guide
Page 4
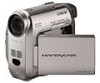
...use the Strap Belt as shown in the following illustration. Then, touch the buttons displayed on the screen. • Unavailable buttons will be used for screen display on your camcorder (p. 20). • Be careful not to press buttons beside the LCD screen accidentally when you open or close the LCD panel, or when ...you are using the camcorder • Hold your hand on the back side of the LCD panel. • Do not hold the camcorder by the following parts. • If the ...
...use the Strap Belt as shown in the following illustration. Then, touch the buttons displayed on the screen. • Unavailable buttons will be used for screen display on your camcorder (p. 20). • Be careful not to press buttons beside the LCD screen accidentally when you open or close the LCD panel, or when ...you are using the camcorder • Hold your hand on the back side of the LCD panel. • Do not hold the camcorder by the following parts. • If the ...

Camera Operations Guide
Page 9
... date and time is not set the date and time, see page 17. You can also record by pressing REC START/STOP beside the LCD screen. 4 View the recorded picture on . To stop, press (stop). Quick Start Guide 9 a Slide the POWER switch repeatedly until the PLAY/EDIT lamp lights ...up the CAMERA lamp. b Touch (rewind). a Set the LENS COVER switch to CLOSE. Recording starts. To turn off the power, slide the POWER switch up in the default setting. The...
... date and time is not set the date and time, see page 17. You can also record by pressing REC START/STOP beside the LCD screen. 4 View the recorded picture on . To stop, press (stop). Quick Start Guide 9 a Slide the POWER switch repeatedly until the PLAY/EDIT lamp lights ...up the CAMERA lamp. b Touch (rewind). a Set the LENS COVER switch to CLOSE. Recording starts. To turn off the power, slide the POWER switch up in the default setting. The...

Camera Operations Guide
Page 16
...LCD panel and viewfinder Adjusting the LCD panel You can check the subject on the LCD screen during recording by selecting [LCD B.L.] on the (LCD/VF SET) menu (p. 51). • When you use your camcorder in bright conditions, set LCD BACKLIGHT to turn off the backlight for operation on the ...(OTHERS) menu (p. 60). Maximum 180 degrees Maximum 90 degrees Open the LCD panel. Use the viewfinder when the battery is running out, or when the screen is set to the PLAY/EDIT mode, touch ...
...LCD panel and viewfinder Adjusting the LCD panel You can check the subject on the LCD screen during recording by selecting [LCD B.L.] on the (LCD/VF SET) menu (p. 51). • When you use your camcorder in bright conditions, set LCD BACKLIGHT to turn off the backlight for operation on the ...(OTHERS) menu (p. 60). Maximum 180 degrees Maximum 90 degrees Open the LCD panel. Use the viewfinder when the battery is running out, or when the screen is set to the PLAY/EDIT mode, touch ...

Camera Operations Guide
Page 17
...set the clock for the first time. ,continued Getting started To use your camcorder for the first time. Getting started 17 The LCD screen is turned off. 5 Touch the LCD screen while checking the display in rechargeable button-type battery gets discharged and the ...set the date and time again. b Note • If you turn on your camcorder (p. 15). 2 Open the LCD panel. appears on the LCD screen, touch . To hide the buttons on the screen. 3 Touch . 4 Touch . are displayed. 6 Touch the button you are recording, you can adjust the exposure (p. 28) and fader (p....
...set the clock for the first time. ,continued Getting started To use your camcorder for the first time. Getting started 17 The LCD screen is turned off. 5 Touch the LCD screen while checking the display in rechargeable button-type battery gets discharged and the ...set the date and time again. b Note • If you turn on your camcorder (p. 15). 2 Open the LCD panel. appears on the LCD screen, touch . To hide the buttons on the screen. 3 Touch . 4 Touch . are displayed. 6 Touch the button you are recording, you can adjust the exposure (p. 28) and fader (p....

Camera Operations Guide
Page 20
...] FRANÇAIS ESPANOL PORTUGUÊS EXEC RET. 20 Getting started SCH SURE 4 Touch MENU. 5 Select (SETUP MENU), then select LANGUAGE with / , then touch EXEC. 7 Touch . POWER switch 1 Turn on the LCD screen. 6 Select the desired language with / , then touch EXEC. z Tip • Your camcorder offers [ENG[SIMP]] (Simplified English) for when you cannot find your...
...] FRANÇAIS ESPANOL PORTUGUÊS EXEC RET. 20 Getting started SCH SURE 4 Touch MENU. 5 Select (SETUP MENU), then select LANGUAGE with / , then touch EXEC. 7 Touch . POWER switch 1 Turn on the LCD screen. 6 Select the desired language with / , then touch EXEC. z Tip • Your camcorder offers [ENG[SIMP]] (Simplified English) for when you cannot find your...

Camera Operations Guide
Page 23
... recording, press REC START/ STOP. REC START/STOP REC START/STOP REC START/STOP 1 Touch and select [PAGE2]. 2 Touch [SELF TIMER]. appears. 60min STBY 0:00:00 Open the LCD panel 90 degrees to the camcorder, then rotate it 180 degrees towards the subject. The recording starts. To cancel the self-...about 10 seconds. Recording 23 With the self-timer, you can start recording after a delay of the subject appears on the LCD screen, but the picture will hear a beep sound counting down Press REC START/STOP. A mirror-image of about 10 seconds. Recording Extend the viewfinder...
... recording, press REC START/ STOP. REC START/STOP REC START/STOP REC START/STOP 1 Touch and select [PAGE2]. 2 Touch [SELF TIMER]. appears. 60min STBY 0:00:00 Open the LCD panel 90 degrees to the camcorder, then rotate it 180 degrees towards the subject. The recording starts. To cancel the self-...about 10 seconds. Recording 23 With the self-timer, you can start recording after a delay of the subject appears on the LCD screen, but the picture will hear a beep sound counting down Press REC START/STOP. A mirror-image of about 10 seconds. Recording Extend the viewfinder...

Camera Operations Guide
Page 25
...screen font size increases for easy viewing. Press REC START/STOP again to 7 in blue. REC START/STOP REC START/STOP z Tip • When you touch MENU during Easy Handycam operation. b Notes • You cannot switch from/to your camcorder. • You cannot use Easy Handycam... operation together with ease - Recording 25 Easy Handycam With this Easy Handycam operation, most of the camera settings are...
...screen font size increases for easy viewing. Press REC START/STOP again to 7 in blue. REC START/STOP REC START/STOP z Tip • When you touch MENU during Easy Handycam operation. b Notes • You cannot switch from/to your camcorder. • You cannot use Easy Handycam... operation together with ease - Recording 25 Easy Handycam With this Easy Handycam operation, most of the camera settings are...

Camera Operations Guide
Page 26
... can adjust the exposure to prevent the subject from becoming shadowed. appears. To cancel the back light function, press BACK LIGHT again. AUTO OK 4 Touch the point you set to the CAMERA mode. . Adjusting the exposure The exposure is set [EXPOSURE] to [MANUAL] (p. 28) or select [SPOT...BACK LIGHT when the POWER switch is adjusted automatically in the limelight on the screen. [SPOT METER] flashes while the camera is adjusting the exposure for the selected point. 60min STBY SPOT METER 0:00:00 AUTO 5 Touch 6 Touch OK . . 26 Recording b Note • The back light function ...
... can adjust the exposure to prevent the subject from becoming shadowed. appears. To cancel the back light function, press BACK LIGHT again. AUTO OK 4 Touch the point you set to the CAMERA mode. . Adjusting the exposure The exposure is set [EXPOSURE] to [MANUAL] (p. 28) or select [SPOT...BACK LIGHT when the POWER switch is adjusted automatically in the limelight on the screen. [SPOT METER] flashes while the camera is adjusting the exposure for the selected point. 60min STBY SPOT METER 0:00:00 AUTO 5 Touch 6 Touch OK . . 26 Recording b Note • The back light function ...

Camera Operations Guide
Page 27
...of the recording environment. You brought your camcorder in parentheses appear when the setting is automatically set to [ AUTO]. Adjusting the white balance manually You can adjust the color balance to the brightness of paper filling the screen under the same lighting conditions as those ... adjustment when [WHT BAL] is set to [ AUTO], aim your camcorder for replacement. - To return the setting to automatic exposure Follow steps 1 to 3, then touch [ AUTO] in the memory, the indicator stops flashing. 5 Touch . 6 Touch . You changed the [PROGRAM AE] settings when [WHT BAL] is...
...of the recording environment. You brought your camcorder in parentheses appear when the setting is automatically set to [ AUTO]. Adjusting the white balance manually You can adjust the color balance to the brightness of paper filling the screen under the same lighting conditions as those ... adjustment when [WHT BAL] is set to [ AUTO], aim your camcorder for replacement. - To return the setting to automatic exposure Follow steps 1 to 3, then touch [ AUTO] in the memory, the indicator stops flashing. 5 Touch . 6 Touch . You changed the [PROGRAM AE] settings when [WHT BAL] is...

Camera Operations Guide
Page 29
... subjects in complete darkness, set [N.S.LIGHT] to [OFF] in dark places (such as when capturing the face of the screen. 1 Slide the POWER switch to select the CAMERA mode. 2 Touch to focus automatically. • Do not cover the infrared port with your baby sleeping) with : - [PROGRAM AE] ...bright places. White balance • Adjust the focus manually when it is attached. • Depending on the screen. [SPOT FOCUS] flashes while the camera is hard to display [PAGE1]. 3 Touch [SPOT FOCUS]. 60min STBY SPOT FOCUS 0:00:00 b Notes • Do not use the NightShot plus function...
... subjects in complete darkness, set [N.S.LIGHT] to [OFF] in dark places (such as when capturing the face of the screen. 1 Slide the POWER switch to select the CAMERA mode. 2 Touch to focus automatically. • Do not cover the infrared port with your baby sleeping) with : - [PROGRAM AE] ...bright places. White balance • Adjust the focus manually when it is attached. • Depending on the screen. [SPOT FOCUS] flashes while the camera is hard to display [PAGE1]. 3 Touch [SPOT FOCUS]. 60min STBY SPOT FOCUS 0:00:00 b Notes • Do not use the NightShot plus function...

Camera Operations Guide
Page 32
...the start point while viewing the pictures on the screen. Searching manually - To cancel the operation Touch [END SCH] again. You can do this operation. END SEARCH This function is selected, you can search for about 5 seconds, and the camcorder enters the standby mode at the point where ...you have ejected the cassette. 1 Slide the POWER switch to select the CAMERA mode. 2 Touch to display [PAGE1]. 3 Touch [END SCH]. If you use a cassette without Cassette Memory, the...
...the start point while viewing the pictures on the screen. Searching manually - To cancel the operation Touch [END SCH] again. You can do this operation. END SEARCH This function is selected, you can search for about 5 seconds, and the camcorder enters the standby mode at the point where ...you have ejected the cassette. 1 Slide the POWER switch to select the CAMERA mode. 2 Touch to display [PAGE1]. 3 Touch [END SCH]. If you use a cassette without Cassette Memory, the...

Camera Operations Guide
Page 35
... Also, you may appear at the top, bottom, or in the center of the previously played picture remaining on the screen. 1 Touch and select [PAGE3] during playback. play back frame by frame (frame) during playback. play back slowly** [ SLOW] during playback ...pause. To reverse direction, touch (frame) again during frame playback. *Horizontal lines may see mosaic-like images of the screen. Playback 35 Picture search Keep touching (fast forward) or (rewind) during playback - To resume fast forwarding or rewinding...
... Also, you may appear at the top, bottom, or in the center of the previously played picture remaining on the screen. 1 Touch and select [PAGE3] during playback. play back frame by frame (frame) during playback. play back slowly** [ SLOW] during playback ...pause. To reverse direction, touch (frame) again during frame playback. *Horizontal lines may see mosaic-like images of the screen. Playback 35 Picture search Keep touching (fast forward) or (rewind) during playback - To resume fast forwarding or rewinding...
Camera Operations Guide
Page 36
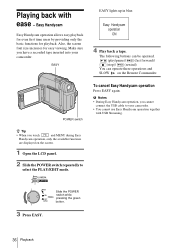
...can operate these operations and SLOW on the screen. 1 Open the LCD panel. 2 Slide the POWER switch repeatedly to your camcorder. POWER switch To cancel Easy Handycam operation Press EASY again. b Notes • During Easy Handycam operation, you cannot connect the USB cable ...a recorded tape inserted into your camcorder. • You cannot use Easy Handycam operation together with ease - Easy Handycam operation ON 4 Play back a tape. Also, the screen font size increases for playback. Make sure you touch and MENU during Easy Handycam operation, only the available functions...
...can operate these operations and SLOW on the screen. 1 Open the LCD panel. 2 Slide the POWER switch repeatedly to your camcorder. POWER switch To cancel Easy Handycam operation Press EASY again. b Notes • During Easy Handycam operation, you cannot connect the USB cable ...a recorded tape inserted into your camcorder. • You cannot use Easy Handycam operation together with ease - Easy Handycam operation ON 4 Play back a tape. Also, the screen font size increases for playback. Make sure you touch and MENU during Easy Handycam operation, only the available functions...

Camera Operations Guide
Page 37
...time data display, the date and time is displayed in step 4. DSPL/BATT INFO POWER switch Displaying the screen indicators You can display the screen indicators during playback or playback pause. 3 Touch [DATA CODE]. 60min DATA CODE OFF CAM DATE/ DATA TIME 0:00:00:00 OK 4 Select [...continued Playback 37 z Tips • You can display the screen indicators by pressing DISPLAY on the Remote Commander. • You can choose to select the PLAY/EDIT mode. 2 Touch and select [PAGE2] during playback on the screen. The indicators appear/disappear as you can display the recorded ...
...time data display, the date and time is displayed in step 4. DSPL/BATT INFO POWER switch Displaying the screen indicators You can display the screen indicators during playback or playback pause. 3 Touch [DATA CODE]. 60min DATA CODE OFF CAM DATE/ DATA TIME 0:00:00:00 OK 4 Select [...continued Playback 37 z Tips • You can display the screen indicators by pressing DISPLAY on the Remote Commander. • You can choose to select the PLAY/EDIT mode. 2 Touch and select [PAGE2] during playback on the screen. The indicators appear/disappear as you can display the recorded ...

Camera Operations Guide
Page 43
... FLASH MODE FLASH LVL AUTO SHTR STBY EXEC RET. 4 Select the icon of your camcorder. Customizing Your Camcorder 43 Customizing Your Camcorder BAdvanced operations Customizing Your Camcorder Changing the menu settings You can go back to the previous screen each time you touch [ RET.]. OTHERS WORLD TIME BEEP A.SHUT OFF COMMANDER DISPLAY REC LAMP STBY ON...
... FLASH MODE FLASH LVL AUTO SHTR STBY EXEC RET. 4 Select the icon of your camcorder. Customizing Your Camcorder 43 Customizing Your Camcorder BAdvanced operations Customizing Your Camcorder Changing the menu settings You can go back to the previous screen each time you touch [ RET.]. OTHERS WORLD TIME BEEP A.SHUT OFF COMMANDER DISPLAY REC LAMP STBY ON...

Camera Operations Guide
Page 51
...screen's backlight. L. LCD B.L. LCD COLOR Touch / to adjust the color on the LCD/ VF SET menu. Low intensity High intensity VF B.L. The recorded picture will be affected by this setting. LCD COLOR VF B. GBRT NORMAL Standard brightness. b Notes • When you connect your camcorder... is reduced by about 10 percent during recording. Customizing Your Camcorder 51 Unavailable items will not be grayed out. You can operate at the moment. The default settings are marked with G. The screen shows the items you can adjust the brightness of the viewfinder...
...screen's backlight. L. LCD B.L. LCD COLOR Touch / to adjust the color on the LCD/ VF SET menu. Low intensity High intensity VF B.L. The recorded picture will be affected by this setting. LCD COLOR VF B. GBRT NORMAL Standard brightness. b Notes • When you connect your camcorder... is reduced by about 10 percent during recording. Customizing Your Camcorder 51 Unavailable items will not be grayed out. You can operate at the moment. The default settings are marked with G. The screen shows the items you can adjust the brightness of the viewfinder...

Camera Operations Guide
Page 52
...the power mode of within 20 characters each) in the same manner. 5 When you have finished entering characters, touch . 2 Select the title you have been stored in your camcorder. CM SET TITLE TITLEERASE TITLE DSPL CM SEARCH TAPE TITLE ERASE ALL EXEC RET. Note, however, that only...default settings are marked with Cassette Memory. The screen shows the items you can create original titles (up to select the desired character on the CM SET menu. To erase a character: Touch . To insert a space: Touch . 4 Touch to move s to insert, then touch [EXEC]. TITLE/TAPE TITLE/ERASE ALL, etc...
...the power mode of within 20 characters each) in the same manner. 5 When you have finished entering characters, touch . 2 Select the title you have been stored in your camcorder. CM SET TITLE TITLEERASE TITLE DSPL CM SEARCH TAPE TITLE ERASE ALL EXEC RET. Note, however, that only...default settings are marked with Cassette Memory. The screen shows the items you can create original titles (up to select the desired character on the CM SET menu. To erase a character: Touch . To insert a space: Touch . 4 Touch to move s to insert, then touch [EXEC]. TITLE/TAPE TITLE/ERASE ALL, etc...

Camera Operations Guide
Page 53
...entered remain stored in step 1, touch [EXEC] and select [CREATE/ EDIT], then touch [EXEC]. GON OFF Select to [NEVER] (p. 60). Turn the power back on, then start recording, [TITLE SAVE] is set . When you want to delete using your camcorder on the screen for about 5 seconds, and ...playback pause, or recording [TITLE SAVE] is the one you press REC START/STOP to start again from 8 to delete, then touch . During recording standby [TITLE] appears. Customizing Your Camcorder Color white t yellow t violet t red t cyan t green t blue Size small y large (You can only select the...
...entered remain stored in step 1, touch [EXEC] and select [CREATE/ EDIT], then touch [EXEC]. GON OFF Select to [NEVER] (p. 60). Turn the power back on, then start recording, [TITLE SAVE] is set . When you want to delete using your camcorder on the screen for about 5 seconds, and ...playback pause, or recording [TITLE SAVE] is the one you press REC START/STOP to start again from 8 to delete, then touch . During recording standby [TITLE] appears. Customizing Your Camcorder Color white t yellow t violet t red t cyan t green t blue Size small y large (You can only select the...

Camera Operations Guide
Page 55
... for about 8 seconds: • After you touch (play back the tape on other camcorders or VCRs. • When you can record pictures with the cassette inserted, and your camcorder calculates the remaining amount of your camcorder. The use of Sony Excellence/Master mini DV cassette is selected. REMAIN...a stop-motion animated effect by alternately frame recording and then moving the subject a little. Operate your camcorder. To select these items, see "Changing the menu settings" (p. 43). The screen shows the items you mix recordings in the SP mode and in the 16-bit mode (1 stereo ...
... for about 8 seconds: • After you touch (play back the tape on other camcorders or VCRs. • When you can record pictures with the cassette inserted, and your camcorder calculates the remaining amount of your camcorder. The use of Sony Excellence/Master mini DV cassette is selected. REMAIN...a stop-motion animated effect by alternately frame recording and then moving the subject a little. Operate your camcorder. To select these items, see "Changing the menu settings" (p. 43). The screen shows the items you mix recordings in the SP mode and in the 16-bit mode (1 stereo ...

Camera Operations Guide
Page 56
...; 6 frames from the selected time. 56 Customizing Your Camcorder To cancel Interval recording, set to [OFF], then touch [EXEC] in recording time of flowers blooming, etc. You can record pictures on the screen during the operation. [a] [a] [b] [b] a. [REC TIME] b. [INTERVAL] 1 Select [SET], then touch [EXEC]. 2 Select [INTERVAL], then touch [EXEC]. 3 Select a desired interval time (30 seconds...
...; 6 frames from the selected time. 56 Customizing Your Camcorder To cancel Interval recording, set to [OFF], then touch [EXEC] in recording time of flowers blooming, etc. You can record pictures on the screen during the operation. [a] [a] [b] [b] a. [REC TIME] b. [INTERVAL] 1 Select [SET], then touch [EXEC]. 2 Select [INTERVAL], then touch [EXEC]. 3 Select a desired interval time (30 seconds...


