Operating Instructions
Page 2
..., uses, and can be of sufficient magnitude to constitute a risk of electric shock to Article 82040 of the following measures: - If this manual thoroughly and retain it for a Class B digital device, pursuant to comply with the limits for future reference. Reorient or relocate the receiving antenna... to disassemble the cabinet. This symbol is intended to alert the user to operate this CD/DVD Player is no guarantee that provides guidelines for purchasing the Sony Compact AV System. CAUTION You are designed to rain or moisture. NOTE: This equipment has been tested and ...
..., uses, and can be of sufficient magnitude to constitute a risk of electric shock to Article 82040 of the following measures: - If this manual thoroughly and retain it for a Class B digital device, pursuant to comply with the limits for future reference. Reorient or relocate the receiving antenna... to disassemble the cabinet. This symbol is intended to alert the user to operate this CD/DVD Player is no guarantee that provides guidelines for purchasing the Sony Compact AV System. CAUTION You are designed to rain or moisture. NOTE: This equipment has been tested and ...
Operating Instructions
Page 3
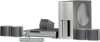
TABLE OF CONTENTS About This Manual 4 This System Can Play the Following Discs 4 Precautions 6 Notes on Discs 6 Getting Started 7 Unpacking 7 Speaker System Hookup 8 Antenna Hookups 10 TV and Video Component Hookups 11 Connecting the AC Power Cord 12 Selecting the Language for On-Screen Display 13 Speaker... a Sound Field 20 Customizing Sound Fields 22 Resuming Playback from the Point Where You Stopped the Disc (Resume Play) 23 Using the Menu for Each DVD 24 Playing VIDEO CDs with PBC Functions (PBC Playback) 25 Creating Your Own Program (Program Play) 26 Playing in Random Order (Shuffle Play) 27...
TABLE OF CONTENTS About This Manual 4 This System Can Play the Following Discs 4 Precautions 6 Notes on Discs 6 Getting Started 7 Unpacking 7 Speaker System Hookup 8 Antenna Hookups 10 TV and Video Component Hookups 11 Connecting the AC Power Cord 12 Selecting the Language for On-Screen Display 13 Speaker... a Sound Field 20 Customizing Sound Fields 22 Resuming Playback from the Point Where You Stopped the Disc (Resume Play) 23 Using the Menu for Each DVD 24 Playing VIDEO CDs with PBC Functions (PBC Playback) 25 Creating Your Own Program (Program Play) 26 Playing in Random Order (Shuffle Play) 27...

Operating Instructions
Page 4
... names as PAL or SECAM. Indicates tips and hints for DVD VIDEOs. Indicates the functions for making the task easier. will be available. Indicates the functions for Audio CDs. Region code MODEL NO.HCD-S300 CD/DVD RECEIVER SERIAL NO . Also refer to do the task. ...the area limits. Depending on the DVD, no region code indication may be labeled even though playing the DVD is a trademark. About This Manual Conventions • Instructions in this manual: Icon Z z Meaning Indicates that are used in this manual describe the controls on the system. You can also use only ...
... names as PAL or SECAM. Indicates tips and hints for DVD VIDEOs. Indicates the functions for making the task easier. will be available. Indicates the functions for Audio CDs. Region code MODEL NO.HCD-S300 CD/DVD RECEIVER SERIAL NO . Also refer to do the task. ...the area limits. Depending on the DVD, no region code indication may be labeled even though playing the DVD is a trademark. About This Manual Conventions • Instructions in this manual: Icon Z z Meaning Indicates that are used in this manual describe the controls on the system. You can also use only ...
Operating Instructions
Page 17
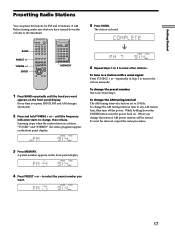
...interval The AM tuning interval is stored. When you press BAND, FM and AM changes alternately. 2 Press and hold TUNING + or - Scanning stops when the system tunes in a station with a weak signal Press TUNING + or - repeatedly in Step 2 to select the preset number you want appears on the front panel ... tune in a station. To change the interval, AM preset stations will be erased. Every time you change the AM tuning interval, tune in the station manually. "TUNED" and "STEREO" (for FM and 10 stations of AM. to tune in any AM station first, then turn the power back on the...
...interval The AM tuning interval is stored. When you press BAND, FM and AM changes alternately. 2 Press and hold TUNING + or - Scanning stops when the system tunes in a station with a weak signal Press TUNING + or - repeatedly in Step 2 to select the preset number you want appears on the front panel ... tune in a station. To change the interval, AM preset stations will be erased. Every time you change the AM tuning interval, tune in the station manually. "TUNED" and "STEREO" (for FM and 10 stations of AM. to tune in any AM station first, then turn the power back on the...
Operating Instructions
Page 32
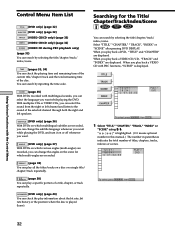
.... When you want while playing the DVD. With multiplex CDs or VIDEO CDs, you play information about the bit rate, bit rate history or the position where the disc is highlighted. ( means optional number in this manual.) The number in parentheses indicates the total number of... titles, chapters, tracks, indexes or scenes. 1 2 ( 2 7 ) 1 8 ( 3 4 ) C 01:32:55 PLAY DVD To select, press , then ENTER . 32 REPEAT (page 38) You can ...
.... When you want while playing the DVD. With multiplex CDs or VIDEO CDs, you play information about the bit rate, bit rate history or the position where the disc is highlighted. ( means optional number in this manual.) The number in parentheses indicates the total number of... titles, chapters, tracks, indexes or scenes. 1 2 ( 2 7 ) 1 8 ( 3 4 ) C 01:32:55 PLAY DVD To select, press , then ENTER . 32 REPEAT (page 38) You can ...
Operating Instructions
Page 53
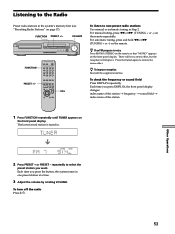
...Preset radio stations in the system's memory first (see "Presetting Radio Stations" on the remote. Other Operations 2 Press PRESET + or PRESET - There will be no stereo effect, but the reception will improve. Press the button again to non-preset radio stations Use manual or automatic tuning in ...Step 2. repeatedly to select the preset station you press the button, the system tunes in . For automatic tuning, press and hold m or M (TUNING + or -) on ...
...Preset radio stations in the system's memory first (see "Presetting Radio Stations" on the remote. Other Operations 2 Press PRESET + or PRESET - There will be no stereo effect, but the reception will improve. Press the button again to non-preset radio stations Use manual or automatic tuning in ...Step 2. repeatedly to select the preset station you press the button, the system tunes in . For automatic tuning, press and hold m or M (TUNING + or -) on ...


