
Operating Instructions
Page 16
...area and making noise during the measurement. BASIC - 10 Press . 11 Connect the calibration mic to the A.CAL MIC jack on the front panel and press X/x to select [YES]. AUTO CALIBRATION Connect calibration mic. Auto Calibration starts. 16US FRONT L : YES FRONT R : YES CENTER : NONE SUBWOOFER : ... Surround Sound for [SPEAKER FORMATION], measurement of each speaker should face the calibration mic, and there should be no obstruction between the speakers and the calibration mic. Be quiet during the measurement (which the system is not displayed. 14 Press . Getting Started -
...area and making noise during the measurement. BASIC - 10 Press . 11 Connect the calibration mic to the A.CAL MIC jack on the front panel and press X/x to select [YES]. AUTO CALIBRATION Connect calibration mic. Auto Calibration starts. 16US FRONT L : YES FRONT R : YES CENTER : NONE SUBWOOFER : ... Surround Sound for [SPEAKER FORMATION], measurement of each speaker should face the calibration mic, and there should be no obstruction between the speakers and the calibration mic. Be quiet during the measurement (which the system is not displayed. 14 Press . Getting Started -

Operating Instructions
Page 64
...[CONNECTION] setting in the front panel display. 2 Press DISPLAY when the system is output when [AUTO CALIBRATION] starts. Calibrating the Appropriate Settings Automatically (AUTO CALIBRATION) D. Note • Loud test sound is in stop mode. The ...) 3 ( 2 8 ) T 0:03:04 SPEAKER FORMATION SPEAKER FORMATION AUTO CALIBRATION DVD VIDEO 4 Press X/x to [STANDARD]. Start measurement? C. (Digital Cinema Auto Calibration) can set [AUTO CALIBRATION], you need to connect the supplied calibration mic. • The front panel display indicates the selected [SPEAKER FORMATION]. C. SPEAKER...
...[CONNECTION] setting in the front panel display. 2 Press DISPLAY when the system is output when [AUTO CALIBRATION] starts. Calibrating the Appropriate Settings Automatically (AUTO CALIBRATION) D. Note • Loud test sound is in stop mode. The ...) 3 ( 2 8 ) T 0:03:04 SPEAKER FORMATION SPEAKER FORMATION AUTO CALIBRATION DVD VIDEO 4 Press X/x to [STANDARD]. Start measurement? C. (Digital Cinema Auto Calibration) can set [AUTO CALIBRATION], you need to connect the supplied calibration mic. • The front panel display indicates the selected [SPEAKER FORMATION]. C. SPEAKER...

Operating Instructions
Page 65
... the distance between the listening position and each speaker should face the calibration mic, and there should be no obstruction between the speakers and the calibration mic. front speakers are connected. - Retry? AUDIO IN / A.CAL MIC Calibration mic Note • Avoid being in which the system is installed may affect measurements. • If an error message appears, follow...
... the distance between the listening position and each speaker should face the calibration mic, and there should be no obstruction between the speakers and the calibration mic. front speakers are connected. - Retry? AUDIO IN / A.CAL MIC Calibration mic Note • Avoid being in which the system is installed may affect measurements. • If an error message appears, follow...

Operating Instructions
Page 66
...Display appears. do not change the function. - do not connect the headphones. - do not disconnect the calibration mic. • The measurement for [SETUP] appear. 1 2 ( 2 7 ) 1 8 ( 3 4 ) T 0:00:02 DVD VIDEO QUICK QUICK CUSTOM RESET BNR 4 Press X/x to select [CUSTOM], then press . Using the Setup ... and not all the functions described may work. 1 Press FUNCTION repeatedly until "DVD" appears in the front panel display. 2 Press DISPLAY when the system is always [YES] since the system does not perform subwoofer calibration. The options for [SUBWOOFER] is in stop mode.
...Display appears. do not change the function. - do not connect the headphones. - do not disconnect the calibration mic. • The measurement for [SETUP] appear. 1 2 ( 2 7 ) 1 8 ( 3 4 ) T 0:00:02 DVD VIDEO QUICK QUICK CUSTOM RESET BNR 4 Press X/x to select [CUSTOM], then press . Using the Setup ... and not all the functions described may work. 1 Press FUNCTION repeatedly until "DVD" appears in the front panel display. 2 Press DISPLAY when the system is always [YES] since the system does not perform subwoofer calibration. The options for [SUBWOOFER] is in stop mode.

Operating Instructions
Page 82
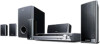
...ohms 93 × 162 × 75 mm (3 3/4 × 6 1/2 × 3 inches) (w/h/d) 0.6 kg (1 lb 6 oz) Subwoofer (SS-WS71) Speaker system Speaker unit Rated impedance Dimensions (approx.) Mass (approx.) Bass reflex 160 mm (6 3/8 inches) dia, cone type 3.0 ohms 197 × 322 × 345 mm ... red/white/green/gray/blue/purple) • Video Cord (1) • Remote Commander (remote) (1) • R6 (size AA) batteries (2) • Calibration mic (1) • Foot pads (1 set) 82US • Operating Instructions • HDMI CONTROL Guide • Speaker and TV connections (card) •Standby power...
...ohms 93 × 162 × 75 mm (3 3/4 × 6 1/2 × 3 inches) (w/h/d) 0.6 kg (1 lb 6 oz) Subwoofer (SS-WS71) Speaker system Speaker unit Rated impedance Dimensions (approx.) Mass (approx.) Bass reflex 160 mm (6 3/8 inches) dia, cone type 3.0 ohms 197 × 322 × 345 mm ... red/white/green/gray/blue/purple) • Video Cord (1) • Remote Commander (remote) (1) • R6 (size AA) batteries (2) • Calibration mic (1) • Foot pads (1 set) 82US • Operating Instructions • HDMI CONTROL Guide • Speaker and TV connections (card) •Standby power...


