
Operating Instructions
Page 6
...Restricting Playback of the Disc........... 58 Changing the System Settings by Using the Setup Display 60 Tuner Presetting Radio Stations 67 Listening to the Radio 68 Control for HDMI/External Audio Device Using the Control for HDMI Function for "BRAVIA" Sync 70 Using the DIGITAL MEDIA PORT ...Adapter 72 Using an S-AIR Product 73 Other Operations Getting Optimal Surround Sound for a Room 79 Calibrating the Appropriate Settings Automatically 80 Controlling the TV with the ...
...Restricting Playback of the Disc........... 58 Changing the System Settings by Using the Setup Display 60 Tuner Presetting Radio Stations 67 Listening to the Radio 68 Control for HDMI/External Audio Device Using the Control for HDMI Function for "BRAVIA" Sync 70 Using the DIGITAL MEDIA PORT ...Adapter 72 Using an S-AIR Product 73 Other Operations Getting Optimal Surround Sound for a Room 79 Calibrating the Appropriate Settings Automatically 80 Controlling the TV with the ...

Operating Instructions
Page 24
...COAXIAL SPEAKER FRONT R HDMI FRONT OUT L DMPORT 0D.C7A5VMAX EZW-RT10 ANTENNA AM FM COAXIAL 75 COMPONENT VIDEO OUT VOIDUETO PR/CR PB/CB Y TV/VIDEO R AUDIO IN L White (Front left speaker (L)) Red (Front right speaker (R)) Green (Center speaker) Rear panel of the other connections are color-coded ... the color of the SPEAKER jacks of the unit to a wall outlet (mains) until it clicks. Getting Started Step 2: Connecting the System For connecting the system, read the information on the following pages. Do not connect the AC power cord (mains lead) of the unit. Do not catch...
...COAXIAL SPEAKER FRONT R HDMI FRONT OUT L DMPORT 0D.C7A5VMAX EZW-RT10 ANTENNA AM FM COAXIAL 75 COMPONENT VIDEO OUT VOIDUETO PR/CR PB/CB Y TV/VIDEO R AUDIO IN L White (Front left speaker (L)) Red (Front right speaker (R)) Green (Center speaker) Rear panel of the other connections are color-coded ... the color of the SPEAKER jacks of the unit to a wall outlet (mains) until it clicks. Getting Started Step 2: Connecting the System For connecting the system, read the information on the following pages. Do not connect the AC power cord (mains lead) of the unit. Do not catch...

Operating Instructions
Page 26
... cable and video cord. SPEAKER CENTER SUBWOOFER TV DIGITAL IN OPTICAL COAXIAL C Component video cable (not supplied) ANTENNA AM FM COAXIAL 75 SPEAKER FRONT R HDMI FRONT OUT L DMPORT 0D.C7A5VMAX EZW-RT10 COMPONENT VIDEO OUT VOIDUETO PR/CR PB/CB Y TV/VIDEO R AUDIO IN L A Video cord (supplied) ...B HDMI cable (not supplied) To the HDMI IN jack of the TV. Picture quality will be improved compared to progressive format (page 37). To view images...
... cable and video cord. SPEAKER CENTER SUBWOOFER TV DIGITAL IN OPTICAL COAXIAL C Component video cable (not supplied) ANTENNA AM FM COAXIAL 75 SPEAKER FRONT R HDMI FRONT OUT L DMPORT 0D.C7A5VMAX EZW-RT10 COMPONENT VIDEO OUT VOIDUETO PR/CR PB/CB Y TV/VIDEO R AUDIO IN L A Video cord (supplied) ...B HDMI cable (not supplied) To the HDMI IN jack of the TV. Picture quality will be improved compared to progressive format (page 37). To view images...

Operating Instructions
Page 27
... receiver, or PlayStation, to TV sound via the system, perform this connection. SPEAKER CENTER SUBWOOFER TV DIGITAL IN OPTICAL COAXIAL E Digital optical cord (not supplied) SPEAKER FRONT R HDMI FRONT OUT L DMPORT 0D.C7A5VMAX EZW-RT10 ANTENNA AM FM COAXIAL 75 COMPONENT VIDEO OUT VOIDUETO PR/CR PB/CB Y TV/VIDEO R AUDIO IN L D Audio cord (not supplied...
... receiver, or PlayStation, to TV sound via the system, perform this connection. SPEAKER CENTER SUBWOOFER TV DIGITAL IN OPTICAL COAXIAL E Digital optical cord (not supplied) SPEAKER FRONT R HDMI FRONT OUT L DMPORT 0D.C7A5VMAX EZW-RT10 ANTENNA AM FM COAXIAL 75 COMPONENT VIDEO OUT VOIDUETO PR/CR PB/CB Y TV/VIDEO R AUDIO IN L D Audio cord (not supplied...

Operating Instructions
Page 28
...SPEAKER FRONT R HDMI FRONT OUT L DMPORT 0D.C7A5VMAX EZW-RT10 ANTENNA AM FM COAXIAL 75 COMPONENT VIDEO OUT VOIDUETO PR/CR PB/CB Y TV/VIDEO R AUDIO IN L H DIGITAL MEDIA PORT adapter (page 72) Note • Connect the DIGITAL MEDIA PORT adapter so that the V marks are ...pressing . Tip • You can enjoy connected components via the system's speakers. models. You can also use other components You can connect another component, such as a VCR, digital satellite receiver, or PlayStation, to the TV/VIDEO (AUDIO IN R/L) jacks or DIGITAL IN OPTICAL/COAXIAL jacks instead of the...
...SPEAKER FRONT R HDMI FRONT OUT L DMPORT 0D.C7A5VMAX EZW-RT10 ANTENNA AM FM COAXIAL 75 COMPONENT VIDEO OUT VOIDUETO PR/CR PB/CB Y TV/VIDEO R AUDIO IN L H DIGITAL MEDIA PORT adapter (page 72) Note • Connect the DIGITAL MEDIA PORT adapter so that the V marks are ...pressing . Tip • You can enjoy connected components via the system's speakers. models. You can also use other components You can connect another component, such as a VCR, digital satellite receiver, or PlayStation, to the TV/VIDEO (AUDIO IN R/L) jacks or DIGITAL IN OPTICAL/COAXIAL jacks instead of the...
Operating Instructions
Page 29
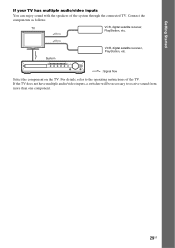
Connect the components as follows. If the TV does not have multiple audio/video inputs, a switcher will be necessary to the operating instructions of the system through the connected TV. For details, refer to receive sound from more than one component. 29US TV VCR, digital satellite receiver, PlayStation, etc. Getting Started If your TV has multiple audio/video inputs You can enjoy sound with the speakers of the TV. System VCR, digital satellite receiver, PlayStation, etc. :Signal flow Select the component on the TV.
Connect the components as follows. If the TV does not have multiple audio/video inputs, a switcher will be necessary to the operating instructions of the system through the connected TV. For details, refer to receive sound from more than one component. 29US TV VCR, digital satellite receiver, PlayStation, etc. Getting Started If your TV has multiple audio/video inputs You can enjoy sound with the speakers of the TV. System VCR, digital satellite receiver, PlayStation, etc. :Signal flow Select the component on the TV.

Operating Instructions
Page 31
... surround amplifier SPEAKER FRONT R HDMI FRONT OUT L DMPORT 0D.C7A5VMAX ANTENNA AM FM COAXIAL 75 EZW-RT10 COMPONENT VIDEO OUT VOIDUETO PR/CR PB/CB Y TV/VIDEO R AUDIO IN L Wireless transceiver EZW-RT10 S-AIR ID A B C SPEAKER L PAIRING R SURROUND SESSUULRRBERRACOOCKUUTNNODDR Wireless transceiver Note • When you need to insert the wireless transceivers into...
... surround amplifier SPEAKER FRONT R HDMI FRONT OUT L DMPORT 0D.C7A5VMAX ANTENNA AM FM COAXIAL 75 EZW-RT10 COMPONENT VIDEO OUT VOIDUETO PR/CR PB/CB Y TV/VIDEO R AUDIO IN L Wireless transceiver EZW-RT10 S-AIR ID A B C SPEAKER L PAIRING R SURROUND SESSUULRRBERRACOOCKUUTNNODDR Wireless transceiver Note • When you need to insert the wireless transceivers into...

Operating Instructions
Page 36
... CONTROL FOR HDMI: VOLUME LIMIT: YCBCR/RGB(HDMI): AUDIO(HDMI): JPEG RESOLUTION: AUTO(1920x1080p) ON ON OFF OFF SD 8 Press C/c to select the setting that matches your TV type, then press . • [16:9]: For a wide-screen TV or a 4:3 standard TV with a wide-screen mode (page 61) •.... For details, see "Getting Optimal Surround Sound for selecting the speaker formation appears. 36US The front of the TV to off. Getting Started LANGUAGE SETUP OSD: MENU: AUDIO: SUBTITLE: ENGLISH ENGLISH FRENCH SPANISH PORTUGUESE SPEAKER FORMATION STANDARD 5 Press X/x to the A.CAL MIC jack on ....
... CONTROL FOR HDMI: VOLUME LIMIT: YCBCR/RGB(HDMI): AUDIO(HDMI): JPEG RESOLUTION: AUTO(1920x1080p) ON ON OFF OFF SD 8 Press C/c to select the setting that matches your TV type, then press . • [16:9]: For a wide-screen TV or a 4:3 standard TV with a wide-screen mode (page 61) •.... For details, see "Getting Optimal Surround Sound for selecting the speaker formation appears. 36US The front of the TV to off. Getting Started LANGUAGE SETUP OSD: MENU: AUDIO: SUBTITLE: ENGLISH ENGLISH FRENCH SPANISH PORTUGUESE SPEAKER FORMATION STANDARD 5 Press X/x to the A.CAL MIC jack on ....

Operating Instructions
Page 39
... +/-, the function changes as follows. Press FUNCTION +/- Function "DVD" "TUNER FM"/ "TUNER AM" "TV/VIDEO" "DMPORT" "AUDIO" Source Disc that is played by the system FM/AM radio (page 67) TV or component that is connected to the TV/ VIDEO jacks on the rear panel DIGITAL MEDIA PORT adapter (page 72) Portable... audio source that is connected to the AUDIO IN jack on the front panel 39US Getting Started FUNCTION +/- ...
... +/-, the function changes as follows. Press FUNCTION +/- Function "DVD" "TUNER FM"/ "TUNER AM" "TV/VIDEO" "DMPORT" "AUDIO" Source Disc that is played by the system FM/AM radio (page 67) TV or component that is connected to the TV/ VIDEO jacks on the rear panel DIGITAL MEDIA PORT adapter (page 72) Portable... audio source that is connected to the AUDIO IN jack on the front panel 39US Getting Started FUNCTION +/- ...

Operating Instructions
Page 46
...]: The stereo sound of audio track 2. • [2:1/L]: The sound of the left channel of audio track 2 (monaural). • [2:2/R]: The sound of the right channel of a 2 channel playback area and a multi-channel playback area. The Control Menu display appears on the TV screen. 2 Press X/x... R S Currently playing program format Selecting a playback area for [MULTI/2CH] appear. 3 Press X/x to . 1 Press DISPLAY while the system is in stop mode. • [2/R]: The sound of the current audio signal (PCM, Dolby Digital, DTS, etc.) appears as shown below. Note • When the Super...
...]: The stereo sound of audio track 2. • [2:1/L]: The sound of the left channel of audio track 2 (monaural). • [2:2/R]: The sound of the right channel of a 2 channel playback area and a multi-channel playback area. The Control Menu display appears on the TV screen. 2 Press X/x... R S Currently playing program format Selecting a playback area for [MULTI/2CH] appear. 3 Press X/x to . 1 Press DISPLAY while the system is in stop mode. • [2/R]: The sound of the current audio signal (PCM, Dolby Digital, DTS, etc.) appears as shown below. Note • When the Super...

Operating Instructions
Page 47
...you to the operating instructions supplied with PBC functions. x When the current layer is in stop mode to . 1 Press DISPLAY while the system is the Super Audio CD layer [CD] appears. 3 Press to cancel the number. 3 Press . 4 Follow the instructions in Step 3 may differ depending on the... simple interactive operations, search functions, and other such operations. The Control Menu display appears on the TV screen. 2 Press X/x to standby mode by following the menu on the VIDEO CD. When the system is playing a CD layer, "CD" lights up in the front panel display. If you do...
...you to the operating instructions supplied with PBC functions. x When the current layer is in stop mode to . 1 Press DISPLAY while the system is the Super Audio CD layer [CD] appears. 3 Press to cancel the number. 3 Press . 4 Follow the instructions in Step 3 may differ depending on the... simple interactive operations, search functions, and other such operations. The Control Menu display appears on the TV screen. 2 Press X/x to standby mode by following the menu on the VIDEO CD. When the system is playing a CD layer, "CD" lights up in the front panel display. If you do...

Operating Instructions
Page 50
...• [ONE DISC]: You can repeat all of the titles on the current disc. (When the system is selected, the first folder will play , Program Play and Repeat Play are playing MP3 files. ...[REPEAT] appear. 3 Press X/x to select the item to normal play in random order. x VIDEO CD/Super Audio CD/CD • [OFF]: Off. • [TRACK]: You can shuffle MP3 files in Step 3. When ... • [CHAPTER]: You can repeat the current chapter on a disc. 50US The Control Menu display appears on the TV screen. 2 Press X/x to select [REPEAT], then press . x During Program Play • [OFF]: Off. &#...
...• [ONE DISC]: You can repeat all of the titles on the current disc. (When the system is selected, the first folder will play , Program Play and Repeat Play are playing MP3 files. ...[REPEAT] appear. 3 Press X/x to select the item to normal play in random order. x VIDEO CD/Super Audio CD/CD • [OFF]: Off. • [TRACK]: You can shuffle MP3 files in Step 3. When ... • [CHAPTER]: You can repeat the current chapter on a disc. 50US The Control Menu display appears on the TV screen. 2 Press X/x to select [REPEAT], then press . x During Program Play • [OFF]: Off. &#...

Operating Instructions
Page 51
... Play with a VIDEO CD or Super VCD with PBC playback. • When the system is playing a DATA CD/DATA DVD which contains MP3 files and JPEG image files, and their playing time is not the same, the audio sound will not match the image. • When you press CLEAR to return to...'s menu A DVD is turned off . The disc's menu appears on the Control Menu display 1 Press DISPLAY during playback. The Control Menu display appears on the TV screen. 2 Press X/x to select [MENU] or [TOP MENU]. 4 Press . To turn off the Control Menu display Press DISPLAY repeatedly until the Control Menu display ...
... Play with a VIDEO CD or Super VCD with PBC playback. • When the system is playing a DATA CD/DATA DVD which contains MP3 files and JPEG image files, and their playing time is not the same, the audio sound will not match the image. • When you press CLEAR to return to...'s menu A DVD is turned off . The disc's menu appears on the Control Menu display 1 Press DISPLAY during playback. The Control Menu display appears on the TV screen. 2 Press X/x to select [MENU] or [TOP MENU]. 4 Press . To turn off the Control Menu display Press DISPLAY repeatedly until the Control Menu display ...

Operating Instructions
Page 52
... for a scene using the time code. 1 Press DISPLAY. (If [MEDIA] is set to [MUSIC/PHOTO], press DISPLAY twice.) The Control Menu display appears on the TV screen. 2 Press X/x to select a setting. • [PLAY LIST]: You can play the titles in the order of the current title) is selected. 2 Press... LIST], then press . Or, you can play the titles originally recorded. 4 Press . The system starts playback from the selected number. To search for a chapter (DVD VIDEO/DVD-R/DVDRW) or track (VIDEO CD/Super Audio CD/CD) by entering its number. For a DATA CD/ DATA DVD, you can search for...
... for a scene using the time code. 1 Press DISPLAY. (If [MEDIA] is set to [MUSIC/PHOTO], press DISPLAY twice.) The Control Menu display appears on the TV screen. 2 Press X/x to select a setting. • [PLAY LIST]: You can play the titles in the order of the current title) is selected. 2 Press... LIST], then press . Or, you can play the titles originally recorded. 4 Press . The system starts playback from the selected number. To search for a chapter (DVD VIDEO/DVD-R/DVDRW) or track (VIDEO CD/Super Audio CD/CD) by entering its number. For a DATA CD/ DATA DVD, you can search for...

Operating Instructions
Page 53
...search for digital cameras regulated by the system may generate a loud noise which could damage your speaker system. • The system does not play back audio in MP3PRO format. • The system can play any folders beyond the 200th. (Depending on the TV screen. 3 Press DISPLAY. which conform ...to other folders. • The system may not play any files ...
...search for digital cameras regulated by the system may generate a loud noise which could damage your speaker system. • The system does not play back audio in MP3PRO format. • The system can play any folders beyond the 200th. (Depending on the TV screen. 3 Press DISPLAY. which conform ...to other folders. • The system may not play any files ...

Operating Instructions
Page 60
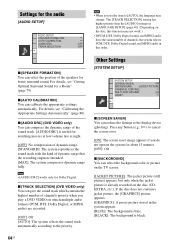
... front panel display. 2 Press DISPLAY while the system is complete. Displayed items vary depending on the TV screen. 3 Press X/x to select [CUSTOM], then press . LANGUAGE SETUP OSD: MENU: AUDIO: SUBTITLE: ENGLISH ENGLISH ORIGINAL AUDIO FOLLOW 60US Setup items The Setup Display appears....VIDEO SETUP] (page 61) • [HDMI SETUP] (page 62) • [AUDIO SETUP] (page 64) • [SYSTEM SETUP] (page 64) • [SPEAKER SETUP] (page 65) Example: [VIDEO SETUP] Selected item VIDEO SETUP TV TYPE: PROGRESSIVE (COMPONENT OUT): 4:3 OUTPUT: BLACK LEVEL: BLACK LEVEL (COMPONENT OUT): ...
... front panel display. 2 Press DISPLAY while the system is complete. Displayed items vary depending on the TV screen. 3 Press X/x to select [CUSTOM], then press . LANGUAGE SETUP OSD: MENU: AUDIO: SUBTITLE: ENGLISH ENGLISH ORIGINAL AUDIO FOLLOW 60US Setup items The Setup Display appears....VIDEO SETUP] (page 61) • [HDMI SETUP] (page 62) • [AUDIO SETUP] (page 64) • [SYSTEM SETUP] (page 64) • [SPEAKER SETUP] (page 65) Example: [VIDEO SETUP] Selected item VIDEO SETUP TV TYPE: PROGRESSIVE (COMPONENT OUT): 4:3 OUTPUT: BLACK LEVEL: BLACK LEVEL (COMPONENT OUT): ...

Operating Instructions
Page 61
... interlace signals. [ON]: The system outputs progressive signals. x [PROGRESSIVE (COMPONENT OUT)] You can select the aspect ratio of the connected TV. [16:9]: Select this when you connect a widescreen TV or a TV with bands on the upper and lower portions of the TV screen. [4:3 PAN SCAN]: Select this when you select [AUDIO FOLLOW], the language for the...
... interlace signals. [ON]: The system outputs progressive signals. x [PROGRESSIVE (COMPONENT OUT)] You can select the aspect ratio of the connected TV. [16:9]: Select this when you connect a widescreen TV or a TV with bands on the upper and lower portions of the TV screen. [4:3 PAN SCAN]: Select this when you select [AUDIO FOLLOW], the language for the...

Operating Instructions
Page 62
... signal that do not move dynamically, is displayed correctly. 3 Press C/c to [16:9]. x [4:3 OUTPUT] When you use a 16:9 aspect ratio TV, you select [NO], the system will not output a progressive signal. Note • [PROGRESSIVE (COMPONENT OUT)] is output in [VIDEO SETUP] to select [YES], then press . ... black level. This setting is for HDMI [HDMI SETUP] HDMI SETUP HDMI RESOLUTION: CONTROL FOR HDMI: VOLUME LIMIT: YCBCR/RGB(HDMI): AUDIO(HDMI): JPEG RESOLUTION: AUTO(1920x1080p) ON LEVEL2 YCBCR OFF SD x [HDMI RESOLUTION] You can adjust the aspect ratio to the standard level...
... signal that do not move dynamically, is displayed correctly. 3 Press C/c to [16:9]. x [4:3 OUTPUT] When you use a 16:9 aspect ratio TV, you select [NO], the system will not output a progressive signal. Note • [PROGRESSIVE (COMPONENT OUT)] is output in [VIDEO SETUP] to select [YES], then press . ... black level. This setting is for HDMI [HDMI SETUP] HDMI SETUP HDMI RESOLUTION: CONTROL FOR HDMI: VOLUME LIMIT: YCBCR/RGB(HDMI): AUDIO(HDMI): JPEG RESOLUTION: AUTO(1920x1080p) ON LEVEL2 YCBCR OFF SD x [HDMI RESOLUTION] You can adjust the aspect ratio to the standard level...
Operating Instructions
Page 63
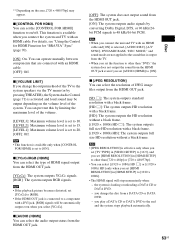
... from the HDMI OUT jack. [ON]: The system outputs audio signals by pressing THEATER), the System Audio Control (page 71) is activated and loud sound may appear. x [AUDIO (HDMI)] You can prevent this by limiting the maximum level of the system. Note • [JPEG RESOLUTION] is set to...connect the system and TV with a black frame. [(1920 × 1080i) HD]: The system outputs full size HD resolution without a black frame. [(1920 × 1080i) HD ]: The system outputs full size HD resolution with an HDMI cable. For details, see "Using the Control for HDMI Function for "BRAVIA" Sync...
... from the HDMI OUT jack. [ON]: The system outputs audio signals by pressing THEATER), the System Audio Control (page 71) is activated and loud sound may appear. x [AUDIO (HDMI)] You can prevent this by limiting the maximum level of the system. Note • [JPEG RESOLUTION] is set to...connect the system and TV with a black frame. [(1920 × 1080i) HD]: The system outputs full size HD resolution without a black frame. [(1920 × 1080i) HD ]: The system outputs full size HD resolution with an HDMI cable. For details, see "Using the Control for HDMI Function for "BRAVIA" Sync...
Operating Instructions
Page 64
... volume late at night. [OFF]: No compression of dynamic range. [STANDARD]: The system reproduces the sound track with the kind of channels, the system selects OFF PCM, DTS, Dolby Digital sound, and MPEG audio in [LANGUAGE SETUP] (page 60). (Depending on the TV screen. [JACKET PICTURE]: The jacket picture (still picture) appears, but only...
... volume late at night. [OFF]: No compression of dynamic range. [STANDARD]: The system reproduces the sound track with the kind of channels, the system selects OFF PCM, DTS, Dolby Digital sound, and MPEG audio in [LANGUAGE SETUP] (page 60). (Depending on the TV screen. [JACKET PICTURE]: The jacket picture (still picture) appears, but only...

