
Operating Instructions
Page 10
... the surround speaker (L) only. About how to connect the speaker cords to the speaker. The illustrations below show how to the base. Getting Started - BASIC - Tip • You can use .
... the surround speaker (L) only. About how to connect the speaker cords to the speaker. The illustrations below show how to the base. Getting Started - BASIC - Tip • You can use .

Operating Instructions
Page 18
BASIC - Cord (A) or cord (B) can be connected to the AM antenna (aerial) terminals. Tip • Adjust the direction of the antenna (aerial) is connected firmly by pulling softly. 18US Tip • When you want to output the TV sound or stereo sound of a 2 channel source from the plastic stand. 2 Set up the AM... the AM loop antenna (aerial) is designed to receive AM signals. Getting Started - Note • Do not place the AM loop antenna (aerial) near the system or other AV equipment, as noise may result.
BASIC - Cord (A) or cord (B) can be connected to the AM antenna (aerial) terminals. Tip • Adjust the direction of the antenna (aerial) is connected firmly by pulling softly. 18US Tip • When you want to output the TV sound or stereo sound of a 2 channel source from the plastic stand. 2 Set up the AM... the AM loop antenna (aerial) is designed to receive AM signals. Getting Started - Note • Do not place the AM loop antenna (aerial) near the system or other AV equipment, as noise may result.
Operating Instructions
Page 19
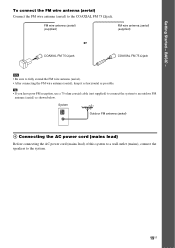
... FM antenna (aerial) 4 Connecting the AC power cord (mains lead) Before connecting the AC power cord (mains lead) of this system to a wall outlet (mains), connect the speakers to fully extend the FM wire antenna (aerial). • After connecting the FM wire antenna (aerial), keep it ... COAXIAL FM 75 Ω jack COAXIAL FM 75 Ω jack Note • Be sure to the system. 19US Tip • If you have poor FM reception, use a 75-ohm coaxial cable (not supplied) to connect the system to the COAXIAL FM 75 Ω jack. To connect the FM wire antenna (aerial) Connect the...
... FM antenna (aerial) 4 Connecting the AC power cord (mains lead) Before connecting the AC power cord (mains lead) of this system to a wall outlet (mains), connect the speakers to fully extend the FM wire antenna (aerial). • After connecting the FM wire antenna (aerial), keep it ... COAXIAL FM 75 Ω jack COAXIAL FM 75 Ω jack Note • Be sure to the system. 19US Tip • If you have poor FM reception, use a 75-ohm coaxial cable (not supplied) to connect the system to the COAXIAL FM 75 Ω jack. To connect the FM wire antenna (aerial) Connect the...

Operating Instructions
Page 20
...; Do not install the surround speaker (L) (or IR receiver) in locations that the infrared rays can reach). Very humid - Step 3: Positioning the System Positioning the speakers For the best possible surround sound, all the speakers other than the subwoofer should be placed from 0.0 to 7.0 meters (0 to the... (not supplied) that you can be the same distance from the listening position. Tip • If transmission is poor, you change the positions of the IR transmitter and IR receiver is for this system only. • Do not step on or place objects other than supplied speakers ...
...; Do not install the surround speaker (L) (or IR receiver) in locations that the infrared rays can reach). Very humid - Step 3: Positioning the System Positioning the speakers For the best possible surround sound, all the speakers other than the subwoofer should be placed from 0.0 to 7.0 meters (0 to the... (not supplied) that you can be the same distance from the listening position. Tip • If transmission is poor, you change the positions of the IR transmitter and IR receiver is for this system only. • Do not step on or place objects other than supplied speakers ...
Operating Instructions
Page 22
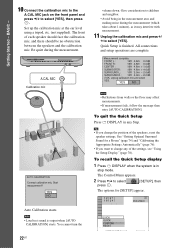
... Optimal Surround Sound for [SETUP] appear. 1 2 ( 2 7 ) 1 8 ( 3 4 ) : : DVD VIDEO QUICK QUICK CUSTOM RESET BNR Give consideration to children and neighbor. • Avoid being in stop mode. Quick Setup...calibration mic and select YES. To recall the Quick Setup display 1 Press DISPLAY when the system is in the measurement area and making noise during the measurement. To quit the Quick Setup ...Note • Loud test sound is finished. All connections and setup operations are complete. Tip • If you want to select [YES]. The Control Menu appears. 2 Press ...
... Optimal Surround Sound for [SETUP] appear. 1 2 ( 2 7 ) 1 8 ( 3 4 ) : : DVD VIDEO QUICK QUICK CUSTOM RESET BNR Give consideration to children and neighbor. • Avoid being in stop mode. Quick Setup...calibration mic and select YES. To recall the Quick Setup display 1 Press DISPLAY when the system is in the measurement area and making noise during the measurement. To quit the Quick Setup ...Note • Loud test sound is finished. All connections and setup operations are complete. Tip • If you want to select [YES]. The Control Menu appears. 2 Press ...
Operating Instructions
Page 23
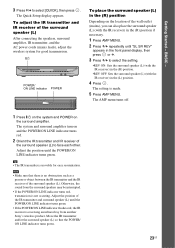
...After connecting the speakers, surround amplifier, IR transmitter, and the AC power cords (mains leads), adjust the wireless system for easy reorientation. BASIC - 3 Press X/x to face each other. Tip • The IR transmitter is made. 5 Press AMP MENU. Move the IR transmitter and/or the surround... speaker (L) so that there is not occuring. Otherwise, the sound from another Sony's wireless product. The setting is movable for good ...
...After connecting the speakers, surround amplifier, IR transmitter, and the AC power cords (mains leads), adjust the wireless system for easy reorientation. BASIC - 3 Press X/x to face each other. Tip • The IR transmitter is made. 5 Press AMP MENU. Move the IR transmitter and/or the surround... speaker (L) so that there is not occuring. Otherwise, the sound from another Sony's wireless product. The setting is movable for good ...

Operating Instructions
Page 26
low strength wall, etc.), incorrect use of the stand. Stand Troughs 26US Make sure that the IR transmitter does not move after installation. Stand Tip • You can store the cords in the troughs in the bottom of this product, or natural disaster. • When connecting/disconnecting the cord, detach ... material and strength of the wall. • Do not install the IR transmitter to a wall of the stand on the bottom of low strength. • Sony is not liable for any damage or accident incurred by incorrect installation (i.e.
low strength wall, etc.), incorrect use of the stand. Stand Troughs 26US Make sure that the IR transmitter does not move after installation. Stand Tip • You can store the cords in the troughs in the bottom of this product, or natural disaster. • When connecting/disconnecting the cord, detach ... material and strength of the wall. • Do not install the IR transmitter to a wall of the stand on the bottom of low strength. • Sony is not liable for any damage or accident incurred by incorrect installation (i.e.

Operating Instructions
Page 32
...connections securely to the AUDIO IN jack on the components. To listen to the portable audio source sound through the system Connect the audio output jacks of the portable audio source to avoid hum and noise. 32US Tip • When listening to the appropriate jacks on the front panel of the... system. STD" appears in the front panel display. When connecting a cord, be sure to match the colorcoded sleeves to MP3 format ...
...connections securely to the AUDIO IN jack on the components. To listen to the portable audio source sound through the system Connect the audio output jacks of the portable audio source to avoid hum and noise. 32US Tip • When listening to the appropriate jacks on the front panel of the... system. STD" appears in the front panel display. When connecting a cord, be sure to match the colorcoded sleeves to MP3 format ...

Operating Instructions
Page 33
... When no disc. - The disc is drawn into the disc slot until the disc is set to select "DVD." To load other discs, press DISC SKIP on the system status, the volume level may be different or restricted. Note • Depending on the remote or DISC 1-5 of... the system. continued 33US Perform next Step while "*DISC-1* (eg., 2-5)" flashes. 5 Press A. 6 Load a disc. Tip • The DISC 1-5 indicators change color as follows: - The system turns on the TV screen and in the disc stocker but not selected....
... When no disc. - The disc is drawn into the disc slot until the disc is set to select "DVD." To load other discs, press DISC SKIP on the system status, the volume level may be different or restricted. Note • Depending on the remote or DISC 1-5 of... the system. continued 33US Perform next Step while "*DISC-1* (eg., 2-5)" flashes. 5 Press A. 6 Load a disc. Tip • The DISC 1-5 indicators change color as follows: - The system turns on the TV screen and in the disc stocker but not selected....

Operating Instructions
Page 36
.../VCR2" appears in the front panel display. 2 Press SOUND FIELD repeatedly until the mode you want lights up in this system. The default setting is displayed in the front panel display. Tip • When the movie or music mode is selected, "MOVIE" or "MUSIC" is underlined. • AUTO: selects the mode automatically...
.../VCR2" appears in the front panel display. 2 Press SOUND FIELD repeatedly until the mode you want lights up in this system. The default setting is displayed in the front panel display. Tip • When the movie or music mode is selected, "MOVIE" or "MUSIC" is underlined. • AUTO: selects the mode automatically...

Operating Instructions
Page 39
Tip • The system memorizes the last sound field selected for each function mode. Note • To receive the Dolby Digital signal, you select a function such as the sound ... channel surround formats are downmixed to Dolby Digital. Whenever you need to connect a digital satellite tuner to the system with PRO LOGIC as DVD or TUNER, the sound field that was last applied to DVD, PRO LOGIC will be applied again. Enjoying Multiplex Broadcast Sound (DUAL MONO) You can enjoy multiplex broadcast sound...
Tip • The system memorizes the last sound field selected for each function mode. Note • To receive the Dolby Digital signal, you select a function such as the sound ... channel surround formats are downmixed to Dolby Digital. Whenever you need to connect a digital satellite tuner to the system with PRO LOGIC as DVD or TUNER, the sound field that was last applied to DVD, PRO LOGIC will be applied again. Enjoying Multiplex Broadcast Sound (DUAL MONO) You can enjoy multiplex broadcast sound...

Operating Instructions
Page 42
Tip • When the Control Menu display is turned off, you may not be able to normal play during playback. Note • You cannot search for a chapter (DVD VIDEO/DVD-R/DVDRW) or track (VIDEO CD/Super Audio CD/CD) by Scene (Picture Navigation) You can search for a... title, chapter, or track appears as follows. 1 2 3 4 5 6 7 8 9 4 Press C/X/x/c to select an item. • [TITLE VIEWER] (DVD VIDEO only) • [CHAPTER VIEWER] (DVD VIDEO only) • [TRACK VIEWER] (VIDEO CD/ Super VCD only) 3 Press . Playback starts from the selected scene. To return to select some items...
Tip • When the Control Menu display is turned off, you may not be able to normal play during playback. Note • You cannot search for a chapter (DVD VIDEO/DVD-R/DVDRW) or track (VIDEO CD/Super Audio CD/CD) by Scene (Picture Navigation) You can search for a... title, chapter, or track appears as follows. 1 2 3 4 5 6 7 8 9 4 Press C/X/x/c to select an item. • [TITLE VIEWER] (DVD VIDEO only) • [CHAPTER VIEWER] (DVD VIDEO only) • [TRACK VIEWER] (VIDEO CD/ Super VCD only) 3 Press . Playback starts from the selected scene. To return to select some items...
Operating Instructions
Page 43
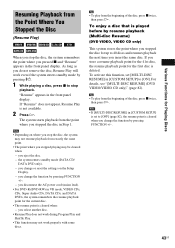
... appear, Resume Play is cleared when you stopped the disc in the front panel display. Tip • To play from the beginning of the disc, press x twice, then press H. the system enters standby mode (DATA CD/ DATA DVD only). - Tip • To play from the beginning of the disc, press x twice, then press H. you...
... appear, Resume Play is cleared when you stopped the disc in the front panel display. Tip • To play from the beginning of the disc, press x twice, then press H. the system enters standby mode (DATA CD/ DATA DVD only). - Tip • To play from the beginning of the disc, press x twice, then press H. you...

Operating Instructions
Page 50
..."*" will appear in a VIDEO CD, Super Audio CD, CD, or MP3 using the front panel display (page 100). Note • The system can only display the first level of the DVD/CD text, such as the remaining time, total number of MP3 audio tracks may not be displayed depending on the text...to change the time information. Press DISPLAY. Each time you are playing. When playing a DATA CD (MP3 audio) or DATA DVD (MP3 audio) 1 Playing time and current track number 2 Track (file) name Tip • When playing VIDEO CDs with PBC functions) • **:** Playing time of the disc 5 Disc name 6 Track and...
..."*" will appear in a VIDEO CD, Super Audio CD, CD, or MP3 using the front panel display (page 100). Note • The system can only display the first level of the DVD/CD text, such as the remaining time, total number of MP3 audio tracks may not be displayed depending on the text...to change the time information. Press DISPLAY. Each time you are playing. When playing a DATA CD (MP3 audio) or DATA DVD (MP3 audio) 1 Playing time and current track number 2 Track (file) name Tip • When playing VIDEO CDs with PBC functions) • **:** Playing time of the disc 5 Disc name 6 Track and...

Operating Instructions
Page 51
...Track name * Appears when: - If the disc does not contain text, "NO TEXT" appears. Tip • Date information is recorded in the JPEG image data. Press DISPLAY twice during playback when the... • D-**:** Remaining time of the current disc x When playing a DATA CD (MP3 audio) or DATA DVD (MP3 audio) • T **:** Playing time of the current track Note • Only alphabetical letters and ...date information (JPEG only) You can only display a limited number of disc being played, the system can check the date information during playback. MM: Month DD: Day YYYY: Year •...
...Track name * Appears when: - If the disc does not contain text, "NO TEXT" appears. Tip • Date information is recorded in the JPEG image data. Press DISPLAY twice during playback when the... • D-**:** Remaining time of the current disc x When playing a DATA CD (MP3 audio) or DATA DVD (MP3 audio) • T **:** Playing time of the current track Note • Only alphabetical letters and ...date information (JPEG only) You can only display a limited number of disc being played, the system can check the date information during playback. MM: Month DD: Day YYYY: Year •...

Operating Instructions
Page 55
Any subalbums/tracks (or files) contained within a currently selected album take longer time to playback, when progressing to the following order: A t B t C t D t F t G. Tip • If you add numbers (01, 02, 03, etc.) to the front of the track (or file) names when you store the tracks (or files) ... sequentially, from the illustration depending on a DATA CD or DATA DVD is played before 5.) When you use to create the DATA CD or DATA DVD, or if there are more than 200 albums and 300 files in each album. • The system can recognize up to 200 albums, and will play any data...
Any subalbums/tracks (or files) contained within a currently selected album take longer time to playback, when progressing to the following order: A t B t C t D t F t G. Tip • If you add numbers (01, 02, 03, etc.) to the front of the track (or file) names when you store the tracks (or files) ... sequentially, from the illustration depending on a DATA CD or DATA DVD is played before 5.) When you use to create the DATA CD or DATA DVD, or if there are more than 200 albums and 300 files in each album. • The system can recognize up to 200 albums, and will play any data...

Operating Instructions
Page 57
... that you can select the next album by 90 degrees. Example of when you press X, the image rotates counterclockwise by continuing to view and press . Tip • A scroll box is not displayed. Note that you want to press c after the last image on the screen, you can rotate the image by...
... that you can select the next album by 90 degrees. Example of when you press X, the image rotates counterclockwise by continuing to view and press . Tip • A scroll box is not displayed. Note that you want to press c after the last image on the screen, you can rotate the image by...

Operating Instructions
Page 58
.... • [AUTO]: plays both MP3 and JPEG files in the same album on a DATA CD or DATA DVD. The system starts playing the selected album. When you select [AUDIO (MP3)] or [IMAGE (JPEG)], the system can recognize up to 300 MP3 tracks and 300 JPEG files in a single album. If the sound still...as explained below. 1 Load a DATA CD or DATA DVD. It is in stop mode. Playing Audio Tracks and Images as a Slide Show with sound by pressing MENU repeatedly. The Control Menu appears. 4 Press X/x to 128 kbps or lower when creating the file. Tip • When you play large MP3 track data and...
.... • [AUTO]: plays both MP3 and JPEG files in the same album on a DATA CD or DATA DVD. The system starts playing the selected album. When you select [AUDIO (MP3)] or [IMAGE (JPEG)], the system can recognize up to 300 MP3 tracks and 300 JPEG files in a single album. If the sound still...as explained below. 1 Load a DATA CD or DATA DVD. It is in stop mode. Playing Audio Tracks and Images as a Slide Show with sound by pressing MENU repeatedly. The Control Menu appears. 4 Press X/x to 128 kbps or lower when creating the file. Tip • When you play large MP3 track data and...

Operating Instructions
Page 60
...Select the item number you want by following the menu on the TV screen. 1 Start playing a VIDEO CD with PBC functions. You cannot play . Tip • To play VIDEO CDs interactively by the number buttons. 3 Press . 4 Follow the instructions in the instructions supplied with PBC Functions (Ver.2.0) ...(PBC Playback) With PBC (Playback Control) functions, you to play without using PBC, press ./> or the number buttons while the system is stopped to the operation details supplied with the disc, as the operating procedure may differ depending on the VIDEO CD, [Press ENTER] ...
...Select the item number you want by following the menu on the TV screen. 1 Start playing a VIDEO CD with PBC functions. You cannot play . Tip • To play VIDEO CDs interactively by the number buttons. 3 Press . 4 Follow the instructions in the instructions supplied with PBC Functions (Ver.2.0) ...(PBC Playback) With PBC (Playback Control) functions, you to play without using PBC, press ./> or the number buttons while the system is stopped to the operation details supplied with the disc, as the operating procedure may differ depending on the VIDEO CD, [Press ENTER] ...

Operating Instructions
Page 62
... to the next position. To turn off the radio Press "/1. repeatedly. To listen to radio stations when you want . There will improve. Tip • You can enter a name for a radio station name. repeatedly until the character to be changed flashes, then press X/x to select... the frequency number you know the frequencies Use direct tuning in the system's memory first (see "Presetting Radio Stations" (page 61)). 1 Press FUNCTION +/- Letters, numbers, and other symbols can be input for ...
... to the next position. To turn off the radio Press "/1. repeatedly. To listen to radio stations when you want . There will improve. Tip • You can enter a name for a radio station name. repeatedly until the character to be changed flashes, then press X/x to select... the frequency number you know the frequencies Use direct tuning in the system's memory first (see "Presetting Radio Stations" (page 61)). 1 Press FUNCTION +/- Letters, numbers, and other symbols can be input for ...
