Operating Instructions
Page 1
4-255-434-13(2) DVD Home Theatre System Operating Instructions DAV-FR1/FR8/FR9 ©2004 Sony Corporation
4-255-434-13(2) DVD Home Theatre System Operating Instructions DAV-FR1/FR8/FR9 ©2004 Sony Corporation

Operating Instructions
Page 2
...operate this equipment. Refer to them whenever you call the CATV system installer's attention to Part 15 of optical instruments with the instructions, may be determined by one or more of the unit. DAV-FR1/FR8/FR9 Serial No WARNING This equipment has been tested and ...serial number in accordance with this product will not occur in this manual could void your Sony dealer regarding this equipment does cause harmful interference to radio or television reception, which the system is no guarantee that may cause harmful interference to rain or moisture. Caution - Connect...
...operate this equipment. Refer to them whenever you call the CATV system installer's attention to Part 15 of optical instruments with the instructions, may be determined by one or more of the unit. DAV-FR1/FR8/FR9 Serial No WARNING This equipment has been tested and ...serial number in accordance with this product will not occur in this manual could void your Sony dealer regarding this equipment does cause harmful interference to radio or television reception, which the system is no guarantee that may cause harmful interference to rain or moisture. Caution - Connect...
Operating Instructions
Page 3
...by pressing the "/1 button (the STANDBY indicator lights up in a place subject to use it for purchasing Sony DVD Home Theatre System. Should this occur, the system may condense inside the system. In this manual thoroughly and retain it for energy efficiency. If you do , the speakers may cause ...where ventilation is poor as microwave ovens, or large loudspeakers. • Do not place heavy objects on the lenses inside the DVD Home Theatre System and cause damage to a section with strong magnets, such as this product meets the ENERGY STAR® guidelines for future reference...
...by pressing the "/1 button (the STANDBY indicator lights up in a place subject to use it for purchasing Sony DVD Home Theatre System. Should this occur, the system may condense inside the system. In this manual thoroughly and retain it for energy efficiency. If you do , the speakers may cause ...where ventilation is poor as microwave ovens, or large loudspeakers. • Do not place heavy objects on the lenses inside the DVD Home Theatre System and cause damage to a section with strong magnets, such as this product meets the ENERGY STAR® guidelines for future reference...
Operating Instructions
Page 4
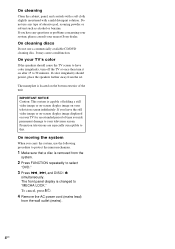
... abrasive pad, scouring powder or solvent such as alcohol or benzine. Do not use any questions or problems concerning your system, please consult your nearest Sony dealer. On your TV's color If the speakers should persist, place the speakers farther away from the... television screen indefinitely. On cleaning discs Do not use the following procedure to select "DVD." 3 Press ., >, and DISC1 Z simultaneously. It may cause a malfunction. If you carry the system, use a commercially available CD/DVD cleaning disc. If color irregularity should cause the TV screen to have any type of...
... abrasive pad, scouring powder or solvent such as alcohol or benzine. Do not use any questions or problems concerning your system, please consult your nearest Sony dealer. On your TV's color If the speakers should persist, place the speakers farther away from the... television screen indefinitely. On cleaning discs Do not use the following procedure to select "DVD." 3 Press ., >, and DISC1 Z simultaneously. It may cause a malfunction. If you carry the system, use a commercially available CD/DVD cleaning disc. If color irregularity should cause the TV screen to have any type of...
Operating Instructions
Page 5
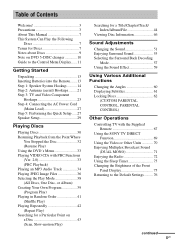
... the Following Discs 7 Terms for Discs 7 Notes about Discs 9 Note on DVD 5-DISC changer 10 Guide to the Control Menu Display...... 11 Getting Started Unpacking 13 Inserting Batteries into the Remote....... 13 Step 1: Speaker System Hookup........... 14 Step 2: Antenna (aerial) Hookups......... 21 Step 3: TV and ...Subtitles 61 Locking Discs 62 (CUSTOM PARENTAL CONTROL, PARENTAL CONTROL) Other Operations Controlling TV with the Supplied Remote 67 Using the SONY TV DIRECT Function 69 Using the Video or Other Units 70 Enjoying Multiplex Broadcast Sound (DUAL MONO 71 Enjoying the Radio 72...
... the Following Discs 7 Terms for Discs 7 Notes about Discs 9 Note on DVD 5-DISC changer 10 Guide to the Control Menu Display...... 11 Getting Started Unpacking 13 Inserting Batteries into the Remote....... 13 Step 1: Speaker System Hookup........... 14 Step 2: Antenna (aerial) Hookups......... 21 Step 3: TV and ...Subtitles 61 Locking Discs 62 (CUSTOM PARENTAL CONTROL, PARENTAL CONTROL) Other Operations Controlling TV with the Supplied Remote 67 Using the SONY TV DIRECT Function 69 Using the Video or Other Units 70 Enjoying Multiplex Broadcast Sound (DUAL MONO 71 Enjoying the Radio 72...
Operating Instructions
Page 6
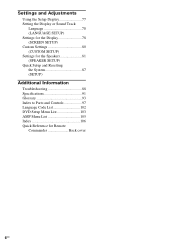
Settings and Adjustments Using the Setup Display 77 Setting the Display or Sound Track Language 78 (LANGUAGE SETUP) Settings for the Display 78 (SCREEN SETUP) Custom Settings 80 (CUSTOM SETUP) Settings for the Speakers 81 (SPEAKER SETUP) Quick Setup and Resetting the System 87 (SETUP) Additional Information Troubleshooting 88 Specifications 91 Glossary 93 Index to Parts and Controls 97 Language Code List 102 DVD Setup Menu List 103 AMP Menu List 105 Index 106 Quick Reference for Remote Commander Back cover 6US
Settings and Adjustments Using the Setup Display 77 Setting the Display or Sound Track Language 78 (LANGUAGE SETUP) Settings for the Display 78 (SCREEN SETUP) Custom Settings 80 (CUSTOM SETUP) Settings for the Speakers 81 (SPEAKER SETUP) Quick Setup and Resetting the System 87 (SETUP) Additional Information Troubleshooting 88 Specifications 91 Glossary 93 Index to Parts and Controls 97 Language Code List 102 DVD Setup Menu List 103 AMP Menu List 105 Index 106 Quick Reference for Remote Commander Back cover 6US
Operating Instructions
Page 7
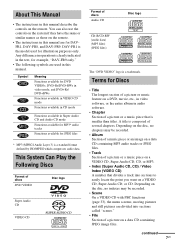
... "scenes." • File Section of a picture or a music piece on a data CD containing JPEG image files. DAV-FR1 is a trademark. This System Can Play the Following Discs Format of discs DVD VIDEO Disc logo Super Audio CD VIDEO CD Format of several chapters. Terms for JPEG files * MP3 (MPEG1 Audio Layer...data) (MP3 files) (JPEG files) Disc logo The "DVD VIDEO" logo is the model used in this manual describe the controls on the remote. • The instructions in this manual. You can also use the controls on the system if they have the same or similar names as those on...
... "scenes." • File Section of a picture or a music piece on a data CD containing JPEG image files. DAV-FR1 is a trademark. This System Can Play the Following Discs Format of discs DVD VIDEO Disc logo Super Audio CD VIDEO CD Format of several chapters. Terms for JPEG files * MP3 (MPEG1 Audio Layer...data) (MP3 files) (JPEG files) Disc logo The "DVD VIDEO" logo is the model used in this manual describe the controls on the remote. • The instructions in this manual. You can also use the controls on the system if they have the same or similar names as those on...
Operating Instructions
Page 8
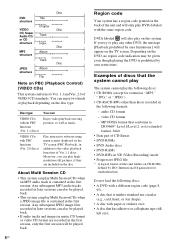
...8226; Data part of CD-Extras • DVD-ROMs • DVD Audio discs • DVD-RAMs • DVD-RWs in the first session. Region code Your system has a region code printed on the back of discs that the system cannot play The system cannot play DVDs labeled with PBC functions (Ver. 2.0 discs)...: • CD-ROMs (except for standardization) Do not load the following formats: - Moreover, you try to play on this system. Disc DVD Title structure Chapter VIDEO Disc CD, Super Audio CD, Track or CD structure Index Disc MP3 structure Album Track Disc JPEG structure Album...
...8226; Data part of CD-Extras • DVD-ROMs • DVD Audio discs • DVD-RAMs • DVD-RWs in the first session. Region code Your system has a region code printed on the back of discs that the system cannot play The system cannot play DVDs labeled with PBC functions (Ver. 2.0 discs)...: • CD-ROMs (except for standardization) Do not load the following formats: - Moreover, you try to play on this system. Disc DVD Title structure Chapter VIDEO Disc CD, Super Audio CD, Track or CD structure Index Disc MP3 structure Album Track Disc JPEG structure Album...
Operating Instructions
Page 9
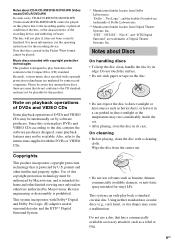
...home and other intellectual property rights. Copyrights This product incorporates copyright protection technology that discs created in its edge. Use of this product. "DTS", "DTS-ES", "Neo:6", and "DTS Digital Surround" are some playback features may be played. Wipe the disc from Digital Theater Systems...play back a standard circular disc. Notes about CD-R/CD-RW/DVD-R/DVD-RW (Video mode)/DVD+R/DVD+RW In some record companies. Music discs encoded with copyright protection technologies are trademarks of Digital Theater Systems, Inc. Please be aware that among those discs, there ...
...home and other intellectual property rights. Copyrights This product incorporates copyright protection technology that discs created in its edge. Use of this product. "DTS", "DTS-ES", "Neo:6", and "DTS Digital Surround" are some playback features may be played. Wipe the disc from Digital Theater Systems...play back a standard circular disc. Notes about CD-R/CD-RW/DVD-R/DVD-RW (Video mode)/DVD+R/DVD+RW In some record companies. Music discs encoded with copyright protection technologies are trademarks of Digital Theater Systems, Inc. Please be aware that among those discs, there ...
Operating Instructions
Page 10
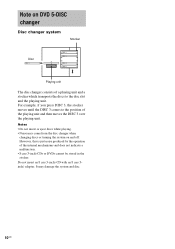
... unit and then moves the DISC 3 over the playing unit. It may come from the disc changer when changing discs or turning the system on DVD 5-DISC changer Disc changer system Stocker Disc DISC 3 DISC 1 DISC 2 DISC 4 DISC 5 Playing unit The disc changer consists of a playing unit and a stocker which...internal mechanisms and does not indicate a malfunction. • 8 cm (3-inch) CDs or DVDs cannot be stored in the stocker. Notes • Do not insert or eject discs while playing. • Noise may damage the system and disc. 10US For example, if you press DISC 3, the stocker moves until the...
... unit and then moves the DISC 3 over the playing unit. It may come from the disc changer when changing discs or turning the system on DVD 5-DISC changer Disc changer system Stocker Disc DISC 3 DISC 1 DISC 2 DISC 4 DISC 5 Playing unit The disc changer consists of a playing unit and a stocker which...internal mechanisms and does not indicate a malfunction. • 8 cm (3-inch) CDs or DVDs cannot be stored in the stocker. Notes • Do not insert or eject discs while playing. • Noise may damage the system and disc. 10US For example, if you press DISC 3, the stocker moves until the...

Operating Instructions
Page 11
...status Currently playing chapter name or disc type (NPlayback, XPause, xStop, etc.) number (VIDEO CD/Super Audio CD/CD: index number) 1:DVD 1 2 ( 2 7 ) TITLE 12 1 8 ( 3 4 ) DVD Type of disc being played back Playing time T 1:32:55 Icon of selected Control Menu item Control Menu items 1: ENGLISH 2: FRENCH ... Menu item Operation message SUBTITLE Select: ENTER List of Control Menu Items DISC Displays the disc name or the disc type inserted into the system. Displays the scene (VIDEO CD in PBC playback). ALBUM (JPEG only) (page 36) Selects the album (JPEG) to (page 45...
...status Currently playing chapter name or disc type (NPlayback, XPause, xStop, etc.) number (VIDEO CD/Super Audio CD/CD: index number) 1:DVD 1 2 ( 2 7 ) TITLE 12 1 8 ( 3 4 ) DVD Type of disc being played back Playing time T 1:32:55 Icon of selected Control Menu item Control Menu items 1: ENGLISH 2: FRENCH ... Menu item Operation message SUBTITLE Select: ENTER List of Control Menu Items DISC Displays the disc name or the disc type inserted into the system. Displays the scene (VIDEO CD in PBC playback). ALBUM (JPEG only) (page 36) Selects the album (JPEG) to (page 45...

Operating Instructions
Page 12
PLAYMODE (VIDEO CD/Super Selects the play mode. ANGLE (DVD only) (page 60) Changes the angle. DATE (JPEG only) (page 50) Displays the date information. FILE (JPEG only) (page 36) Selects the file (JPEG) to .../chapter/ track/album, or contents of program repeatedly. CUSTOM PARENTAL CONTROL (page 62) Sets the disc to be played. Tips • Each time you press DVD DISPLAY, the Control Menu display changes as follows: Control Menu display m Control Menu display off The Control Menu items vary, depending on the disc. •...
PLAYMODE (VIDEO CD/Super Selects the play mode. ANGLE (DVD only) (page 60) Changes the angle. DATE (JPEG only) (page 50) Displays the date information. FILE (JPEG only) (page 36) Selects the file (JPEG) to .../chapter/ track/album, or contents of program repeatedly. CUSTOM PARENTAL CONTROL (page 62) Sets the disc to be played. Tips • Each time you press DVD DISPLAY, the Control Menu display changes as follows: Control Menu display m Control Menu display off The Control Menu items vary, depending on the disc. •...
Operating Instructions
Page 13
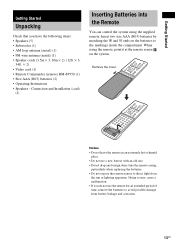
... that you do not use a new battery with an old one. • Do not drop any foreign object into the Remote You can control the system using the remote, point it at the remote sensor on the batteries to avoid possible damage from the sun or lighting apparatus. Insert two size... AAA (R03) batteries by matching the 3 and # ends on the system. When using the supplied remote. Notes • Do not leave the remote in an extremely hot or humid place. • Do not use the remote...
... that you do not use a new battery with an old one. • Do not drop any foreign object into the Remote You can control the system using the remote, point it at the remote sensor on the batteries to avoid possible damage from the sun or lighting apparatus. Insert two size... AAA (R03) batteries by matching the 3 and # ends on the system. When using the supplied remote. Notes • Do not leave the remote in an extremely hot or humid place. • Do not use the remote...
Operating Instructions
Page 14
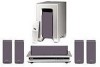
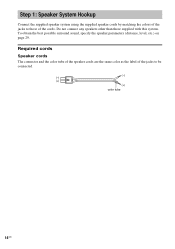
Required cords Speaker cords The connector and the color tube of the speaker cords are the same color as the label of the cords. Step 1: Speaker System Hookup Connect the supplied speaker system using the supplied speaker cords by matching the colors of the jacks to be connected. (-) (-) (+) (+) color tube 14US Do not connect any speakers other than those of the jacks to those supplied with this system. To obtain the best possible surround sound, specify the speaker parameters (distance, level, etc.) on page 29.
Required cords Speaker cords The connector and the color tube of the speaker cords are the same color as the label of the cords. Step 1: Speaker System Hookup Connect the supplied speaker system using the supplied speaker cords by matching the colors of the jacks to be connected. (-) (-) (+) (+) color tube 14US Do not connect any speakers other than those of the jacks to those supplied with this system. To obtain the best possible surround sound, specify the speaker parameters (distance, level, etc.) on page 29.
Operating Instructions
Page 15
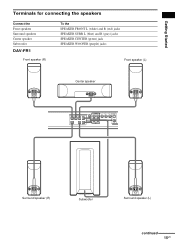
Getting Started Terminals for connecting the speakers Connect the Front speakers Surround speakers Center speaker Subwoofer DAV-FR1 Front speaker (R) To the SPEAKER FRONT L (white) and R (red) jacks SPEAKER SURR L (blue) and R (gray) jacks SPEAKER CENTER (green) jack SPEAKER WOOFER (purple) jacks Front speaker (L) Center speaker SPEAKER FRONT R CENTER FRONT L WOOFER R VIDEO AUDIO IN Y L PB/CB PR/CR S VIDEO (DVD ONLY) SURR R SURROUND BACK R SURR L WOOFER AUDIO IN S AT COMPOMEMT VIDEO OUT L VIDEO MONITOR Surround speaker (R) Subwoofer Surround speaker (L) continued 15US
Getting Started Terminals for connecting the speakers Connect the Front speakers Surround speakers Center speaker Subwoofer DAV-FR1 Front speaker (R) To the SPEAKER FRONT L (white) and R (red) jacks SPEAKER SURR L (blue) and R (gray) jacks SPEAKER CENTER (green) jack SPEAKER WOOFER (purple) jacks Front speaker (L) Center speaker SPEAKER FRONT R CENTER FRONT L WOOFER R VIDEO AUDIO IN Y L PB/CB PR/CR S VIDEO (DVD ONLY) SURR R SURROUND BACK R SURR L WOOFER AUDIO IN S AT COMPOMEMT VIDEO OUT L VIDEO MONITOR Surround speaker (R) Subwoofer Surround speaker (L) continued 15US
Operating Instructions
Page 16
DAV-FR8 Front speaker (R) Center speaker Front speaker (L) SPEAKER FRONT R CENTER FRONT L WOOFER R VIDEO AUDIO IN Y L PB/CB PR/CR S VIDEO (DVD ONLY) SURR R SURROUND BACK R SURR L WOOFER AUDIO IN S AT COMPOMEMT VIDEO OUT L VIDEO MONITOR Bottom of the front speaker Bottom of the front speaker Surround speaker (R) Subwoofer Surround speaker (L) 16US
DAV-FR8 Front speaker (R) Center speaker Front speaker (L) SPEAKER FRONT R CENTER FRONT L WOOFER R VIDEO AUDIO IN Y L PB/CB PR/CR S VIDEO (DVD ONLY) SURR R SURROUND BACK R SURR L WOOFER AUDIO IN S AT COMPOMEMT VIDEO OUT L VIDEO MONITOR Bottom of the front speaker Bottom of the front speaker Surround speaker (R) Subwoofer Surround speaker (L) 16US

Operating Instructions
Page 17
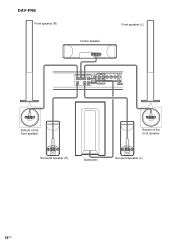
Getting Started DAV-FR9 Front speaker (R) Center speaker Front speaker (L) SPEAKER FRONT R CENTER FRONT L WOOFER R VIDEO AUDIO IN Y L PB/CB PR/CR S VIDEO (DVD ONLY) SURR R SURROUND BACK R SURR L WOOFER AUDIO IN S AT COMPOMEMT VIDEO OUT L VIDEO MONITOR Bottom of the front speaker Bottom of the front speaker Surround speaker (R) Subwoofer Bottom of the surround speaker Surround speaker (L) Bottom of the surround speaker continued 17US
Getting Started DAV-FR9 Front speaker (R) Center speaker Front speaker (L) SPEAKER FRONT R CENTER FRONT L WOOFER R VIDEO AUDIO IN Y L PB/CB PR/CR S VIDEO (DVD ONLY) SURR R SURROUND BACK R SURR L WOOFER AUDIO IN S AT COMPOMEMT VIDEO OUT L VIDEO MONITOR Bottom of the front speaker Bottom of the front speaker Surround speaker (R) Subwoofer Bottom of the surround speaker Surround speaker (L) Bottom of the surround speaker continued 17US
Operating Instructions
Page 18
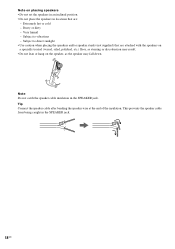
Subject to direct sunlight • Use caution when placing the speakers and/or speaker stands (not supplied) that are attached with the speakers on a specially treated (waxed, oiled, polished, etc.) floor, as staining or discoloration may result. • Do not lean or hang on placing speakers • Do not set the speakers in an inclined position. • Do not place the speakers in locations that are : - Note Do not catch the speaker cable insulation in the SPEAKER jack. 18US Dusty or dirty - Tip Connect the speaker cable after bending the speaker wire at the end of the ...
Subject to direct sunlight • Use caution when placing the speakers and/or speaker stands (not supplied) that are attached with the speakers on a specially treated (waxed, oiled, polished, etc.) floor, as staining or discoloration may result. • Do not lean or hang on placing speakers • Do not set the speakers in an inclined position. • Do not place the speakers in locations that are : - Note Do not catch the speaker cable insulation in the SPEAKER jack. 18US Dusty or dirty - Tip Connect the speaker cable after bending the speaker wire at the end of the ...
Operating Instructions
Page 19
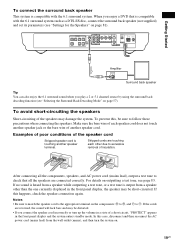
...also enjoy the 6.1 surround sound when you connect the speaker cord incorrectly or turn the system on outputting a test tone, see "Selecting the Surround Back Decoding Mode" on page 57). When you enjoy a DVD that all the speakers are touching each speaker cord does not touch another speaker jack ...or the bare wire of the speakers may damage the system. If no sound is heard from a speaker other due to excessive ...
...also enjoy the 6.1 surround sound when you connect the speaker cord incorrectly or turn the system on outputting a test tone, see "Selecting the Surround Back Decoding Mode" on page 57). When you enjoy a DVD that all the speakers are touching each speaker cord does not touch another speaker jack ...or the bare wire of the speakers may damage the system. If no sound is heard from a speaker other due to excessive ...

Operating Instructions
Page 20
... both cords. 20US 10 mm AWG #22. • Before attaching a new cable, strip off 10 mm (13/32 in the front panel display and the system enters standby mode. Tips • You can use a different speaker cable, you can detach the plug for attachment to another cable. Note that the two...; When using the subwoofer cord, note that the cord marked with letters are negative. (-) (-) (+) (+) (-) (-) • If you connect the subwoofer cord incorrectly or turn the system on.
... both cords. 20US 10 mm AWG #22. • Before attaching a new cable, strip off 10 mm (13/32 in the front panel display and the system enters standby mode. Tips • You can use a different speaker cable, you can detach the plug for attachment to another cable. Note that the two...; When using the subwoofer cord, note that the cord marked with letters are negative. (-) (-) (+) (+) (-) (-) • If you connect the subwoofer cord incorrectly or turn the system on.