Operating Instructions
Page 19
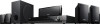
... 1: Installing the System How to position the system Install the system by referring to the subwoofer , Remove the foot pads from the protective cover. A B F C G A Front speaker (L (left)) B Front speaker (R (right)) C Center speaker D Surround speaker (L (left)) E Surround speaker (R (right)) F Subwoofer G Unit D E To attach the foot pads to the illustration below. Note • Use caution when placing the...
... 1: Installing the System How to position the system Install the system by referring to the subwoofer , Remove the foot pads from the protective cover. A B F C G A Front speaker (L (left)) B Front speaker (R (right)) C Center speaker D Surround speaker (L (left)) E Surround speaker (R (right)) F Subwoofer G Unit D E To attach the foot pads to the illustration below. Note • Use caution when placing the...
Operating Instructions
Page 20
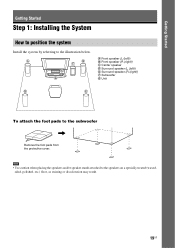
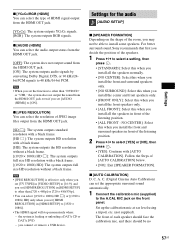
...(7/32 inch) 10 mm (13/32 inch) Hole on the back of the speaker 3 Fasten the screws to the wall, then hang the speaker on a vertical and flat wall where reinforcement is applied. • Sony is especially fragile, attach the screws securely to a beam. Depth of each...As a plaster board wall is not responsible for the wall material and strength. Color tube Front left speaker (L): White Front right speaker (R): Red Center speaker: Green Surround left speaker (L): Blue Surround right speaker (R): Gray 2 Prepare screws (not supplied) that are suitable for the hole on the back of ...
...(7/32 inch) 10 mm (13/32 inch) Hole on the back of the speaker 3 Fasten the screws to the wall, then hang the speaker on a vertical and flat wall where reinforcement is applied. • Sony is especially fragile, attach the screws securely to a beam. Depth of each...As a plaster board wall is not responsible for the wall material and strength. Color tube Front left speaker (L): White Front right speaker (R): Red Center speaker: Green Surround left speaker (L): Blue Surround right speaker (R): Gray 2 Prepare screws (not supplied) that are suitable for the hole on the back of ...
Operating Instructions
Page 21
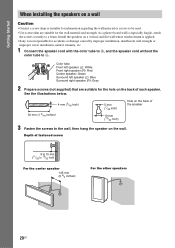
SPEAKERSUSR L SUR R FRONT R FRONSTPLEAKSEURBWSOOFER CENTER Red (Front right speaker (R)) Gray (Surround right speaker (R)) Blue (Surround left speaker (L)) Green (Center speaker) Purple (Subwoofer) White (Front left speaker (L)) 2 Connect the speaker cord with the color tube to 3, and the speaker cord without the color tube to the subwoofer. Rear of the unit until they click. Getting Started Step 2: Connecting the System Connecting...
SPEAKERSUSR L SUR R FRONT R FRONSTPLEAKSEURBWSOOFER CENTER Red (Front right speaker (R)) Gray (Surround right speaker (R)) Blue (Surround left speaker (L)) Green (Center speaker) Purple (Subwoofer) White (Front left speaker (L)) 2 Connect the speaker cord with the color tube to 3, and the speaker cord without the color tube to the subwoofer. Rear of the unit until they click. Getting Started Step 2: Connecting the System Connecting...
Operating Instructions
Page 27
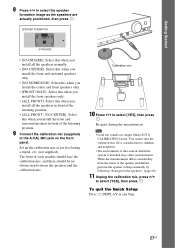
...; Loud test sounds are actually positioned, then press . SPEAKER FORMATION STANDARD • [STANDARD]: Select this when you install all the speakers normally. • [NO CENTER]: Select this when you install the front and surround speakers only. • [NO SURROUND]: Select this when you install the center and front speakers only. • [FRONT ONLY]: Select this when...
...; Loud test sounds are actually positioned, then press . SPEAKER FORMATION STANDARD • [STANDARD]: Select this when you install all the speakers normally. • [NO CENTER]: Select this when you install the front and surround speakers only. • [NO SURROUND]: Select this when you install the center and front speakers only. • [FRONT ONLY]: Select this when...
Operating Instructions
Page 44
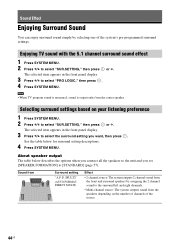
...SYSTEM MENU. MULTI" (AUTO FORMAT DIRECT MULTI) Effect • 2 channel source: The system outputs 2 channel sound from the front and surround speakers by selecting one of the source. 44US The selected item appears in the front panel display. 3 Press X/x to select "PRO LOGIC," then... MENU. The selected item appears in the front panel display. 3 Press X/x to select the surround setting you set [SPEAKER FORMATION] to [STANDARD] (page 57). Sound from the center speaker. Enjoying TV sound with the 5.1 channel surround sound effect 1 Press SYSTEM MENU. 2 Press X/x to select "SUR....
...SYSTEM MENU. MULTI" (AUTO FORMAT DIRECT MULTI) Effect • 2 channel source: The system outputs 2 channel sound from the front and surround speakers by selecting one of the source. 44US The selected item appears in the front panel display. 3 Press X/x to select "PRO LOGIC," then... MENU. The selected item appears in the front panel display. 3 Press X/x to select the surround setting you set [SPEAKER FORMATION] to [STANDARD] (page 57). Sound from the center speaker. Enjoying TV sound with the 5.1 channel surround sound effect 1 Press SYSTEM MENU. 2 Press X/x to select "SUR....
Operating Instructions
Page 57
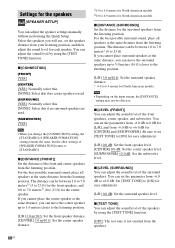
...connect or remove a USB device. NO CENTER]: Select this when you install all the speakers normally. • [NO CENTER]: Select this when you install the front and surround speakers only. • [NO SURROUND]: Select this when you install the center and front speakers only. • [FRONT ONLY]: Select ...RGB]: The system outputs RGB signals. For better surround sound, Sony recommends that first you decide the position of the speakers. 1 Press C/c to [ON]. Follow the Steps of [AUTO CALIBRATION] below. • [NO]: Exit [SPEAKER FORMATION]. the system is effective only when you set [TV...
...connect or remove a USB device. NO CENTER]: Select this when you install all the speakers normally. • [NO CENTER]: Select this when you install the front and surround speakers only. • [NO SURROUND]: Select this when you install the center and front speakers only. • [FRONT ONLY]: Select ...RGB]: The system outputs RGB signals. For better surround sound, Sony recommends that first you decide the position of the speakers. 1 Press C/c to [ON]. Follow the Steps of [AUTO CALIBRATION] below. • [NO]: Exit [SPEAKER FORMATION]. the system is effective only when you set [TV...
Operating Instructions
Page 60
.... You can adjust the sound level by using the [TEST TONE] function. Be sure to set the speaker distance from -6.0 dB to [ON] for easy adjustment. [L/R] 0.0 dB: Set the front speaker level. [CENTER] 0.0 dB: Set the center speaker level. [SUBWOOFER] +2.0 dB: Set the subwoofer level. You can set the parameter from the listening position. x [CONNECTION...
.... You can adjust the sound level by using the [TEST TONE] function. Be sure to set the speaker distance from -6.0 dB to [ON] for easy adjustment. [L/R] 0.0 dB: Set the front speaker level. [CENTER] 0.0 dB: Set the center speaker level. [SUBWOOFER] +2.0 dB: Set the subwoofer level. You can set the parameter from the listening position. x [CONNECTION...
Operating Instructions
Page 65
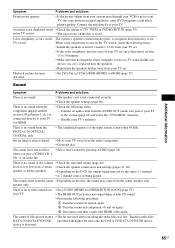
...when you play a VIDEO CD, a CD, or an audio file. Disable your TV. speaker only. Additional Information Symptom Problems and solutions Picture noise appears. • If the picture output from the center speaker only. An image is very low from your TV to [ON] (page 57). •...the setting of your TV. • Set [AUDIO (HDMI)] in [YCBCR/RGB (HDMI)] to your TV's speakers. The sound comes from the center • Depending on the The system's speakers contain magnet parts, so magnetic distortion may not be the entire 5.1 channel. • A 2 channel source is...
...when you play a VIDEO CD, a CD, or an audio file. Disable your TV. speaker only. Additional Information Symptom Problems and solutions Picture noise appears. • If the picture output from the center speaker only. An image is very low from your TV to [ON] (page 57). •...the setting of your TV. • Set [AUDIO (HDMI)] in [YCBCR/RGB (HDMI)] to your TV's speakers. The sound comes from the center • Depending on the The system's speakers contain magnet parts, so magnetic distortion may not be the entire 5.1 channel. • A 2 channel source is...
Operating Instructions
Page 71
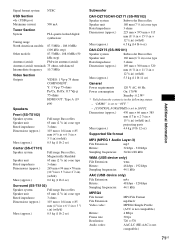
... mm × 164 mm × 85 mm (4 1/8 in × 6 1/2 in × 3 3/8 in) (w/h/d) 0.5 kg (1 lb 2 oz) Center (SS-CT101) Speaker system Speaker unit Rated impedance Dimensions (approx.) Mass (approx.) Full range Bass reflex, Magnetically Shielded 65 mm (2 5/8 in) cone type 3 ohms 265 mm × 94 ...× 315 mm (8 7/8 in × 15 5/8 in × 12 1/2 in) (w/h/d) Mass (approx.) 6.5 kg (14 lb 6 oz) DAV-DZ175 (SS-WS101) Speaker system Subwoofer Bass reflex Speaker unit 160 mm (6 3/8 in) cone type Rated impedance 3 ohms Dimensions (approx.) 169 mm × 300 mm × 320 mm (6 3/4 in...
... mm × 164 mm × 85 mm (4 1/8 in × 6 1/2 in × 3 3/8 in) (w/h/d) 0.5 kg (1 lb 2 oz) Center (SS-CT101) Speaker system Speaker unit Rated impedance Dimensions (approx.) Mass (approx.) Full range Bass reflex, Magnetically Shielded 65 mm (2 5/8 in) cone type 3 ohms 265 mm × 94 ...× 315 mm (8 7/8 in × 15 5/8 in × 12 1/2 in) (w/h/d) Mass (approx.) 6.5 kg (14 lb 6 oz) DAV-DZ175 (SS-WS101) Speaker system Subwoofer Bass reflex Speaker unit 160 mm (6 3/8 in) cone type Rated impedance 3 ohms Dimensions (approx.) 169 mm × 300 mm × 320 mm (6 3/4 in...


