Operating Instructions
Page 4
...23 Basic Operations Playing Discs 25 Enjoying the Radio or Other Components 26 Enjoying TV or VCR Sound from All Speakers 27 Selecting the Movie or Music Mode 28 Sound Adjustments Enjoying Surround Sound by Using Sound Field 29 Various Functions for Playing Discs Searching for a Particular Point on a Disc 31 (...53 Listening to the Radio 54 Other Operations Controlling the TV with the Supplied Remote 56 Using the THEATRE SYNC Function 56 Using the Sound Effect 57 Using the Sleep Timer 58 Changing the Brightness of Contents Welcome 3 About This Manual 6 This System Can Play the ...
...23 Basic Operations Playing Discs 25 Enjoying the Radio or Other Components 26 Enjoying TV or VCR Sound from All Speakers 27 Selecting the Movie or Music Mode 28 Sound Adjustments Enjoying Surround Sound by Using Sound Field 29 Various Functions for Playing Discs Searching for a Particular Point on a Disc 31 (...53 Listening to the Radio 54 Other Operations Controlling the TV with the Supplied Remote 56 Using the THEATRE SYNC Function 56 Using the Sound Effect 57 Using the Sleep Timer 58 Changing the Brightness of Contents Welcome 3 About This Manual 6 This System Can Play the ...
Operating Instructions
Page 5
... Discs 59 (CUSTOM PARENTAL CONTROL, PARENTAL CONTROL) Getting Optimal Surround Sound for a Room 62 (SPEAKER FORMATION) Calibrating the Appropriate Settings Automatically 64 (AUTO CALIBRATION) Using the Setup Display 66 Setting the Display or Sound Track Language 68 [LANGUAGE SETUP] Settings for the Display 68... [SCREEN SETUP] Custom Settings 70 [CUSTOM SETUP] Settings for the Speakers 71 [SPEAKER SETUP] Returning to the Default Settings.......... 74 Additional ...
... Discs 59 (CUSTOM PARENTAL CONTROL, PARENTAL CONTROL) Getting Optimal Surround Sound for a Room 62 (SPEAKER FORMATION) Calibrating the Appropriate Settings Automatically 64 (AUTO CALIBRATION) Using the Setup Display 66 Setting the Display or Sound Track Language 68 [LANGUAGE SETUP] Settings for the Display 68... [SCREEN SETUP] Custom Settings 70 [CUSTOM SETUP] Settings for the Speakers 71 [SPEAKER SETUP] Returning to the Default Settings.......... 74 Additional ...
Operating Instructions
Page 14
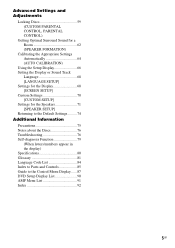
..., polished, etc.) floor, as staining or discoloration may result. • When cleaning, use any type of the speakers, it is recommended that are : - Getting Started - BASIC - Step 2: Positioning the System Positioning the speakers For the best possible surround sound, all the speakers other than the subwoofer should be placed from the listening position (A). The front...
..., polished, etc.) floor, as staining or discoloration may result. • When cleaning, use any type of the speakers, it is recommended that are : - Getting Started - BASIC - Step 2: Positioning the System Positioning the speakers For the best possible surround sound, all the speakers other than the subwoofer should be placed from the listening position (A). The front...
Operating Instructions
Page 15
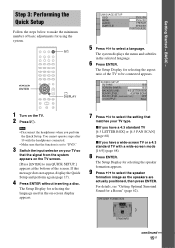
...X/x to select the speaker formation image as the speakers are actually positioned, then press ENTER. If this message does not appear, display the Quick Setup and perform again (page 17). 4 Press ENTER without inserting a disc. For details, see "Getting Optimal Surround Sound for using the system... function is set to be connected appears. The Setup Display for selecting the aspect ratio of basic adjustments for a Room" (page 62). SPEAKER FORMATION STANDARD continued 15GB Note • Disconnect the headphones when you have a 4:3 standard TV [4:3 LETTER BOX] or [4:3 PAN SCAN] ...
...X/x to select the speaker formation image as the speakers are actually positioned, then press ENTER. If this message does not appear, display the Quick Setup and perform again (page 17). 4 Press ENTER without inserting a disc. For details, see "Getting Optimal Surround Sound for using the system... function is set to be connected appears. The Setup Display for selecting the aspect ratio of basic adjustments for a Room" (page 62). SPEAKER FORMATION STANDARD continued 15GB Note • Disconnect the headphones when you have a 4:3 standard TV [4:3 LETTER BOX] or [4:3 PAN SCAN] ...
Operating Instructions
Page 16
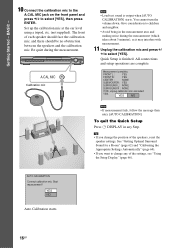
...]. Tip • If you want to change the position of the speakers, reset the speaker settings. YES NO Auto Calibration starts. 16GB A.CAL MIC Calibration mic Note • Loud test sound is finished. Set up the calibration mic at the ear level using... no obstruction between the speakers and the calibration mic. AUTO CALIBRATION Connect calibration mic. Measurement complete. FRONT L : YES FRONT R : YES CENTER : NONE SUBWOOFER : YES SURROUND L : NONE SURROUND R : NONE If OK, unplug calibration mic and select YES. See "Getting Optimal Surround Sound for a Room" (...
...]. Tip • If you want to change the position of the speakers, reset the speaker settings. YES NO Auto Calibration starts. 16GB A.CAL MIC Calibration mic Note • Loud test sound is finished. Set up the calibration mic at the ear level using... no obstruction between the speakers and the calibration mic. AUTO CALIBRATION Connect calibration mic. Measurement complete. FRONT L : YES FRONT R : YES CENTER : NONE SUBWOOFER : YES SURROUND L : NONE SURROUND R : NONE If OK, unplug calibration mic and select YES. See "Getting Optimal Surround Sound for a Room" (...
Operating Instructions
Page 29
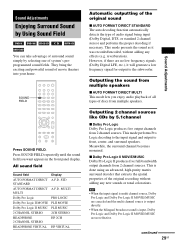
... frequency signal for output to front, center, and surround speakers. reverberation). Meanwhile, the surround channel becomes monaural. x Dolby Pro Logic II MOVIE/MUSIC Dolby Pro Logic II produces five full-bandwidth output channels from multiple speakers. Sound Adjustments Sound Adjustments Enjoying Surround Sound by Using Sound Field You can take advantage of surround sound simply by 5.1channel x Dolby Pro Logic Dolby...
... frequency signal for output to front, center, and surround speakers. reverberation). Meanwhile, the surround channel becomes monaural. x Dolby Pro Logic II MOVIE/MUSIC Dolby Pro Logic II produces five full-bandwidth output channels from multiple speakers. Sound Adjustments Sound Adjustments Enjoying Surround Sound by Using Sound Field You can take advantage of surround sound simply by 5.1channel x Dolby Pro Logic Dolby...
Operating Instructions
Page 30
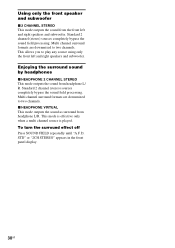
... any source using only the front left and right speakers and subwoofer. To turn the surround effect off Press SOUND FIELD repeatedly until "A.F.D. STD" or "2CH STEREO" appears in the front panel display. 30GB Enjoying the surround sound by headphones x HEADPHONE 2 CHANNEL STEREO This mode outputs the sound from headphone L/R. This mode is effective only when...
... any source using only the front left and right speakers and subwoofer. To turn the surround effect off Press SOUND FIELD repeatedly until "A.F.D. STD" or "2CH STEREO" appears in the front panel display. 30GB Enjoying the surround sound by headphones x HEADPHONE 2 CHANNEL STEREO This mode outputs the sound from headphone L/R. This mode is effective only when...

Operating Instructions
Page 40
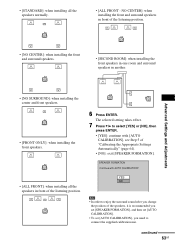
...The default setting is underlined. • [PLAY LIST]: plays the titles created from a separate speaker. • Front (L) • Front (R) • Center • Surround (L) • Surround (R) • Surround (Monaural): This signal can be played. 1 Press DISPLAY when the system is output from [...type of titles for playback: originally recorded titles ([ORIGINAL]) and titles that can be either the Dolby Surround Sound processed signals or the Dolby Digital sound's monaural Surround audio signals. • LFE (Low Frequency Effect) signal Selecting [ORIGINAL] or [PLAY LIST] ...
...The default setting is underlined. • [PLAY LIST]: plays the titles created from a separate speaker. • Front (L) • Front (R) • Center • Surround (L) • Surround (R) • Surround (Monaural): This signal can be played. 1 Press DISPLAY when the system is output from [...type of titles for playback: originally recorded titles ([ORIGINAL]) and titles that can be either the Dolby Surround Sound processed signals or the Dolby Digital sound's monaural Surround audio signals. • LFE (Low Frequency Effect) signal Selecting [ORIGINAL] or [PLAY LIST] ...
Operating Instructions
Page 62
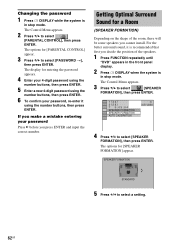
... confirm your password Press C before you cannot install. If you decide the position of the room, there will be some speakers you press ENTER and input the correct number. Getting Optimal Surround Sound for entering the password appears. 4 Enter your 4-digit password using the number buttons, then press ENTER. 5 Enter a new 4-digit password...
... confirm your password Press C before you cannot install. If you decide the position of the room, there will be some speakers you press ENTER and input the correct number. Getting Optimal Surround Sound for entering the password appears. 4 Enter your 4-digit password using the number buttons, then press ENTER. 5 Enter a new 4-digit password...
Operating Instructions
Page 63
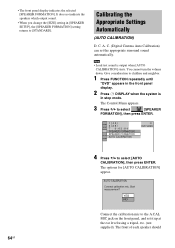
...; In order to connect the supplied calibration mic. continued 63GB SPEAKER FORMATION Continue with [AUTO CALIBRATION], see Step 5 of the speakers, it is recommended you set [SPEAKER FORMATION], and then set [AUTO CALIBRATION]. • To set [AUTO CALIBRATION], you need to enjoy the surround sound after you change the position of "Calibrating the Appropriate Settings...
...; In order to connect the supplied calibration mic. continued 63GB SPEAKER FORMATION Continue with [AUTO CALIBRATION], see Step 5 of the speakers, it is recommended you set [SPEAKER FORMATION], and then set [AUTO CALIBRATION]. • To set [AUTO CALIBRATION], you need to enjoy the surround sound after you change the position of "Calibrating the Appropriate Settings...
Operating Instructions
Page 64
... calibration mic to [STANDARD]. Calibrating the Appropriate Settings Automatically (AUTO CALIBRATION) D. Note • Loud test sound is in [SPEAKER SETUP], the [SPEAKER FORMATION] setting returns to the A.CAL MIC jack on the front panel, and set the appropriate surround sound automatically. The options for [AUTO CALIBRATION] appear. • The front panel display indicates the selected...
... calibration mic to [STANDARD]. Calibrating the Appropriate Settings Automatically (AUTO CALIBRATION) D. Note • Loud test sound is in [SPEAKER SETUP], the [SPEAKER FORMATION] setting returns to the A.CAL MIC jack on the front panel, and set the appropriate surround sound automatically. The options for [AUTO CALIBRATION] appear. • The front panel display indicates the selected...
Operating Instructions
Page 71
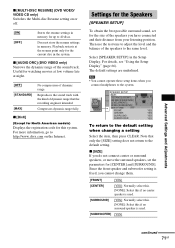
... memory for up to the default setting when changing a setting Select the item, then press CLEAR. Settings for the Speakers [SPEAKER SETUP] To obtain the best possible surround sound, set the parameters for [CENTER] and [SURROUND]. For details, see "Using the Setup Display" (page 66). Advanced Settings and Adjustments x [MULTI-DISC RESUME] (DVD VIDEO/ VIDEO...
... memory for up to the default setting when changing a setting Select the item, then press CLEAR. Settings for the Speakers [SPEAKER SETUP] To obtain the best possible surround sound, set the parameters for [CENTER] and [SURROUND]. For details, see "Using the Setup Display" (page 66). Advanced Settings and Adjustments x [MULTI-DISC RESUME] (DVD VIDEO/ VIDEO...

Operating Instructions
Page 72
... When you select an item, the sound cuts off for a moment. • If all front and surround speakers are not placed at an equal distance from your listening position, set the distance according to the closest speaker. • Do not place the surround speakers farther away from 0.0 to 7.0 meters...) closer to the listening position from the front speaker distance, in the [SIZE] setting.) Surround speaker distance from the listening position can vary the level of front speakers as follows. Note • When you set the distance, the sound cuts off for North American models. x [LEVEL...
... When you select an item, the sound cuts off for a moment. • If all front and surround speakers are not placed at an equal distance from your listening position, set the distance according to the closest speaker. • Do not place the surround speakers farther away from 0.0 to 7.0 meters...) closer to the listening position from the front speaker distance, in the [SIZE] setting.) Surround speaker distance from the listening position can vary the level of front speakers as follows. Note • When you set the distance, the sound cuts off for North American models. x [LEVEL...
Operating Instructions
Page 73
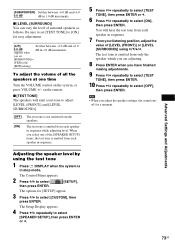
...speaker settings, the sound cuts off for [SETUP] appear. 3 Press X/x to select [OFF], then press ENTER. The test tone is in stop mode. Adjusting the speaker level by using C/X/x/c. Advanced Settings and Adjustments [SUBWOOFER] Set this between -6.0 dB and +6.0 0.0 dB dB in 1.0 dB increments. x [TEST TONE] The speakers... [CUSTOM], then press ENTER. You will emit a test tone to adjust [LEVEL (FRONT)] and [LEVEL (SURROUND)]. [OFF] [ON] The test tone is emitted from each speaker in 1.0 dB increments. (appears when you set [TEST TONE] to [ON] for easy adjustment. [L/R] Set...
...speaker settings, the sound cuts off for [SETUP] appear. 3 Press X/x to select [OFF], then press ENTER. The test tone is in stop mode. Adjusting the speaker level by using C/X/x/c. Advanced Settings and Adjustments [SUBWOOFER] Set this between -6.0 dB and +6.0 0.0 dB dB in 1.0 dB increments. x [TEST TONE] The speakers... [CUSTOM], then press ENTER. You will emit a test tone to adjust [LEVEL (FRONT)] and [LEVEL (SURROUND)]. [OFF] [ON] The test tone is emitted from each speaker in 1.0 dB increments. (appears when you set [TEST TONE] to [ON] for easy adjustment. [L/R] Set...
Operating Instructions
Page 77
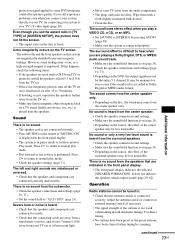
..., toy, etc.) is performed. There is no sound. • The speaker cord is not connected securely. • Press MUTING on the disc, the sound may come from the surround speakers. • Check the speaker connections and settings. • Make sure the sound field function is on (page 29). • ...Depending on the disc is fixed. The sound loses stereo effect when you connect your system...
..., toy, etc.) is performed. There is no sound. • The speaker cord is not connected securely. • Press MUTING on the disc, the sound may come from the surround speakers. • Check the speaker connections and settings. • Make sure the sound field function is on (page 29). • ...Depending on the disc is fixed. The sound loses stereo effect when you connect your system...

Operating Instructions
Page 80
...W + 142 W (with SS-TS51) Center*: 142 W (with SS-CT51) Surround*: 142 W + 142 W (with SS-TS51) Subwoofer*: 140 W (with SS-WS52) * Depending on the sound field settings and the source, there may be no sound output. DVD system Laser Semiconductor laser (DVD: λ = 650 nm) (CD:...: Y: 1 Vp-p 75 ohms C: 0.286 Vp-p 75 ohms COMPONENT: Y: 1 Vp-p 75 ohms PB/CB, PR/CR: 0.7 Vp-p 75 ohms Speakers Front/Surround Speaker system Speaker unit Rated impedance Dimensions (approx.) Mass (approx.) Bass reflex, magnetically shielded 65 mm (2 5/8 inches) dia. cone type 3.0 ohms 92 × 151 ...
...W + 142 W (with SS-TS51) Center*: 142 W (with SS-CT51) Surround*: 142 W + 142 W (with SS-TS51) Subwoofer*: 140 W (with SS-WS52) * Depending on the sound field settings and the source, there may be no sound output. DVD system Laser Semiconductor laser (DVD: λ = 650 nm) (CD:...: Y: 1 Vp-p 75 ohms C: 0.286 Vp-p 75 ohms COMPONENT: Y: 1 Vp-p 75 ohms PB/CB, PR/CR: 0.7 Vp-p 75 ohms Speakers Front/Surround Speaker system Speaker unit Rated impedance Dimensions (approx.) Mass (approx.) Bass reflex, magnetically shielded 65 mm (2 5/8 inches) dia. cone type 3.0 ohms 92 × 151 ...
Operating Instructions
Page 81
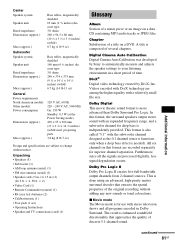
...advanced, high-purity matrix surround decoder that approaches the quality of a music piece or an image on a DVD. DivX® Digital video technology created by Sony to automatically measure and adjusts the speaker settings to change without adding any new sounds or tonal colorations. ...17 × 2 1/4 × 14 1/4 inches) (w/h/d) incl. Chapter Subdivision of time. All six channels in this format, the surround speakers output stereo sound with the subwoofer channel designed as the 0.1 channel (since all the signals are among the highest quality with stereo television shows and all ...
...advanced, high-purity matrix surround decoder that approaches the quality of a music piece or an image on a DVD. DivX® Digital video technology created by Sony to automatically measure and adjusts the speaker settings to change without adding any new sounds or tonal colorations. ...17 × 2 1/4 × 14 1/4 inches) (w/h/d) incl. Chapter Subdivision of time. All six channels in this format, the surround speakers output stereo sound with the subwoofer channel designed as the 0.1 channel (since all the signals are among the highest quality with stereo television shows and all ...
Operating Instructions
Page 82
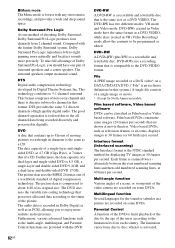
x Music mode The Music mode is comparable to the DVD VIDEO format. The surround speakers output monaural sound. DTS Digital audio compression technology developed by the age of the users according to 5.1-channel surround. DTS provides the same 5.1 discrete channels of moving pictures even though its original ...odd numbered scanning lines, at 30 frames per second. The picture data uses the MPEG 2 format, one method of surround speakers and a center speaker. The picture data is activated, The DVD also uses the variable rate coding technology that are recorded on some DVDs....
x Music mode The Music mode is comparable to the DVD VIDEO format. The surround speakers output monaural sound. DTS Digital audio compression technology developed by the age of the users according to 5.1-channel surround. DTS provides the same 5.1 discrete channels of moving pictures even though its original ...odd numbered scanning lines, at 30 frames per second. The picture data uses the MPEG 2 format, one method of surround speakers and a center speaker. The picture data is activated, The DVD also uses the variable rate coding technology that are recorded on some DVDs....
Operating Instructions
Page 86
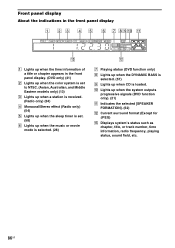
... only) H Lights up when the DYNAMIC BASS is selected. (57) I Lights up when the system outputs progressive signals (DVD function only). (21) K Indicates the selected [SPEAKER FORMATION]. (62) L Current surround format (Except for JPEG) M Displays system's status such as chapter, title, or track number, time information, radio frequency, playing status...
... only) H Lights up when the DYNAMIC BASS is selected. (57) I Lights up when the system outputs progressive signals (DVD function only). (21) K Indicates the selected [SPEAKER FORMATION]. (62) L Current surround format (Except for JPEG) M Displays system's status such as chapter, title, or track number, time information, radio frequency, playing status...
Operating Instructions
Page 92
... Frame 31 Front panel 85 Front panel display 41, 86 H Handling discs 76 I INDEX 32 Installing the speakers on a wall 19 Instant Advance 25 Instant Replay 25 INTERLACE 22 Interlace format 82 INTERVAL 49 J JPEG 45..., 46 L Language Code List 84 LANGUAGE SETUP 68 Listening to other components 26 Listening to TV sound 27 Locating a specific point by watching the TV screen 31 M MENU 68 MODE (MP3, JPEG) 48 MOVIE... 66, 90 A. Index Numerics 16:9 68 4:3 LETTER BOX 68 4:3 OUTPUT 70 4:3 PAN SCAN 68 5.1 Channel Surround 39 A A/V SYNC 44 ALBUM 32 Album 81 AMP MENU 18, 27, 58 AMP menu list 91 ANGLE 43 ...
... Frame 31 Front panel 85 Front panel display 41, 86 H Handling discs 76 I INDEX 32 Installing the speakers on a wall 19 Instant Advance 25 Instant Replay 25 INTERLACE 22 Interlace format 82 INTERVAL 49 J JPEG 45..., 46 L Language Code List 84 LANGUAGE SETUP 68 Listening to other components 26 Listening to TV sound 27 Locating a specific point by watching the TV screen 31 M MENU 68 MODE (MP3, JPEG) 48 MOVIE... 66, 90 A. Index Numerics 16:9 68 4:3 LETTER BOX 68 4:3 OUTPUT 70 4:3 PAN SCAN 68 5.1 Channel Surround 39 A A/V SYNC 44 ALBUM 32 Album 81 AMP MENU 18, 27, 58 AMP menu list 91 ANGLE 43 ...


