
Child Safety: It Makes A Difference Where Your TV Stands
Page 1
... may cause unnecessary injury. Thank you have more than one television. Sometimes televisions are improperly secured or inappropriately situated on dressers, bookcases, shelves, desks, audio speakers, chests or carts. Tune Into Safety 1 One size does NOT fit all. The industry is a Sector of television and consumer electronics furniture manufacturers to climb...
... may cause unnecessary injury. Thank you have more than one television. Sometimes televisions are improperly secured or inappropriately situated on dressers, bookcases, shelves, desks, audio speakers, chests or carts. Tune Into Safety 1 One size does NOT fit all. The industry is a Sector of television and consumer electronics furniture manufacturers to climb...
Operating Instructions
Page 4
...TV 10 Step 2: Positioning the System ...14 Step 3: Performing the Quick Setup 15 Getting Started - Turning off the Demonstration 18 Installing the Speakers on a Wall.......... 19 TV Hookup (Advanced 20 Other Component Hookup 23 Basic Operations Playing Discs 25 Enjoying the Radio or Other Components 26 ...Enjoying TV or VCR Sound from All Speakers 27 Selecting the Movie or Music Mode 28 Sound Adjustments Enjoying Surround Sound by Using Sound Field 29 Various Functions for Playing Discs...
...TV 10 Step 2: Positioning the System ...14 Step 3: Performing the Quick Setup 15 Getting Started - Turning off the Demonstration 18 Installing the Speakers on a Wall.......... 19 TV Hookup (Advanced 20 Other Component Hookup 23 Basic Operations Playing Discs 25 Enjoying the Radio or Other Components 26 ...Enjoying TV or VCR Sound from All Speakers 27 Selecting the Movie or Music Mode 28 Sound Adjustments Enjoying Surround Sound by Using Sound Field 29 Various Functions for Playing Discs...
Operating Instructions
Page 5
...Settings and Adjustments Locking Discs 59 (CUSTOM PARENTAL CONTROL, PARENTAL CONTROL) Getting Optimal Surround Sound for a Room 62 (SPEAKER FORMATION) Calibrating the Appropriate Settings Automatically 64 (AUTO CALIBRATION) Using the Setup Display 66 Setting the Display or Sound... Language 68 [LANGUAGE SETUP] Settings for the Display 68 [SCREEN SETUP] Custom Settings 70 [CUSTOM SETUP] Settings for the Speakers 71 [SPEAKER SETUP] Returning to the Default Settings.......... 74 Additional Information Precautions 75 Notes about the Discs 76 Troubleshooting 76 Self-diagnosis Function 79...
...Settings and Adjustments Locking Discs 59 (CUSTOM PARENTAL CONTROL, PARENTAL CONTROL) Getting Optimal Surround Sound for a Room 62 (SPEAKER FORMATION) Calibrating the Appropriate Settings Automatically 64 (AUTO CALIBRATION) Using the Setup Display 66 Setting the Display or Sound... Language 68 [LANGUAGE SETUP] Settings for the Display 68 [SCREEN SETUP] Custom Settings 70 [CUSTOM SETUP] Settings for the Speakers 71 [SPEAKER SETUP] Returning to the Default Settings.......... 74 Additional Information Precautions 75 Notes about the Discs 76 Troubleshooting 76 Self-diagnosis Function 79...
Operating Instructions
Page 10
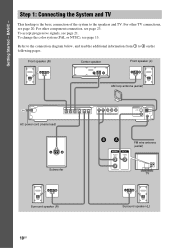
... 23. For other TV connections, see page 13. Refer to the connection diagram below, and read the additional information from 1 to the speakers and TV. To change the color system (PAL or NTSC), see page 20. For other component connection, see page 21. Step 1: ...Connecting the System and TV This hookup is the basic connection of the system to 4 on the following pages. Front speaker (R) Center speaker Front speaker (L) AM loop antenna (aerial) AC power cord (mains lead) SPEAKER FRONT R FRONT L CENTER WOOFER SUR R SUR L R AUDIO IN L Y PB/CB PR/CR TV/VCR (...
... 23. For other TV connections, see page 13. Refer to the connection diagram below, and read the additional information from 1 to the speakers and TV. To change the color system (PAL or NTSC), see page 20. For other component connection, see page 21. Step 1: ...Connecting the System and TV This hookup is the basic connection of the system to 4 on the following pages. Front speaker (R) Center speaker Front speaker (L) AM loop antenna (aerial) AC power cord (mains lead) SPEAKER FRONT R FRONT L CENTER WOOFER SUR R SUR L R AUDIO IN L Y PB/CB PR/CR TV/VCR (...
Operating Instructions
Page 11
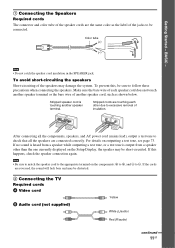
... distorted. 2 Connecting the TV Required cords A Video cord . Stripped speaker cord is output from a speaker other due to the appropriate terminal on the Setup Display, the speaker may be sure to check that all the components, speakers, and AC power cord (mains lead), output a test tone to follow... these precautions when connecting the speakers. Note • Be sure to match the speaker cord to excessive removal of the speakers may be connected. B Audio cord (not supplied) Yellow White (L/audio) Red (R/audio) continued ...
... distorted. 2 Connecting the TV Required cords A Video cord . Stripped speaker cord is output from a speaker other due to the appropriate terminal on the Setup Display, the speaker may be sure to check that all the components, speakers, and AC power cord (mains lead), output a test tone to follow... these precautions when connecting the speakers. Note • Be sure to match the speaker cord to excessive removal of the speakers may be connected. B Audio cord (not supplied) Yellow White (L/audio) Red (R/audio) continued ...

Operating Instructions
Page 12
... the TV sound or stereo sound of a 2 channel source from the plastic stand. 2 Set up the antenna (aerial). 1 Remove only the loop part from the 6 speakers, select the "Dolby Pro Logic," "Dolby Pro Logic II MOVIE," or "Dolby Pro Logic II MUSIC" sound field (page 29). 3 Connecting the Antenna (Aerial) To...
... the TV sound or stereo sound of a 2 channel source from the plastic stand. 2 Set up the antenna (aerial). 1 Remove only the loop part from the 6 speakers, select the "Dolby Pro Logic," "Dolby Pro Logic II MOVIE," or "Dolby Pro Logic II MUSIC" sound field (page 29). 3 Connecting the Antenna (Aerial) To...
Operating Instructions
Page 13
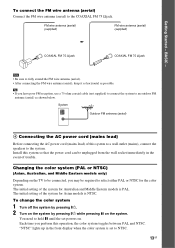
... only) Depending on the TV to an outdoor FM antenna (aerial) as possible. The initial setting of this system to a wall outlet (mains), connect the speakers to select either PAL or NTSC for the color system. "NTSC" lights up in the event of the system for Asian models is PAL. System...
... only) Depending on the TV to an outdoor FM antenna (aerial) as possible. The initial setting of this system to a wall outlet (mains), connect the speakers to select either PAL or NTSC for the color system. "NTSC" lights up in the event of the system for Asian models is PAL. System...
Operating Instructions
Page 14
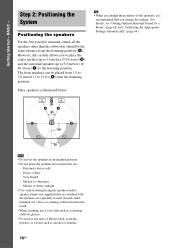
...scouring powder, or solvent such as illustrated below. Very humid - However, this system allows you to place the center speaker up to 1.6 meters (5 ft) closer (B) and the surround speakers up to 5.0 meters (16 ft) closer (C) to 23 ft) (A) from the listening position (A). Getting Started -... locations that you change the settings. Subject to vibrations - Tip • When you change the positions of the speakers, it is recommended that are attached with the speakers on a specially treated (waxed, oiled, polished, etc.) floor, as staining or discoloration may result. • When ...
...scouring powder, or solvent such as illustrated below. Very humid - However, this system allows you to place the center speaker up to 1.6 meters (5 ft) closer (B) and the surround speakers up to 5.0 meters (16 ft) closer (C) to 23 ft) (A) from the listening position (A). Getting Started -... locations that you change the settings. Subject to vibrations - Tip • When you change the positions of the speakers, it is recommended that are attached with the speakers on a specially treated (waxed, oiled, polished, etc.) floor, as staining or discoloration may result. • When ...
Operating Instructions
Page 15
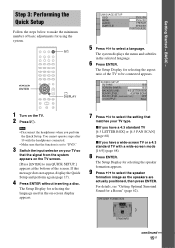
... TV or a 4:3 standard TV with the headphones connected. • Make sure that the signal from the system appears on the TV. 2 Press [/1. SPEAKER FORMATION STANDARD continued 15GB Getting Started - x If you have a 4:3 standard TV [4:3 LETTER BOX] or [4:3 PAN SCAN] (page 68) x If you... the function is set to "DVD." 3 Switch the input selector on -screen display appears. 7 Press X/x to select the speaker formation image as the speakers are actually positioned, then press ENTER. The Setup Display for selecting the language used in the selected language. 6 Press ENTER. ...
... TV or a 4:3 standard TV with the headphones connected. • Make sure that the signal from the system appears on the TV. 2 Press [/1. SPEAKER FORMATION STANDARD continued 15GB Getting Started - x If you have a 4:3 standard TV [4:3 LETTER BOX] or [4:3 PAN SCAN] (page 68) x If you... the function is set to "DVD." 3 Switch the input selector on -screen display appears. 7 Press X/x to select the speaker formation image as the speakers are actually positioned, then press ENTER. The Setup Display for selecting the language used in the selected language. 6 Press ENTER. ...
Operating Instructions
Page 16
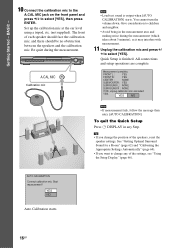
... measurement. 11 Unplug the calibration mic and press C/ c to change the position of each speaker should face the calibration mic, and there should be no obstruction between the speakers and the calibration mic. Quick Setup is output when [AUTO CALIBRATION] starts. YES NO Note... 16GB To quit the Quick Setup Press DISPLAY in the measurement area and making noise during the measurement. The front of the speakers, reset the speaker settings. Give consideration to select [YES], then press ENTER. AUTO CALIBRATION Connect calibration mic. See "Getting Optimal Surround Sound for...
... measurement. 11 Unplug the calibration mic and press C/ c to change the position of each speaker should face the calibration mic, and there should be no obstruction between the speakers and the calibration mic. Quick Setup is output when [AUTO CALIBRATION] starts. YES NO Note... 16GB To quit the Quick Setup Press DISPLAY in the measurement area and making noise during the measurement. The front of the speakers, reset the speaker settings. Give consideration to select [YES], then press ENTER. AUTO CALIBRATION Connect calibration mic. See "Getting Optimal Surround Sound for...
Operating Instructions
Page 19
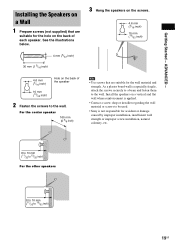
...improper screw installation, natural calamity, etc. 8 to 10 mm (11/32 to 13/32 inch) For the other speakers 8 to 10 mm (11/32 to 13/32 inch) 19GB Getting Started - See the illustrations below. 4 mm...mm (3/16 inch) 10 mm (13/32 inch) Hole on the back of the speaker 2 Fasten the screws to the wall. As a plaster board wall is not responsible for the hole on the...8226; Use screws that are suitable for the wall material and strength. For the center speaker 160 mm (6 3/8 inch) 3 Hang the speakers on a vertical and flat wall where reinforcement is applied. • Contact a screw ...
...improper screw installation, natural calamity, etc. 8 to 10 mm (11/32 to 13/32 inch) For the other speakers 8 to 10 mm (11/32 to 13/32 inch) 19GB Getting Started - See the illustrations below. 4 mm...mm (3/16 inch) 10 mm (13/32 inch) Hole on the back of the speaker 2 Fasten the screws to the wall. As a plaster board wall is not responsible for the hole on the...8226; Use screws that are suitable for the wall material and strength. For the center speaker 160 mm (6 3/8 inch) 3 Hang the speakers on a vertical and flat wall where reinforcement is applied. • Contact a screw ...

Operating Instructions
Page 20
... A (standard) to a TV. Picture quality improves in order from the video signals and will not be connected via an S video jack. To COMPONENT VIDEO OUT SPEAKER FRONT R FRONT L CENTER WOOFER SUR R SUR L R AUDIO IN L Y PB/CB PR/CR TV/VCR (DVD ONLY) COMPONENT VIDEO OUT MONITOR OUT S VIDEO (DVD ONLY) VIDEO...
... A (standard) to a TV. Picture quality improves in order from the video signals and will not be connected via an S video jack. To COMPONENT VIDEO OUT SPEAKER FRONT R FRONT L CENTER WOOFER SUR R SUR L R AUDIO IN L Y PB/CB PR/CR TV/VCR (DVD ONLY) COMPONENT VIDEO OUT MONITOR OUT S VIDEO (DVD ONLY) VIDEO...
Operating Instructions
Page 23
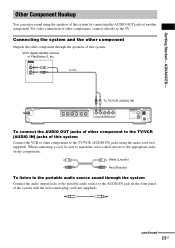
... or PlayStation 2, etc. Connecting the system and the other component Outputs the other components, connect directly to the TV/VCR (AUDIO IN) jacks using the speakers of this system by connecting the AUDIO OUT jacks of this system. continued 23GB AUDIO OUT L R To TV/VCR (AUDIO IN... Hookup You can enjoy sound using the audio cord (not supplied). White (L/audio) Red (R/audio) To listen to the portable audio source sound through the speakers of the system with the stereo mini-plug cord (not supplied). When connecting a cord, be sure to match the color-coded sleeves to the AUDIO...
... or PlayStation 2, etc. Connecting the system and the other component Outputs the other components, connect directly to the TV/VCR (AUDIO IN) jacks using the speakers of this system by connecting the AUDIO OUT jacks of this system. continued 23GB AUDIO OUT L R To TV/VCR (AUDIO IN... Hookup You can enjoy sound using the audio cord (not supplied). White (L/audio) Red (R/audio) To listen to the portable audio source sound through the speakers of the system with the stereo mini-plug cord (not supplied). When connecting a cord, be sure to match the color-coded sleeves to the AUDIO...

Operating Instructions
Page 27
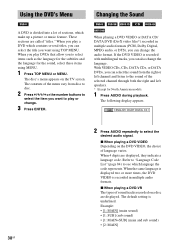
Enjoying TV or VCR Sound from All Speakers You can enjoy TV or VCR sound from the 6 speakers, select the "PRO LOGIC," "PLII MOVIE," or "PLII MUSIC" sound field. For details, see page 29. 27GB The setting is changed. • ATT OFF: normal ...input level. 5 Press ENTER. For details of a 2 channel source from all the speakers in this system. The AMP menu turns off. When you want to select a setting. • ATT ON: attenuates the input level. SOUND FIELD FUNCTION 1 Press...
Enjoying TV or VCR Sound from All Speakers You can enjoy TV or VCR sound from the 6 speakers, select the "PRO LOGIC," "PLII MOVIE," or "PLII MUSIC" sound field. For details, see page 29. 27GB The setting is changed. • ATT OFF: normal ...input level. 5 Press ENTER. For details of a 2 channel source from all the speakers in this system. The AMP menu turns off. When you want to select a setting. • ATT ON: attenuates the input level. SOUND FIELD FUNCTION 1 Press...
Operating Instructions
Page 29
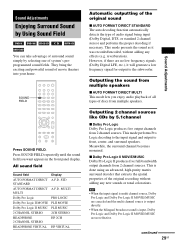
...home. This mode presents the sound as it will generate a low frequency signal for output to front, center, and surround speakers. Outputting the sound from multiple speakers x AUTO FORMAT DIRECT MULTI This mode lets you want appears in the front panel display. x Dolby Pro Logic II ...MOVIE/MUSIC Dolby Pro Logic II produces five full-bandwidth output channels from multiple speakers. All sound field Sound field Display AUTO FORMAT DIRECT A.F.D. However, if there are not effective. MULTI MULTI Dolby Pro Logic PRO LOGIC...
...home. This mode presents the sound as it will generate a low frequency signal for output to front, center, and surround speakers. Outputting the sound from multiple speakers x AUTO FORMAT DIRECT MULTI This mode lets you want appears in the front panel display. x Dolby Pro Logic II ...MOVIE/MUSIC Dolby Pro Logic II produces five full-bandwidth output channels from multiple speakers. All sound field Sound field Display AUTO FORMAT DIRECT A.F.D. However, if there are not effective. MULTI MULTI Dolby Pro Logic PRO LOGIC...
Operating Instructions
Page 30
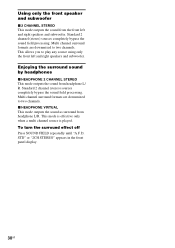
... L/R. This mode is effective only when a multi channel source is played. This allows you to play any source using only the front left and right speakers and subwoofer. Using only the front speaker and subwoofer x 2 CHANNEL STEREO This mode outputs the sound from the front left and right...
... L/R. This mode is effective only when a multi channel source is played. This allows you to play any source using only the front left and right speakers and subwoofer. Using only the front speaker and subwoofer x 2 CHANNEL STEREO This mode outputs the sound from the front left and right...
Operating Instructions
Page 38
The disc's menu appears on a disc are displayed. The contents of the menu vary from the right or left speakers. * Except for the sound, select these items using TOP MENU. With VIDEO CDs, CDs, DATA CDs, or DATA DVDs, you can select the sound from ...
The disc's menu appears on a disc are displayed. The contents of the menu vary from the right or left speakers. * Except for the sound, select these items using TOP MENU. With VIDEO CDs, CDs, DATA CDs, or DATA DVDs, you can select the sound from ...

Operating Instructions
Page 40
The default setting is underlined. • [PLAY LIST]: plays the titles created from a separate speaker. • Front (L) • Front (R) • Center • Surround (L) • Surround (R) • Surround (Monaural): This signal can be either the Dolby Surround Sound processed signals or ...
The default setting is underlined. • [PLAY LIST]: plays the titles created from a separate speaker. • Front (L) • Front (R) • Center • Surround (L) • Surround (R) • Surround (Monaural): This signal can be either the Dolby Surround Sound processed signals or ...

Operating Instructions
Page 45
... in the Packet Write format. • which have the extension ".MP3" (MP3 audio track) or ".JPG"/".JPEG" (JPEG image file) • which could damage your speaker system. • The system does not conform to the DCF* image file format * "Design rule for Camera File system": Image standards for Playing Discs About...
... in the Packet Write format. • which have the extension ".MP3" (MP3 audio track) or ".JPG"/".JPEG" (JPEG image file) • which could damage your speaker system. • The system does not conform to the DCF* image file format * "Design rule for Camera File system": Image standards for Playing Discs About...
Operating Instructions
Page 62
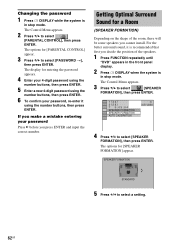
...before you cannot install. The Control Menu appears. 2 Press X/x to select [SPEAKER FORMATION], then press ENTER. The Control Menu appears. 3 Press X/x to select [SPEAKER FORMATION], then press ENTER. 1 ( 4 4 ) 3 ( 2 8 ) T 0:03:04 SPEAKER FORMATION SPEAKER FORMATION AUTO CALIBRATION DVD VIDEO 4 Press X/x to select [PARENTAL CONTROL], then press... your password, re-enter it is recommended that first you decide the position of the room, there will be some speakers you press ENTER and input the correct number. Changing the password 1 Press DISPLAY while the system is in stop mode...
...before you cannot install. The Control Menu appears. 2 Press X/x to select [SPEAKER FORMATION], then press ENTER. The Control Menu appears. 3 Press X/x to select [SPEAKER FORMATION], then press ENTER. 1 ( 4 4 ) 3 ( 2 8 ) T 0:03:04 SPEAKER FORMATION SPEAKER FORMATION AUTO CALIBRATION DVD VIDEO 4 Press X/x to select [PARENTAL CONTROL], then press... your password, re-enter it is recommended that first you decide the position of the room, there will be some speakers you press ENTER and input the correct number. Changing the password 1 Press DISPLAY while the system is in stop mode...


