
Child Safety: It Makes A Difference Where Your TV Stands
Page 1
... and remotes that may cause unnecessary injury. Use the appropriate furniture that is a growing trend, and larger televisions are popular purchases and are not always supported on dressers, bookcases, shelves, desks, audio speakers, chests or carts. The home theater entertainment ...experience is large enough to support the weight of television and consumer electronics furniture manufacturers to making home entertainment enjoyable and safe. The Industry Cares! Tune Into Safety 1 One...
... and remotes that may cause unnecessary injury. Use the appropriate furniture that is a growing trend, and larger televisions are popular purchases and are not always supported on dressers, bookcases, shelves, desks, audio speakers, chests or carts. The home theater entertainment ...experience is large enough to support the weight of television and consumer electronics furniture manufacturers to making home entertainment enjoyable and safe. The Industry Cares! Tune Into Safety 1 One...
Operating Instructions
Page 4
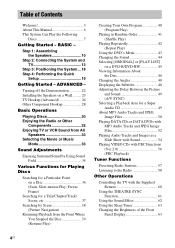
Step 1: Assembling the Speakers 10 Step 2: Connecting the System and TV 13 Step 3: Positioning the System ...18 Step 4: Performing the Quick Setup 19 Getting Started - ADVANCED - Turning off the Demonstration 22 Installing the Speakers on a Wall.......... 23 TV Hookup (...Functions (Ver.2.0 56 (PBC Playback) Tuner Functions Presetting Radio Stations 57 Listening to the Radio 58 Other Operations Controlling the TV with the Supplied Remote 60 Using the THEATRE SYNC Function 61 Using the Sound Effect 62 Using the Sleep Timer 63 Changing the Brightness of Contents Welcome 3 About This...
Step 1: Assembling the Speakers 10 Step 2: Connecting the System and TV 13 Step 3: Positioning the System ...18 Step 4: Performing the Quick Setup 19 Getting Started - ADVANCED - Turning off the Demonstration 22 Installing the Speakers on a Wall.......... 23 TV Hookup (...Functions (Ver.2.0 56 (PBC Playback) Tuner Functions Presetting Radio Stations 57 Listening to the Radio 58 Other Operations Controlling the TV with the Supplied Remote 60 Using the THEATRE SYNC Function 61 Using the Sound Effect 62 Using the Sleep Timer 63 Changing the Brightness of Contents Welcome 3 About This...
Operating Instructions
Page 6
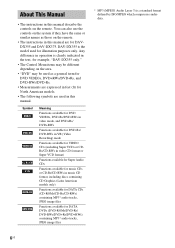
...8226; The following symbols are for DAVDX355 and DAV-DX375. DAV-DX355 is a standard format defined by ISO/MPEG which compresses audio data. 6US You can also use the controls on the system if they have the same or similar names as those on the remote. • The instructions in this manual ...describe the controls on the area. • "DVD" may be different depending on the remote. Any difference in operation is clearly indicated in the text, for example, "DAV-DX355 only." • The Control Menu items may be used as a general term for DVD VIDEOs, DVD...
...8226; The following symbols are for DAVDX355 and DAV-DX375. DAV-DX355 is a standard format defined by ISO/MPEG which compresses audio data. 6US You can also use the controls on the system if they have the same or similar names as those on the remote. • The instructions in this manual ...describe the controls on the area. • "DVD" may be different depending on the remote. Any difference in operation is clearly indicated in the text, for example, "DAV-DX355 only." • The Control Menu items may be used as a general term for DVD VIDEOs, DVD...
Operating Instructions
Page 9
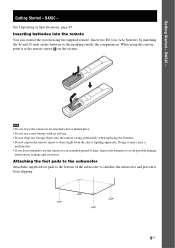
...; If you do not intend to use a new battery with an old one. • Do not drop any foreign object into the remote You can control the system using the remote, point it from the sun or lighting apparatus. BASIC - Insert two R6 (size AA) batteries by matching the 3 and # ends on... the system. Getting Started - Attaching the foot pads to the subwoofer Attach the supplied foot pads to the bottom of time, remove the ...
...; If you do not intend to use a new battery with an old one. • Do not drop any foreign object into the remote You can control the system using the remote, point it from the sun or lighting apparatus. BASIC - Insert two R6 (size AA) batteries by matching the 3 and # ends on... the system. Getting Started - Attaching the foot pads to the subwoofer Attach the supplied foot pads to the bottom of time, remove the ...
Operating Instructions
Page 22
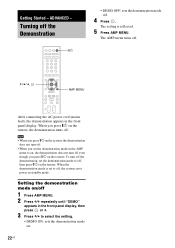
...off the Demonstration "/1 • DEMO OFF: sets the demonstration mode off . Note • When you press "/1 on the system, the demonstration does not turn off , the system saves power in the front panel display, then press or c. 3 Press X/x to on, the demonstration does not turn off ...the demonstration, set the demonstration mode to off . • When you press "/1 on the remote, the demonstration turns off , then press "/1 on the remote. Getting Started...
...off the Demonstration "/1 • DEMO OFF: sets the demonstration mode off . Note • When you press "/1 on the system, the demonstration does not turn off , the system saves power in the front panel display, then press or c. 3 Press X/x to on, the demonstration does not turn off ...the demonstration, set the demonstration mode to off . • When you press "/1 on the remote, the demonstration turns off , then press "/1 on the remote. Getting Started...
Operating Instructions
Page 30
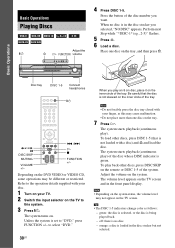
... not appear on the inner circle of the disc whose DISC indicator is not skewed on the TV to "DVD," press FUNCTION +/- The system turns on the system. The system starts playback (continuous play an 8 cm disc, place it on the TV screen. orange: a disc is being played back. - Press the button ...of the system. To load other discs, press DISC SKIP on the TV screen and in the disc stocker you want. The volume level appears on the remote or DISC 1-5 of the disc number you selected, "NO DISC" appears. Place one...
... not appear on the inner circle of the disc whose DISC indicator is not skewed on the TV to "DVD," press FUNCTION +/- The system turns on the system. The system starts playback (continuous play an 8 cm disc, place it on the TV screen. orange: a disc is being played back. - Press the button ...of the system. To load other discs, press DISC SKIP on the TV screen and in the disc stocker you want. The volume level appears on the remote or DISC 1-5 of the disc number you selected, "NO DISC" appears. Place one...
Operating Instructions
Page 60
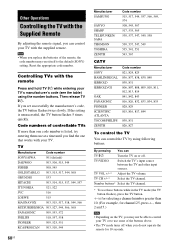
...'s code (see the table) using following buttons. Then release TV [/1. TV Manufacturer Code number SONY/AIWA 501 (default) DAEWOO 503, 506, 515, 544 FISHER 508, 545 GOLDSTAR/LG 503,...537, 547, 549, 558 530, 537, 547, 549 535, 541, 551 543, 567 CATV Manufacturer SONY HAMLIN/REGAL JERROLD JERROLD/GI OAK PANASONIC PIONEER SCIENTIFIC ATLANTA TOCOM/PHILIPS ZENITH Code number 821, 824, 825...try entering them one at a time until you find the one that works with the supplied remote. Reset the appropriate code number. is unsuccessful, the TV button flashes 5 times quickly. ...
...'s code (see the table) using following buttons. Then release TV [/1. TV Manufacturer Code number SONY/AIWA 501 (default) DAEWOO 503, 506, 515, 544 FISHER 508, 545 GOLDSTAR/LG 503,...537, 547, 549, 558 530, 537, 547, 549 535, 541, 551 543, 567 CATV Manufacturer SONY HAMLIN/REGAL JERROLD JERROLD/GI OAK PANASONIC PIONEER SCIENTIFIC ATLANTA TOCOM/PHILIPS ZENITH Code number 821, 824, 825...try entering them one at a time until you find the one that works with the supplied remote. Reset the appropriate code number. is unsuccessful, the TV button flashes 5 times quickly. ...
Operating Instructions
Page 61
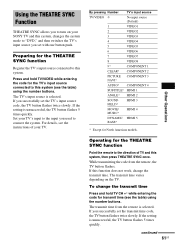
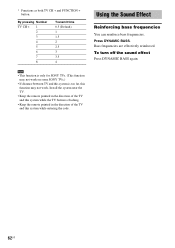
...THEATRE SYNC function Register the TV's input source connected to this system (see the table) using the number buttons. Using the THEATRE SYNC Function THEATRE SYNC allows you to turn on the TV. Preparing for the THEATRE SYNC function Point the remote to the direction of your TV's input to the input... you used to connect the system. The transmit time varies depending on your SONY TV and this function does not work, change the transmit time Press and hold...
...THEATRE SYNC function Register the TV's input source connected to this system (see the table) using the number buttons. Using the THEATRE SYNC Function THEATRE SYNC allows you to turn on the TV. Preparing for the THEATRE SYNC function Point the remote to the direction of your TV's input to the input... you used to connect the system. The transmit time varies depending on your SONY TV and this function does not work, change the transmit time Press and hold...
Operating Instructions
Page 62
Bass frequencies are effectively reinforced. Press DYNAMIC BASS. Install the system near the TV. • Keep the remote pointed in the direction of the TV and this function may not work. Using the Sound Effect Reinforcing bass frequencies You can reinforce bass frequencies. * ... • This function is only for SONY TVs. (This function may not work on some SONY TVs.) • If distance between TV and this system is flashing. • Keep the remote pointed in the direction of the TV and this system while the TV button is too far, this system while entering the code. To turn...
Bass frequencies are effectively reinforced. Press DYNAMIC BASS. Install the system near the TV. • Keep the remote pointed in the direction of the TV and this function may not work. Using the Sound Effect Reinforcing bass frequencies You can reinforce bass frequencies. * ... • This function is only for SONY TVs. (This function may not work on some SONY TVs.) • If distance between TV and this system is flashing. • Keep the remote pointed in the direction of the TV and this system while the TV button is too far, this system while entering the code. To turn...
Operating Instructions
Page 78
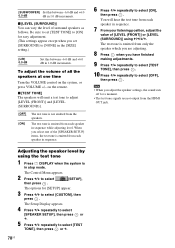
... your listening position, adjust the value of the [SPEAKER SETUP] items, the test tone is not emitted from each speaker in 1.0 dB increments. on the system, or press VOLUME +/- The test tone is in sequence. 6 Press X/x repeatedly to select [OFF], then press . Adjusting the speaker level by using C/X/x/c. You will emit...)] You can vary the level of all the speakers at one of [LEVEL (FRONT)] or [LEVEL (SURROUND)] using the test tone 1 Press DISPLAY when the system is emitted from only the speaker which you select one time Turn the VOLUME control on the...
... your listening position, adjust the value of the [SPEAKER SETUP] items, the test tone is not emitted from each speaker in 1.0 dB increments. on the system, or press VOLUME +/- The test tone is in sequence. 6 Press X/x repeatedly to select [OFF], then press . Adjusting the speaker level by using C/X/x/c. You will emit...)] You can vary the level of all the speakers at one of [LEVEL (FRONT)] or [LEVEL (SURROUND)] using the test tone 1 Press DISPLAY when the system is emitted from only the speaker which you select one time Turn the VOLUME control on the...
Operating Instructions
Page 82
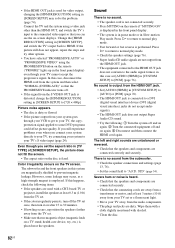
...8226; The plugs and jacks are connected correctly and securely. If the picture still does not appear, repeat the steps and try connecting your system to your TV cannot accept the progressive signal. Severe hum or noise is heard. • Check that the speakers and components are connected ...in [CUSTOM SETUP] to some leakage may solve the problem (page 74). Even though you can see the on the remote ("PROGRE" lights up in this system are magnetically shielded to the connected video input so that the speakers and components are dirty. The subwoofer and the front...
...8226; The plugs and jacks are connected correctly and securely. If the picture still does not appear, repeat the steps and try connecting your system to your TV cannot accept the progressive signal. Severe hum or noise is heard. • Check that the speakers and components are connected ...in [CUSTOM SETUP] to some leakage may solve the problem (page 74). Even though you can see the on the remote ("PROGRE" lights up in this system are magnetically shielded to the connected video input so that the speakers and components are dirty. The subwoofer and the front...
Operating Instructions
Page 83
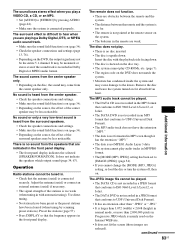
... formatted in MP3 even though it has the extension ".MP3." • The data is not MPEG1 Audio Layer 3 data. • The system cannot play audio tracks in a JPEG format that the antenna (aerial) is recorded in Dolby Digital or MPEG audio format. The disc does not...the disc with automatic tuning). The remote does not function. • There are obstacles between the remote and the system. • The distance between the remote and the system is too far. • The remote is not pointed at the remote sensor on the system. • The batteries in the remote are playing a Dolby Digital, ...
... formatted in MP3 even though it has the extension ".MP3." • The data is not MPEG1 Audio Layer 3 data. • The system cannot play audio tracks in a JPEG format that the antenna (aerial) is recorded in Dolby Digital or MPEG audio format. The disc does not...the disc with automatic tuning). The remote does not function. • There are obstacles between the remote and the system. • The distance between the remote and the system is too far. • The remote is not pointed at the remote sensor on the system. • The batteries in the remote are playing a Dolby Digital, ...
Operating Instructions
Page 84
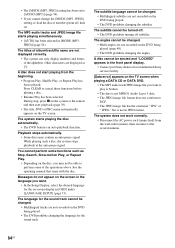
... has been selected. During stop, press x on the system or the remote and then start playing from the wall outlet (mains), then reconnect after several minutes. 84US The system starts playing the disc automatically. • The DVD features... an auto playback function. The subtitle language cannot be ejected and "LOCKED" appears in the front panel display. • Contact your Sony dealer or local authorized Sony...
... has been selected. During stop, press x on the system or the remote and then start playing from the wall outlet (mains), then reconnect after several minutes. 84US The system starts playing the disc automatically. • The DVD features... an auto playback function. The subtitle language cannot be ejected and "LOCKED" appears in the front panel display. • Contact your Sony dealer or local authorized Sony...
Operating Instructions
Page 86
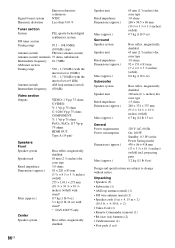
...8226; Speaker cords (5 m × 4, 15 m × 2) (16.5 ft. × 4, 50 ft. × 2) • Video Cord (1) • Remote Commander (remote) (1) • R6 (size AA) batteries (2) • Calibration mic (1) • Foot pads (1 set at 9 kHz) Antenna (aerial) AM loop antenna (aerial) ... 1,710 kHz (with stand* * DAV-DX375 only Bass reflex, magnetically shielded Speaker unit Rated impedance Dimensions (approx.) Mass (approx.) Surround Speaker system Speaker unit Rated impedance Dimensions (approx.) Mass (approx.) Subwoofer Speaker system Speaker unit Rated impedance Dimensions (approx.)...
...8226; Speaker cords (5 m × 4, 15 m × 2) (16.5 ft. × 4, 50 ft. × 2) • Video Cord (1) • Remote Commander (remote) (1) • R6 (size AA) batteries (2) • Calibration mic (1) • Foot pads (1 set at 9 kHz) Antenna (aerial) AM loop antenna (aerial) ... 1,710 kHz (with stand* * DAV-DX375 only Bass reflex, magnetically shielded Speaker unit Rated impedance Dimensions (approx.) Mass (approx.) Surround Speaker system Speaker unit Rated impedance Dimensions (approx.) Mass (approx.) Subwoofer Speaker system Speaker unit Rated impedance Dimensions (approx.)...
Operating Instructions
Page 92
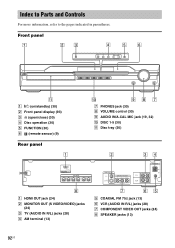
... information, refer to the pages indicated in parentheses. Front panel A "/1 (on/standby) (30) B Front panel display (93) C A (open/close) (30) D Disc operation (30) E FUNCTION (30) F (remote sensor) (9) Rear panel G PHONES jack (30) H VOLUME control (30) I AUDIO IN/A.CAL MIC jack (19, 32) J DISC 1-5 (30) K Disc tray (30) (DVD ONLY) OUT SPEAKER...
... information, refer to the pages indicated in parentheses. Front panel A "/1 (on/standby) (30) B Front panel display (93) C A (open/close) (30) D Disc operation (30) E FUNCTION (30) F (remote sensor) (9) Rear panel G PHONES jack (30) H VOLUME control (30) I AUDIO IN/A.CAL MIC jack (19, 32) J DISC 1-5 (30) K Disc tray (30) (DVD ONLY) OUT SPEAKER...

Operating Instructions
Page 98
AMP Menu List You can set the following items with AMP MENU on the remote. AMP menu DIMMER DEMO ATTENUATE DIMMER ON DIMMER OFF DEMO ON DEMO OFF ATT ON ATT OFF 98US
AMP Menu List You can set the following items with AMP MENU on the remote. AMP menu DIMMER DEMO ATTENUATE DIMMER ON DIMMER OFF DEMO ON DEMO OFF ATT ON ATT OFF 98US
Operating Instructions
Page 99
... 40 PROGRESSIVE AUTO 26 Progressive format 26, 89 PROGRESSIVE VIDEO 26 Q Quick Setup 19 R Radio 58 Radio Stations 57 Rear Panel 92 Region Code 8, 89 Remote 9, 60 Repeat Play 42 RESET 72 Resume Play 39 99US C. Index Numerics 16:9 73 4:3 LETTER BOX 73 4:3 OUTPUT 75 4:3 PAN SCAN 73 5.1 Channel Surround 44...
... 40 PROGRESSIVE AUTO 26 Progressive format 26, 89 PROGRESSIVE VIDEO 26 Q Quick Setup 19 R Radio 58 Radio Stations 57 Rear Panel 92 Region Code 8, 89 Remote 9, 60 Repeat Play 42 RESET 72 Resume Play 39 99US C. Index Numerics 16:9 73 4:3 LETTER BOX 73 4:3 OUTPUT 75 4:3 PAN SCAN 73 5.1 Channel Surround 44...
Operating Instructions
Page 104
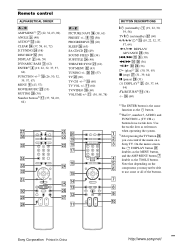
Use the tactile dots as references when operating the system. 3)After pressing the TV button w;, you can control the menu on the component, you may not be able to use some or all of the buttons. Note that depending on a Sony TV. Z PICTURE NAVI qh (38, 61) PRESET +/- 8 ...play)2) 9 (30, 39, 65) x (stop) wj (31, 39, 64) X (pause) wl (31) DISPLAY3) ea (20, 37, 64, 94) O RETURN3) qf (38) -/-- Sony Corporation Printed in China Remote control ALPHABETICAL ORDER A - qa (30, 58, 78) BUTTON DESCRIPTIONS [/1 (on/standby) 1 (19, 22, 30, 39, 58) TV [/1 (on/standby) ej (60) C/X/x/c/ 3) qg (19...
Use the tactile dots as references when operating the system. 3)After pressing the TV button w;, you can control the menu on the component, you may not be able to use some or all of the buttons. Note that depending on a Sony TV. Z PICTURE NAVI qh (38, 61) PRESET +/- 8 ...play)2) 9 (30, 39, 65) x (stop) wj (31, 39, 64) X (pause) wl (31) DISPLAY3) ea (20, 37, 64, 94) O RETURN3) qf (38) -/-- Sony Corporation Printed in China Remote control ALPHABETICAL ORDER A - qa (30, 58, 78) BUTTON DESCRIPTIONS [/1 (on/standby) 1 (19, 22, 30, 39, 58) TV [/1 (on/standby) ej (60) C/X/x/c/ 3) qg (19...


