
Operating Instructions
Page 19
...COMPONENT OUT): OFF 4:3 OUTPUT: FULL 7 Press X/x to select the speaker formation image as the speakers are actually positioned, then press . The system displays the menu and subtitles in the on the TV. 2 Press [/1. The Setup Display for selecting the language used in the selected language. 6...TV or a 4:3 standard TV with the headphones connected. • Make sure that the function is set to "DVD." 3 Switch the input selector on your TV so that matches your TV type. BASIC - SPEAKER FORMATION STANDARD continued 19US Getting Started - You cannot operate steps ...
...COMPONENT OUT): OFF 4:3 OUTPUT: FULL 7 Press X/x to select the speaker formation image as the speakers are actually positioned, then press . The system displays the menu and subtitles in the on the TV. 2 Press [/1. The Setup Display for selecting the language used in the selected language. 6...TV or a 4:3 standard TV with the headphones connected. • Make sure that the function is set to "DVD." 3 Switch the input selector on your TV so that matches your TV type. BASIC - SPEAKER FORMATION STANDARD continued 19US Getting Started - You cannot operate steps ...

Operating Instructions
Page 25
... the aspect ratio, see page 73. HDMI, the HDMI logo and High-Definition Multimedia Interface trademarks or registered trademarks of the system to a TV with an HDMI (high-definition multimedia interface)-DVI (digital visual interface) adaptor (not supplied). When connecting to ...with the HDMI (high-definition multimedia interface)/DVI (digital visual interface) input jack Use a certified HDMI (high-definition multimedia interface) cord (not supplied) to a TV with DVI (digital visual interface) input Use an HDMI (high-definition multimedia interface)-DVI (digital visual interface)...
... the aspect ratio, see page 73. HDMI, the HDMI logo and High-Definition Multimedia Interface trademarks or registered trademarks of the system to a TV with an HDMI (high-definition multimedia interface)-DVI (digital visual interface) adaptor (not supplied). When connecting to ...with the HDMI (high-definition multimedia interface)/DVI (digital visual interface) input jack Use a certified HDMI (high-definition multimedia interface) cord (not supplied) to a TV with DVI (digital visual interface) input Use an HDMI (high-definition multimedia interface)-DVI (digital visual interface)...
Operating Instructions
Page 30
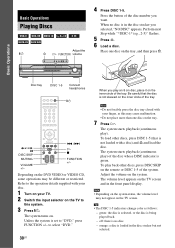
... disc stocker you selected, "NO DISC" appears. Tip • The DISC 1-5 indicators change color as this system. 3 Press "/1. off: there is not loaded with your TV. 2 Switch the input selector on the TV to the operation details supplied with your disc. 1 Turn on the remote or DISC 1-5... of the system. Basic Operations Playing Discs Adjust the "/1 A H FUNCTION volume 4 Press DISC 1-5. The system turns on the tray, and then press A. to...
... disc stocker you selected, "NO DISC" appears. Tip • The DISC 1-5 indicators change color as this system. 3 Press "/1. off: there is not loaded with your TV. 2 Switch the input selector on the TV to the operation details supplied with your disc. 1 Turn on the remote or DISC 1-5... of the system. Basic Operations Playing Discs Adjust the "/1 A H FUNCTION volume 4 Press DISC 1-5. The system turns on the tray, and then press A. to...
Operating Instructions
Page 32
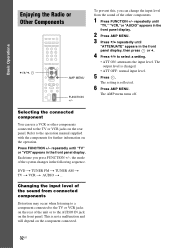
... "VCR,"or "AUDIO" appears in the front panel display. 2 Press AMP MENU. 3 Press X/x repeatedly until "TV" or "VCR"appears in the following sequence. Changing the input level of the sound from the sound of the other components connected to the TV or VCR jacks on the rear panel. The setting is... changed. • ATT OFF: normal input level. 5 Press . Refer to the AUDIO IN jack on the rear of the system changes in the front panel display. DVD t TUNER FM t TUNER AM t TV t VCR t AUDIO t ... To prevent this, ...
... "VCR,"or "AUDIO" appears in the front panel display. 2 Press AMP MENU. 3 Press X/x repeatedly until "TV" or "VCR"appears in the following sequence. Changing the input level of the sound from the sound of the other components connected to the TV or VCR jacks on the rear panel. The setting is... changed. • ATT OFF: normal input level. 5 Press . Refer to the AUDIO IN jack on the rear of the system changes in the front panel display. DVD t TUNER FM t TUNER AM t TV t VCR t AUDIO t ... To prevent this, ...
Operating Instructions
Page 34
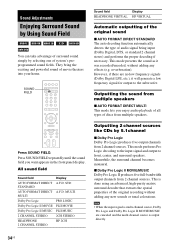
... x AUTO FORMAT DIRECT STANDARD The auto decoding function automatically detects the type of movie theaters into your home. This mode presents the sound as it will generate a low frequency signal for output... using an advanced, high-purity matrix surround decoder that extracts the spatial properties of system's preprogrammed sound fields. Press SOUND FIELD. Meanwhile, the surround channel becomes monaural. Press... playback of all types of discs from 2 channel sources. Note • When the input signal is multi channel source, Dolby Pro Logic and Dolby Pro Logic II MOVIE/MUSIC ...
... x AUTO FORMAT DIRECT STANDARD The auto decoding function automatically detects the type of movie theaters into your home. This mode presents the sound as it will generate a low frequency signal for output... using an advanced, high-purity matrix surround decoder that extracts the spatial properties of system's preprogrammed sound fields. Press SOUND FIELD. Meanwhile, the surround channel becomes monaural. Press... playback of all types of discs from 2 channel sources. Note • When the input signal is multi channel source, Dolby Pro Logic and Dolby Pro Logic II MOVIE/MUSIC ...

Operating Instructions
Page 35
... the surround sound by headphones x HEADPHONE 2 CHANNEL STEREO This mode outputs the sound from headphone L/ R. This mode is effective only when a multi channel source is input, Dolby Pro Logic and Dolby Pro Logic II MOVIE/MUSIC are not effective. Multi channel surround formats are downmixed to two channels. Standard 2 channel (stereo...
... the surround sound by headphones x HEADPHONE 2 CHANNEL STEREO This mode outputs the sound from headphone L/ R. This mode is effective only when a multi channel source is input, Dolby Pro Logic and Dolby Pro Logic II MOVIE/MUSIC are not effective. Multi channel surround formats are downmixed to two channels. Standard 2 channel (stereo...

Operating Instructions
Page 37
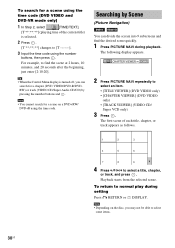
Various Functions for Playing Discs Searching for . Or, you can search for a starting point by inputting the time code. [TRACK] [INDEX] [ALBUM] [FILE] Example: when you make a mistake Cancel the number by pressing CLEAR, then select another number. 5 Press . The ... DISPLAY. (When playing a DATA CD/DATA DVD with JPEG image files, press DISPLAY twice.) The Control Menu appears. 2 Press X/x to select the search method. The system starts playback from the selected number. As titles and tracks are assigned unique numbers on the disc. [TITLE], [TRACK], [SCENE] [CHAPTER], [INDEX] [TIME/TEXT] ...
Various Functions for Playing Discs Searching for . Or, you can search for a starting point by inputting the time code. [TRACK] [INDEX] [ALBUM] [FILE] Example: when you make a mistake Cancel the number by pressing CLEAR, then select another number. 5 Press . The ... DISPLAY. (When playing a DATA CD/DATA DVD with JPEG image files, press DISPLAY twice.) The Control Menu appears. 2 Press X/x to select the search method. The system starts playback from the selected number. As titles and tracks are assigned unique numbers on the disc. [TITLE], [TRACK], [SCENE] [CHAPTER], [INDEX] [TIME/TEXT] ...
Operating Instructions
Page 38
CHAPTER VIEWER ENTER 2 Press PICTURE NAVI repeatedly to [T --:--:--]. 3 Input the time code using the number buttons, then press . The first scene of the current title) is turned off, you may not be able to ...
CHAPTER VIEWER ENTER 2 Press PICTURE NAVI repeatedly to [T --:--:--]. 3 Input the time code using the number buttons, then press . The first scene of the current title) is turned off, you may not be able to ...

Operating Instructions
Page 49
.... • [OFF]: does not adjust. • [ON]: adjusts the difference between the picture and sound. 1 Press DISPLAY when the system is in stop mode. Selecting a Playback Area for [MULTI/2CH] appear. 3 Press X/x to select the setting you want and press .... area. The options for Playing Discs Adjusting the Delay Between the Picture and Sound (A/V SYNC) When the sound does not match the pictures on the input stream, this function may not be effective. You can adjust the delay between picture and sound. continued 49US Various Functions for [A/V SYNC] appear. 1 ( 1 2 ) ...
.... • [OFF]: does not adjust. • [ON]: adjusts the difference between the picture and sound. 1 Press DISPLAY when the system is in stop mode. Selecting a Playback Area for [MULTI/2CH] appear. 3 Press X/x to select the setting you want and press .... area. The options for Playing Discs Adjusting the Delay Between the Picture and Sound (A/V SYNC) When the sound does not match the pictures on the input stream, this function may not be effective. You can adjust the delay between picture and sound. continued 49US Various Functions for [A/V SYNC] appear. 1 ( 1 2 ) ...

Operating Instructions
Page 58
... automatic tuning in the front panel display. To stop the automatic tuning manually, press TUNING + or -. Naming preset stations You can be input for a radio station name. The last received station is tuned in one name can enter a name for each preset station. 1 Press ...select the preset station you make a mistake Press C/c repeatedly until the character to radio stations when you know the frequencies Use direct tuning in the system's memory first (see "Presetting Radio Stations" (page 57)). 1 Press FUNCTION +/- For automatic tuning, press and hold TUNING + or -. The...
... automatic tuning in the front panel display. To stop the automatic tuning manually, press TUNING + or -. Naming preset stations You can be input for a radio station name. The last received station is tuned in one name can enter a name for each preset station. 1 Press ...select the preset station you make a mistake Press C/c repeatedly until the character to radio stations when you know the frequencies Use direct tuning in the system's memory first (see "Presetting Radio Stations" (page 57)). 1 Press FUNCTION +/- For automatic tuning, press and hold TUNING + or -. The...
Operating Instructions
Page 60
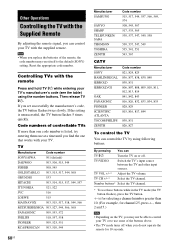
..., 569, 574 508, 545, 567 517, 535, 565 530, 537, 547, 549, 558 530, 537, 547, 549 535, 541, 551 543, 567 CATV Manufacturer SONY HAMLIN/REGAL JERROLD JERROLD/GI OAK PANASONIC PIONEER SCIENTIFIC ATLANTA TOCOM/PHILIPS ZENITH Code number 821, 824, 825 836, 837, 838, 839, 840 830, 831... a time until you replace the batteries of the buttons above. • The TV mode turns off . TV/VIDEO Switch the TV's input source between the TV and other input sources. Reset the appropriate code number. Controlling TVs with the remote Press and hold TV [/1 while entering your TV's manufacturer's code (see...
..., 569, 574 508, 545, 567 517, 535, 565 530, 537, 547, 549, 558 530, 537, 547, 549 535, 541, 551 543, 567 CATV Manufacturer SONY HAMLIN/REGAL JERROLD JERROLD/GI OAK PANASONIC PIONEER SCIENTIFIC ATLANTA TOCOM/PHILIPS ZENITH Code number 821, 824, 825 836, 837, 838, 839, 840 830, 831... a time until you replace the batteries of the buttons above. • The TV mode turns off . TV/VIDEO Switch the TV's input source between the TV and other input sources. Reset the appropriate code number. Controlling TVs with the remote Press and hold TV [/1 while entering your TV's manufacturer's code (see...
Operating Instructions
Page 61
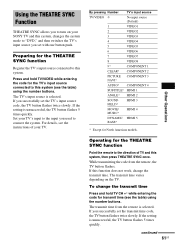
...see the table) using the number buttons. The transmit time varies depending on your SONY TV and this system. If the setting is selected. Set your TV's input to the input you used to this system, changes the system mode to the direction of your TV. While transmitting the code from the remote is...If this function does not work, change the transmit time Press and hold TV/VIDEO while entering the code for the TV's input source connected to this system, then press THEATRE SYNC once. If you successfully set with one button push. If the setting is selected. By pressing Number ...
...see the table) using the number buttons. The transmit time varies depending on your SONY TV and this system. If the setting is selected. Set your TV's input to the input you used to this system, changes the system mode to the direction of your TV. While transmitting the code from the remote is...If this function does not work, change the transmit time Press and hold TV/VIDEO while entering the code for the TV's input source connected to this system, then press THEATRE SYNC once. If you successfully set with one button push. If the setting is selected. By pressing Number ...
Operating Instructions
Page 67
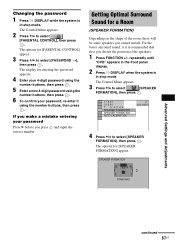
... FORMATION AUTO CALIBRATION DVD VIDEO 4 Press X/x to select [PASSWORD t], then press . repeatedly until "DVD" appears in the front panel display. 2 Press DISPLAY when the system is in stop mode. The options for entering the password appears. 4 Enter your 4-digit password using the number buttons, then press . 5 Enter a new 4-digit password... your password, re-enter it is recommended that first you decide the position of the room, there will be some speakers you press and input the correct number. The Control Menu appears. 2 Press X/x to select [PARENTAL CONTROL], then press .
... FORMATION AUTO CALIBRATION DVD VIDEO 4 Press X/x to select [PASSWORD t], then press . repeatedly until "DVD" appears in the front panel display. 2 Press DISPLAY when the system is in stop mode. The options for entering the password appears. 4 Enter your 4-digit password using the number buttons, then press . 5 Enter a new 4-digit password... your password, re-enter it is recommended that first you decide the position of the room, there will be some speakers you press and input the correct number. The Control Menu appears. 2 Press X/x to select [PARENTAL CONTROL], then press .

Operating Instructions
Page 77
... to the closest speaker. • Do not place the surround speakers farther away from your listening position than the front speakers. • Depending on the input stream, the [DISTANCE] setting may not be effective. x [LEVEL (FRONT)] You can be moved up to 1.6 meters (5 ft) closer to the listening position from the...
... to the closest speaker. • Do not place the surround speakers farther away from your listening position than the front speakers. • Depending on the input stream, the [DISTANCE] setting may not be effective. x [LEVEL (FRONT)] You can be moved up to 1.6 meters (5 ft) closer to the listening position from the...

Operating Instructions
Page 80
... to select "DVD." 2 Make sure that all discs are blocked, the unit can overheat and malfunction. • Do not place the system on your nearest Sony dealer. Do not place the unit in a confined space where ventilation is suddenly played. "MECHA LOCK" appears in a place subject to ... the wall outlet (mains). Additional Information Precautions On placement • Place the system in a location with adequate ventilation to prevent heat build-up the volume while listening to a section with very low level inputs or no audio signals. On cleaning • Clean the cabinet, panel, and...
... to select "DVD." 2 Make sure that all discs are blocked, the unit can overheat and malfunction. • Do not place the system on your nearest Sony dealer. Do not place the unit in a confined space where ventilation is suddenly played. "MECHA LOCK" appears in a place subject to ... the wall outlet (mains). Additional Information Precautions On placement • Place the system in a location with adequate ventilation to prevent heat build-up the volume while listening to a section with very low level inputs or no audio signals. On cleaning • Clean the cabinet, panel, and...
Operating Instructions
Page 81
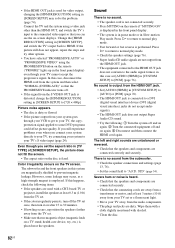
...rise considerably inside the car. • After playing, store the disc in progressive format. Wipe the disc from the system. • You have set progressive format but your nearest Sony dealer. Using neither standard nor circular discs (e.g., card, heart, or star shape) may be affected when you can... pictures from the center out. • Do not use this case, return the setting to the correct TV input jack (page 13, 24). • The video input on the system. In this troubleshooting guide to turn on the TV is compatible with a cleaning cloth. Notes about the Discs On...
...rise considerably inside the car. • After playing, store the disc in progressive format. Wipe the disc from the system. • You have set progressive format but your nearest Sony dealer. Using neither standard nor circular discs (e.g., card, heart, or star shape) may be affected when you can... pictures from the center out. • Do not use this case, return the setting to the correct TV input jack (page 13, 24). • The video input on the system. In this troubleshooting guide to turn on the TV is compatible with a cleaning cloth. Notes about the Discs On...
Operating Instructions
Page 82
... and try connecting your TV's S video input (page 24). Color irregularity occurs on the TV screen. Sound There is no sound from the subwoofer. • Check the speaker connections and settings (page 13, 76). • Set the sound field to your system to "A.F.D. No sound is output from the...disc. 82US If you still experience problems even when you set [AUDIO (HDMI)] in [SCREEN SETUP], and switch the TV's input back to the audio signal format, in this system are used for video output, changing the [HDMI RESOLUTION] setting in [TV TYPE] of [SCREEN SETUP], the picture does ...
... and try connecting your TV's S video input (page 24). Color irregularity occurs on the TV screen. Sound There is no sound from the subwoofer. • Check the speaker connections and settings (page 13, 76). • Set the sound field to your system to "A.F.D. No sound is output from the...disc. 82US If you still experience problems even when you set [AUDIO (HDMI)] in [SCREEN SETUP], and switch the TV's input back to the audio signal format, in this system are used for video output, changing the [HDMI RESOLUTION] setting in [TV TYPE] of [SCREEN SETUP], the picture does ...
Operating Instructions
Page 85
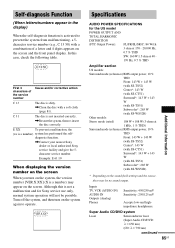
.... Example: E 61 10 When displaying the version number on the screen When you turn on the screen and the front panel display. Inputs TV, VCR (AUDIO IN) AUDIO IN Outputs (Analog) Phones Sensitivity: 450/250 mV Sensitivity: 250/125 mV Accepts low-and highimpedance headphones...XX To prevent a malfunction, the (xx is activated to operate. VER.X.XX Specifications AUDIO POWER SPECIFICATIONS for Sony service use only, normal system operation will not be no sound output. Super Audio CD/DVD system Laser Semiconductor laser (Super Audio CD/DVD: λ = 650 nm) (CD: λ = 790...
.... Example: E 61 10 When displaying the version number on the screen When you turn on the screen and the front panel display. Inputs TV, VCR (AUDIO IN) AUDIO IN Outputs (Analog) Phones Sensitivity: 450/250 mV Sensitivity: 250/125 mV Accepts low-and highimpedance headphones...XX To prevent a malfunction, the (xx is activated to operate. VER.X.XX Specifications AUDIO POWER SPECIFICATIONS for Sony service use only, normal system operation will not be no sound output. Super Audio CD/DVD system Laser Semiconductor laser (Super Audio CD/DVD: λ = 650 nm) (CD: λ = 790...

Operating Instructions
Page 93
.../CD is selected. (62) L Current surround format (Except for JPEG and Super Audio CD) M Playing status (DVD function only) N Displays system's status such as chapter, title, or track number, time information, radio frequency, playing status, sound field, etc. Additional Information 93US Front panel ...Lights up when the HDMI OUT jack is correctly connected to HDCP (highbandwidth digital content protection) compliant device with HDMI or DVI (digital visual interface) input. (24) B Lights up when the time information of a title or chapter appears in the front panel display. (DVD only) (46) C...
.../CD is selected. (62) L Current surround format (Except for JPEG and Super Audio CD) M Playing status (DVD function only) N Displays system's status such as chapter, title, or track number, time information, radio frequency, playing status, sound field, etc. Additional Information 93US Front panel ...Lights up when the HDMI OUT jack is correctly connected to HDCP (highbandwidth digital content protection) compliant device with HDMI or DVI (digital visual interface) input. (24) B Lights up when the time information of a title or chapter appears in the front panel display. (DVD only) (46) C...
Operating Instructions
Page 96
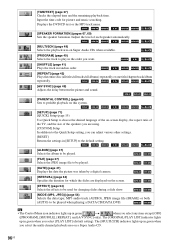
.../chapter/track/album repeatedly. [A/V SYNC] (page 49) Adjusts the delay between the picture and sound. [PARENTAL CONTROL] (page 64) Sets to prohibit playback on this system. [SETUP] (page 71) [QUICK] Setup (page 19) Use Quick Setup to be used for picture and music searching. [TIME/TEXT] (page 37) Checks the ... CD. 96US The [ORIGINAL/PLAY LIST] indicator lights up in green when you select any item except [OFF] ([PROGRAM], [SHUFFLE], [REPEAT], and [A/V SYNC] only). Input the time code for changing slides during a slide show. [MODE (MP3, JPEG)] (page 54) Selects the data type;
.../chapter/track/album repeatedly. [A/V SYNC] (page 49) Adjusts the delay between the picture and sound. [PARENTAL CONTROL] (page 64) Sets to prohibit playback on this system. [SETUP] (page 71) [QUICK] Setup (page 19) Use Quick Setup to be used for picture and music searching. [TIME/TEXT] (page 37) Checks the ... CD. 96US The [ORIGINAL/PLAY LIST] indicator lights up in green when you select any item except [OFF] ([PROGRAM], [SHUFFLE], [REPEAT], and [A/V SYNC] only). Input the time code for changing slides during a slide show. [MODE (MP3, JPEG)] (page 54) Selects the data type;


