Operating Instructions
Page 3
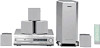
It is connected to the mains outlet, even if the unit itself has been turned off. • Unplug the unit from a cold to a warm location, moisture may block the ...Do not place the unit on surfaces (rugs, blankets, etc.) or near materials (curtains, draperies) that may condense inside the Compact AV System and cause damage to direct sunlight, excessive dust, mechanical vibration, or shock. • Do not install the unit in a place...the cabinet, unplug the unit and have it checked by the cord. Before operating this system, please read this Sony Compact AV System. Welcome!
It is connected to the mains outlet, even if the unit itself has been turned off. • Unplug the unit from a cold to a warm location, moisture may block the ...Do not place the unit on surfaces (rugs, blankets, etc.) or near materials (curtains, draperies) that may condense inside the Compact AV System and cause damage to direct sunlight, excessive dust, mechanical vibration, or shock. • Do not install the unit in a place...the cabinet, unplug the unit and have it checked by the cord. Before operating this system, please read this Sony Compact AV System. Welcome!
Operating Instructions
Page 4
...system is not a malfunction. It may be changed only at once then turn...system and have colour irregularity, turn...turned off . • AC power cord must be damaged. • For power saving purposes, the system can overheat and malfunction. • Do not place the system...the system,...system. Should this may condense on your television screen. On adjusting volume Do not turn...system may be avoided. IMPORTANT NOTICE Caution: This system is played. Precautions On safety • Caution - The system...system. If you have any questions or problems concerning your system...system turned...system ...
...system is not a malfunction. It may be changed only at once then turn...system and have colour irregularity, turn...turned off . • AC power cord must be damaged. • For power saving purposes, the system can overheat and malfunction. • Do not place the system...the system,...system. Should this may condense on your television screen. On adjusting volume Do not turn...system may be avoided. IMPORTANT NOTICE Caution: This system is played. Precautions On safety • Caution - The system...system. If you have any questions or problems concerning your system...system turned...system ...

Operating Instructions
Page 10
Note Noise may come from the disc changer when changing discs or turning the system on DVD 5-disc changer with EXCHANGE mechanism You can change other discs while playing a disc (EXCHANGE mechanism). However, this is just noise produced by the ... unit, trays which hold the discs, and a stocker which transports the discs on their trays to the disc slot and the playing unit. Disc changer system Stocker 1 2 4 4 3 5 Disc tray Playing unit The disc changer consists of the internal mechanisms and does not indicate a malfunction. 10 If you press DISC 3, the stocker...
Note Noise may come from the disc changer when changing discs or turning the system on DVD 5-disc changer with EXCHANGE mechanism You can change other discs while playing a disc (EXCHANGE mechanism). However, this is just noise produced by the ... unit, trays which hold the discs, and a stocker which transports the discs on their trays to the disc slot and the playing unit. Disc changer system Stocker 1 2 4 4 3 5 Disc tray Playing unit The disc changer consists of the internal mechanisms and does not indicate a malfunction. 10 If you press DISC 3, the stocker...
Operating Instructions
Page 24
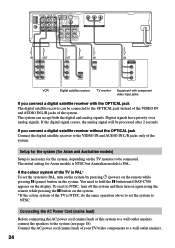
... receiver to the VIDEO IN and AUDIO IN L/R jacks only of this system to a wall outlet (mains), connect the speakers to hold the X button until DAV-C700 appears on the system. To reset to NTSC, turn off the system and then turn on the system by pressing 1 (power) on the remote while pressing X (pause)... button on the display. Connect the AC power cord (mains lead) of the TV is PAL* To set the system to be connected....
... receiver to the VIDEO IN and AUDIO IN L/R jacks only of this system to a wall outlet (mains), connect the speakers to hold the X button until DAV-C700 appears on the system. To reset to NTSC, turn off the system and then turn on the system by pressing 1 (power) on the remote while pressing X (pause)... button on the display. Connect the AC power cord (mains lead) of the TV is PAL* To set the system to be connected....
Operating Instructions
Page 26
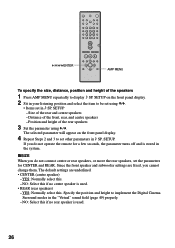
Distance of the speakers 1 Press AMP MENU repeatedly to set in the system. xSIZE When you do not operate the remote for CENTER and REAR. 1 23 4 56 7 89 >10 10/0 C/X/x/c/ENTER AMP MENU To specify the size, distance, ... to implement the Digital Cinema Surround modes in 9 SP. SETUP. Specify the position and height to be set the parameters for a few seconds, the parameter turns off and is used . 26 If you cannot change them. Position and height of the rear and centre speakers - NO: Select this if no rear...
Distance of the speakers 1 Press AMP MENU repeatedly to set in the system. xSIZE When you do not operate the remote for CENTER and REAR. 1 23 4 56 7 89 >10 10/0 C/X/x/c/ENTER AMP MENU To specify the size, distance, ... to implement the Digital Cinema Surround modes in 9 SP. SETUP. Specify the position and height to be set the parameters for a few seconds, the parameter turns off and is used . 26 If you cannot change them. Position and height of the rear and centre speakers - NO: Select this if no rear...

Operating Instructions
Page 30
... FM AM NTSCPBC ANGLE TRACK CHAPTER INDEX H TUNED M MONO ST S dB REPEAT 1 k H z PROGRAM M H z SHUFFLE 3 Press MEMORY. Before tuning, make sure to turn down the volume to AM or FM alternately. 2 Press and hold TUNING + or - Scanning stops when the system tunes in a station. MEMORY PRESET +/- 1 23 4 56 7 89 >10 10/0 BAND TUNING +/-
... FM AM NTSCPBC ANGLE TRACK CHAPTER INDEX H TUNED M MONO ST S dB REPEAT 1 k H z PROGRAM M H z SHUFFLE 3 Press MEMORY. Before tuning, make sure to turn down the volume to AM or FM alternately. 2 Press and hold TUNING + or - Scanning stops when the system tunes in a station. MEMORY PRESET +/- 1 23 4 56 7 89 >10 10/0 BAND TUNING +/-
Operating Instructions
Page 31
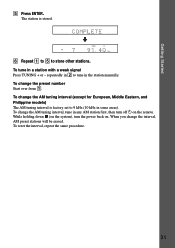
...). To change the AM tuning interval (except for European, Middle Eastern, and Philippine models) The AM tuning interval is stored. While holding down x (on the system), turn off 1 on . Getting Started 5 Press ENTER. To change the AM tuning interval, tune in a station with a weak signal Press TUNING + or - To reset the interval... M H z SHUFFLE 6 Repeat 1 to 5 to store other stations. To change the interval, AM preset stations will be erased. To tune in any AM station first, then turn the power back on the remote.
...). To change the AM tuning interval (except for European, Middle Eastern, and Philippine models) The AM tuning interval is stored. While holding down x (on the system), turn off 1 on . Getting Started 5 Press ENTER. To change the AM tuning interval, tune in a station with a weak signal Press TUNING + or - To reset the interval... M H z SHUFFLE 6 Repeat 1 to 5 to store other stations. To change the interval, AM preset stations will be erased. To tune in any AM station first, then turn the power back on the remote.
Operating Instructions
Page 32
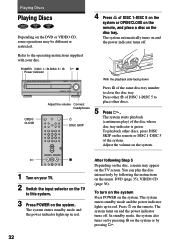
... same disc tray number to this system. 3 Press POWER on the system. The system turns on and the power indicator turns off . The system enters standby mode and the power indicator lights up in red. The system automatically turns on and the power indicator turns off . After following the instructions ...on the menu. Press 1 on the system. In standby mode, the system also turns on by pressing A on the system or by following Step 5 Depending on...
... same disc tray number to this system. 3 Press POWER on the system. The system turns on and the power indicator turns off . The system enters standby mode and the power indicator lights up in red. The system automatically turns on and the power indicator turns off . After following the instructions ...on the menu. Press 1 on the system. In standby mode, the system also turns on by pressing A on the system or by following Step 5 Depending on...
Operating Instructions
Page 33
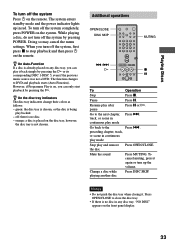
... change their colors as follows: - off: there is not chosen. orange: a disc is placed on the remote. While playing a disc, do not turn off the system, first press x to stop playback and then press 1 on the disc tray, however, the disc tray is no disc in red. The function changes... to the Press .. To cancel muting, press it again or turn off the system completely, press POWER on the front panel display. 33 However, if Programme Play is no disc. - Resume play and remove Press OPEN/CLOSE....
... change their colors as follows: - off: there is not chosen. orange: a disc is placed on the remote. While playing a disc, do not turn off the system, first press x to stop playback and then press 1 on the disc tray, however, the disc tray is no disc in red. The function changes... to the Press .. To cancel muting, press it again or turn off the system completely, press POWER on the front panel display. 33 However, if Programme Play is no disc. - Resume play and remove Press OPEN/CLOSE....

Operating Instructions
Page 34
...press x twice, then press H. 34 H x 1 While playing a disc, press x to stop the disc, the system remembers the point where you pressed x and "RESUME" appears on where you stopped the disc, the system may not resume playback from exactly the same point. • The point where you stopped playing is... cleared when: - you change the play from the point where you stopped the disc. The system starts playback from the Point Where You Stopped the Disc (Resume Play) When you stop playback. you turn the power off by pressing 1. >10 10/0 Notes • Depending on the front panel display...
...press x twice, then press H. 34 H x 1 While playing a disc, press x to stop the disc, the system remembers the point where you pressed x and "RESUME" appears on where you stopped the disc, the system may not resume playback from exactly the same point. • The point where you stopped playing is... cleared when: - you change the play from the point where you stopped the disc. The system starts playback from the Point Where You Stopped the Disc (Resume Play) When you stop playback. you turn the power off by pressing 1. >10 10/0 Notes • Depending on the front panel display...

Operating Instructions
Page 39
To cancel the selected programme, select the programme using X/x after Step 1 or 4, then press ENTER. To turn off the programme menu. To cancel the programmed order To cancel all the titles, chapters, or tracks in the programmed order, press X, and select "ALL... 2 to normal play Press CLEAR during Programme Play. When the programme ends, you want to turn off the programme menu In stop mode, press PLAY MODE repeatedly until "SHUFFLE" appears on a disc. z You can have the system "shuffle" titles, chapters, or tracks and play . Subsequent "shuffling" may not be able to start...
To cancel the selected programme, select the programme using X/x after Step 1 or 4, then press ENTER. To turn off the programme menu. To cancel the programmed order To cancel all the titles, chapters, or tracks in the programmed order, press X, and select "ALL... 2 to normal play Press CLEAR during Programme Play. When the programme ends, you want to turn off the programme menu In stop mode, press PLAY MODE repeatedly until "SHUFFLE" appears on a disc. z You can have the system "shuffle" titles, chapters, or tracks and play . Subsequent "shuffling" may not be able to start...

Operating Instructions
Page 43
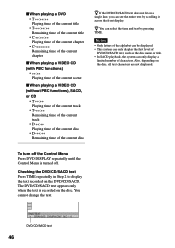
... TEXT). (TIME/ "T **:**:**" (playing time of the current title) is selected. 2 Press ENTER. Note The title, chapter or track number displayed is turned off. To search for a Scene 43 To turn off the Control Menu Press DVD DISPLAY repeatedly until the Control Menu is the same number recorded on the disc. Searching for...
... TEXT). (TIME/ "T **:**:**" (playing time of the current title) is selected. 2 Press ENTER. Note The title, chapter or track number displayed is turned off. To search for a Scene 43 To turn off the Control Menu Press DVD DISPLAY repeatedly until the Control Menu is the same number recorded on the disc. Searching for...
Operating Instructions
Page 46
...on the disc, all text characters are not displayed. The DVD/CD/SACD text appears only when the text is turned off. You cannot change the text. Also, depending on the disc. TIME/TEXT BRAHMS SYMPHONY NO - 4 ...the front display. Notes • Only letters of the alphabet can be displayed. • This system can only display the first level of DVD/CD/SACD text, such as the disc name or title. •... In SACD playback, the system can only display a limited number of the current disc z If the DVD/CD/SACD text does not ...
...on the disc, all text characters are not displayed. The DVD/CD/SACD text appears only when the text is turned off. You cannot change the text. Also, depending on the disc. TIME/TEXT BRAHMS SYMPHONY NO - 4 ...the front display. Notes • Only letters of the alphabet can be displayed. • This system can only display the first level of DVD/CD/SACD text, such as the disc name or title. •... In SACD playback, the system can only display a limited number of the current disc z If the DVD/CD/SACD text does not ...
Operating Instructions
Page 47
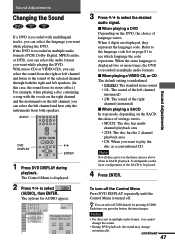
...; 1/L: The sound of the left channel and listen to the sound of the SACD to play the disc as a conventional CD. If the DVD is turned off. The options for AUDIO appear. 1 2 ( 2 7 ) 1 8 ( 3 4 ) T 1:32:55 1: ENGLISH 1: ENGLISH 2: ENGLISH 3: FRENCH DVD... PROGRAM FORMAT DOLBY DIGITAL 3/2.1 L CR LFE LS RS Sound Adjustments 3 Press X/x to select the desired audio signal. To turn off the Control Menu Press DVD DISPLAY repeatedly until the Control Menu is recorded in multiple audio formats. z You can select the audio format you...
...; 1/L: The sound of the left channel and listen to the sound of the SACD to play the disc as a conventional CD. If the DVD is turned off. The options for AUDIO appear. 1 2 ( 2 7 ) 1 8 ( 3 4 ) T 1:32:55 1: ENGLISH 1: ENGLISH 2: ENGLISH 3: FRENCH DVD... PROGRAM FORMAT DOLBY DIGITAL 3/2.1 L CR LFE LS RS Sound Adjustments 3 Press X/x to select the desired audio signal. To turn off the Control Menu Press DVD DISPLAY repeatedly until the Control Menu is recorded in multiple audio formats. z You can select the audio format you...
Operating Instructions
Page 51
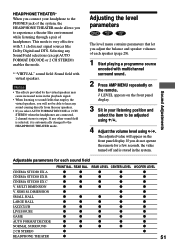
... AMP MENU repeatedly on the remote. 9 LEVEL appears on the front panel display. If you will appear on the front panel display. 3 Sit in the system. REAR LEVEL CENTER LEVEL WOOFER LEVEL CINEMA STUDIO EX A z z z z z CINEMA STUDIO EX B z z z z z CINEMA STUDIO EX C z z z z z V. DIMENSION z z z SMALL HALL z z z z z LARGE HALL z z..., it is very effective with virtual speakers. Sound Adjustments Adjustable parameters for a few seconds, the value turned off and is output. Notes • The effects provided by the virtual speakers may cause increased noise ...
... AMP MENU repeatedly on the remote. 9 LEVEL appears on the front panel display. If you will appear on the front panel display. 3 Sit in the system. REAR LEVEL CENTER LEVEL WOOFER LEVEL CINEMA STUDIO EX A z z z z z CINEMA STUDIO EX B z z z z z CINEMA STUDIO EX C z z z z z V. DIMENSION z z z SMALL HALL z z z z z LARGE HALL z z..., it is very effective with virtual speakers. Sound Adjustments Adjustable parameters for a few seconds, the value turned off and is output. Notes • The effects provided by the virtual speakers may cause increased noise ...

Operating Instructions
Page 52
..."-." 1 2 ( 2 7 ) 1 8 ( 3 4 ) DVD T 1:32:55 - ( 9 ) 4 Select the angle number using the number buttons or X/x, then press ENTER. The angle is turned off the Control Menu Press DVD DISPLAY repeatedly until the Control Menu is changed to change the viewing angle. Enjoying Movies Changing the Angles If ...various angles (multi-angles) for a scene are recorded on the DVD. 52 The angle number appears. To turn off . Number Buttons ANGLE 1 23 4 56 7 89 >10 10/0 DVD DISPLAY ENTER X/c/x 1 Press DVD DISPLAY during playback. z You can...
..."-." 1 2 ( 2 7 ) 1 8 ( 3 4 ) DVD T 1:32:55 - ( 9 ) 4 Select the angle number using the number buttons or X/x, then press ENTER. The angle is turned off the Control Menu Press DVD DISPLAY repeatedly until the Control Menu is changed to change the viewing angle. Enjoying Movies Changing the Angles If ...various angles (multi-angles) for a scene are recorded on the DVD. 52 The angle number appears. To turn off . Number Buttons ANGLE 1 23 4 56 7 89 >10 10/0 DVD DISPLAY ENTER X/c/x 1 Press DVD DISPLAY during playback. z You can...
Operating Instructions
Page 53
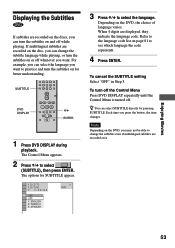
...digits are displayed, they indicate the language code. To cancel the SUBTITLE setting Select "OFF" in Step 3. To turn the subtitles on and off while playing. Each time you want to practice and turn the subtitles on or off . Refer to the language code list on page 81 to change the subtitle... language while playing, or turn the subtitles on the DVD, the choice of language varies. z You can turn off the Control Menu Press DVD DISPLAY repeatedly until the Control Menu is turned off whenever you press the button, the item changes. If multilingual ...
...digits are displayed, they indicate the language code. To cancel the SUBTITLE setting Select "OFF" in Step 3. To turn the subtitles on and off while playing. Each time you want to practice and turn the subtitles on or off . Refer to the language code list on page 81 to change the subtitle... language while playing, or turn the subtitles on the DVD, the choice of language varies. z You can turn off the Control Menu Press DVD DISPLAY repeatedly until the Control Menu is turned off whenever you press the button, the item changes. If multilingual ...

Operating Instructions
Page 54
...a disc. LAYER Appears when the DVD has dual layers Indicates the approximate point where the disc is turned off. The higher the bit rate, the larger the amount of data. To turn off the Control Menu Press DVD DISPLAY repeatedly until the Control Menu is playing. Displays of video/audio... data per second). If it is a dual-layer DVD, the system indicates which layer is displayed. 2 Press X/x to "Displays of...
...a disc. LAYER Appears when the DVD has dual layers Indicates the approximate point where the disc is turned off. The higher the bit rate, the larger the amount of data. To turn off the Control Menu Press DVD DISPLAY repeatedly until the Control Menu is playing. Displays of video/audio... data per second). If it is a dual-layer DVD, the system indicates which layer is displayed. 2 Press X/x to "Displays of...
Operating Instructions
Page 56
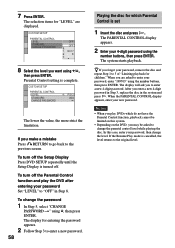
... to select "PASSWORD t," then press ENTER. If you make a mistake entering your 4-digit password using the number buttons, then press ENTER. The system is replaced by using the number buttons, then press ENTER. z If you make a mistake Press O RETURN, then start from Step 3 again.... O RETURN, then press DVD DISPLAY repeatedly until the Control Menu is already set a playback limitation level. CUSTOM PARENTAL CONTROL Custom parental control is turned off the Custom Parental Control function 1 In Step 4, select "OFF t," then press ENTER. 2 Enter your password Press C before you to...
... to select "PASSWORD t," then press ENTER. If you make a mistake entering your 4-digit password using the number buttons, then press ENTER. The system is replaced by using the number buttons, then press ENTER. z If you make a mistake Press O RETURN, then start from Step 3 again.... O RETURN, then press DVD DISPLAY repeatedly until the Control Menu is already set a playback limitation level. CUSTOM PARENTAL CONTROL Custom parental control is turned off the Custom Parental Control function 1 In Step 4, select "OFF t," then press ENTER. 2 Enter your password Press C before you to...
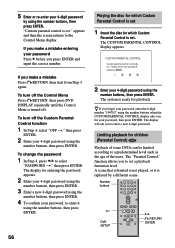
Operating Instructions
Page 58
... password appears. 2 Follow Step 3 to enter your password, remove the disc and repeat Step 1 to enter a new 4-digit password. In this system. • Depending on the DVD, you make a mistake Press O RETURN to go back to the original level. CUSTOM SETUP PARENTAL CONTROL LEVEL: ...the parental control level while playing the disc. To turn off the Setup Display Press DVD SETUP repeatedly until the Setup Display is turned off the Parental Control function and play DVDs which Parental Control is complete. The system starts playback. CUSTOM SETUP PARENTAL CONTROL LEVEL: STANDARD:...
... password appears. 2 Follow Step 3 to enter your password, remove the disc and repeat Step 1 to enter a new 4-digit password. In this system. • Depending on the DVD, you make a mistake Press O RETURN to go back to the original level. CUSTOM SETUP PARENTAL CONTROL LEVEL: ...the parental control level while playing the disc. To turn off the Setup Display Press DVD SETUP repeatedly until the Setup Display is turned off the Parental Control function and play DVDs which Parental Control is complete. The system starts playback. CUSTOM SETUP PARENTAL CONTROL LEVEL: STANDARD:...


