
Limited Warranty (US Only)
Page 1
... DURATION OF THIS WARRANTY. PARTS: In addition, Sony will repair or replace the Product, at its original packaging or packaging affording an equal degree of protection, to obtain warranty service. REPAIR OR REPLACEMENT AS PROVIDED UNDER THIS WARRANTY IS THE EXCLUSIVE REMEDY OF THE CONSUMER. 4-557-172-02 General Stereo/Hifi Components/Tape Decks ® CD Players/Mini Disc Players/Audio Systems Hifi Audio LIMITED WARRANTY Sony Electronics Inc. ("Sony") warrants this Product is...
... DURATION OF THIS WARRANTY. PARTS: In addition, Sony will repair or replace the Product, at its original packaging or packaging affording an equal degree of protection, to obtain warranty service. REPAIR OR REPLACEMENT AS PROVIDED UNDER THIS WARRANTY IS THE EXCLUSIVE REMEDY OF THE CONSUMER. 4-557-172-02 General Stereo/Hifi Components/Tape Decks ® CD Players/Mini Disc Players/Audio Systems Hifi Audio LIMITED WARRANTY Sony Electronics Inc. ("Sony") warrants this Product is...
Operating Instructions
Page 1
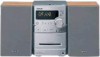
Record the serial number in the space provided below. Refer to them whenever you call upon your Sony dealer regarding this product. Model No Serial No CMT-NEZ5 CMT-NEZ3 ©2005 Sony Corporation 2-582-894-14(1) Micro HI-FI Component System Operating Instructions Owner's Record The model and serial numbers are located on the rear of the unit.
Record the serial number in the space provided below. Refer to them whenever you call upon your Sony dealer regarding this product. Model No Serial No CMT-NEZ5 CMT-NEZ3 ©2005 Sony Corporation 2-582-894-14(1) Micro HI-FI Component System Operating Instructions Owner's Record The model and serial numbers are located on the rear of the unit.
Operating Instructions
Page 2
... of important operating and maintenance (servicing) instructions in this product will increase eye hazard. And don't place lighted candles on a circuit different from that the cable ground shall be connected to the grounding system of cable entry as close to provide reasonable protection against harmful interference in this manual could void your authority to operate this apparatus to CATV system installer: This reminder...
... of important operating and maintenance (servicing) instructions in this product will increase eye hazard. And don't place lighted candles on a circuit different from that the cable ground shall be connected to the grounding system of cable entry as close to provide reasonable protection against harmful interference in this manual could void your authority to operate this apparatus to CATV system installer: This reminder...

Operating Instructions
Page 3
... - Rec Timer Display Turning off the display 20 - Program Play Tuner Presetting radio stations 12 Listening to music 17 - Play Timer Timer recording radio programs........... 19 - Power Saving Mode Viewing information about the disc in the display 20 Optional Components Hooking up optional components......... 21 Troubleshooting Problems and remedies 22 Messages 25 Additional Information Precautions 26 Specifications 27 List of Contents How to use this manual 4 Playable discs 4 Getting Started Hooking up to music 18 - Manual Recording Sound Adjustment Adjusting the sound 17...
... - Rec Timer Display Turning off the display 20 - Program Play Tuner Presetting radio stations 12 Listening to music 17 - Play Timer Timer recording radio programs........... 19 - Power Saving Mode Viewing information about the disc in the display 20 Optional Components Hooking up optional components......... 21 Troubleshooting Problems and remedies 22 Messages 25 Additional Information Precautions 26 Specifications 27 List of Contents How to use this manual 4 Playable discs 4 Getting Started Hooking up to music 18 - Manual Recording Sound Adjustment Adjusting the sound 17...
Operating Instructions
Page 4
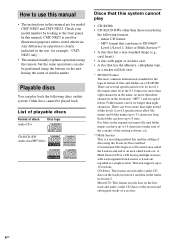
... etc. ** Multi Session This is clearly indicated in the text, for model CMT-NEZ5 and CMT-NEZ3. How to use this manual • The instructions in this manual are several specification levels. Playable discs You can be played back. Other discs cannot be no...tape, or a sticker still left on a CD-ROM. Mixed CD: This format records data on the first track and audio (audio CD data) on the tracks in and end at the front panel. In this system cannot play back the following formats: - List of playable discs Format of files and folders on it . • A disc that this manual, CMT-NEZ3...
... etc. ** Multi Session This is clearly indicated in the text, for model CMT-NEZ5 and CMT-NEZ3. How to use this manual • The instructions in this manual are several specification levels. Playable discs You can be played back. Other discs cannot be no...tape, or a sticker still left on a CD-ROM. Mixed CD: This format records data on the first track and audio (audio CD data) on the tracks in and end at the front panel. In this system cannot play back the following formats: - List of playable discs Format of files and folders on it . • A disc that this manual, CMT-NEZ3...
Operating Instructions
Page 6
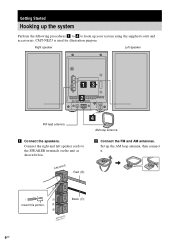
Getting Started Hooking up the system Perform the following procedures 1 to 4 to the SPEAKER terminals on the unit as shown below. 2 Connect the FM and AM antennas. Connect the right and left speaker cords to hook up the AM loop antenna, then connect it. CMT-NEZ3 is used for illustration purpose. Set up your system using the supplied cords and accessories. R Black (#) UIMSPEE6D-A16NCE 6GB Right speaker Left speaker 13 2 FM lead antenna 4 AM loop antenna 1 Connect the speakers. SPEAKER Red (3) L 3 # # # Insert this portion.
Getting Started Hooking up the system Perform the following procedures 1 to 4 to the SPEAKER terminals on the unit as shown below. 2 Connect the FM and AM antennas. Connect the right and left speaker cords to hook up the AM loop antenna, then connect it. CMT-NEZ3 is used for illustration purpose. Set up your system using the supplied cords and accessories. R Black (#) UIMSPEE6D-A16NCE 6GB Right speaker Left speaker 13 2 FM lead antenna 4 AM loop antenna 1 Connect the speakers. SPEAKER Red (3) L 3 # # # Insert this portion.
Operating Instructions
Page 12
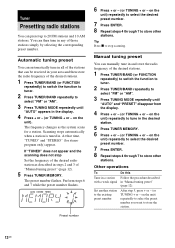
... stereo program only) appear. Tuner Presetting radio stations You can preset up to store the station. 12GB Manual tuning preset You can manually tune in "Manual tuning preset" (page 12). Other operations To Do this Tune in a station Follow the procedure described with a weak signal in and store the radio frequency of the desired stations. 1 Press TUNER/BAND (or FUNCTION repeatedly) to switch the function to tuner. 2 Press TUNER/BAND repeatedly to stop Set the frequency of the stations that time, "TUNED" and "STEREO" (for a station...
... stereo program only) appear. Tuner Presetting radio stations You can preset up to store the station. 12GB Manual tuning preset You can manually tune in "Manual tuning preset" (page 12). Other operations To Do this Tune in a station Follow the procedure described with a weak signal in and store the radio frequency of the desired stations. 1 Press TUNER/BAND (or FUNCTION repeatedly) to switch the function to tuner. 2 Press TUNER/BAND repeatedly to stop Set the frequency of the stations that time, "TUNED" and "STEREO" (for a station...
Operating Instructions
Page 13
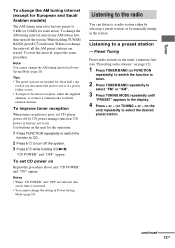
.... • You cannot change the setting in the station. Notes • When "CD POWER" and "OFF"are selected, disc access time is poor, set CD player power off by manually tuning in Power Saving Mode (page 20). Tips • The preset stations are erased. "CD POWER" and "OFF" appear. Use buttons on the unit for the operation. 1 Press FUNCTION repeatedly to switch the function to CD. 2 Press ?/1 to turn off the system. 3 Press ?/1 while holding...
.... • You cannot change the setting in the station. Notes • When "CD POWER" and "OFF"are selected, disc access time is poor, set CD player power off by manually tuning in Power Saving Mode (page 20). Tips • The preset stations are erased. "CD POWER" and "OFF" appear. Use buttons on the unit for the operation. 1 Press FUNCTION repeatedly to switch the function to CD. 2 Press ?/1 to turn off the system. 3 Press ?/1 while holding...
Operating Instructions
Page 14
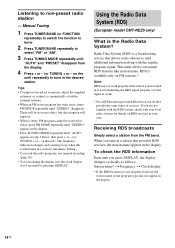
... antennas, or connect a commercially available external antenna. • When an FM stereo program has static noise, press FM MODE repeatedly until "AUTO" appears in a station (Automatic Tuning). • To record the radio programs, use manual recording (page 16). • You can change the display into the clock display (for details on the unit). If you tune in a station that allows radio stations to select "FM" or "AM". 3 Press TUNING MODE repeatedly until "AUTO" and "PRESET...
... antennas, or connect a commercially available external antenna. • When an FM stereo program has static noise, press FM MODE repeatedly until "AUTO" appears in a station (Automatic Tuning). • To record the radio programs, use manual recording (page 16). • You can change the display into the clock display (for details on the unit). If you tune in a station that allows radio stations to select "FM" or "AM". 3 Press TUNING MODE repeatedly until "AUTO" and "PRESET...
Operating Instructions
Page 16
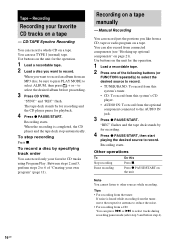
... system's tuner. • CD: To record from this Press x. CD-TAPE Synchro Recording You can press . Recording on the unit. You can record just the portions you like from connected components (see "Hooking up optional components" on a tape - "SYNC" and "REC" flash. Manual Recording You can also record from a CD, tape or radio program on the unit for playback. 4 Press z PAUSE/START. Tape - Recording starts. Use buttons...
... system's tuner. • CD: To record from this Press x. CD-TAPE Synchro Recording You can press . Recording on the unit. You can record just the portions you like from connected components (see "Hooking up optional components" on a tape - "SYNC" and "REC" flash. Manual Recording You can also record from a CD, tape or radio program on the unit for playback. 4 Press z PAUSE/START. Tape - Recording starts. Use buttons...
Operating Instructions
Page 17
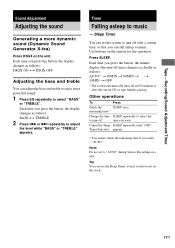
... set the system to "AUTO" during Syncro Recording on the remote for the operation. Recording/Sound Adjustment/Timer Sound Adjustment Adjusting the sound Generating a more powerful sound. 1 Press EQ repeatedly to music. or > repeatedly to music - Tip You can set to turn -off after the current CD or tape finishes playing. Sleep Timer You can use the Sleep Timer, even if you want. Each time you press the button, the display changes as follows: AUTO...
... set the system to "AUTO" during Syncro Recording on the remote for the operation. Recording/Sound Adjustment/Timer Sound Adjustment Adjusting the sound Generating a more powerful sound. 1 Press EQ repeatedly to music. or > repeatedly to music - Tip You can set to turn -off after the current CD or tape finishes playing. Sleep Timer You can use the Sleep Timer, even if you want. Each time you press the button, the display changes as follows: AUTO...

Operating Instructions
Page 18
... press the button, the display changes cyclically as the setting is not canceled manually. or > repeatedly to select "PLAY", then press ENTER. Each time you use the optional component connected to AUDIO IN jack as the sound source for the operation. 1 Prepare the sound source you have set the clock (see "Listening to the radio" on page 13). 2 Press VOLUME + or - (or turn off the system. 18GB Other operations To Check the setting Change the setting Cancel...
... press the button, the display changes cyclically as the setting is not canceled manually. or > repeatedly to select "PLAY", then press ENTER. Each time you use the optional component connected to AUDIO IN jack as the sound source for the operation. 1 Prepare the sound source you have set the clock (see "Listening to the radio" on page 13). 2 Press VOLUME + or - (or turn off the system. 18GB Other operations To Check the setting Change the setting Cancel...
Operating Instructions
Page 19
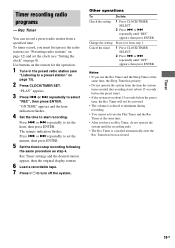
... setting Change the setting Cancel the timer Do this 1 Press CLOCK/TIMER SELECT. 2 Press . Notes • If you must first preset the radio station (see "Presetting radio stations" on page 12) and set Rec Timer, do not operate the system until the recording ends. • The Rec Timer is canceled automatically after the Rec Timer has been activated. 19GB Use buttons on the remote for the operation. 1 Tune...
... setting Change the setting Cancel the timer Do this 1 Press CLOCK/TIMER SELECT. 2 Press . Notes • If you must first preset the radio station (see "Presetting radio stations" on page 12) and set Rec Timer, do not operate the system until the recording ends. • The Rec Timer is canceled automatically after the Rec Timer has been activated. 19GB Use buttons on the remote for the operation. 1 Tune...

Operating Instructions
Page 20
... the button, the display switches cyclically as the titles and the artist's names. Note You cannot perform the following operations in the display You can be displayed depending on the disc and total playing time of the disc. 3) For discs with MP3 audio tracks 2) TOC = Table of power consumed during Normal Play. When a disc with MP3 audio tracks is in Program Play mode The last track number of the program and...
... the button, the display switches cyclically as the titles and the artist's names. Note You cannot perform the following operations in the display You can be displayed depending on the disc and total playing time of the disc. 3) For discs with MP3 audio tracks 2) TOC = Table of power consumed during Normal Play. When a disc with MP3 audio tracks is in Program Play mode The last track number of the program and...
Operating Instructions
Page 22
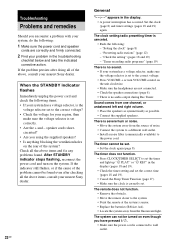
... display. • A power interruption has occurred. After STANDBY indicator stops flashing, reconnect the power cord and turn VOLUME control on even though you have pressed ?/1. • Make sure the power cord is connected to set the timer and light up "c PLAY" or "c REC" in the troubleshooting checklist below and take the indicated corrective action. There is severe hum or noise. • Move the system away from one channel...
... display. • A power interruption has occurred. After STANDBY indicator stops flashing, reconnect the power cord and turn VOLUME control on even though you have pressed ?/1. • Make sure the power cord is connected to set the timer and light up "c PLAY" or "c REC" in the troubleshooting checklist below and take the indicated corrective action. There is severe hum or noise. • Move the system away from one channel...

Operating Instructions
Page 23
... nearest Sony dealer if the supplied AM antenna has come from one channel, or unbalanced left and right volume. • Check the speaker connections and placement. Numbers (0 to Z) - CD/MP3 player Play does not start. • Wipe the disc clean (page 26). • Replace the disc. • Place the disc that can be displayed by this system can play. • Place the disc correctly in the center of...
... nearest Sony dealer if the supplied AM antenna has come from one channel, or unbalanced left and right volume. • Check the speaker connections and placement. Numbers (0 to Z) - CD/MP3 player Play does not start. • Wipe the disc clean (page 26). • Replace the disc. • Place the disc that can be displayed by this system can play. • Place the disc correctly in the center of...
Operating Instructions
Page 24
... measures, reset the system as the preset stations, clock, and timer. Cover the broken tab with the connected component and start playing. • Press FUNCTION repeatedly to select "AUDIO IN" (page 21). You should set the settings you made, such as follows: Use buttons on the unit for the operation. 1 Disconnect the power cord. 2 Reconnect the power cord. 3 Press ?/1 to turn VOLUME control to the end. Clean them (page 27). The tape does...
... measures, reset the system as the preset stations, clock, and timer. Cover the broken tab with the connected component and start playing. • Press FUNCTION repeatedly to select "AUDIO IN" (page 21). You should set the settings you made, such as follows: Use buttons on the unit for the operation. 1 Disconnect the power cord. 2 Reconnect the power cord. 3 Press ?/1 to turn VOLUME control to the end. Clean them (page 27). The tape does...
Operating Instructions
Page 26
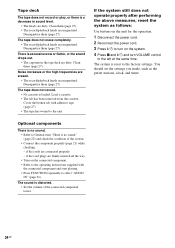
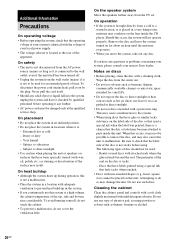
... the plug. Notes on the label side of the disc or that used for an extended period of time. Rental or used : - Additional Information Precautions On operating voltage • Before operating the system, check that the operating voltage of your system is identical with the voltage of your nearest Sony dealer. Subject to direct sunlight. • Use caution when placing the unit or speakers...
... the plug. Notes on the label side of the disc or that used for an extended period of time. Rental or used : - Additional Information Precautions On operating voltage • Before operating the system, check that the operating voltage of your system is identical with the voltage of your nearest Sony dealer. Subject to direct sunlight. • Use caution when placing the unit or speakers...
Operating Instructions
Page 27
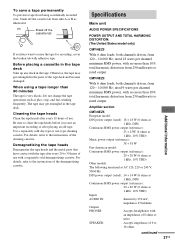
.... Specifications Main unit AUDIO POWER SPECIFICATIONS POWER OUTPUT AND TOTAL HARMONIC DISTORTION: (The United States model only) CMT-NEZ5 With 6 ohm loads, both channels driven, from 250 milliwatts to the instructions of use with no more than 10% total harmonic distortion from 120 - 10,000 Hz; Before placing a cassette in the tape deck Take up any slack in the parts of use . Do not change the tape operations such...
.... Specifications Main unit AUDIO POWER SPECIFICATIONS POWER OUTPUT AND TOTAL HARMONIC DISTORTION: (The United States model only) CMT-NEZ5 With 6 ohm loads, both channels driven, from 250 milliwatts to the instructions of use with no more than 10% total harmonic distortion from 120 - 10,000 Hz; Before placing a cassette in the tape deck Take up any slack in the parts of use . Do not change the tape operations such...
Operating Instructions
Page 28
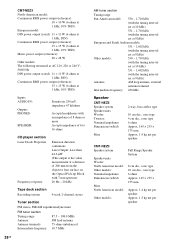
... lens surface on the Optical Pick-up Block with 7 mm aperture) 20 Hz - 20 kHz Tape deck section Recording system 4-track 2-channel, stereo Tuner section FM stereo, FM/AM superheterodyne tuner FM tuner section Tuning range Antenna Antenna terminals Intermediate frequency 87.5 - 108.0 MHz FM lead antenna 75 ohms unbalanced 10.7 MHz 28GB AM tuner section Tuning range Pan-American model: 530 - 1,710 kHz (with the tuning interval set at 10 kHz) 531...
... lens surface on the Optical Pick-up Block with 7 mm aperture) 20 Hz - 20 kHz Tape deck section Recording system 4-track 2-channel, stereo Tuner section FM stereo, FM/AM superheterodyne tuner FM tuner section Tuning range Antenna Antenna terminals Intermediate frequency 87.5 - 108.0 MHz FM lead antenna 75 ohms unbalanced 10.7 MHz 28GB AM tuner section Tuning range Pan-American model: 530 - 1,710 kHz (with the tuning interval set at 10 kHz) 531...


