

Limited Warranty (U.S. Only)
Page 1
...in exchange for the time periods and as fuses or batteries). For specific instructions on how to obtain warranty service for your product, Visit Sony's Web Site: www.sony.com/service Or call : 1-800-488-SONY (7669) Repair / Replacement Warranty: This Limited Warranty...Car Audio LIMITED WARRANTY (U.S. Only) Sony Electronics Inc. ("Sony") warrants this Labor Warranty has expired but not limited to product issues due to commercial use ; Instructions: To obtain warranty service, you . Any parts or product replaced under this Limited Warranty, Sony will not be responsible for in the United...
...in exchange for the time periods and as fuses or batteries). For specific instructions on how to obtain warranty service for your product, Visit Sony's Web Site: www.sony.com/service Or call : 1-800-488-SONY (7669) Repair / Replacement Warranty: This Limited Warranty...Car Audio LIMITED WARRANTY (U.S. Only) Sony Electronics Inc. ("Sony") warrants this Labor Warranty has expired but not limited to product issues due to commercial use ; Instructions: To obtain warranty service, you . Any parts or product replaced under this Limited Warranty, Sony will not be responsible for in the United...
Operating Instructions
Page 2
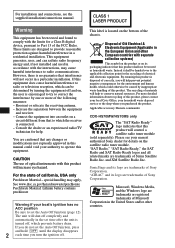
...: Lithium battery contains perchlorate Warning if your nearest authorized Sony dealer for a Class B digital device, pursuant to Part 15 of this product will help . This label is encouraged to try to provide reasonable protection against harmful interference in accordance with this product. If you do not set time after the unit is turned off and on, the user is located on a circuit...
...: Lithium battery contains perchlorate Warning if your nearest authorized Sony dealer for a Class B digital device, pursuant to Part 15 of this product will help . This label is encouraged to try to provide reasonable protection against harmful interference in accordance with this product. If you do not set time after the unit is turned off and on, the user is located on a circuit...
Operating Instructions
Page 3
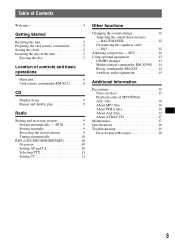
... Specifications 18 Troubleshooting 19 Error displays/Messages 20 3 SET 12 Using optional equipment 13 CD/MD changer 13 Marine remote commander RM-X55M . . . 14 Rotary commander RM-X4S 14 Auxiliary audio equipment 15 Additional Information Precautions 15 Notes on discs 15 Playback order of controls and basic operations Main unit 6 Card remote commander RM-X151 8 CD Display items 9 Repeat and shuffle play 9 Radio Storing and receiving stations 9 Storing automatically - BAL/FAD/SUB...
... Specifications 18 Troubleshooting 19 Error displays/Messages 20 3 SET 12 Using optional equipment 13 CD/MD changer 13 Marine remote commander RM-X55M . . . 14 Rotary commander RM-X4S 14 Auxiliary audio equipment 15 Additional Information Precautions 15 Notes on discs 15 Playback order of controls and basic operations Main unit 6 Card remote commander RM-X151 8 CD Display items 9 Repeat and shuffle play 9 Radio Storing and receiving stations 9 Storing automatically - BAL/FAD/SUB...
Operating Instructions
Page 4
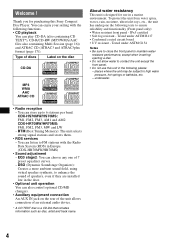
... panel. • Do not use in a marine environment. EQ3 stage2: You can choose any one of speakers, even if they are installed low in the door. • Optional unit operation You can enjoy your sailing with the Radio Data System (RDS) in the following places: - You can also control optional CD/MD changers. • Auxiliary equipment connection An AUX IN jack on the disc...
... panel. • Do not use in a marine environment. EQ3 stage2: You can choose any one of speakers, even if they are installed low in the door. • Optional unit operation You can enjoy your sailing with the Radio Data System (RDS) in the following places: - You can also control optional CD/MD changers. • Auxiliary equipment connection An AUX IN jack on the disc...

Operating Instructions
Page 5
... remote commander for the first time, or after replacing the boat's battery or changing the connections, you must reset the unit. The hour indication flashes. 4 Rotate the volume control dial to set the hour and minute, press M or m. The setup is ejected. 3 Close the front panel. 5 Notes • Do not put anything on the inner surface of the arrow. RESET button Note Pressing the RESET button will erase the clock setting...
... remote commander for the first time, or after replacing the boat's battery or changing the connections, you must reset the unit. The hour indication flashes. 4 Rotate the volume control dial to set the hour and minute, press M or m. The setup is ejected. 3 Close the front panel. 5 Notes • Do not put anything on the inner surface of the arrow. RESET button Note Pressing the RESET button will erase the clock setting...
Operating Instructions
Page 6
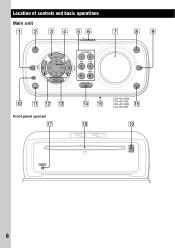
Location of controls and basic operations Main unit OFF SELECT Front panel opened SEEK SEEK GP/ALBM REP SHUF PAUSE SOURCE DSPL MODE CDX-HS70MW CDX-HS70MS CDX-HR70MW CDX-HR70MS RESET 6
Location of controls and basic operations Main unit OFF SELECT Front panel opened SEEK SEEK GP/ALBM REP SHUF PAUSE SOURCE DSPL MODE CDX-HS70MW CDX-HS70MS CDX-HR70MW CDX-HR70MS RESET 6
Operating Instructions
Page 7
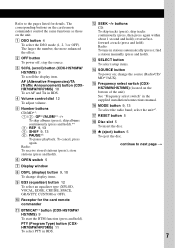
... remote commander control the same functions as those on ; AF (Alternative Frequencies)/TA (Traffic Announcement) button (CDXHR70MW/HR70MS) 10 To set AF and TA in the supplied installation/connections manual. M SELECT button To select setup items. N SOURCE button To power on the unit. D Volume control dial 12 To adjust volume. E Number buttons CD/MD*1: (1)/(2): GP*2/ALBM*3 -/+ To skip albums (press); store stations (press and hold ). reverse/fastforward a track (press and hold ). S Z (eject) button 5 To eject the disc. B OFF button...
... remote commander control the same functions as those on ; AF (Alternative Frequencies)/TA (Traffic Announcement) button (CDXHR70MW/HR70MS) 10 To set AF and TA in the supplied installation/connections manual. M SELECT button To select setup items. N SOURCE button To power on the unit. D Volume control dial 12 To adjust volume. E Number buttons CD/MD*1: (1)/(2): GP*2/ALBM*3 -/+ To skip albums (press); store stations (press and hold ). reverse/fastforward a track (press and hold ). S Z (eject) button 5 To eject the disc. B OFF button...
Operating Instructions
Page 8
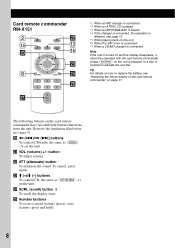
... played. *4 If the changer is connected, the operation is connected. Remove the insulation film before use (page 5). ws ATT (attenuate) button To attenuate the sound. The following buttons on how to activate the unit first. button To adjust volume. To cancel, press again. wf SCRL (scroll) button 9 To scroll the display item. Note If the unit is turned off and the display disappears, it cannot be operated with the card remote commander unless (SOURCE...
... played. *4 If the changer is connected, the operation is connected. Remove the insulation film before use (page 5). ws ATT (attenuate) button To attenuate the sound. The following buttons on how to activate the unit first. button To adjust volume. To cancel, press again. wf SCRL (scroll) button 9 To scroll the display item. Note If the unit is turned off and the display disappears, it cannot be operated with the card remote commander unless (SOURCE...
Operating Instructions
Page 9
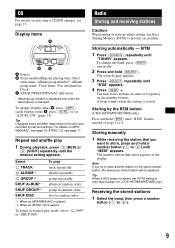
...*2 SHUF DISC To play 1 During playback, press (3) (REP) or (4) (SHUF) repeatedly until the desired setting appears. group repeatedly. To return to prevent an accident. The setup display appears. 3 Press (SELECT) repeatedly until "BTM" flashes, instead of frequency on the number buttons. BTM 1 Press (SOURCE) repeatedly until "MEM" appears. The unit stores stations in the display. Tip When a RDS station is stored, the AF/TA setting is played...
...*2 SHUF DISC To play 1 During playback, press (3) (REP) or (4) (SHUF) repeatedly until the desired setting appears. group repeatedly. To return to prevent an accident. The setup display appears. 3 Press (SELECT) repeatedly until "BTM" flashes, instead of frequency on the number buttons. BTM 1 Press (SOURCE) repeatedly until "MEM" appears. The unit stores stations in the display. Tip When a RDS station is stored, the AF/TA setting is played...
Operating Instructions
Page 10
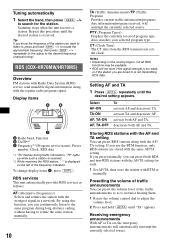
... frequency (manual tuning). Display items A Radio band, Function B TA/TP*1 C Frequency*2 (Program service name), Preset number, Clock, RDS data *1 "TA" flashes during long-distance sailing without having to the same program during traffic information. By using this procedure until the desired setting appears. If you preset manually, you are stored with the AF/ TA setting. PTY (Program Types) Displays the currently received program type. CT (Clock Time) The CT data from the RDS transmission sets the clock...
... frequency (manual tuning). Display items A Radio band, Function B TA/TP*1 C Frequency*2 (Program service name), Preset number, Clock, RDS data *1 "TA" flashes during long-distance sailing without having to the same program during traffic information. By using this procedure until the desired setting appears. If you preset manually, you are stored with the AF/ TA setting. PTY (Program Types) Displays the currently received program type. CT (Clock Time) The CT data from the RDS transmission sets the clock...
Operating Instructions
Page 11
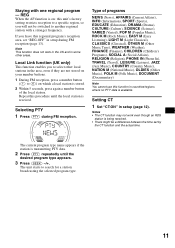
...), PHONE IN (Phone In), TRAVEL (Travel), LEISURE (Leisure), JAZZ (Jazz Music), COUNTRY (Country Music), NATION M (National Music), OLDIES (Oldies Music), FOLK M (Folk Music), DOCUMENT (Documentary) Note You cannot use this regional program's reception area, set by the CT function and the actual time. If you to another regional station with one regional program - Note This function does not work even though an RDS station is available. Selecting PTY...
...), PHONE IN (Phone In), TRAVEL (Travel), LEISURE (Leisure), JAZZ (Jazz Music), COUNTRY (Country Music), NATION M (National Music), OLDIES (Oldies Music), FOLK M (Folk Music), DOCUMENT (Documentary) Note You cannot use this regional program's reception area, set by the CT function and the actual time. If you to another regional station with one regional program - Note This function does not work even though an RDS station is available. Selecting PTY...
Operating Instructions
Page 12
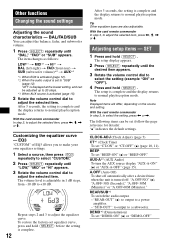
... play/reception mode. The item changes as follows: LOW*1 t MID*1 t HI*1 t BAL (left-right) t FAD (front-rear) t SUB (subwoofer volume)*2 t AUX*3 *1 When EQ3 is activated (page 12). *2 When the audio output is complete and the display returns to adjust the selected item. Other functions Changing the sound settings Adjusting the sound characteristics - After 3 seconds, the setting is set to adjust the selected item, press "ATT" is displayed at the lowest setting, and can adjust the balance, fader, and subwoofer volume. 1 Press (SELECT...
... play/reception mode. The item changes as follows: LOW*1 t MID*1 t HI*1 t BAL (left-right) t FAD (front-rear) t SUB (subwoofer volume)*2 t AUX*3 *1 When EQ3 is activated (page 12). *2 When the audio output is complete and the display returns to adjust the selected item. Other functions Changing the sound settings Adjusting the sound characteristics - After 3 seconds, the setting is set to adjust the selected item, press "ATT" is displayed at the lowest setting, and can adjust the balance, fader, and subwoofer volume. 1 Press (SELECT...
Operating Instructions
Page 13
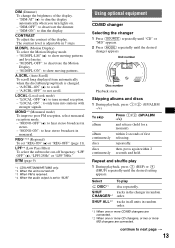
... the display. The contrast level is changed. - "A.SCRL-ON" (z): to deactivate the dimmer. - BTM (page 9) *1 CDX-HR70MW/HR70MS only. *2 When the unit is turned off frequency: "LPF OFF" (z), "LPF125Hz" or "LPF 78Hz." Using optional equipment CD/MD changer Selecting the changer 1 Press (SOURCE) repeatedly until "CD" or "MD" appears. 2 Press (MODE) repeatedly until the desired setting appears. "A.SCRL-OFF": to "SUB." M.DSPL (Motion Display) To select the Motion Display mode...
... the display. The contrast level is changed. - "A.SCRL-ON" (z): to deactivate the dimmer. - BTM (page 9) *1 CDX-HR70MW/HR70MS only. *2 When the unit is turned off frequency: "LPF OFF" (z), "LPF125Hz" or "LPF 78Hz." Using optional equipment CD/MD changer Selecting the changer 1 Press (SOURCE) repeatedly until "CD" or "MD" appears. 2 Press (MODE) repeatedly until the desired setting appears. "A.SCRL-OFF": to "SUB." M.DSPL (Motion Display) To select the Motion Display mode...
Operating Instructions
Page 14
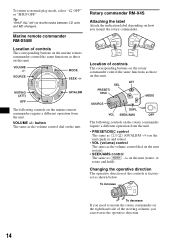
... between CD units and MD changers. button The same as those on this unit. Changing the operative direction The operative direction of the controls is factoryset as those on this unit. VOLUME +/- To increase To decrease If you need to normal play mode, select " OFF" or "SHUF OFF." Marine remote commander RM-X55M Location of controls The corresponding buttons on the marine remote commander control the same functions as the volume control dial on how you mount the...
... between CD units and MD changers. button The same as those on this unit. Changing the operative direction The operative direction of the controls is factoryset as those on this unit. VOLUME +/- To increase To decrease If you need to normal play mode, select " OFF" or "SHUF OFF." Marine remote commander RM-X55M Location of controls The corresponding buttons on the marine remote commander control the same functions as the volume control dial on how you mount the...
Operating Instructions
Page 15
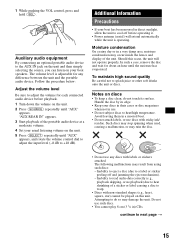
... connected audio device before operating it. • Power antenna (aerial) will not operate properly. Avoid leaving them in direct sunlight, allow the unit to splash juice or other soft drinks onto the unit or discs. Do not use . • Do not subject discs to next page t 15 Follow the procedure below: Adjust the volume level Be sure to the AUX IN jack on the unit and then simply selecting...
... connected audio device before operating it. • Power antenna (aerial) will not operate properly. Avoid leaving them in direct sunlight, allow the unit to splash juice or other soft drinks onto the unit or discs. Do not use . • Do not subject discs to next page t 15 Follow the procedure below: Adjust the volume level Be sure to the AUX IN jack on the unit and then simply selecting...
Operating Instructions
Page 17
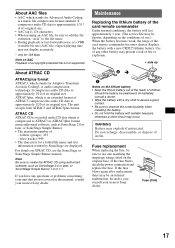
... lithium battery. If the fuse blows, check the power connection and replace the fuse. It compresses audio CD data to the file name. • During playback or fast-forward/reverse of a VBR (variable bit rate) AAC file, elapsed playing time may be sure to add the file extension ".m4a" to approximately 1/11* of in this manual, consult your nearest Sony dealer...
... lithium battery. If the fuse blows, check the power connection and replace the fuse. It compresses audio CD data to the file name. • During playback or fast-forward/reverse of a VBR (variable bit rate) AAC file, elapsed playing time may be sure to add the file extension ".m4a" to approximately 1/11* of in this manual, consult your nearest Sony dealer...

Operating Instructions
Page 18
...LW Tuning range: MW: 531 - 1,602 kHz LW: 153 - 279 kHz Antenna (aerial) terminal: External antenna (aerial) connector Intermediate frequency: 10.7 MHz/450 kHz Sensitivity: MW: 30 µV, LW: 40 µV Power amplifier section Outputs: Speaker outputs (sure seal connectors) Speaker impedance: 4 - 8 ohms Maximum power output: 52 W × 4 (at 4 ohms) General Outputs: Audio outputs terminal (front, rear/sub switchable) Power antenna (aerial) relay control terminal Power amplifier control terminal Inputs: Telephone ATT control terminal Illumination control terminal BUS control input terminal BUS...
...LW Tuning range: MW: 531 - 1,602 kHz LW: 153 - 279 kHz Antenna (aerial) terminal: External antenna (aerial) connector Intermediate frequency: 10.7 MHz/450 kHz Sensitivity: MW: 30 µV, LW: 40 µV Power amplifier section Outputs: Speaker outputs (sure seal connectors) Speaker impedance: 4 - 8 ohms Maximum power output: 52 W × 4 (at 4 ohms) General Outputs: Audio outputs terminal (front, rear/sub switchable) Power antenna (aerial) relay control terminal Power amplifier control terminal Inputs: Telephone ATT control terminal Illumination control terminal BUS control input terminal BUS...
Operating Instructions
Page 19
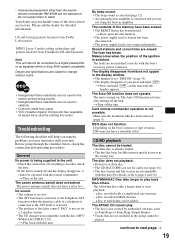
... set "DIM-ON" (page 13). • The display disappears if you may encounter with this unit. The Auto Off function does not operate. t Turn off the unit. Depending on the unit until the display appears. a disc recorded with the boat's accessory power connector. a disc to the ATT lead) is activated. • The position of the fader control "FAD" is turned off and the display disappears, it cannot be connected to play...
... set "DIM-ON" (page 13). • The display disappears if you may encounter with this unit. The Auto Off function does not operate. t Turn off the unit. Depending on the unit until the display appears. a disc recorded with the boat's accessory power connector. a disc to the ATT lead) is activated. • The position of the fader control "FAD" is turned off and the display disappears, it cannot be connected to play...
Operating Instructions
Page 20
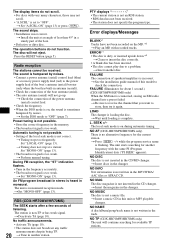
... searching for about 1 second.) (CDX-HS70MW/HS70MS only) When the XM tuner is connected, storing an XM radio channel into a preset failed. Preset tuning is not possible. • Store the correct frequency in the MP3/WMA/ AAC files or ATRAC CD. PTY displays The current station is loading the disc. SEEK +/- t Insert the magazine in the CD changer. t Install the unit at a station: Set "MONO-ON" (page 13...
... searching for about 1 second.) (CDX-HS70MW/HS70MS only) When the XM tuner is connected, storing an XM radio channel into a preset failed. Preset tuning is not possible. • Store the correct frequency in the MP3/WMA/ AAC files or ATRAC CD. PTY displays The current station is loading the disc. SEEK +/- t Insert the magazine in the CD changer. t Install the unit at a station: Set "MONO-ON" (page 13...
Operating Instructions
Page 21
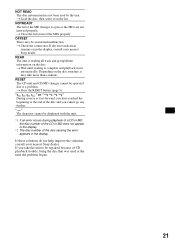
... in the display. *2 The disc number of CD playback trouble, bring the disc that was used at the time the problem began. 21 OFFSET There may take the unit to a problem. RESET The CD unit and CD/MD changer cannot be operated due to be repaired because of the disc causing the error appears in the display, consult your nearest Sony dealer. If these solutions do not help improve the...
... in the display. *2 The disc number of CD playback trouble, bring the disc that was used at the time the problem began. 21 OFFSET There may take the unit to a problem. RESET The CD unit and CD/MD changer cannot be operated due to be repaired because of the disc causing the error appears in the display, consult your nearest Sony dealer. If these solutions do not help improve the...


