
Operating Instructions
Page 3
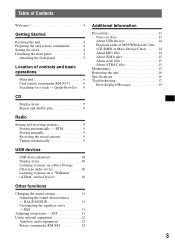
...Welcome 4 Getting Started Resetting the unit 4 Preparing the card remote commander 4 Setting the clock 4 Detaching the front panel 5 Attaching the front panel 5 Location of MP3/WMA/AAC files (CD-R/RW or Mass Storage Class 14 About MP3 files 14 About WMA files 15 ...files 15 About ATRAC files 15 Maintenance 15 Removing the unit 16 Specifications 16 Troubleshooting 17 Error displays/Messages 19 CD Display items 9 Repeat and shuffle play 9 Radio Storing and receiving stations 9 Storing automatically - BTM 9 Storing manually 9 Receiving the stored stations 9 Tuning ...
...Welcome 4 Getting Started Resetting the unit 4 Preparing the card remote commander 4 Setting the clock 4 Detaching the front panel 5 Attaching the front panel 5 Location of MP3/WMA/AAC files (CD-R/RW or Mass Storage Class 14 About MP3 files 14 About WMA files 15 ...files 15 About ATRAC files 15 Maintenance 15 Removing the unit 16 Specifications 16 Troubleshooting 17 Error displays/Messages 19 CD Display items 9 Repeat and shuffle play 9 Radio Storing and receiving stations 9 Storing automatically - BTM 9 Storing manually 9 Receiving the stored stations 9 Tuning ...
Operating Instructions
Page 4
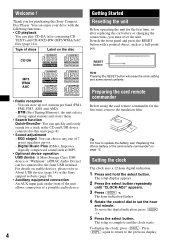
...For details on usable devices, please refer to this Sony Compact Disc Player. Preparing the card remote commander Before using the card remote commander for purchasing this unit (page 8). • Sound adjustment - Setting the clock The clock uses a 12-hour digital indication. 1 Press and... hold the select button. The setup display appears. 2 Press the select button repeatedly until "CLOCK-ADJ" appears. 3 Press (SEEK) +. CD-DA MP3 WMA AAC • Radio reception - Press (DSPL) again...
...For details on usable devices, please refer to this Sony Compact Disc Player. Preparing the card remote commander Before using the card remote commander for purchasing this unit (page 8). • Sound adjustment - Setting the clock The clock uses a 12-hour digital indication. 1 Press and... hold the select button. The setup display appears. 2 Press the select button repeatedly until "CLOCK-ADJ" appears. 3 Press (SEEK) +. CD-DA MP3 WMA AAC • Radio reception - Press (DSPL) again...
Operating Instructions
Page 9
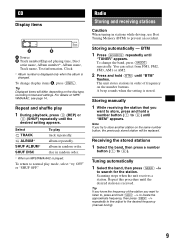
CD Display items A Source B Track number/Elapsed playing time, Disc/ artist name, Album number*, Album name, Track name, Text information, Clock * Album number is displayed only when the album is stored. album in random order. * When an MP3/WMA/AAC is received. OFF" Radio Storing... the approximate frequency, then press (SEEK) -/+ repeatedly to fine adjust to the desired frequency (manual tuning). 9 A beep sounds when the setting is changed. Repeat this procedure until the desired station is played. To change the band, press (MODE) repeatedly. Tip Displayed items will be...
CD Display items A Source B Track number/Elapsed playing time, Disc/ artist name, Album number*, Album name, Track name, Text information, Clock * Album number is displayed only when the album is stored. album in random order. * When an MP3/WMA/AAC is received. OFF" Radio Storing... the approximate frequency, then press (SEEK) -/+ repeatedly to fine adjust to the desired frequency (manual tuning). 9 A beep sounds when the setting is changed. Repeat this procedure until the desired station is played. To change the band, press (MODE) repeatedly. Tip Displayed items will be...
Operating Instructions
Page 10
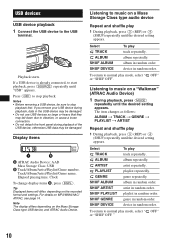
...ARTIST SHUF PLAYLIST SHUF GENRE SHUF DEVICE To play 1 During playback, press (3) (REP) or (4) (SHUF) repeatedly until the desired setting appears. genre in random order. Playback starts. Tip Displayed items will differ, depending on MP3/WMA/AAC/ ATRAC, see page 14...Artist/Playlist/Genre number, Track/Album/Artist/Playlist/Genre name, Elapsed playing time, Clock To change display items B, press (DSPL). genre repeatedly. To return to start playback, press (SOURCE) repeatedly until the desired setting appears. If a USB device is already connected, to normal play 1 During ...
...ARTIST SHUF PLAYLIST SHUF GENRE SHUF DEVICE To play 1 During playback, press (3) (REP) or (4) (SHUF) repeatedly until the desired setting appears. genre in random order. Playback starts. Tip Displayed items will differ, depending on MP3/WMA/AAC/ ATRAC, see page 14...Artist/Playlist/Genre number, Track/Album/Artist/Playlist/Genre name, Elapsed playing time, Clock To change display items B, press (DSPL). genre repeatedly. To return to start playback, press (SOURCE) repeatedly until the desired setting appears. If a USB device is already connected, to normal play 1 During ...
Operating Instructions
Page 11
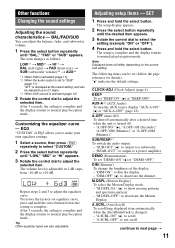
...Display) To select the Motion Display mode. - Customizing the equalizer curve - To restore the factory-set to adjust the equalizer curve. Adjusting setup items - CLOCK-ADJ (Clock Adjust) (page 4) BEEP To set "DEMO-ON" (z) or "DEMO-OFF." "A.SCRL-ON" (z): to deactivate the Motion Display. AUX...page 12). SUB/REAR*1 To switch the audio output. - "SUB-OUT" (z): to output to normal play /reception mode. After 3 seconds, the setting is set equalizer curve, press and hold the select button. "DIM-ON": to normal play /reception mode. "A.OFF-NO" (z), "A.OFF-30S (Seconds)," "A.OFF...
...Display) To select the Motion Display mode. - Customizing the equalizer curve - To restore the factory-set to adjust the equalizer curve. Adjusting setup items - CLOCK-ADJ (Clock Adjust) (page 4) BEEP To set "DEMO-ON" (z) or "DEMO-OFF." "A.SCRL-ON" (z): to deactivate the Motion Display. AUX...page 12). SUB/REAR*1 To switch the audio output. - "SUB-OUT" (z): to output to normal play /reception mode. After 3 seconds, the setting is set equalizer curve, press and hold the select button. "DIM-ON": to normal play /reception mode. "A.OFF-NO" (z), "A.OFF-30S (Seconds)," "A.OFF...

