Operating Instructions
Page 1
CDX-GT11W © 2006 Sony Corporation To cancel the demonstration (DEMO) display, see page 8. Para cancelar la pantalla de demostración (DEMO), consulte la página 8. Record the serial number in the space provided below. CDX-GT11W Serial No. Refer to these numbers whenever you call upon your Sony dealer regarding this product. 2-696-856-11 (2) FM/AM Compact Disc Player Operating Instructions US Manual de instrucciones ES Owner's Record The model and serial numbers are located on the bottom of the unit. Model No.
CDX-GT11W © 2006 Sony Corporation To cancel the demonstration (DEMO) display, see page 8. Para cancelar la pantalla de demostración (DEMO), consulte la página 8. Record the serial number in the space provided below. CDX-GT11W Serial No. Refer to these numbers whenever you call upon your Sony dealer regarding this product. 2-696-856-11 (2) FM/AM Compact Disc Player Operating Instructions US Manual de instrucciones ES Owner's Record The model and serial numbers are located on the bottom of the unit. Model No.
Operating Instructions
Page 2
... set the Auto Off function, press and hold (OFF) until the display disappears each time you do not set time after the unit is connected. - Consult the dealer or an experienced radio/TV technician for a Class B digital device, pursuant to Part 15 of optical instruments with the instructions, may cause harmful interference to radio or television reception, which prevents battery drain. Reorient or relocate the receiving antenna...
... set the Auto Off function, press and hold (OFF) until the display disappears each time you do not set time after the unit is connected. - Consult the dealer or an experienced radio/TV technician for a Class B digital device, pursuant to Part 15 of optical instruments with the instructions, may cause harmful interference to radio or television reception, which prevents battery drain. Reorient or relocate the receiving antenna...
Operating Instructions
Page 3
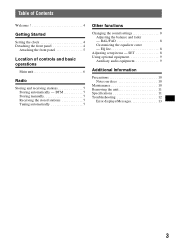
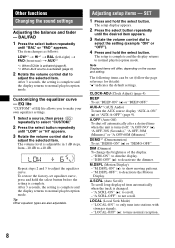
... 10 Removing the unit 11 Specifications 11 Troubleshooting 12 Error displays/Messages 13 3 EQ lite 8 Adjusting setup items - Table of Contents Welcome 4 Getting Started Setting the clock 4 Detaching the front panel 4 Attaching the front panel 5 Location of controls and basic operations Main unit 6 Radio Storing and receiving stations 7 Storing automatically - BAL/FAD 8 Customizing the equalizer curve - BTM 7 Storing manually 7 Receiving the stored stations 7 Tuning automatically 7 Other functions Changing the sound settings 8 Adjusting the balance and fader...
... 10 Removing the unit 11 Specifications 11 Troubleshooting 12 Error displays/Messages 13 3 EQ lite 8 Adjusting setup items - Table of Contents Welcome 4 Getting Started Setting the clock 4 Detaching the front panel 4 Attaching the front panel 5 Location of controls and basic operations Main unit 6 Radio Storing and receiving stations 7 Storing automatically - BAL/FAD 8 Customizing the equalizer curve - BTM 7 Storing manually 7 Receiving the stored stations 7 Tuning automatically 7 Other functions Changing the sound settings 8 Adjusting the balance and fader...
Operating Instructions
Page 4
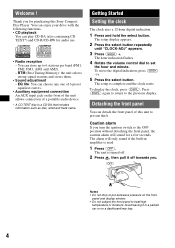
... the unit allows connection of a portable audio device. * A CD TEXT disc is complete and the clock starts. BTM (Best Tuning Memory): the unit selects strong signal stations and stores them. • Sound adjustment - Getting Started Setting the clock The clock uses a 12-hour digital indication. 1 Press and hold the select button. The setup display appears. 2 Press the select button repeatedly until "CLOCK-ADJ" appears. 3 Press (SEEK) +. You can enjoy your drive with the following functions. • CD playback...
... the unit allows connection of a portable audio device. * A CD TEXT disc is complete and the clock starts. BTM (Best Tuning Memory): the unit selects strong signal stations and stores them. • Sound adjustment - Getting Started Setting the clock The clock uses a 12-hour digital indication. 1 Press and hold the select button. The setup display appears. 2 Press the select button repeatedly until "CLOCK-ADJ" appears. 3 Press (SEEK) +. You can enjoy your drive with the following functions. • CD playback...
Operating Instructions
Page 5
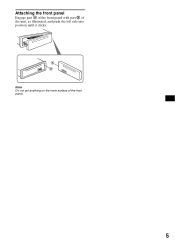
A B Note Do not put anything on the inner surface of the unit, as illustrated, and push the left side into position until it clicks. Attaching the front panel Engage part A of the front panel with part B of the front panel. 5
A B Note Do not put anything on the inner surface of the unit, as illustrated, and push the left side into position until it clicks. Attaching the front panel Engage part A of the front panel with part B of the front panel. 5
Operating Instructions
Page 6
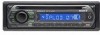
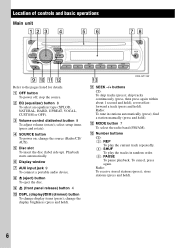
A OFF button To power off; change display items (press); L MODE button 7 To select the radio band (FM/AM). store stations (press and hold ). stop the source. F Display window G AUX input jack 9 To connect a portable audio device. find a station manually (press and hold ). 6 E Disc slot To insert the disc (label side up). I (front panel release) button 4 J DSPL (display)/DIM (dimmer) button To change the display brightness (press and hold). reverse/fastforward a track (press and hold ); qd CDX-GT11W K SEEK -/+ buttons CD: To skip...
A OFF button To power off; change display items (press); L MODE button 7 To select the radio band (FM/AM). store stations (press and hold ). stop the source. F Display window G AUX input jack 9 To connect a portable audio device. find a station manually (press and hold ). 6 E Disc slot To insert the disc (label side up). I (front panel release) button 4 J DSPL (display)/DIM (dimmer) button To change the display brightness (press and hold). reverse/fastforward a track (press and hold ); qd CDX-GT11W K SEEK -/+ buttons CD: To skip...
Operating Instructions
Page 7
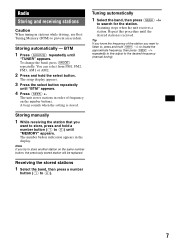
... the setting is received. Tuning automatically 1 Select the band, then press (SEEK) -/+ to (6)). Repeat this procedure until "MEMORY" appears. To change the band, press (MODE) repeatedly. Storing manually 1 While receiving the station that you try to store another station on the number buttons. Scanning stops when the unit receives a station. The setup display appears. 3 Press the select button repeatedly until "TUNER" appears. Note If you want to listen to the desired frequency (manual tuning...
... the setting is received. Tuning automatically 1 Select the band, then press (SEEK) -/+ to (6)). Repeat this procedure until "MEMORY" appears. To change the band, press (MODE) repeatedly. Storing manually 1 While receiving the station that you try to store another station on the number buttons. Scanning stops when the unit receives a station. The setup display appears. 3 Press the select button repeatedly until "TUNER" appears. Note If you want to listen to the desired frequency (manual tuning...
Operating Instructions
Page 8
... only tune into stations with stronger signals. - AUX-A*1 (AUX Audio) To turn the AUX source display "AUX-A-ON" (z) or "AUX-A-OFF" (page 9). M.DSPL (Motion Display) - "LOCAL-ON": to select the setting (example "ON" or "OFF"). 4 Press and hold the select button. The following items can be set "DEMO-ON" (z) or "DEMO-OFF." DEMO*1 (Demonstration) To set (follow the page reference for details): "z" indicates the default settings. "M.DSPL-ON" (z): to normal play/reception mode. After...
... only tune into stations with stronger signals. - AUX-A*1 (AUX Audio) To turn the AUX source display "AUX-A-ON" (z) or "AUX-A-OFF" (page 9). M.DSPL (Motion Display) - "LOCAL-ON": to select the setting (example "ON" or "OFF"). 4 Press and hold the select button. The following items can be set "DEMO-ON" (z) or "DEMO-OFF." DEMO*1 (Demonstration) To set (follow the page reference for details): "z" indicates the default settings. "M.DSPL-ON" (z): to normal play/reception mode. After...
Operating Instructions
Page 9
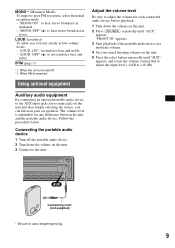
... volume control dial to adjust the input level (-8 dB to the unit. LOUD (Loudness) To allow you to the AUX input jack (stereo mini jack) on the unit and then simply selecting the source, you can listen on the unit. 3 Connect to +18 dB). The volume level is received. Auxiliary audio equipment By connecting an optional portable audio device to listen clearly at a moderate volume. 4 Set your car speakers. MONO*2 (Monaural Mode) To improve poor FM reception, select...
... volume control dial to adjust the input level (-8 dB to the unit. LOUD (Loudness) To allow you to the AUX input jack (stereo mini jack) on the unit and then simply selecting the source, you can listen on the unit. 3 Connect to +18 dB). The volume level is received. Auxiliary audio equipment By connecting an optional portable audio device to listen clearly at a moderate volume. 4 Set your car speakers. MONO*2 (Monaural Mode) To improve poor FM reception, select...
Operating Instructions
Page 10
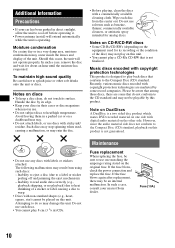
... may damage the unit. Recently, various music discs encoded with copyright protection technologies are some record companies. However, since the audio material side does not conform to the Compact Disc (CD) standard, playback on this product. Such discs may stop spinning when used for its recording or the condition of the unit. If the fuse blows, check the power connection and replace the fuse. Fuse (10A) 10...
... may damage the unit. Recently, various music discs encoded with copyright protection technologies are some record companies. However, since the audio material side does not conform to the Compact Disc (CD) standard, playback on this product. Such discs may stop spinning when used for its recording or the condition of the unit. If the fuse blows, check the power connection and replace the fuse. Fuse (10A) 10...
Operating Instructions
Page 11
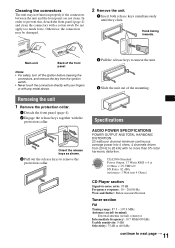
... unseat the unit. 3 Slide the unit out of the mounting. Specifications AUDIO POWER SPECIFICATIONS POWER OUTPUT AND TOTAL HARMONIC DISTORTION 23 watts per channel minimum continuous average power into 4 Ohms) CD Player section Signal-to-noise ratio: 95 dB Frequency response: 10 - 20,000 Hz Wow and flutter: Below measurable limit Tuner section FM Tuning range: 87.5 - 107.9 MHz Antenna (aerial) terminal: External antenna (aerial) connector Intermediate frequency: 10.7 MHz...
... unseat the unit. 3 Slide the unit out of the mounting. Specifications AUDIO POWER SPECIFICATIONS POWER OUTPUT AND TOTAL HARMONIC DISTORTION 23 watts per channel minimum continuous average power into 4 Ohms) CD Player section Signal-to-noise ratio: 95 dB Frequency response: 10 - 20,000 Hz Wow and flutter: Below measurable limit Tuner section FM Tuning range: 87.5 - 107.9 MHz Antenna (aerial) terminal: External antenna (aerial) connector Intermediate frequency: 10.7 MHz...
Operating Instructions
Page 12
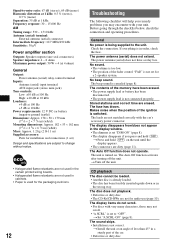
... connected properly. The Auto Off function activates after turning off the unit. No sound. • The volume is too low. • The position of the fader control "FAD" is not set ) Design and specifications are subject to change without notice. • Halogenated flame retardants are not used in the certain printed wiring boards. • Halogenated flame retardants are dirty (page 11). Stored stations and correct time...
... connected properly. The Auto Off function activates after turning off the unit. No sound. • The volume is too low. • The position of the fader control "FAD" is not set ) Design and specifications are subject to change without notice. • Halogenated flame retardants are not used in the certain printed wiring boards. • Halogenated flame retardants are dirty (page 11). Stored stations and correct time...
Operating Instructions
Page 13
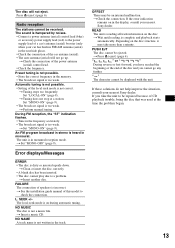
... be ejected. t Set "MONO-ON" (page 9). SEEK +/- t Insert a music CD. PUSH EJT The disc cannot be displayed with the unit. t Press Z (eject) (page 6). If these solutions do not help improve the situation, consult your car has built-in FM/AM antenna (aerial) in monaural reception mode. t Check the connection of this model to check the connection. Preset tuning is too weak. t Perform manual tuning. t See the installation guide manual of the power antenna (aerial) control...
... be ejected. t Set "MONO-ON" (page 9). SEEK +/- t Insert a music CD. PUSH EJT The disc cannot be displayed with the unit. t Press Z (eject) (page 6). If these solutions do not help improve the situation, consult your car has built-in FM/AM antenna (aerial) in monaural reception mode. t Check the connection of this model to check the connection. Preset tuning is too weak. t Perform manual tuning. t See the installation guide manual of the power antenna (aerial) control...
Operating Instructions
Page 28
only); Call 1-800-222-7669 URL http://www.SONY.com http://www.sony.net/ Sony Corporation Printed in these Operating Instructions. 2 Please contact (U.S.A. If you have any questions/problems regarding this product, try the following: 1 Read Troubleshooting in China
only); Call 1-800-222-7669 URL http://www.SONY.com http://www.sony.net/ Sony Corporation Printed in these Operating Instructions. 2 Please contact (U.S.A. If you have any questions/problems regarding this product, try the following: 1 Read Troubleshooting in China


