
Limited Warranty (U.S. Only)
Page 1
... still in the United States. This Limited Warranty gives you specific legal rights and you . Parts: For a period of product ("Parts Warranty"), Sony will supply new or refurbished replacement parts in material or workmanship during service and Sony will be lost or reformatted during ordinary consumer use , acts of God, misuse, limitations of technology, or modification of protection to be responsible...
... still in the United States. This Limited Warranty gives you specific legal rights and you . Parts: For a period of product ("Parts Warranty"), Sony will supply new or refurbished replacement parts in material or workmanship during service and Sony will be lost or reformatted during ordinary consumer use , acts of God, misuse, limitations of technology, or modification of protection to be responsible...
Operating Instructions (primary manual)
Page 1
Refer to these numbers in the space provided below. Record these numbers whenever you call upon your Sony dealer regarding this product. For installation and connections, see the supplied installation/connections manual. CDX-4000X CDX-4005 © 2000 Sony Corporation Model No. Serial No. 3-043-292-11 (1) FM/AM Compact Disc Player Operating Instructions US Owner's Record The model and serial numbers are located on the bottom of the unit.
Refer to these numbers in the space provided below. Record these numbers whenever you call upon your Sony dealer regarding this product. For installation and connections, see the supplied installation/connections manual. CDX-4000X CDX-4005 © 2000 Sony Corporation Model No. Serial No. 3-043-292-11 (1) FM/AM Compact Disc Player Operating Instructions US Owner's Record The model and serial numbers are located on the bottom of the unit.
Operating Instructions (primary manual)
Page 2
... not installed and used in temperature inside the unit, reduce the sound quality, or prevent sound reproduction altogether. Thank you have any questions or problems concerning your unit that any changes or modifications not expressly approved in this manual could void your nearest Sony dealer. If this product will not operate properly. Reorient or relocate the receiving antenna. - Precautions • If your audio equipment...
... not installed and used in temperature inside the unit, reduce the sound quality, or prevent sound reproduction altogether. Thank you have any questions or problems concerning your unit that any changes or modifications not expressly approved in this manual could void your nearest Sony dealer. If this product will not operate properly. Reorient or relocate the receiving antenna. - Precautions • If your audio equipment...

Operating Instructions (primary manual)
Page 3
... a sticky residue on this unit. • You cannot play CD-RWs (rewritable CDs) on the surface (for analog discs. Notes on CD-R discs • You can be played on the audio CD player). • You cannot play a CD-R that are beginning to direct sunlight or heat sources such as hot air-ducts, or leave them in a car parked in temperature inside...
... a sticky residue on this unit. • You cannot play CD-RWs (rewritable CDs) on the surface (for analog discs. Notes on CD-R discs • You can be played on the audio CD player). • You cannot play a CD-R that are beginning to direct sunlight or heat sources such as hot air-ducts, or leave them in a car parked in temperature inside...
Operating Instructions (primary manual)
Page 4
... Adjusting the sound characteristics 15 Attenuating the sound 15 Changing the sound and display settings ...... 16 Boosting the bass sound - Best Tuning Memory (BTM 10 Memorizing only the desired stations 11 Receiving the memorized stations 11 Storing the station names - Table of Contents Location of controls 5 Getting Started Resetting the unit 6 Detaching the front panel 6 Turning the unit on/off 7 How to use the menu 7 Setting the clock 7 CD Player Listening to a CD 8 Playing a CD in various modes 10 Radio...
... Adjusting the sound characteristics 15 Attenuating the sound 15 Changing the sound and display settings ...... 16 Boosting the bass sound - Best Tuning Memory (BTM 10 Memorizing only the desired stations 11 Receiving the memorized stations 11 Storing the station names - Table of Contents Location of controls 5 Getting Started Resetting the unit 6 Detaching the front panel 6 Turning the unit on/off 7 How to use the menu 7 Setting the clock 7 CD Player Listening to a CD 8 Playing a CD in various modes 10 Radio...
Operating Instructions (primary manual)
Page 5
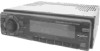
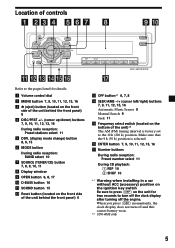
... radio reception: Preset stations select 11 5 DSPL (display mode change) button 8, 9, 13 6 MODE button During radio reception: BAND select 10 7 SOURCE (TUNER/CD) button 7, 8, 9, 10, 11 8 Display window 9 OPEN button 6, 8, 17 q; When you press (OFF) momentarily, the clock display does not turn off the clock display after turning off and this causes battery wear. *2 CDX-4005 only 5 Location of the unit behind the front panel) 6 qd OFF button*1 6, 7, 8 qf SEEK/AMS -/+ (cursor left/right) buttons 7, 9, 11, 12, 15, 16 Automatic Music Sensor 9 Manual...
... radio reception: Preset stations select 11 5 DSPL (display mode change) button 8, 9, 13 6 MODE button During radio reception: BAND select 10 7 SOURCE (TUNER/CD) button 7, 8, 9, 10, 11 8 Display window 9 OPEN button 6, 8, 17 q; When you press (OFF) momentarily, the clock display does not turn off the clock display after turning off and this causes battery wear. *2 CDX-4005 only 5 Location of the unit behind the front panel) 6 qd OFF button*1 6, 7, 8 qf SEEK/AMS -/+ (cursor left/right) buttons 7, 9, 11, 12, 15, 16 Automatic Music Sensor 9 Manual...

Operating Instructions (primary manual)
Page 6
... sound will erase the clock setting and some memorized functions such as a ball- Remove the front pannel and press the reset button with you connect an optional power amplifier and do not leave it in a humid place. x Detaching the front panel You can detach the front panel of this unit to protect the unit from the unit. • If you detach the panel while the unit is still turned...
... sound will erase the clock setting and some memorized functions such as a ball- Remove the front pannel and press the reset button with you connect an optional power amplifier and do not leave it in a humid place. x Detaching the front panel You can detach the front panel of this unit to protect the unit from the unit. • If you detach the panel while the unit is still turned...
Operating Instructions (primary manual)
Page 7
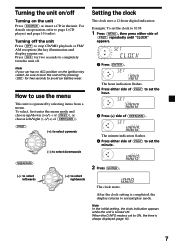
... play mode. Press (OFF) for two seconds to page 8 (CD player) and page 10 (radio). When the D.INFO mode is set the clock to 10:08 1 Press (MENU), then press either side of (SEEK/AMS)). (PRST) (+): to select upwards SOURCE (-): to completely turn the unit off . How to use the menu This unit is completed, the display returns to ON, the time is turned off by selecting items from a menu...
... play mode. Press (OFF) for two seconds to page 8 (CD player) and page 10 (radio). When the D.INFO mode is set the clock to 10:08 1 Press (MENU), then press either side of (SEEK/AMS)). (PRST) (+): to select upwards SOURCE (-): to completely turn the unit off . How to use the menu This unit is completed, the display returns to ON, the time is turned off by selecting items from a menu...
Operating Instructions (primary manual)
Page 8
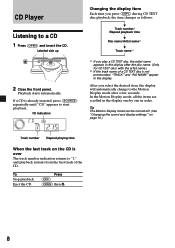
CD Player Listening to the Motion Display mode after the disc name. (Only for CD TEXT discs with the artist name.) *2 If the track name of the CD. Tip The Motion Display mode can be turned off. (See "Changing the sound and display settings" on page 16.) Track number Elapsed playing time When the last track on the CD is over The track number indication returns to...
CD Player Listening to the Motion Display mode after the disc name. (Only for CD TEXT discs with the artist name.) *2 If the track name of the CD. Tip The Motion Display mode can be turned off. (See "Changing the sound and display settings" on page 16.) Track number Elapsed playing time When the last track on the CD is over The track number indication returns to...
Operating Instructions (primary manual)
Page 9
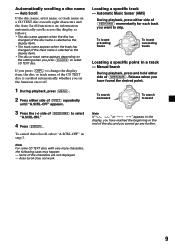
...: - To locate preceding tracks SOURCE To locate succeeding tracks Locating a specific point in step 3. Some of (SEEK/AMS). Locating a specific track - Auto Scroll does not work. Manual Search During playback, press and hold either side of the characters are not displayed. - If you press (DSPL) to change the display item, the disc or track name of the CD TEXT disc is selected as the display item). •...
...: - To locate preceding tracks SOURCE To locate succeeding tracks Locating a specific point in step 3. Some of (SEEK/AMS). Locating a specific track - Auto Scroll does not work. Manual Search During playback, press and hold either side of the characters are not displayed. - If you press (DSPL) to change the display item, the disc or track name of the CD TEXT disc is selected as the display item). •...
Operating Instructions (primary manual)
Page 10
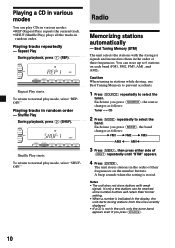
... the unit, only the tuner band appears even if you press (SOURCE). 10 Playing tracks in stations while driving, use Best Tuning Memory to prevent accidents. 1 Press (SOURCE) repeatedly to select the band. If only a few stations can store up to normal play mode, select "SHUFOFF." Repeat Play During playback, press (1) (REP). Caution When tuning in random order - To return to 6 stations on the number buttons. Best Tuning Memory (BTM) The unit selects the stations...
... the unit, only the tuner band appears even if you press (SOURCE). 10 Playing tracks in stations while driving, use Best Tuning Memory to prevent accidents. 1 Press (SOURCE) repeatedly to select the band. If only a few stations can store up to normal play mode, select "SHUFOFF." Repeat Play During playback, press (1) (REP). Caution When tuning in random order - To return to 6 stations on the number buttons. Best Tuning Memory (BTM) The unit selects the stations...
Operating Instructions (primary manual)
Page 11
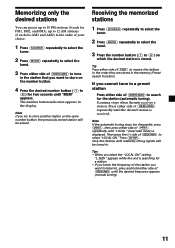
..., press (MENU), then press either side of (PRST) repeatedly until "MEM" appears. Scanning stops when the unit receives a station. Press (ENTER). Only the stations with relatively strong signals will be tuned in. If you select the "LOCAL-ON" setting, "L.SEEK" appears while the unit is stored. Tips • When you cannot tune in the display. The number button indication appears in a preset station Press either...
..., press (MENU), then press either side of (PRST) repeatedly until "MEM" appears. Scanning stops when the unit receives a station. Press (ENTER). Only the stations with relatively strong signals will be tuned in. If you select the "LOCAL-ON" setting, "L.SEEK" appears while the unit is stored. Tips • When you cannot tune in the display. The number button indication appears in a preset station Press either...
Operating Instructions (primary manual)
Page 12
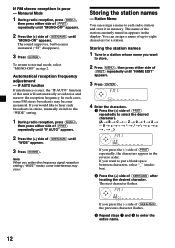
... (-) side of (SEEK/AMS) after locating the desired character. IF AUTO function If interference occurs, the "IF AUTO" function of (SEEK/AMS) until "IF AUTO" appears. 2 Press the (+) side of up to eight characters for a station. If you widen the frequency signal reception setting ("WIDE" mode), some FM stereo broadcasts may occur. Monaural Mode 1 During radio reception, press (MENU), then press either side of (PRST...
... (-) side of (SEEK/AMS) after locating the desired character. IF AUTO function If interference occurs, the "IF AUTO" function of (SEEK/AMS) until "IF AUTO" appears. 2 Press the (+) side of up to eight characters for a station. If you widen the frequency signal reception setting ("WIDE" mode), some FM stereo broadcasts may occur. Monaural Mode 1 During radio reception, press (MENU), then press either side of (PRST...
Operating Instructions (primary manual)
Page 14
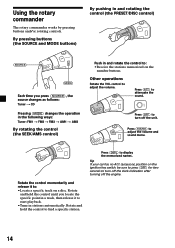
... rotating the control (the PRESET/DISC control) (SOURCE) (MODE) Each time you locate the specific point in a track, then release it to start playback. •Tune in and rotate the control to find a specific station. Rotate and hold the control to : •Receive the stations memorized on a disc. Press (DSPL) to attenuate the sound. Rotate the control momentarily and release it to : •Locate a specific track on the number buttons. Press (ATT) to display the...
... rotating the control (the PRESET/DISC control) (SOURCE) (MODE) Each time you locate the specific point in a track, then release it to start playback. •Tune in and rotate the control to find a specific station. Rotate and hold the control to : •Receive the stations memorized on a disc. Press (DSPL) to attenuate the sound. Rotate the control momentarily and release it to : •Locate a specific track on the number buttons. Press (ATT) to display the...

Operating Instructions (primary manual)
Page 15
... the VOL control. When adjusting with the unit (see "Changing the sound and display settings" on page 16). Changing the operative direction The operative direction of controls is connected to the ATT lead, the unit decreases the volume automatically when a telephone call comes in (Telephone ATT function). 15 You can adjust the bass, treble, balance, and fader. Attenuating the sound Press (ATT) on the right hand side of the steering column, you want to mount the...
... the VOL control. When adjusting with the unit (see "Changing the sound and display settings" on page 16). Changing the operative direction The operative direction of controls is connected to the ATT lead, the unit decreases the volume automatically when a telephone call comes in (Telephone ATT function). 15 You can adjust the bass, treble, balance, and fader. Attenuating the sound Press (ATT) on the right hand side of the steering column, you want to mount the...
Operating Instructions (primary manual)
Page 16
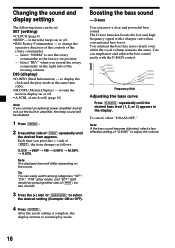
... If the bass sound becomes distorted, select a less effective setting of the rotary commander. - to use the built-in the display. The D-bass function boosts the low and high frequency signal with the D-BASS control. Level D.BASS-3 D.BASS-2 D.BASS-1 D.BASS-3 D.BASS-2 D.BASS-1 0dB Frequency (Hz) Adjusting the bass curve Press (D-BASS) repeatedly until the desired item appears. After the mode setting is complete, the display returns to change the operative direction of the controls of "D.BASS" or adjust the volume. 4 Press (ENTER...
... If the bass sound becomes distorted, select a less effective setting of the rotary commander. - to use the built-in the display. The D-bass function boosts the low and high frequency signal with the D-BASS control. Level D.BASS-3 D.BASS-2 D.BASS-1 D.BASS-3 D.BASS-2 D.BASS-1 0dB Frequency (Hz) Adjusting the bass curve Press (D-BASS) repeatedly until the desired item appears. After the mode setting is complete, the display returns to change the operative direction of the controls of "D.BASS" or adjust the volume. 4 Press (ENTER...
Operating Instructions (primary manual)
Page 17
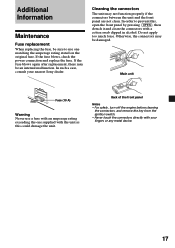
... fuse. Main unit Fuse (10 A) Warning Never use one supplied with the unit as this , open the front panel by pressing (OPEN), then detach it and clean the connectors with your nearest Sony dealer. Additional Information Maintenance Fuse replacement When replacing the fuse, be an internal malfunction. If the fuse blows, check the power connection and replace the fuse. Cleaning the connectors The unit may not function properly if the connectors...
... fuse. Main unit Fuse (10 A) Warning Never use one supplied with the unit as this , open the front panel by pressing (OPEN), then detach it and clean the connectors with your nearest Sony dealer. Additional Information Maintenance Fuse replacement When replacing the fuse, be an internal malfunction. If the fuse blows, check the power connection and replace the fuse. Cleaning the connectors The unit may not function properly if the connectors...
Operating Instructions (primary manual)
Page 19
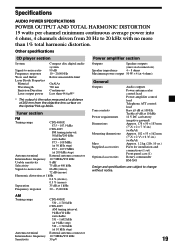
... connectors) Speaker impedance 4 - 8 ohms Maximum power output 50 W × 4 (at 4 ohms) General Outputs Tone controls Power requirements Dimensions Mounting dimensions Mass Supplied accessories Optional accessories Audio outputs Power antenna relay control lead Power amplifier control lead Telephone ATT control lead Bass ±9 dB at 100 Hz Treble ±9 dB at 10 kHz step) External antenna connector 10.7 MHz/450 kHz 30 µV 19 AM Tuning range Antenna terminal Intermediate frequency Sensitivity CDX-4000X 530 - 1,710 kHz CDX-4005...
... connectors) Speaker impedance 4 - 8 ohms Maximum power output 50 W × 4 (at 4 ohms) General Outputs Tone controls Power requirements Dimensions Mounting dimensions Mass Supplied accessories Optional accessories Audio outputs Power antenna relay control lead Power amplifier control lead Telephone ATT control lead Bass ±9 dB at 100 Hz Treble ±9 dB at 10 kHz step) External antenna connector 10.7 MHz/450 kHz 30 µV 19 AM Tuning range Antenna terminal Intermediate frequency Sensitivity CDX-4000X 530 - 1,710 kHz CDX-4005...
Operating Instructions (primary manual)
Page 20
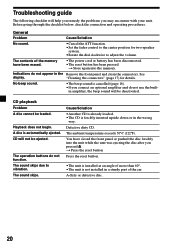
... the connectors" (page 17) for two-speaker system. •Rotate the dial clockwise to vibration. Press the reset button. •The unit is installed at an angle of the car. The operation buttons do not function. The sound skips due to adjust the volume. You have been erased. •The power cord or battery has been disconnected. •The reset button has been pressed. A disc is not installed in the...
... the connectors" (page 17) for two-speaker system. •Rotate the dial clockwise to vibration. Press the reset button. •The unit is installed at an angle of the car. The operation buttons do not function. The sound skips due to adjust the volume. You have been erased. •The power cord or battery has been disconnected. •The reset button has been pressed. A disc is not installed in the...
Operating Instructions (primary manual)
Page 21
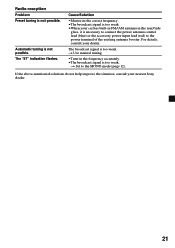
... signal is necessary to connect the power antenna control lead (blue) or the accessory power input lead (red) to the MONO mode (page 12). t Set to the power terminal of the existing antenna booster. The "ST" indication flashes. t Use manual tuning. •Tune in the rear/side glass, it is too weak. •When your nearest Sony dealer. 21 For details, consult your dealer. Radio reception Problem Preset tuning is too weak.
... signal is necessary to connect the power antenna control lead (blue) or the accessory power input lead (red) to the MONO mode (page 12). t Set to the power terminal of the existing antenna booster. The "ST" indication flashes. t Use manual tuning. •Tune in the rear/side glass, it is too weak. •When your nearest Sony dealer. 21 For details, consult your dealer. Radio reception Problem Preset tuning is too weak.


