Operating Instructions (primary manual)
Page 2
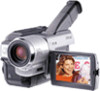
With your nearest Sony Service Center or Factory Service Center. You will soon be producing home video that you can return your ...this Sony Handycam VisionTM camcorder. LITHIUM ION BATTERY. DISPOSE OF PROPERLY. For the Sony Service Center nearest you call 1-800-222-SONY (United States only) For the Sony Factory Service Center nearest you call 416-499-SONY (Canada...of important operating and maintenance (servicing) instructions in the U.S.A. For customers in this manual could void your purchase of electric shock to constitute a risk of this equipment. Congratulations on your ...
With your nearest Sony Service Center or Factory Service Center. You will soon be producing home video that you can return your ...this Sony Handycam VisionTM camcorder. LITHIUM ION BATTERY. DISPOSE OF PROPERLY. For the Sony Service Center nearest you call 1-800-222-SONY (United States only) For the Sony Factory Service Center nearest you call 416-499-SONY (Canada...of important operating and maintenance (servicing) instructions in the U.S.A. For customers in this manual could void your purchase of electric shock to constitute a risk of this equipment. Congratulations on your ...
Operating Instructions (primary manual)
Page 5
... 39 Adjusting the exposure manually ...... 41 Focusing manually 42 Superimposing a title 43 Making your camcorder abroad 66 Maintenance information and precautions 67 Specifications 72 Quick Reference Identifying the parts and controls ...... 73 Index Back cover Advanced Recording Operations Using the wide ... the date and time on TV 32 Customizing Your Camcorder Changing the menu settings 51 Troubleshooting Types of contents Main Features 4 Quick Start Guide 6 Editing Dubbing a tape 50 Getting started Using this manual 8 Checking supplied accessories 10 Step 1 Preparing the ...
... 39 Adjusting the exposure manually ...... 41 Focusing manually 42 Superimposing a title 43 Making your camcorder abroad 66 Maintenance information and precautions 67 Specifications 72 Quick Reference Identifying the parts and controls ...... 73 Index Back cover Advanced Recording Operations Using the wide ... the date and time on TV 32 Customizing Your Camcorder Changing the menu settings 51 Troubleshooting Types of contents Main Features 4 Quick Start Guide 6 Editing Dubbing a tape 50 Getting started Using this manual 8 Checking supplied accessories 10 Step 1 Preparing the ...
Operating Instructions (primary manual)
Page 8
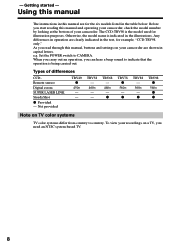
...; - The CCD-TRV98 is the model used for example, "CCD-TRV98 only." e.g. Not provided TRV49 z 450× - - TRV58 - 460× - - TRV68 - 460× - z TRV78 z 560× - To view your camcorder are for the six models listed in the illustrations. Any differences in operation are clearly indicated in capital letters. z TRV98 z 560× z z Note on your recordings on...
...; - The CCD-TRV98 is the model used for example, "CCD-TRV98 only." e.g. Not provided TRV49 z 450× - - TRV58 - 460× - - TRV68 - 460× - z TRV78 z 560× - To view your camcorder are for the six models listed in the illustrations. Any differences in operation are clearly indicated in capital letters. z TRV98 z 560× z z Note on your recordings on...
Operating Instructions (primary manual)
Page 9
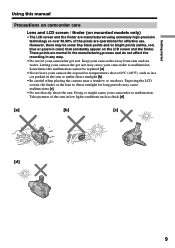
... are normal in the manufacturing process and do not affect the recording in any way. • Do not let your camcorder get wet may cause malfunctions [c]. • Do not directly shoot the sun. Keep your camcorder exposed to malfunction. Exposing the LCD screen, the finder or ...for long periods may cause your camcorder to direct sunlight for effective use. However, there may be repaired [a]. • Never leave your camcorder away from rain and sea water. Doing so might cause your camcorder get wet. Sometimes this manual Precautions on camcorder care Lens and LCD screen / ...
... are normal in the manufacturing process and do not affect the recording in any way. • Do not let your camcorder get wet may cause malfunctions [c]. • Do not directly shoot the sun. Keep your camcorder exposed to malfunction. Exposing the LCD screen, the finder or ...for long periods may cause your camcorder to direct sunlight for effective use. However, there may be repaired [a]. • Never leave your camcorder away from rain and sea water. Doing so might cause your camcorder get wet. Sometimes this manual Precautions on camcorder care Lens and LCD screen / ...
Operating Instructions (primary manual)
Page 26
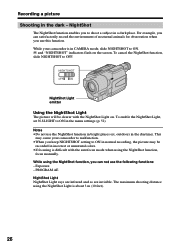
...Light emitter Using the NightShot Light The picture will be recorded in the menu settings (p. 52). To enable the NightShot Light, set N.S.LIGHT to shoot a subject in a dark place. While using the NightShot function, focus manually. For example, you use this function. This may... the NightShot function in CAMERA mode, slide NIGHTSHOT to OFF. Exposure - PROGRAM AE NightShot Light NightShot Light rays are infrared and so are invisible. NightShot The NightShot function enables you keep NIGHTSHOT setting to ON in normal recording, the picture may cause your camcorder is about 3 m...
...Light emitter Using the NightShot Light The picture will be recorded in the menu settings (p. 52). To enable the NightShot Light, set N.S.LIGHT to shoot a subject in a dark place. While using the NightShot function, focus manually. For example, you use this function. This may... the NightShot function in CAMERA mode, slide NIGHTSHOT to OFF. Exposure - PROGRAM AE NightShot Light NightShot Light rays are infrared and so are invisible. NightShot The NightShot function enables you keep NIGHTSHOT setting to ON in normal recording, the picture may cause your camcorder is about 3 m...
Operating Instructions (primary manual)
Page 27
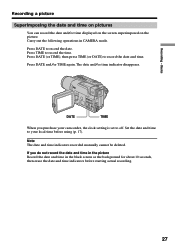
...and/or time indicator disappears. Set the date and time to record the date. Note The date and time indicators recorded manually cannot be deleted. Basics Recording a picture Superimposing the date and time on pictures You can record the date and/or time displayed on the screen superimposed on ...recording. 27 Press DATE to your camcorder, the clock setting is set to off. Press DATE (or TIME), then press TIME (or DATE) to record the time. Recording - DATE TIME When you do not record the date and time in the picture Record the date and time in CAMERA mode. Press TIME to record...
...and/or time indicator disappears. Set the date and time to record the date. Note The date and time indicators recorded manually cannot be deleted. Basics Recording a picture Superimposing the date and time on pictures You can record the date and/or time displayed on the screen superimposed on ...recording. 27 Press DATE to your camcorder, the clock setting is set to off. Press DATE (or TIME), then press TIME (or DATE) to record the time. Recording - DATE TIME When you do not record the date and time in the picture Record the date and time in CAMERA mode. Press TIME to record...
Operating Instructions (primary manual)
Page 41
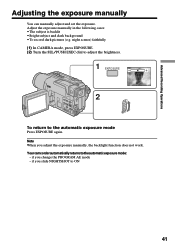
... pictures (e.g. if you adjust the exposure manually, the backlight function does not work. Your camcorder automatically returns to ON 41 Advanced Recording Operations Adjusting the exposure manually You can manually adjust and set the exposure. Note When you change the PROGRAM AE mode - night scenes) faithfully (1) In CAMERA mode, press EXPOSURE. (2) Turn the SEL/PUSH EXEC...
... pictures (e.g. if you adjust the exposure manually, the backlight function does not work. Your camcorder automatically returns to ON 41 Advanced Recording Operations Adjusting the exposure manually You can manually adjust and set the exposure. Note When you change the PROGRAM AE mode - night scenes) faithfully (1) In CAMERA mode, press EXPOSURE. (2) Turn the SEL/PUSH EXEC...

Operating Instructions (primary manual)
Page 52
... as the following icons: MANUAL SET CAMERA SET PLAYER SET LCD SET...record in the CINEMA mode (p. 34) To record in this illustration. If you set to 40×/450×, digital zoom is activated and more than 20× to 40×/450× is performed digitally. (p. 23) (CCD...camcorder model The menu display may be different from that in the 16:9FULL mode To compensate for camera-shake To cancel the SteadyShot function. To use the NightShot Light function (p. 26) To cancel the NightShot Light function POWER switch CAMERA CAMERA CAMERA CAMERA CAMERA CAMERA * CCD-TRV68/TRV78/TRV88/TRV98...
... as the following icons: MANUAL SET CAMERA SET PLAYER SET LCD SET...record in the CINEMA mode (p. 34) To record in this illustration. If you set to 40×/450×, digital zoom is activated and more than 20× to 40×/450× is performed digitally. (p. 23) (CCD...camcorder model The menu display may be different from that in the 16:9FULL mode To compensate for camera-shake To cancel the SteadyShot function. To use the NightShot Light function (p. 26) To cancel the NightShot Light function POWER switch CAMERA CAMERA CAMERA CAMERA CAMERA CAMERA * CCD-TRV68/TRV78/TRV88/TRV98...
Operating Instructions (primary manual)
Page 57
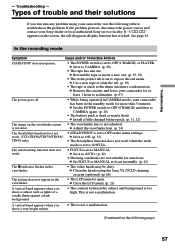
...the cassette and leave your camcorder has been in the menu settings. c Adjust the viewfinder lens. (p. 24) The SteadyShot function does not work. (CCD-TRV68/TRV78/TRV88/ TRV98 only) • STEADYSHOT is...is dead or nearly dead. c Set FOCUS to MANUAL to acclimatize. (p. 67) The power goes off. • While being operated in CAMERA mode, your camcorder for more than 5 minutes. A vertical band appears...CAMERA. (p. 20) • The tape has run into any problem using the Sony V8-25CLD cleaning cassette (optional). (p. 68) The picture does not appear in the viewfinder. • The video...
...the cassette and leave your camcorder has been in the menu settings. c Adjust the viewfinder lens. (p. 24) The SteadyShot function does not work. (CCD-TRV68/TRV78/TRV88/ TRV98 only) • STEADYSHOT is...is dead or nearly dead. c Set FOCUS to MANUAL to acclimatize. (p. 67) The power goes off. • While being operated in CAMERA mode, your camcorder for more than 5 minutes. A vertical band appears...CAMERA. (p. 20) • The tape has run into any problem using the Sony V8-25CLD cleaning cassette (optional). (p. 68) The picture does not appear in the viewfinder. • The video...


