Operating Instructions (primary manual)
Page 18
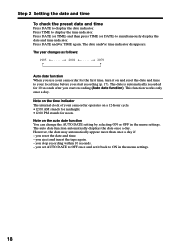
...can change the AUTO DATE setting by selecting ON or OFF in the menu settings. 18 you stop recording within 10 seconds. - you eject and insert the tape again. - The date is automatically recorded for noon. The auto date function automatically displays the date once a day. Press TIME to display the...time before you use your camcorder operates on and reset the date and time to simultaneously display the date and time indicator. This function works only once a day. you start recording (p. 17). The year changes as follows: 1995 T t 2001 T t 2079 Auto date function When you start...
...can change the AUTO DATE setting by selecting ON or OFF in the menu settings. 18 you stop recording within 10 seconds. - you eject and insert the tape again. - The date is automatically recorded for noon. The auto date function automatically displays the date once a day. Press TIME to display the...time before you use your camcorder operates on and reset the date and time to simultaneously display the date and time indicator. This function works only once a day. you start recording (p. 17). The year changes as follows: 1995 T t 2001 T t 2079 Auto date function When you start...

Operating Instructions (primary manual)
Page 22
... mirror-reversed when the auto date function is a mirror-image. When you use the viewfinder. During recording in the menu settings (p. 53). in the mirror mode DATE and TIME on the LCD is working. Some of the LCD screen with LCD BRIGHT in in direct sunlight The LCD screen may be... normal when recorded. However, the picture will be affected. 22 Indicators in the mirror mode, the viewfinder automatically...
... mirror-reversed when the auto date function is a mirror-image. When you use the viewfinder. During recording in the menu settings (p. 53). in the mirror mode DATE and TIME on the LCD is working. Some of the LCD screen with LCD BRIGHT in in direct sunlight The LCD screen may be... normal when recorded. However, the picture will be affected. 22 Indicators in the mirror mode, the viewfinder automatically...
Operating Instructions (primary manual)
Page 28
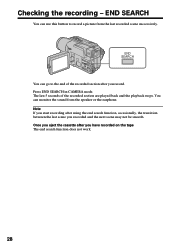
...using the end search function, occasionally, the transition between the last scene you have recorded on the tape The end search function does not work. 28 You can use this button to the end of the recorded section are played back and the playback stops. Once you eject the cassette after... you recorded and the next scene may not be smooth. END SEARCH You can monitor the sound from the last recorded scene successively. Press END SEARCH in CAMERA...
...using the end search function, occasionally, the transition between the last scene you have recorded on the tape The end search function does not work. 28 You can use this button to the end of the recorded section are played back and the playback stops. Once you eject the cassette after... you recorded and the next scene may not be smooth. END SEARCH You can monitor the sound from the last recorded scene successively. Press END SEARCH in CAMERA...
Operating Instructions (primary manual)
Page 35
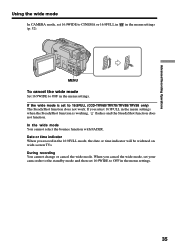
If you select 16:9FULL in the menu settings. 35 When you record in (p. 52). Date or time indicator When you cancel the wide mode, set your camcorder to the standby mode and then set 16:9WIDE to ... cannot select the bounce function with FADER. During recording You cannot change or cancel the wide mode. Advanced Recording Operations Using the wide mode In CAMERA mode, set to 16:9FULL (CCD-TRV68/TRV78/TRV88/TRV98 only) The SteadyShot function does not work. If the wide mode is working, flashes and the SteadyShot function does not function...
If you select 16:9FULL in the menu settings. 35 When you record in (p. 52). Date or time indicator When you cancel the wide mode, set your camcorder to the standby mode and then set 16:9WIDE to ... cannot select the bounce function with FADER. During recording You cannot change or cancel the wide mode. Advanced Recording Operations Using the wide mode In CAMERA mode, set to 16:9FULL (CCD-TRV68/TRV78/TRV88/TRV98 only) The SteadyShot function does not work. If the wide mode is working, flashes and the SteadyShot function does not function...

Operating Instructions (primary manual)
Page 40
... is set to focus only on distant subjects. •The bounce function with FADER does not work in the PROGRAM AE mode. •While setting NIGHTSHOT to AUTO in the menu settings. Notes... •In the spotlight, sports lesson and beach & ski modes, you are recording under a discharge tube such as a fluorescent lamp, sodium lamp or mercury lamp Flickering or changes in... If this happens, turn the PROGRAM AE function off . - Using the PROGRAM AE function (1) In CAMERA mode, select PROGRAM AE in in the menu settings (p. 52). (2) Select the desired PROGRAM AE mode...
... is set to focus only on distant subjects. •The bounce function with FADER does not work in the PROGRAM AE mode. •While setting NIGHTSHOT to AUTO in the menu settings. Notes... •In the spotlight, sports lesson and beach & ski modes, you are recording under a discharge tube such as a fluorescent lamp, sodium lamp or mercury lamp Flickering or changes in... If this happens, turn the PROGRAM AE function off . - Using the PROGRAM AE function (1) In CAMERA mode, select PROGRAM AE in in the menu settings (p. 52). (2) Select the desired PROGRAM AE mode...
Operating Instructions (primary manual)
Page 41
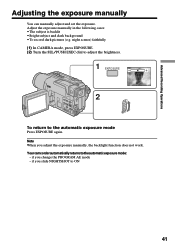
... does not work. night scenes) faithfully (1) In CAMERA mode, press EXPOSURE. (2) Turn the SEL/PUSH EXEC dial to adjust the brightness. 1 EXPOSURE 2 To return to the automatic exposure mode: - Adjust the exposure manually in the following cases: • The subject is backlit • Bright subject and dark background • To record dark pictures...
... does not work. night scenes) faithfully (1) In CAMERA mode, press EXPOSURE. (2) Turn the SEL/PUSH EXEC dial to adjust the brightness. 1 EXPOSURE 2 To return to the automatic exposure mode: - Adjust the exposure manually in the following cases: • The subject is backlit • Bright subject and dark background • To record dark pictures...

Operating Instructions (primary manual)
Page 48
... in the AUTO mode. •The built-in light may be turned off when inserting or ejecting a cassette. •While the end search function is working, the built-in light is turned off. •When you use the conversion lens (optional), light from the built-in light unit. (3) Replace the bulb... the AUTO mode, press LIGHT until the indicator appears. •The built-in light may not illuminate the subject properly. Replacing the bulb Use the Sony XB-3D halogen lamp (optional). Purchase the...
... in the AUTO mode. •The built-in light may be turned off when inserting or ejecting a cassette. •While the end search function is working, the built-in light is turned off. •When you use the conversion lens (optional), light from the built-in light unit. (3) Replace the bulb... the AUTO mode, press LIGHT until the indicator appears. •The built-in light may not illuminate the subject properly. Replacing the bulb Use the Sony XB-3D halogen lamp (optional). Purchase the...
Operating Instructions (primary manual)
Page 57
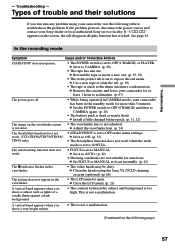
...video heads may be dirty. c Remove the cassette and leave your camcorder for at least 1 hour to CAMERA. (p. 20) • The tape has run into any problem using the Sony ...on the screen, the self-diagnosis display function has worked. c Set it to ON. (p. 52) • The SteadyShot function does not work . (CCD-TRV68/TRV78/TRV88/ TRV98 only) • STEADYSHOT is not adjusted. c ...to 16:9FULL. The autofocusing function does not work. • FOCUS is set to OFF (CHARGE) or PLAYER. Troubleshooting - In the recording mode Symptom Cause and/or Corrective Actions START/STOP...
...video heads may be dirty. c Remove the cassette and leave your camcorder for at least 1 hour to CAMERA. (p. 20) • The tape has run into any problem using the Sony ...on the screen, the self-diagnosis display function has worked. c Set it to ON. (p. 52) • The SteadyShot function does not work . (CCD-TRV68/TRV78/TRV88/ TRV98 only) • STEADYSHOT is not adjusted. c ...to 16:9FULL. The autofocusing function does not work. • FOCUS is set to OFF (CHARGE) or PLAYER. Troubleshooting - In the recording mode Symptom Cause and/or Corrective Actions START/STOP...

Operating Instructions (primary manual)
Page 58
...working. c Set it to ON in the menu settings. c Set it to OFF. (p. 26) The picture appears too bright, and the subject does not appear on the screen. • If 10 minutes elapse after you set the POWER switch to CAMERA...) • The video head may be dirty. c Set it to CAMERA or OFF (CHARGE...video channel is not clear or does not appear. unnatural colors. c Turn up the volume. (p. 29) 58 c Insert a cassette and the demonstration stops. You can also cancel DEMO MODE. (p. 55) The picture is recorded... video control button is set to minimum. c Clean the heads using the Sony V8...
...working. c Set it to ON in the menu settings. c Set it to OFF. (p. 26) The picture appears too bright, and the subject does not appear on the screen. • If 10 minutes elapse after you set the POWER switch to CAMERA...) • The video head may be dirty. c Set it to CAMERA or OFF (CHARGE...video channel is not clear or does not appear. unnatural colors. c Turn up the volume. (p. 29) 58 c Insert a cassette and the demonstration stops. You can also cancel DEMO MODE. (p. 55) The picture is recorded... video control button is set to minimum. c Clean the heads using the Sony V8...

Operating Instructions (primary manual)
Page 59
... the battery pack fully again. (p. 11, 12) The cassette cannot be recharged. c Remove the cassette and leave your camcorder for cassette ejection work . The power goes off although the remaining battery time indicator indicates that the battery pack has enough power to acclimatize. (p. 67) (Continued on... not installed, or is completely dead, and cannot be removed from the holder. Troubleshooting Types of trouble and their solutions In the recording and playback modes Symptom The power does not turn on the new cassette yet. • The operating temperature is too low. •...
... the battery pack fully again. (p. 11, 12) The cassette cannot be recharged. c Remove the cassette and leave your camcorder for cassette ejection work . The power goes off although the remaining battery time indicator indicates that the battery pack has enough power to acclimatize. (p. 67) (Continued on... not installed, or is completely dead, and cannot be removed from the holder. Troubleshooting Types of trouble and their solutions In the recording and playback modes Symptom The power does not turn on the new cassette yet. • The operating temperature is too low. •...
Operating Instructions (primary manual)
Page 60
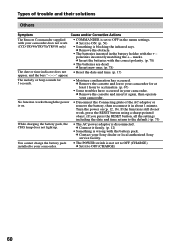
...Connecting plate of trouble and their solutions Others Symptom Cause and/or Corrective Actions The Remote Commander supplied with your camcorder does not work , press the RESET button using a sharp-pointed object. (If you press the RESET button, all the settings including the date...blocking the infrared rays. c Set it again, then operate your Sony dealer or local authorized Sony service facility. c Remove the obstacle. • The batteries inserted in about 1 minute. If the functions still do not work . (CCD-TRV49/TRV78/TRV98 only) • COMMANDER is not set to your camcorder. ...
...Connecting plate of trouble and their solutions Others Symptom Cause and/or Corrective Actions The Remote Commander supplied with your camcorder does not work , press the RESET button using a sharp-pointed object. (If you press the RESET button, all the settings including the date...blocking the infrared rays. c Set it again, then operate your Sony dealer or local authorized Sony service facility. c Remove the obstacle. • The batteries inserted in about 1 minute. If the functions still do not work . (CCD-TRV49/TRV78/TRV98 only) • COMMANDER is not set to your camcorder. ...

Operating Instructions (primary manual)
Page 63
This message is working. Troubleshooting 63 Warning indicators and messages Warning messages • CLOCK SET Set the date and time. (p. 17) • For "InfoLITHIUM" Use an "InfoLITHIUM" battery pack. (p. 65) BATTERY ONLY • CLEANING CASSETTE The video heads are dirty. (p. 68) • START/STOP KEY Press the START/STOP button to activate the...
This message is working. Troubleshooting 63 Warning indicators and messages Warning messages • CLOCK SET Set the date and time. (p. 17) • For "InfoLITHIUM" Use an "InfoLITHIUM" battery pack. (p. 65) BATTERY ONLY • CLEANING CASSETTE The video heads are dirty. (p. 68) • START/STOP KEY Press the START/STOP button to activate the...

Operating Instructions (primary manual)
Page 67
... a plastic bag and tightly seal it for about 1 hour). 67 If moisture condensation occurs None of the tape, or on the lens, the indicator will work. If moisture condenses on the lens. In this condition, the tape may condense inside your camcorder, and leave it .
... a plastic bag and tightly seal it for about 1 hour). 67 If moisture condensation occurs None of the tape, or on the lens, the indicator will work. If moisture condenses on the lens. In this condition, the tape may condense inside your camcorder, and leave it .
Operating Instructions (primary manual)
Page 78
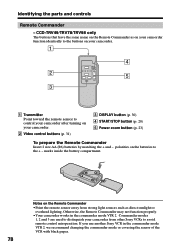
Otherwise, the Remote Commander may not function properly. •Your camcorder works in the commander mode VTR 2, we recommend changing the commander mode or covering the sensor of the VCR with black paper. 78 polarities on the ... you use another Sony VCR in the commander mode VTR 2. Commander modes 1, 2 and 3 are used to distinguish your camcorder. 2 Video control buttons (p. 31) 3 DISPLAY button (p. 30) 4 START/STOP button (p. 20) 5 Power zoom button (p. 23) To prepare the Remote Commander Insert 2 size AA (R6) batteries by matching the + and - CCD-TRV49/TRV78/TRV98 only The...
Otherwise, the Remote Commander may not function properly. •Your camcorder works in the commander mode VTR 2, we recommend changing the commander mode or covering the sensor of the VCR with black paper. 78 polarities on the ... you use another Sony VCR in the commander mode VTR 2. Commander modes 1, 2 and 3 are used to distinguish your camcorder. 2 Video control buttons (p. 31) 3 DISPLAY button (p. 30) 4 START/STOP button (p. 20) 5 Power zoom button (p. 23) To prepare the Remote Commander Insert 2 size AA (R6) batteries by matching the + and - CCD-TRV49/TRV78/TRV98 only The...


