Operating Instructions
Page 2
...purchase of uninsulated "dangerous voltage" within the product's enclosure that may be producing home video that to which can return your unwanted lithium ion batteries to your authority to the presence of the FCC Rules. Your Handycam Vision is loaded with the limits for help. However, there is ...receiver is very easy to Part 15 of important operating and maintenance (servicing) instructions in the sun or under direct sunlight. If this Sony Handycam VisionTM camcorder. Consult the dealer or an experienced radio/TV technician for a Class B digital device, pursuant to use.
...purchase of uninsulated "dangerous voltage" within the product's enclosure that may be producing home video that to which can return your unwanted lithium ion batteries to your authority to the presence of the FCC Rules. Your Handycam Vision is loaded with the limits for help. However, there is ...receiver is very easy to Part 15 of important operating and maintenance (servicing) instructions in the sun or under direct sunlight. If this Sony Handycam VisionTM camcorder. Consult the dealer or an experienced radio/TV technician for a Class B digital device, pursuant to use.
Operating Instructions
Page 3
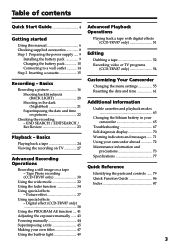
... - END SEARCH / EDITSEARCH / Rec Review 23 Customizing Your Camcorder Changing the menu settings 55 Resetting the date and time 61 Additional Information Usable cassettes and playback modes 63 Changing the lithium battery in the dark (NightShot 21 Superimposing the date and time on...supplied accessories 8 Step 1 Preparing the power supply ..... 9 Installing the battery pack 9 Charging the battery pack 10 Connecting to a wall outlet 14 Step 2 Inserting a cassette 15 Playing back a tape with digital effects (CCD-TRV87 only 51 Editing Dubbing a tape 52 Recording video or TV ...
... - END SEARCH / EDITSEARCH / Rec Review 23 Customizing Your Camcorder Changing the menu settings 55 Resetting the date and time 61 Additional Information Usable cassettes and playback modes 63 Changing the lithium battery in the dark (NightShot 21 Superimposing the date and time on...supplied accessories 8 Step 1 Preparing the power supply ..... 9 Installing the battery pack 9 Charging the battery pack 10 Connecting to a wall outlet 14 Step 2 Inserting a cassette 15 Playing back a tape with digital effects (CCD-TRV87 only 51 Editing Dubbing a tape 52 Recording video or TV ...
Operating Instructions
Page 4
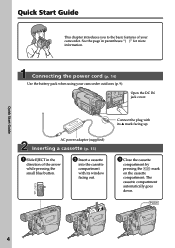
See the page in the direction of your camcorder outdoors (p. 9). Open the DC IN jack cover. Quick Start Guide This chapter introduces you to the basic features of the arrow while pressing the small ... adaptor (supplied) Inserting a cassette (p. 15) 1 Slide EJECT in parentheses "( )" for more information. The cassette compartment automatically goes down. Connecting the power cord (p. 14) Use the battery pack when using your camcorder.
See the page in the direction of your camcorder outdoors (p. 9). Open the DC IN jack cover. Quick Start Guide This chapter introduces you to the basic features of the arrow while pressing the small ... adaptor (supplied) Inserting a cassette (p. 15) 1 Slide EJECT in parentheses "( )" for more information. The cassette compartment automatically goes down. Connecting the power cord (p. 14) Use the battery pack when using your camcorder.
Operating Instructions
Page 5
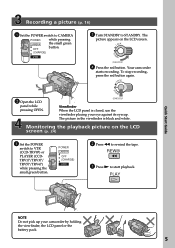
...(p. 24) 1 Set the POWER switch to STANDBY. The picture in the viewfinder is closed, use the viewfinder placing your camcorder by holding the viewfinder, the LCD panel or the battery pack. 5 REW 3 Press N to rewind the tape. POWER CAMERA OFF (CHARGE) VTR 2 Press m to start ... camcorder starts recording. NDBY START/STOP Viewfinder When the LCD panel is black and white. Recording a picture (p. 16) 1 Set the POWER switch to CAMERA POWER while pressing CAMERA OFF the small green button. (CHARGE) VTR STA 3 Turn STANDBY to VTR (CCD-TRV87) or PLAYER (CCDTRV17/TRV37/ TRV57...
...(p. 24) 1 Set the POWER switch to STANDBY. The picture in the viewfinder is closed, use the viewfinder placing your camcorder by holding the viewfinder, the LCD panel or the battery pack. 5 REW 3 Press N to rewind the tape. POWER CAMERA OFF (CHARGE) VTR 2 Press m to start ... camcorder starts recording. NDBY START/STOP Viewfinder When the LCD panel is black and white. Recording a picture (p. 16) 1 Set the POWER switch to CAMERA POWER while pressing CAMERA OFF the small green button. (CHARGE) VTR STA 3 Turn STANDBY to VTR (CCD-TRV87) or PLAYER (CCDTRV17/TRV37/ TRV57...
Operating Instructions
Page 8
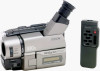
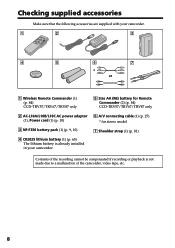
... of the recording cannot be compensated if recording or playback is already installed in your camcorder. 1 2 3 4 5 6 7 * or 1 Wireless Remote Commander (1) (p. 84) CCD-TRV57/TRV67/TRV87 only 5 Size AA (R6) battery for Remote Commander (2) (p. 84) CCD-TRV57/TRV67/TRV87 only 2 AC-L10A/L10B/L10C AC power adaptor 6 A/V connecting cable (1) (p. 27) (1), Power cord (1) (p. 10) * for stereo model 3 NP...
... of the recording cannot be compensated if recording or playback is already installed in your camcorder. 1 2 3 4 5 6 7 * or 1 Wireless Remote Commander (1) (p. 84) CCD-TRV57/TRV67/TRV87 only 5 Size AA (R6) battery for Remote Commander (2) (p. 84) CCD-TRV57/TRV67/TRV87 only 2 AC-L10A/L10B/L10C AC power adaptor 6 A/V connecting cable (1) (p. 27) (1), Power cord (1) (p. 10) * for stereo model 3 NP...
Operating Instructions
Page 9
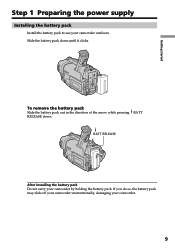
Slide the battery pack down . If you do so, the battery pack may slide off your camcorder unintentionally, damaging your camcorder outdoors. To remove the battery pack Slide the battery pack out in the direction of the arrow while pressing BATT RELEASE down until it clicks. Getting started Step 1 Preparing the power supply Installing the battery pack Install the battery pack to use your camcorder. 9 BATT RELEASE After installing the battery pack Do not carry your camcorder by holding the battery pack.
Slide the battery pack down . If you do so, the battery pack may slide off your camcorder unintentionally, damaging your camcorder outdoors. To remove the battery pack Slide the battery pack out in the direction of the arrow while pressing BATT RELEASE down until it clicks. Getting started Step 1 Preparing the power supply Installing the battery pack Install the battery pack to use your camcorder. 9 BATT RELEASE After installing the battery pack Do not carry your camcorder by holding the battery pack.
Operating Instructions
Page 10
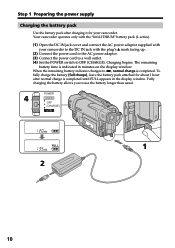
... IN jack cover and connect the AC power adaptor supplied with your camcorder. When the remaining battery indicator changes to OFF (CHARGE). To fully charge the battery (full charge), leave the battery pack attached for about 1 hour after charging it for your camcorder to the DC IN jack with the plug's v mark facing up. (2) Connect...
... IN jack cover and connect the AC power adaptor supplied with your camcorder. When the remaining battery indicator changes to OFF (CHARGE). To fully charge the battery (full charge), leave the battery pack attached for about 1 hour after charging it for your camcorder to the DC IN jack with the plug's v mark facing up. (2) Connect...
Operating Instructions
Page 11
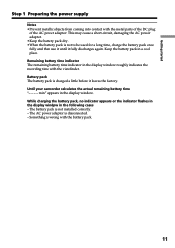
... until it leaves the factory. This may cause a short-circuit, damaging the AC power adaptor. •Keep the battery pack dry. •When the battery pack is disconnected. - Until your camcorder calculates the actual remaining battery time "- - - - Something is wrong with the viewfinder. Getting started Step 1 Preparing the power supply Notes •Prevent metallic...
... until it leaves the factory. This may cause a short-circuit, damaging the AC power adaptor. •Keep the battery pack dry. •When the battery pack is disconnected. - Until your camcorder calculates the actual remaining battery time "- - - - Something is wrong with the viewfinder. Getting started Step 1 Preparing the power supply Notes •Prevent metallic...
Operating Instructions
Page 12
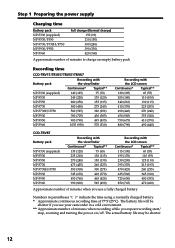
... 210 (150) 300 (240) 390 (330) 420 (360) Approximate number of minutes to charge an empty battery pack Recording time CCD-TRV17/TRV37/TRV57/TRV67 Battery pack Recording with the viewfinder Continuous* Typical** NP-F330 (supplied) NP-F530 NP-F550 NP-F730 NP-F730H/... 470 (420) Approximate number of minutes when you use your camcorder in a cold environment. ** Approximate number of minutes when recording while you use a fully charged battery Numbers in parentheses "( )" indicate the time using a normally charged battery. * Approximate continuous recording time at 77°F (25°C)....
... 210 (150) 300 (240) 390 (330) 420 (360) Approximate number of minutes to charge an empty battery pack Recording time CCD-TRV17/TRV37/TRV57/TRV67 Battery pack Recording with the viewfinder Continuous* Typical** NP-F330 (supplied) NP-F530 NP-F550 NP-F730 NP-F730H/... 470 (420) Approximate number of minutes when you use your camcorder in a cold environment. ** Approximate number of minutes when recording while you use a fully charged battery Numbers in parentheses "( )" indicate the time using a normally charged battery. * Approximate continuous recording time at 77°F (25°C)....
Operating Instructions
Page 13
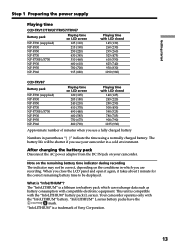
... the conditions in which can exchange data such as battery consumption with compatible electronic equipment. The battery life will be displayed. This unit is a trademark of minutes when you use your camcorder. Getting started Step 1 Preparing the power supply Playing time CCD-TRV17/TRV37/TRV57/TRV67 Battery pack NP-F330 (supplied) NP-F530 NP-F550 NP... (790) Playing time with LCD closed 140 (125) 245 (220) 280 (250) 500 (450) 580 (525) 780 (705) 900 (790) 1035 (930) Approximate number of Sony Corporation. 13 What is a lithium ion battery pack which you are recording.
... the conditions in which can exchange data such as battery consumption with compatible electronic equipment. The battery life will be displayed. This unit is a trademark of minutes when you use your camcorder. Getting started Step 1 Preparing the power supply Playing time CCD-TRV17/TRV37/TRV57/TRV67 Battery pack NP-F330 (supplied) NP-F530 NP-F550 NP... (790) Playing time with LCD closed 140 (125) 245 (220) 280 (250) 500 (450) 580 (525) 780 (705) 900 (790) 1035 (930) Approximate number of Sony Corporation. 13 What is a lithium ion battery pack which you are recording.

Operating Instructions
Page 14
...even when the power cord is not plugged into a wall outlet. Notes • The AC power adaptor can supply power even if the battery pack is attached to your camcorder with the plug's v mark facing up. (2) Connect the power cord to the AC power adaptor. (3) Connect the power cord to a ...wall outlet. 1 2, 3 PRECAUTION The set is connected to the DC IN jack on your camcorder. • The DC IN jack has "source priority". Using a car battery Use Sony DC Adaptor/Charger (not supplied). 14 This means that you power it is not disconnected from the AC power source...
...even when the power cord is not plugged into a wall outlet. Notes • The AC power adaptor can supply power even if the battery pack is attached to your camcorder with the plug's v mark facing up. (2) Connect the power cord to the AC power adaptor. (3) Connect the power cord to a ...wall outlet. 1 2, 3 PRECAUTION The set is connected to the DC IN jack on your camcorder. • The DC IN jack has "source priority". Using a car battery Use Sony DC Adaptor/Charger (not supplied). 14 This means that you power it is not disconnected from the AC power source...
Operating Instructions
Page 16
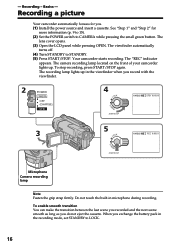
... panel while pressing OPEN. The camera recording lamp located on the front of your camcorder lights up in the viewfinder when you . (1) Install the power source and insert a cassette. Basics - Your camcorder starts recording. The recording lamp lights up . To enable smooth transition You can make... the transition between the last scene you recorded and the next scene smooth as long as you exchange the battery pack in microphone during recording. When...
... panel while pressing OPEN. The camera recording lamp located on the front of your camcorder lights up in the viewfinder when you . (1) Install the power source and insert a cassette. Basics - Your camcorder starts recording. The recording lamp lights up . To enable smooth transition You can make... the transition between the last scene you recorded and the next scene smooth as long as you exchange the battery pack in microphone during recording. When...

Operating Instructions
Page 17
... other way, the indicator appears in the viewfinder and on your camcorder in direct sunlight The LCD screen may be difficult to prevent battery and tape wear. to brighten 180° LCD BRIGHT to OFF (CHARGE). (5) Remove the battery pack. Note When using the LCD screen except in the mirror... mode The picture on LCD BRIGHT. If you leave your camcorder do not work. Basics Recording a picture If you turn STANDBY down to LOCK. (2)...
... other way, the indicator appears in the viewfinder and on your camcorder in direct sunlight The LCD screen may be difficult to prevent battery and tape wear. to brighten 180° LCD BRIGHT to OFF (CHARGE). (5) Remove the battery pack. Note When using the LCD screen except in the mirror... mode The picture on LCD BRIGHT. If you leave your camcorder do not work. Basics Recording a picture If you turn STANDBY down to LOCK. (2)...
Operating Instructions
Page 20
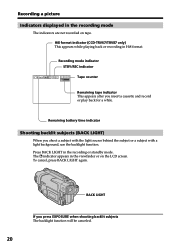
...you shoot a subject with the light source behind the subject or a subject with a light background, use the backlight function. Remaining battery time indicator Shooting backlit subjects (BACK LIGHT) When you press EXPOSURE when shooting backlit subjects The backlight function will be canceled. 20 Recording...cassette and record or play back for a while. Recording a picture Indicators displayed in the viewfinder or on tape. Hi8 format indicator (CCD-TRV67/TRV87 only) This appears while playing back or recording in the recording or standby mode. To cancel, press BACK LIGHT again. ...
...you shoot a subject with the light source behind the subject or a subject with a light background, use the backlight function. Remaining battery time indicator Shooting backlit subjects (BACK LIGHT) When you press EXPOSURE when shooting backlit subjects The backlight function will be canceled. 20 Recording...cassette and record or play back for a while. Recording a picture Indicators displayed in the viewfinder or on tape. Hi8 format indicator (CCD-TRV67/TRV87 only) This appears while playing back or recording in the recording or standby mode. To cancel, press BACK LIGHT again. ...
Operating Instructions
Page 49
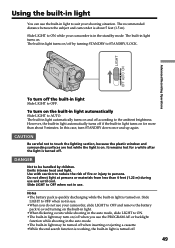
...is on . Notes •The battery pack is quickly discharging while the built-in light is turned on the built-in light automatically Slide LIGHT to suit your camcorder is in the standby mode. Slide... built-in light automatically turns on /off when you do not use your camcorder, slide LIGHT to OFF and remove the battery pack to avoid turning on the built-in light. •When flickering occurs... is working, the built-in light is turned off. 49 The recommended distance between the subject and camcorder is about 5 minutes. In this case, turn off the built-in light Slide LIGHT to STANDBY/...
...is on . Notes •The battery pack is quickly discharging while the built-in light is turned on the built-in light automatically Slide LIGHT to suit your camcorder is in the standby mode. Slide... built-in light automatically turns on /off when you do not use your camcorder, slide LIGHT to OFF and remove the battery pack to avoid turning on the built-in light. •When flickering occurs... is working, the built-in light is turned off. 49 The recommended distance between the subject and camcorder is about 5 minutes. In this case, turn off the built-in light Slide LIGHT to STANDBY/...
Operating Instructions
Page 57
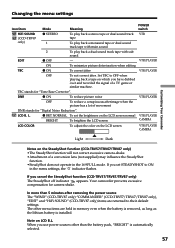
...". Set TBC to ON in the 16:9FULL mode. Your camcorder prevents excessive compensation for "Time Base Corrector". In more than the battery pack, "BRIGHT" is installed. L. When you cancel the SteadyShot function (CCD-TRV57/TRV67/TRV87 only) The SteadyShot off indicator appears. DNR z ON...screen CAMERA LCD COLOR To adjust the color on the LCD screen VTR/PLAYER CAMERA Customizing Your Camcorder Light Dark Notes on LCD B.L. Note on the SteadyShot function (CCD-TRV57/TRV67/TRV87 only) •The SteadyShot function will not correct excessive camera-shake. •Attachment...
...". Set TBC to ON in the 16:9FULL mode. Your camcorder prevents excessive compensation for "Time Base Corrector". In more than the battery pack, "BRIGHT" is installed. L. When you cancel the SteadyShot function (CCD-TRV57/TRV67/TRV87 only) The SteadyShot off indicator appears. DNR z ON...screen CAMERA LCD COLOR To adjust the color on the LCD screen VTR/PLAYER CAMERA Customizing Your Camcorder Light Dark Notes on LCD B.L. Note on the SteadyShot function (CCD-TRV57/TRV67/TRV87 only) •The SteadyShot function will not correct excessive camera-shake. •Attachment...
Operating Instructions
Page 60
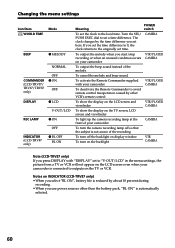
...Icon/item Mode WORLD TIME BEEP z MELODY NORMAL COMMANDER (CCD-TRV57/ TRV67/TRV87 only) OFF z ON OFF DISPLAY z LCD V-OUT/LCD REC LAMP z ON OFF INDICATOR (CCD-TRV87 only) z BL OFF BL ON Meaning POWER switch ... screen and viewfinder To light up the camera recording lamp at the front of your camcorder CAMERA To turn the camera recording lamp off so that the subject is not aware of... to 0, the clock returns to outputs on INDICATOR (CCD-TRV87 only) • When you select "BL ON", battery life is reduced by other than the battery pack, "BL ON" is connected to the originally ...
...Icon/item Mode WORLD TIME BEEP z MELODY NORMAL COMMANDER (CCD-TRV57/ TRV67/TRV87 only) OFF z ON OFF DISPLAY z LCD V-OUT/LCD REC LAMP z ON OFF INDICATOR (CCD-TRV87 only) z BL OFF BL ON Meaning POWER switch ... screen and viewfinder To light up the camera recording lamp at the front of your camcorder CAMERA To turn the camera recording lamp off so that the subject is not aware of... to 0, the clock returns to outputs on INDICATOR (CCD-TRV87 only) • When you select "BL ON", battery life is reduced by other than the battery pack, "BL ON" is connected to the originally ...
Operating Instructions
Page 61
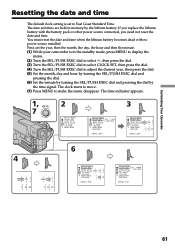
.../PUSH EXEC dial and pressing the dial. (6) Set the minute by turning the SEL/PUSH EXEC dial and pressing the dial by the lithium battery. Customizing Your Camcorder Resetting the date and time The default clock setting is set the year, then the month, the day, the hour and then the minute.... (1) While your camcorder is in memory by the time signal. The date and time are held in the standby mode, press MENU to display the menu. (2) Turn the...
.../PUSH EXEC dial and pressing the dial. (6) Set the minute by turning the SEL/PUSH EXEC dial and pressing the dial by the lithium battery. Customizing Your Camcorder Resetting the date and time The default clock setting is set the year, then the month, the day, the hour and then the minute.... (1) While your camcorder is in memory by the time signal. The date and time are held in the standby mode, press MENU to display the menu. (2) Turn the...
Operating Instructions
Page 65
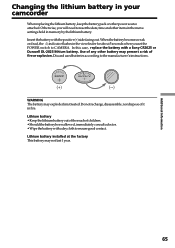
...battery be swallowed, immediately consult a doctor. • Wipe the battery with a Sony CR2025 or Duracell DL-2025 lithium battery. In this case, replace the battery with a dry cloth to reset the date, time and other items in the menu settings hold in memory by the lithium battery...recharge, disassemble, nor dispose of it in fire. Lithium battery installed at the factory This battery may explode if mistreated. Changing the lithium battery in your camcorder When replacing the lithium battery, keep the battery pack or other battery may present a risk of fire or explosion. Otherwise,...
...battery be swallowed, immediately consult a doctor. • Wipe the battery with a Sony CR2025 or Duracell DL-2025 lithium battery. In this case, replace the battery with a dry cloth to reset the date, time and other items in the menu settings hold in memory by the lithium battery...recharge, disassemble, nor dispose of it in fire. Lithium battery installed at the factory This battery may explode if mistreated. Changing the lithium battery in your camcorder When replacing the lithium battery, keep the battery pack or other battery may present a risk of fire or explosion. Otherwise,...
Operating Instructions
Page 66
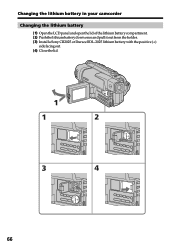
Changing the lithium battery in your camcorder Changing the lithium battery (1) Open the LCD panel and open the lid of the lithium battery compartment. (2) Push the lithium battery down once and pull it out from the holder. (3) Install a Sony CR2025 or Duracell DL-2025 lithium battery with the positive (+) side facing out. (4) Close the lid. 1 1 2 5 CR 202 3 4 5 CR 202 66
Changing the lithium battery in your camcorder Changing the lithium battery (1) Open the LCD panel and open the lid of the lithium battery compartment. (2) Push the lithium battery down once and pull it out from the holder. (3) Install a Sony CR2025 or Duracell DL-2025 lithium battery with the positive (+) side facing out. (4) Close the lid. 1 1 2 5 CR 202 3 4 5 CR 202 66


