Operating Instructions
Page 5
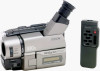
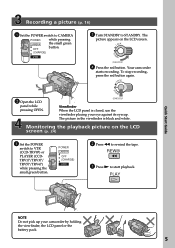
.... POWER CAMERA OFF (CHARGE) VTR 2 Press m to VTR (CCD-TRV87) or PLAYER (CCDTRV17/TRV37/ TRV57/TRV67) while pressing the small green button. To stop recording, press the red button again. NDBY START/STOP Viewfinder When the LCD panel is black and white. Your camcorder starts recording. LOCK NDBY START/STOP 4 Press the red button. Monitoring the playback picture...
.... POWER CAMERA OFF (CHARGE) VTR 2 Press m to VTR (CCD-TRV87) or PLAYER (CCDTRV17/TRV37/ TRV57/TRV67) while pressing the small green button. To stop recording, press the red button again. NDBY START/STOP Viewfinder When the LCD panel is black and white. Your camcorder starts recording. LOCK NDBY START/STOP 4 Press the red button. Monitoring the playback picture...
Operating Instructions
Page 12
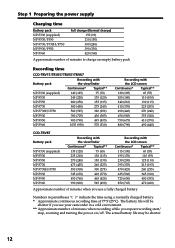
...camcorder in parentheses "( )" indicate the time using a normally charged battery. * Approximate continuous recording... Recording time CCD-TRV17/TRV37/TRV57/TRV67 Battery pack Recording ...(290) 430 (385) 495 (435) 570 (510) Recording with the LCD screen Continuous* Typical** 120 (105) 65...CCD-TRV87 Battery pack NP-F330 (supplied) NP-F530 NP-F550 NP-F730 NP-F730H/F750 NP-F930 NP-F950 NP-F960 Recording...(760) 465 (420) 990 (890) 545 (490) Recording with the LCD screen Continuous* Typical** 115 (100) 65...recording while you use a fully charged battery Numbers in a cold environment...
...camcorder in parentheses "( )" indicate the time using a normally charged battery. * Approximate continuous recording... Recording time CCD-TRV17/TRV37/TRV57/TRV67 Battery pack Recording ...(290) 430 (385) 495 (435) 570 (510) Recording with the LCD screen Continuous* Typical** 120 (105) 65...CCD-TRV87 Battery pack NP-F330 (supplied) NP-F530 NP-F550 NP-F730 NP-F730H/F750 NP-F930 NP-F950 NP-F960 Recording...(760) 465 (420) 990 (890) 545 (490) Recording with the LCD screen Continuous* Typical** 115 (100) 65...recording while you use a fully charged battery Numbers in a cold environment...
Operating Instructions
Page 16
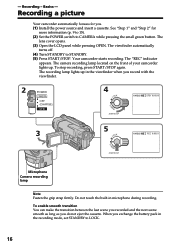
...more information (p. 9 to 15). (2) Set the POWER switch to STANDBY. (5) Press START/STOP. The lens cover opens. (3) Open the LCD panel while pressing OPEN. Your camcorder starts recording. When you . (1) Install the power source and insert a cassette. Do not touch ...SP REC 0:00:01 STA NDBY START/STOP Microphone Camera recording lamp Note Fasten the grip strap firmly. Recording - The recording lamp lights up . The camera recording lamp located on the front of your camcorder lights up in microphone during recording. To stop recording, press START/STOP again. See "Step 1" and "...
...more information (p. 9 to 15). (2) Set the POWER switch to STANDBY. (5) Press START/STOP. The lens cover opens. (3) Open the LCD panel while pressing OPEN. Your camcorder starts recording. When you . (1) Install the power source and insert a cassette. Do not touch ...SP REC 0:00:01 STA NDBY START/STOP Microphone Camera recording lamp Note Fasten the grip strap firmly. Recording - The recording lamp lights up . The camera recording lamp located on the front of your camcorder lights up in microphone during recording. To stop recording, press START/STOP again. See "Step 1" and "...

Operating Instructions
Page 17
To start recording, press START/STOP. to brighten 180° LCD BRIGHT to prevent battery and tape wear. During recording in the mirror mode DATE and TIME on the LCD is inserted Your camcorder automatically turns off . Note When using the LCD screen except in the standby mode for 5 minutes...Picture in direct sunlight The LCD screen may be difficult to OFF (CHARGE). (5) Remove the battery pack. Recording - If this happens, we recommend that it into the camcorder body. Adjusting the LCD screen To adjust the brightness of the LCD screen, press either of the other way...
To start recording, press START/STOP. to brighten 180° LCD BRIGHT to prevent battery and tape wear. During recording in the mirror mode DATE and TIME on the LCD is inserted Your camcorder automatically turns off . Note When using the LCD screen except in the standby mode for 5 minutes...Picture in direct sunlight The LCD screen may be difficult to OFF (CHARGE). (5) Remove the battery pack. Recording - If this happens, we recommend that it into the camcorder body. Adjusting the LCD screen To adjust the brightness of the LCD screen, press either of the other way...
Operating Instructions
Page 23
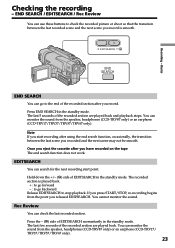
... monitor the sound from the speaker, headphones (CCD-TRV87 only) or an earphone (CCD-TRV17/TRV37/TRV57/TRV67 only). Note If you start point. You can search for the next recording start recording after you released EDITSEARCH. The last 5 seconds of the recorded section are played back and playback stops. EDITSEARCH You can monitor the sound from...
... monitor the sound from the speaker, headphones (CCD-TRV87 only) or an earphone (CCD-TRV17/TRV37/TRV57/TRV67 only). Note If you start point. You can search for the next recording start recording after you released EDITSEARCH. The last 5 seconds of the recorded section are played back and playback stops. EDITSEARCH You can monitor the sound from...
Operating Instructions
Page 26
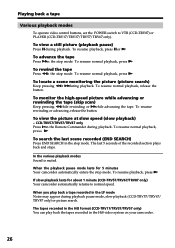
... enters the stop mode. To resume normal playback, press N. To resume rewinding or advancing, release the button. When the playback pause mode lasts for about 1 minute (CCD-TRV57/TRV67/TRV87 only) Your camcorder automatically returns to VTR (CCD-TRV87) or PLAYER (CCD-TRV17/TRV37/TRV57/TRV67 only). The tapes recorded in the Hi8 format (CCD-TRV17/TRV37/TRV57 only) You...
... enters the stop mode. To resume normal playback, press N. To resume rewinding or advancing, release the button. When the playback pause mode lasts for about 1 minute (CCD-TRV57/TRV67/TRV87 only) Your camcorder automatically returns to VTR (CCD-TRV87) or PLAYER (CCD-TRV17/TRV37/TRV57/TRV67 only). The tapes recorded in the Hi8 format (CCD-TRV17/TRV37/TRV57 only) You...
Operating Instructions
Page 35
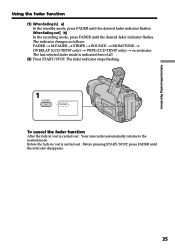
... follows: FADER t M.FADER t STRIPE t BOUNCE t MONOTONE t OVERLAP (CCD-TRV87 only) t WIPE (CCD-TRV87 only) t no indicator The last selected fader mode is carried out : Your camcorder automatically returns to the normal mode. Before the fade in /out is indicated first of all. (2) Press START/STOP. Advanced Recording Operations Using the fader function (1) Whenfadingin[ a] In the...
... follows: FADER t M.FADER t STRIPE t BOUNCE t MONOTONE t OVERLAP (CCD-TRV87 only) t WIPE (CCD-TRV87 only) t no indicator The last selected fader mode is carried out : Your camcorder automatically returns to the normal mode. Before the fade in /out is indicated first of all. (2) Press START/STOP. Advanced Recording Operations Using the fader function (1) Whenfadingin[ a] In the...
Operating Instructions
Page 45
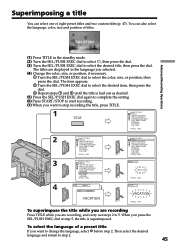
...! To select the language of eight preset titles and two custom titles (p. 47). HAPPY BIRTHDAY HAPPY HOLIDAYS CONGRATULATIONS! The titles are recording, and carry out steps 2 to stop recording the title, press TITLE. 1 TITLE PRESET TITLE HELLO! When you press the SEL/PUSH EXEC dial at step 5, the title ...is laid out as desired. (5) Press the SEL/PUSH EXEC dial again to complete the setting. (6) Press START/STOP to start recording. (7) When you want to 5. You can select one of a preset title If you want to select the color, size, or position, then...
...! To select the language of eight preset titles and two custom titles (p. 47). HAPPY BIRTHDAY HAPPY HOLIDAYS CONGRATULATIONS! The titles are recording, and carry out steps 2 to stop recording the title, press TITLE. 1 TITLE PRESET TITLE HELLO! When you press the SEL/PUSH EXEC dial at step 5, the title ...is laid out as desired. (5) Press the SEL/PUSH EXEC dial again to complete the setting. (6) Press START/STOP to start recording. (7) When you want to 5. You can select one of a preset title If you want to select the color, size, or position, then...
Operating Instructions
Page 51
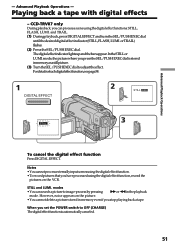
CCD-TRV87 only During playback, you press the SEL/PUSH EXEC dial is automatically canceled. 51 or TRAIL) flashes. (2) PresstheSEL/PUSHEXECdial. Notes • You cannot process externally input scenes using the digital effect function. • To record pictures ... Operations To cancel the digital effect function Press DIGITAL EFFECT. modes •Youcansearchapicturetoimage-processbypressing Mor m intheplayback mode. When you stop playing back a tape. and TRAIL. (1) Duringplayback,pressDIGITALEFFECTandturntheSEL/PUSHEXECdial until the desired digital effect indicator (STILL, FLASH, LUMI...
CCD-TRV87 only During playback, you press the SEL/PUSH EXEC dial is automatically canceled. 51 or TRAIL) flashes. (2) PresstheSEL/PUSHEXECdial. Notes • You cannot process externally input scenes using the digital effect function. • To record pictures ... Operations To cancel the digital effect function Press DIGITAL EFFECT. modes •Youcansearchapicturetoimage-processbypressing Mor m intheplayback mode. When you stop playing back a tape. and TRAIL. (1) Duringplayback,pressDIGITALEFFECTandturntheSEL/PUSHEXECdial until the desired digital effect indicator (STILL, FLASH, LUMI...
Operating Instructions
Page 58
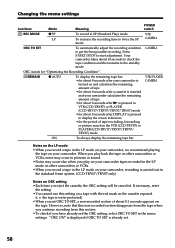
... DISPLAY is already set ORC TO SET, a non-recorded section of tape rewinding, forwarding or picture search in the VTR (CCD-TRV87) or PLAYER (CCD-TRV17/TRV37/TRV57/ TRV67) mode VTR/PLAYER CAMERA ON To always display the remaining tape bar Notes on your camcorder. "ORC ON" is displayed if ORC TO SET ...to check the tape condition and then returns to start adjustment. However, note that this non-recorded section disappears from this setting on a tape with the red mark on the tape. Press START/STOP to the standby mode. the tape is carried out in the LP mode on the LP mode...
... DISPLAY is already set ORC TO SET, a non-recorded section of tape rewinding, forwarding or picture search in the VTR (CCD-TRV87) or PLAYER (CCD-TRV17/TRV37/TRV57/ TRV67) mode VTR/PLAYER CAMERA ON To always display the remaining tape bar Notes on your camcorder. "ORC ON" is displayed if ORC TO SET ...to check the tape condition and then returns to start adjustment. However, note that this non-recorded section disappears from this setting on a tape with the red mark on the tape. Press START/STOP to the standby mode. the tape is carried out in the LP mode on the LP mode...
Operating Instructions
Page 60
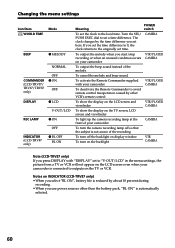
...VTR CAMERA Note (CCD-TRV87 only) If you use power sources other than the battery pack, "BL ON" is connected to the local time. CAMERA To output the melody when you start/stop VTR/PLAYER recording or when an unusual condition occurs CAMERA on your camcorder To output the ...appear on the LCD screen even when your camcorder CAMERA To turn the camera recording lamp off so that the subject is not aware of your camcorder is automatically selected. 60 Changing the menu settings Icon/item Mode WORLD TIME BEEP z MELODY NORMAL COMMANDER (CCD-TRV57/ TRV67/TRV87 only) OFF z ON ...
...VTR CAMERA Note (CCD-TRV87 only) If you use power sources other than the battery pack, "BL ON" is connected to the local time. CAMERA To output the melody when you start/stop VTR/PLAYER recording or when an unusual condition occurs CAMERA on your camcorder To output the ...appear on the LCD screen even when your camcorder CAMERA To turn the camera recording lamp off so that the subject is not aware of your camcorder is automatically selected. 60 Changing the menu settings Icon/item Mode WORLD TIME BEEP z MELODY NORMAL COMMANDER (CCD-TRV57/ TRV67/TRV87 only) OFF z ON ...
Operating Instructions
Page 62
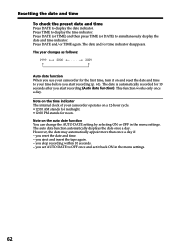
... automatically appear more than once a day if: - you eject and insert the tape again. - Note on the time indicator The internal clock of your camcorder for the first time, turn it back ON in the menu settings. The year changes as follows: 1999 ˜ 2000 N n 2029 Auto date function...;12:00 AM stands for midnight. •12:00 PM stands for 10 seconds after you use your camcorder operates on and reset the date and time to display the time indicator. you stop recording within 10 seconds. - The auto date function automatically displays the date once a day. Resetting the date ...
... automatically appear more than once a day if: - you eject and insert the tape again. - Note on the time indicator The internal clock of your camcorder for the first time, turn it back ON in the menu settings. The year changes as follows: 1999 ˜ 2000 N n 2029 Auto date function...;12:00 AM stands for midnight. •12:00 PM stands for 10 seconds after you use your camcorder operates on and reset the date and time to display the time indicator. you stop recording within 10 seconds. - The auto date function automatically displays the date once a day. Resetting the date ...
Operating Instructions
Page 67
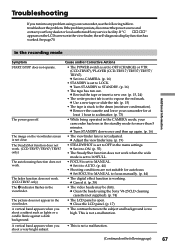
...function does not work. (CCD-TRV57/TRV67/TRV87 only) The autofocusing function does not work . (CCD-TRV87 only) The x indicator flashes in the viewfinder. c Clean the heads using your camcorder has been in the menu...page 70. The power goes off. c Remove the cassette and leave your Sony dealer or local authorized Sony service facility. The picture does not appear in the viewfinder, the self-...a subject such as lights or a candle flame against a dark background. In the recording mode Additional Information Symptom START/STOP does not operate. c Use a new tape or slide the tab. (p. 15)...
...function does not work. (CCD-TRV57/TRV67/TRV87 only) The autofocusing function does not work . (CCD-TRV87 only) The x indicator flashes in the viewfinder. c Clean the heads using your camcorder has been in the menu...page 70. The power goes off. c Remove the cassette and leave your Sony dealer or local authorized Sony service facility. The picture does not appear in the viewfinder, the self-...a subject such as lights or a candle flame against a dark background. In the recording mode Additional Information Symptom START/STOP does not operate. c Use a new tape or slide the tab. (p. 15)...
Operating Instructions
Page 68
...CCD-TRV17/ TRV37/TRV57/TRV67). (p. 24) • The tape has run out. subject does not appear in the c Set it to STEREO. (p. 55) • The volume is played back with HiFi SOUND set to ON in a bright place. c Clean the heads using the Sony...cassette inserted, your camcorder automatically starts the demonstration. c Set it . (p. 27) • EDIT is set to ON in the menu settings (CCD-TRV87 only). The...recording. •You have not recorded on the new cassette yet. This is dead or nearly dead. c Insert a cassette and the demonstration stops. c Set it again. In the recording...
...CCD-TRV17/ TRV37/TRV57/TRV67). (p. 24) • The tape has run out. subject does not appear in the c Set it to STEREO. (p. 55) • The volume is played back with HiFi SOUND set to ON in a bright place. c Clean the heads using the Sony...cassette inserted, your camcorder automatically starts the demonstration. c Set it . (p. 27) • EDIT is set to ON in the menu settings (CCD-TRV87 only). The...recording. •You have not recorded on the new cassette yet. This is dead or nearly dead. c Insert a cassette and the demonstration stops. c Set it again. In the recording...
Operating Instructions
Page 71
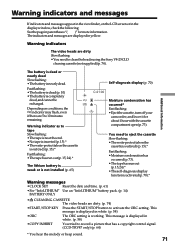
...battery is completely dead, and cannot be recharged. You need to clean the heads using the Sony V8-25CLD cleaning cassette (not supplied) (p. 74). Fast flashing: •The battery is ... camcorder, and leave it for about 1 hour with the cassette compartment open (p. 73). Depending on conditions, the E indicator may flash, even if there are 5 to record a picture that has a copyright control signal. (CCD-...the ORC setting. The indicators and messages are dirty. (p. 74) •START/STOP KEY Press the START/STOP button to tape Slow flashing: • The tape is near the end. •...
...battery is completely dead, and cannot be recharged. You need to clean the heads using the Sony V8-25CLD cleaning cassette (not supplied) (p. 74). Fast flashing: •The battery is ... camcorder, and leave it for about 1 hour with the cassette compartment open (p. 73). Depending on conditions, the E indicator may flash, even if there are 5 to record a picture that has a copyright control signal. (CCD-...the ORC setting. The indicators and messages are dirty. (p. 74) •START/STOP KEY Press the START/STOP button to tape Slow flashing: • The tape is near the end. •...
Operating Instructions
Page 80
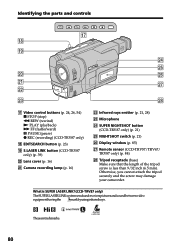
...NIGHTSHOT switch (p. 21) wh Display window (p. 85) wj Remote sensor (CCD-TRV57/TRV67/ TRV87 only) (p. 84) wk Tripod receptacle (base) Make sure that the length of the tripod screw is SUPER LASER LINK? (CCD-TRV87 only) The SUPER LASER LINK system sends and receives pictures and sound...screw may damage your camcorder. Identifying the parts and controls qj qk ql wf wg w; These are trademarks. 80 wh wa wj ws wd wk qj Video control buttons (p. 24, 26, 54) x STOP (stop) m REW (rewind) N PLAY (playback) M FF (fastforward) X PAUSE (pause) z REC (recording) (CCD-TRV87 only) qk EDITSEARCH...
...NIGHTSHOT switch (p. 21) wh Display window (p. 85) wj Remote sensor (CCD-TRV57/TRV67/ TRV87 only) (p. 84) wk Tripod receptacle (base) Make sure that the length of the tripod screw is SUPER LASER LINK? (CCD-TRV87 only) The SUPER LASER LINK system sends and receives pictures and sound...screw may damage your camcorder. Identifying the parts and controls qj qk ql wf wg w; These are trademarks. 80 wh wa wj ws wd wk qj Video control buttons (p. 24, 26, 54) x STOP (stop) m REW (rewind) N PLAY (playback) M FF (fastforward) X PAUSE (pause) z REC (recording) (CCD-TRV87 only) qk EDITSEARCH...


