Camera Operations Guide
Page 1
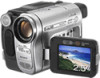
2-515-259-12(1) Camera Operations Guide Read this first Video Camera Recorder/Digital Video Camera Recorder CCD-TRV138/TRV338 DCR-TRV280 © 2005 Sony Corporation
2-515-259-12(1) Camera Operations Guide Read this first Video Camera Recorder/Digital Video Camera Recorder CCD-TRV138/TRV338 DCR-TRV280 © 2005 Sony Corporation
Camera Operations Guide
Page 3
... camcorder. Change the screen language before using a digital still camera, and thus may appear different from that to which can use Note on a cassette tape You can be provided, even if recording or playback is encouraged to try to radio communications. If this... and Hi8 , Digital8 video cassettes on your recordings on -screen displays in each model is connected. - Instructions with the limits for all models. Be careful when placing the camera near a window or outdoors. • Do not aim at dusk. CCD-TRV138: TRV138 CCD-TRV338: TRV338 DCR-TRV280: TRV280 Instructions...
... camcorder. Change the screen language before using a digital still camera, and thus may appear different from that to which can use Note on a cassette tape You can be provided, even if recording or playback is encouraged to try to radio communications. If this... and Hi8 , Digital8 video cassettes on your recordings on -screen displays in each model is connected. - Instructions with the limits for all models. Be careful when placing the camera near a window or outdoors. • Do not aim at dusk. CCD-TRV138: TRV138 CCD-TRV338: TRV338 DCR-TRV280: TRV280 Instructions...
Camera Operations Guide
Page 7
PROGRAM AE/P EFFECT, etc 42 Using the (CAMERA SET) menu - 16:9 WIDE/STEADYSHOT, etc 45 Using the (PLAYER SET)/ (VCR SET) menu - FRAME REC/INT.REC, etc. ......52 Using the (SETUP MENU) - WORLD TIME/VIDEO EDIT, etc 57 Dubbing/Editing Connecting to a VCR 59 Dubbing to DVD") ( TRV280 79... "First Step Guide" ( TRV280 78 Creating a DVD (Direct Access to "Click to another tape 61 Dubbing a tape easily - Easy Dubbing ( TRV138/338 62 Recording pictures from a VCR ( TRV280 66 Dubbing selected scenes from a tape - LCD B.L./LCD COLOR, etc. ......51 Using the (TAPE SET) menu - CLOCK SET/USB...
PROGRAM AE/P EFFECT, etc 42 Using the (CAMERA SET) menu - 16:9 WIDE/STEADYSHOT, etc 45 Using the (PLAYER SET)/ (VCR SET) menu - FRAME REC/INT.REC, etc. ......52 Using the (SETUP MENU) - WORLD TIME/VIDEO EDIT, etc 57 Dubbing/Editing Connecting to a VCR 59 Dubbing to DVD") ( TRV280 79... "First Step Guide" ( TRV280 78 Creating a DVD (Direct Access to "Click to another tape 61 Dubbing a tape easily - Easy Dubbing ( TRV138/338 62 Recording pictures from a VCR ( TRV280 66 Dubbing selected scenes from a tape - LCD B.L./LCD COLOR, etc. ......51 Using the (TAPE SET) menu - CLOCK SET/USB...
Camera Operations Guide
Page 37
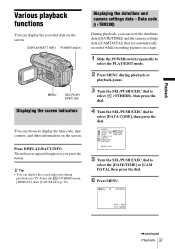
...; You can choose to display the time code, tape counter, and other information on the screen. Displaying the date/time and camera settings data - SHUT OFF DISPLAY VIDEO EDIT RETURN [MENU] : END 5 Turn the SEL/PUSH EXEC dial to select the [DATE/TIME] or [CAM DATA], then...then [V-OUT/LCD] (p. 58). Playback Various playback functions You can view the date/time data ([DATE/TIME]) and the camera settings data ([CAM DATA]) that are automatically recorded while recording pictures on a tape. 1 Slide the POWER switch repeatedly to select the PLAY/EDIT mode. 2 Press MENU during playback on...
...; You can choose to display the time code, tape counter, and other information on the screen. Displaying the date/time and camera settings data - SHUT OFF DISPLAY VIDEO EDIT RETURN [MENU] : END 5 Turn the SEL/PUSH EXEC dial to select the [DATE/TIME] or [CAM DATA], then...then [V-OUT/LCD] (p. 58). Playback Various playback functions You can view the date/time data ([DATE/TIME]) and the camera settings data ([CAM DATA]) that are automatically recorded while recording pictures on a tape. 1 Slide the POWER switch repeatedly to select the PLAY/EDIT mode. 2 Press MENU during playback on...
Camera Operations Guide
Page 57
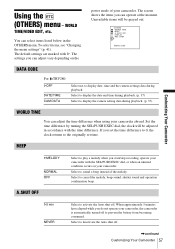
... A.SHUT OFF Select to deactivate the Auto shut off . Select to play a melody when you start/stop recording, operate your camcorder with the time difference. The screen shows the items you set time. Set the time difference...from becoming consumed. Select to sound a beep instead of your camcorder, the camcorder is automatically turned off to display the camera setting data during playback. To select items, see "Changing the menu settings" (p. 41). The default settings are marked with...unusual condition occurs on the power mode of the melody. WORLD TIME/VIDEO EDIT, etc.
... A.SHUT OFF Select to deactivate the Auto shut off . Select to play a melody when you start/stop recording, operate your camcorder with the time difference. The screen shows the items you set time. Set the time difference...from becoming consumed. Select to sound a beep instead of your camcorder, the camcorder is automatically turned off to display the camera setting data during playback. To select items, see "Changing the menu settings" (p. 41). The default settings are marked with...unusual condition occurs on the power mode of the melody. WORLD TIME/VIDEO EDIT, etc.
Camera Operations Guide
Page 58
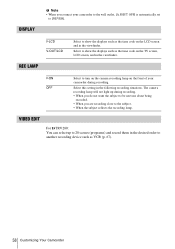
... such as the time code on the TV screen, LCD screen, and in the viewfinder. The camera recording lamp will not light up to 20 scenes (programs) and record them in the following recording situations. Select to show the displays such as VCR (p. 67). 58 Customizing Your Camcorder Select this...the front of your camcorder to the wall outlet, [A.SHUT OFF] is automatically set to [NEVER]. VIDEO EDIT For TRV280: You can select up during recording. GON OFF Select to turn on the camera recording lamp on the LCD screen and in the viewfinder. DISPLAY b Note • When you connect ...
... such as the time code on the TV screen, LCD screen, and in the viewfinder. The camera recording lamp will not light up to 20 scenes (programs) and record them in the following recording situations. Select to show the displays such as VCR (p. 67). 58 Customizing Your Camcorder Select this...the front of your camcorder to the wall outlet, [A.SHUT OFF] is automatically set to [NEVER]. VIDEO EDIT For TRV280: You can select up during recording. GON OFF Select to turn on the camera recording lamp on the LCD screen and in the viewfinder. DISPLAY b Note • When you connect ...
Camera Operations Guide
Page 86
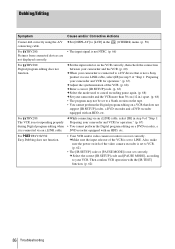
...video camera recorder is set to [LCD] in step 9 of the VCR. (p. 68) cEnter a correct [IR SETUP] code. (p. 63) cSelect the mode used to cancel recording pause again. (p. 68) cSet your camcorder and VCR for operation." (p. 67) • You cannot perform the Digital program editing on a VCR that is not a Sony...TRV280: Digital program editing does not function. For TRV138/338: Easy Dubbing does not function. • Your VCR and/or video camera recorder is not set correctly. Then confirm VCR operation with an HDD, etc. Dubbing/Editing Symptom Cause and/or Corrective Actions Cannot ...
...video camera recorder is set to [LCD] in step 9 of the VCR. (p. 68) cEnter a correct [IR SETUP] code. (p. 63) cSelect the mode used to cancel recording pause again. (p. 68) cSet your camcorder and VCR for operation." (p. 67) • You cannot perform the Digital program editing on a VCR that is not a Sony...TRV280: Digital program editing does not function. For TRV138/338: Easy Dubbing does not function. • Your VCR and/or video camera recorder is not set correctly. Then confirm VCR operation with an HDD, etc. Dubbing/Editing Symptom Cause and/or Corrective Actions Cannot ...

Camera Operations Guide
Page 95
... Hi8 /standard 8 mm system camcorder. (120 minutes of recording time becomes 60 minutes in the Hi8 system correctly on the tape when it to a tape in another video camera connected to the end of the recorded section before you begin the next recording in the case you use standard 8 mm and Hi8 ,... Digital8 video cassettes on the tape Press END SEARCH to go to your camcorder that ...
... Hi8 /standard 8 mm system camcorder. (120 minutes of recording time becomes 60 minutes in the Hi8 system correctly on the tape when it to a tape in another video camera connected to the end of the recorded section before you begin the next recording in the case you use standard 8 mm and Hi8 ,... Digital8 video cassettes on the tape Press END SEARCH to go to your camcorder that ...
Camera Operations Guide
Page 101
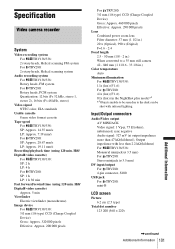
... number 123 200 (560 × 220) ,continued Additional Information 101 Additional Information Hi8/ Digital8 video cassette) Approx. 5 min Viewfinder Electric viewfinder (monochrome) Image device For TRV138/338: 3.0 mm (1/6 type) CCD (Charge Coupled Device) Gross: Approx. 320 000 pixels Effective: Approx. 200 000 pixels For... shot with less than 47 kΩ (kilohms)), Output impedance with infrared lighting. Specification Video camera recorder System Video recording system For TRV138/338: 2 rotary heads, Helical scanning FM system For TRV280: 2 rotary heads, Helical scanning system Audio...
... number 123 200 (560 × 220) ,continued Additional Information 101 Additional Information Hi8/ Digital8 video cassette) Approx. 5 min Viewfinder Electric viewfinder (monochrome) Image device For TRV138/338: 3.0 mm (1/6 type) CCD (Charge Coupled Device) Gross: Approx. 320 000 pixels Effective: Approx. 200 000 pixels For... shot with less than 47 kΩ (kilohms)), Output impedance with infrared lighting. Specification Video camera recorder System Video recording system For TRV138/338: 2 rotary heads, Helical scanning FM system For TRV280: 2 rotary heads, Helical scanning system Audio...
Camera Operations Guide
Page 106
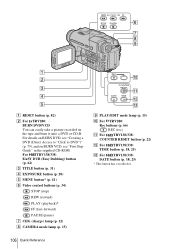
.../338: EASY DUB (Easy Dubbing) button (p. 62) C TITLE button (p. 31) D EXPOSURE button (p. 28) E MENU button* (p. 41) F Video control buttons (p. 34) STOP (stop) REW (rewind) PLAY (playback)* FF (fast-forward) PAUSE (pause) G CHG (charge) lamp (p. 12) H CAMERA mode lamp (p. 15) I PLAY/EDIT mode lamp (p. 15) J For TRV280: Rec buttons (p. 66) REC (rec) K For...: DATE button (p. 18, 25) * This button has a tactile dot. 106 Quick Reference A RESET button (p. 82) B For TRV280: BURN DVD/VCD You can easily take a picture recorded on BURN VCD, see "First Step Guide" in the supplied CD-ROM.
.../338: EASY DUB (Easy Dubbing) button (p. 62) C TITLE button (p. 31) D EXPOSURE button (p. 28) E MENU button* (p. 41) F Video control buttons (p. 34) STOP (stop) REW (rewind) PLAY (playback)* FF (fast-forward) PAUSE (pause) G CHG (charge) lamp (p. 12) H CAMERA mode lamp (p. 15) I PLAY/EDIT mode lamp (p. 15) J For TRV280: Rec buttons (p. 66) REC (rec) K For...: DATE button (p. 18, 25) * This button has a tactile dot. 106 Quick Reference A RESET button (p. 82) B For TRV280: BURN DVD/VCD You can easily take a picture recorded on BURN VCD, see "First Step Guide" in the supplied CD-ROM.
Camera Operations Guide
Page 109
...B.L 51 LCD brightness (LCD BRIGHT) ......... 16 LCD COLOR 51 LCD screen 3 LP (Long Play) See Recording mode (REC MODE) LTR SIZE 55 M Macintosh 73, 77 Main sound See HiFi SOUND Menu 41 CAMERA SET........... 45 LCD SET 51 MANUAL SET .......... 42 OTHERS 57 PLAYER SET 49 SETUP MENU........... 55 TAPE...100 Clock set (CLOCK SET) ......17, 55 D Data code (DATA CODE) .....37, 57 Date/time 37 DEMO MODE 56 Digital program editing (VIDEO EDIT 67 Digital zoom (D ZOOM)... 45 Digital8 system 95 Direct Access to "Click to DVD 79 DirectX 9.0c 76 Display DISPLAY 58 Display indicator....... 108...
...B.L 51 LCD brightness (LCD BRIGHT) ......... 16 LCD COLOR 51 LCD screen 3 LP (Long Play) See Recording mode (REC MODE) LTR SIZE 55 M Macintosh 73, 77 Main sound See HiFi SOUND Menu 41 CAMERA SET........... 45 LCD SET 51 MANUAL SET .......... 42 OTHERS 57 PLAYER SET 49 SETUP MENU........... 55 TAPE...100 Clock set (CLOCK SET) ......17, 55 D Data code (DATA CODE) .....37, 57 Date/time 37 DEMO MODE 56 Digital program editing (VIDEO EDIT 67 Digital zoom (D ZOOM)... 45 Digital8 system 95 Direct Access to "Click to DVD 79 DirectX 9.0c 76 Display DISPLAY 58 Display indicator....... 108...


