Camera Operations Guide
Page 2
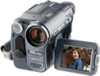
...bottom. Telephone No.: 201-930-6972 This device complies with Part 15 of Conformity Trade Name: SONY Model No.: DCR-TRV260 Responsible Party: Sony Electronics Inc. Owner's Record The model and serial numbers are recyclable. WARNING To prevent fire or shock hazard, do not ...expose the unit to the following two conditions: (1) This device may not cause harmful interference, and (2) this manual thoroughly, and retain ...
...bottom. Telephone No.: 201-930-6972 This device complies with Part 15 of Conformity Trade Name: SONY Model No.: DCR-TRV260 Responsible Party: Sony Electronics Inc. Owner's Record The model and serial numbers are recyclable. WARNING To prevent fire or shock hazard, do not ...expose the unit to the following two conditions: (1) This device may not cause harmful interference, and (2) this manual thoroughly, and retain ...

Camera Operations Guide
Page 3
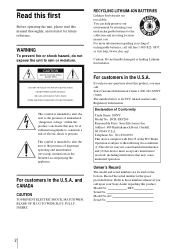
...digital still camera, and thus may cause a malfunction of the camcorder, etc. • TV color systems differ depending on the country/ regions. CCD-TRV128: TRV128 CCD-TRV228: TRV228 CCD-TRV328: TRV328 CCD-TRV428: ... designed to direct sunlight for effective use standard 8 mm and Hi8 , Digital8 video cassettes on the model DCR-TRV265. ,continued 3 Before you insert the connector ...on this manual could void your camcorder. Notes on recording • Before starting to record, test the recording function to make sure the picture and sound are recorded without any...
...digital still camera, and thus may cause a malfunction of the camcorder, etc. • TV color systems differ depending on the country/ regions. CCD-TRV128: TRV128 CCD-TRV228: TRV228 CCD-TRV328: TRV328 CCD-TRV428: ... designed to direct sunlight for effective use standard 8 mm and Hi8 , Digital8 video cassettes on the model DCR-TRV265. ,continued 3 Before you insert the connector ...on this manual could void your camcorder. Notes on recording • Before starting to record, test the recording function to make sure the picture and sound are recorded without any...
Camera Operations Guide
Page 5
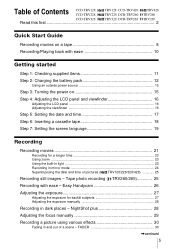
... a cassette tape 18 Step 7: Setting the screen language 19 Recording Recording movies 21 Recording for backlit subjects 27 Adjusting the exposure manually 28 Recording in and out of Contents CCD-TRV128: CCD-TRV228: TRV128 CCD-TRV428: TRV428 TRV228 DCR-TRV260: TRV260 CCD-TRV328: TRV328 DCR-TRV265: TRV265 Read this first 2 Quick Start Guide Recording movies on pictures ( TRV128/228/328/428 25...
... a cassette tape 18 Step 7: Setting the screen language 19 Recording Recording movies 21 Recording for backlit subjects 27 Adjusting the exposure manually 28 Recording in and out of Contents CCD-TRV128: CCD-TRV228: TRV128 CCD-TRV428: TRV428 TRV228 DCR-TRV260: TRV260 CCD-TRV328: TRV328 DCR-TRV265: TRV265 Read this first 2 Quick Start Guide Recording movies on pictures ( TRV128/228/328/428 25...
Camera Operations Guide
Page 7
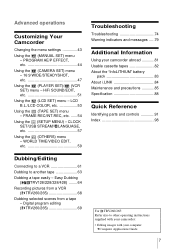
.../428) ........64 Recording pictures from a VCR ( TRV260/265 68 Dubbing selected scenes from a tape - HiFi SOUND/EDIT, etc 51 Using the (LCD SET) menu - LCD B.L./LCD COLOR, etc 53 Using the (TAPE SET) menu - PROGRAM AE/P EFFECT, etc 44 Using the (CAMERA SET) menu -... 63 Dubbing a tape easily - Advanced operations Customizing Your Camcorder Changing the menu settings 43 Using the (MANUAL SET) menu - WORLD TIME/VIDEO EDIT, etc 59 Troubleshooting Troubleshooting 74 Warning indicators and messages .....79 Additional Information Using your computer cComputer Applications Guide 7...
.../428) ........64 Recording pictures from a VCR ( TRV260/265 68 Dubbing selected scenes from a tape - HiFi SOUND/EDIT, etc 51 Using the (LCD SET) menu - LCD B.L./LCD COLOR, etc 53 Using the (TAPE SET) menu - PROGRAM AE/P EFFECT, etc 44 Using the (CAMERA SET) menu -... 63 Dubbing a tape easily - Advanced operations Customizing Your Camcorder Changing the menu settings 43 Using the (MANUAL SET) menu - WORLD TIME/VIDEO EDIT, etc 59 Troubleshooting Troubleshooting 74 Warning indicators and messages .....79 Additional Information Using your computer cComputer Applications Guide 7...
Camera Operations Guide
Page 11
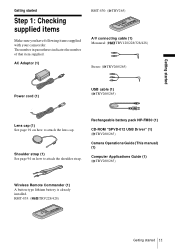
... following items supplied with your camcorder. Getting started Getting started 11 Rechargeable battery pack NP-FM30 (1) CD-ROM "SPVD-012 USB Driver" (1) ( TRV260/265) Camera Operations Guide (This manual) (1) Computer Applications Guide (1) ( TRV260/265) Wireless Remote Commander (1) A button-type lithium battery is already installed. Shoulder strap (1) See page 94 on how to...
... following items supplied with your camcorder. Getting started Getting started 11 Rechargeable battery pack NP-FM30 (1) CD-ROM "SPVD-012 USB Driver" (1) ( TRV260/265) Camera Operations Guide (This manual) (1) Computer Applications Guide (1) ( TRV260/265) Wireless Remote Commander (1) A button-type lithium battery is already installed. Shoulder strap (1) See page 94 on how to...
Camera Operations Guide
Page 17
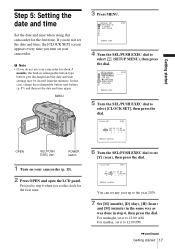
... switch 1 Turn on your camcorder. In that case, charge the rechargeable button-type battery (p. 87) and then set any year up to 12:00 AM. MANUAL SET PROGRAM AE P EFFECT AUTO SHTR STBY [MENU] : END 4 Turn the SEL/PUSH EXEC dial to select [CLOCK SET], then press the dial. For midnight...
... switch 1 Turn on your camcorder. In that case, charge the rechargeable button-type battery (p. 87) and then set any year up to 12:00 AM. MANUAL SET PROGRAM AE P EFFECT AUTO SHTR STBY [MENU] : END 4 Turn the SEL/PUSH EXEC dial to select [CLOCK SET], then press the dial. For midnight...
Camera Operations Guide
Page 19
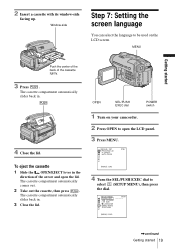
... the LCD panel. 3 Press MENU. Window-side Step 7: Setting the screen language You can select the language to select (SETUP MENU), then press the dial. MANUAL SET PROGRAM AE P EFFECT AUTO SHTR STBY [MENU] : END 4 Turn the SEL/PUSH EXEC dial to be used on your camcorder. 2 Press OPEN to open...
... the LCD panel. 3 Press MENU. Window-side Step 7: Setting the screen language You can select the language to select (SETUP MENU), then press the dial. MANUAL SET PROGRAM AE P EFFECT AUTO SHTR STBY [MENU] : END 4 Turn the SEL/PUSH EXEC dial to be used on your camcorder. 2 Press OPEN to open...

Camera Operations Guide
Page 25
... in the picture, record the date and time in "Getting started" (p. 11 - b Note • The date and time indicators recorded manually cannot be deleted. p. 19). Recording still images - z Tip • If you purchase your local time before starting actual recording. 2 Press OPEN and open the LCD panel. ,continued Recording 25 OPEN PHOTO DATE CCD-TRV428 TIME Press...
... in the picture, record the date and time in "Getting started" (p. 11 - b Note • The date and time indicators recorded manually cannot be deleted. p. 19). Recording still images - z Tip • If you purchase your local time before starting actual recording. 2 Press OPEN and open the LCD panel. ,continued Recording 25 OPEN PHOTO DATE CCD-TRV428 TIME Press...
Camera Operations Guide
Page 28
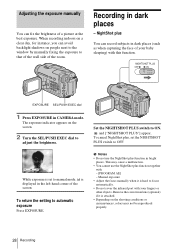
...to focus automatically. • Do not cover the infrared port with : - [PROGRAM AE] - To return the setting to ON. Manual exposure • Adjust the focus manually when it is attached. • Depending on the screen. 2 Turn the SEL/PUSH EXEC dial to adjust the brightness. This may ...b Notes • Do not use the NightShot plus function in the left-hand corner of the screen. and ["NIGHTSHOT PLUS"] appear. Recording in CAMERA mode. Set the NIGHTSHOT PLUS switch to automatic exposure Press EXPOSURE. Remove the conversion lens (optional) if it is displayed in bright places.
...to focus automatically. • Do not cover the infrared port with : - [PROGRAM AE] - To return the setting to ON. Manual exposure • Adjust the focus manually when it is attached. • Depending on the screen. 2 Turn the SEL/PUSH EXEC dial to adjust the brightness. This may ...b Notes • Do not use the NightShot plus function in the left-hand corner of the screen. and ["NIGHTSHOT PLUS"] appear. Recording in CAMERA mode. Set the NIGHTSHOT PLUS switch to automatic exposure Press EXPOSURE. Remove the conversion lens (optional) if it is displayed in bright places.
Camera Operations Guide
Page 29
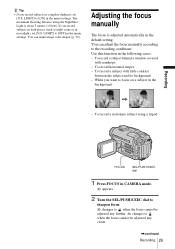
... menu settings. LIGHT] to [ON] in the background. - Use this function in the default setting. Adjusting the focus manually The focus is about 3 meters (10 feet). Recording FOCUS SEL/PUSH EXEC dial 1 Press FOCUS in CAMERA mode. 9 appears. 2 Turn the SEL/PUSH EXEC dial to sharpen focus. 9 changes to when the focus cannot...
... menu settings. LIGHT] to [ON] in the background. - Use this function in the default setting. Adjusting the focus manually The focus is about 3 meters (10 feet). Recording FOCUS SEL/PUSH EXEC dial 1 Press FOCUS in CAMERA mode. 9 appears. 2 Turn the SEL/PUSH EXEC dial to sharpen focus. 9 changes to when the focus cannot...

Camera Operations Guide
Page 30
Tips for focusing manually • It is easier to focus on the subject when you want to record a close-up image of a scene - Recording a picture using various effects FADER To adjust the focus automatically Press FOCUS again. FADER You can add the following effects to fully magnify the .... SEL/PUSH EXEC dial POWER switch Fading in and out of a subject, move the power zoom lever towards W (wide angle) to adjust the zoom for recording. • When you use the zoom function. Move the power zoom lever towards T (telephoto) to adjust the focus, and then, towards W (wide angle) ...
Tips for focusing manually • It is easier to focus on the subject when you want to record a close-up image of a scene - Recording a picture using various effects FADER To adjust the focus automatically Press FOCUS again. FADER You can add the following effects to fully magnify the .... SEL/PUSH EXEC dial POWER switch Fading in and out of a subject, move the power zoom lever towards W (wide angle) to adjust the zoom for recording. • When you use the zoom function. Move the power zoom lever towards T (telephoto) to adjust the focus, and then, towards W (wide angle) ...

Camera Operations Guide
Page 39
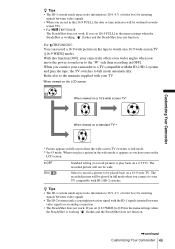
Refer also to the instruction manuals supplied with the devices to a TV using the supplied A/V connecting cable as shown in the following illustration. Playing the picture on a TV For TRV128/228/...
Refer also to the instruction manuals supplied with the devices to a TV using the supplied A/V connecting cable as shown in the following illustration. Playing the picture on a TV For TRV128/228/...
Camera Operations Guide
Page 43
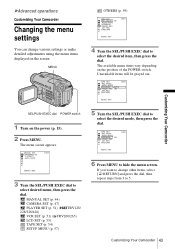
... depending on the power (p. 15). 2 Press MENU. The menu screen appears. MENU OTHERS (p. 59) TAPE SET REC MODE SP AUDIO MODE REMAIN FRAME REC I N T. MANUAL SET (p. 44) CAMERA SET (p. 47) PLAYER SET (p. 51) ( TRV128/ 228/328/428) VCR SET (p. 51) ( TRV260/265) LCD SET (p. 53) TAPE SET (p. 54) SETUP MENU...settings You can change other items, select [ RETURN] and press the dial, then repeat steps from 3 to 5. Unavailable items will be grayed out. MANUAL SET PROGRAM AE P EFFECT AUTO SHTR STBY [MENU] : END 3 Turn the SEL/PUSH EXEC dial to select the desired item, then press the...
... depending on the power (p. 15). 2 Press MENU. The menu screen appears. MENU OTHERS (p. 59) TAPE SET REC MODE SP AUDIO MODE REMAIN FRAME REC I N T. MANUAL SET (p. 44) CAMERA SET (p. 47) PLAYER SET (p. 51) ( TRV128/ 228/328/428) VCR SET (p. 51) ( TRV260/265) LCD SET (p. 53) TAPE SET (p. 54) SETUP MENU...settings You can change other items, select [ RETURN] and press the dial, then repeat steps from 3 to 5. Unavailable items will be grayed out. MANUAL SET PROGRAM AE P EFFECT AUTO SHTR STBY [MENU] : END 3 Turn the SEL/PUSH EXEC dial to select the desired item, then press the...
Camera Operations Guide
Page 44
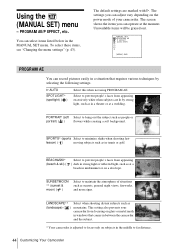
...on a ski slope. PORTRAIT (soft Select to far distance. 44 Customizing Your Camcorder Using the (MANUAL SET) menu - Select to maintain the atmosphere of your camcorder from appearing ) dark in the MANUAL SET menu. SUNSETMOON ** (sunset & moon) ( ) Select to prevent people's faces from appearing... & ski) ( Select to minimize shake when shooting fast- This setting also prevents your camcorder. The screen shows the items you can record pictures easily in a situation that comes in between the camcorder and the subject. * Your camcorder is adjusted to focus only on subjects ...
...on a ski slope. PORTRAIT (soft Select to far distance. 44 Customizing Your Camcorder Using the (MANUAL SET) menu - Select to maintain the atmosphere of your camcorder from appearing ) dark in the MANUAL SET menu. SUNSETMOON ** (sunset & moon) ( ) Select to prevent people's faces from appearing... & ski) ( Select to minimize shake when shooting fast- This setting also prevents your camcorder. The screen shows the items you can record pictures easily in a situation that comes in between the camcorder and the subject. * Your camcorder is adjusted to focus only on subjects ...
Camera Operations Guide
Page 48
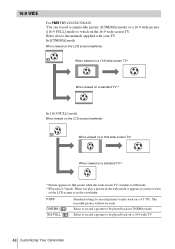
... to be played back in CINEMA mode. 16:9 FULL ( ) Select to record a picture to be wide. In [CINEMA] mode When viewed on the LCD screen/viewfinder When ...be played back on a 16:9 wide TV. 48 Customizing Your Camcorder Refer also to the manuals supplied with your TV. GOFF Standard setting (to record pictures to play a picture in the wide mode, it appears as you have seen on ...switches to full mode. **Played in 4:3 mode. 16:9 WIDE For TRV128/228/328/428: You can record a cinema-like picture ([CINEMA] mode) or a 16:9 wide picture ([16:9 FULL] mode) to watch on the LCD screen or ...
... to be played back in CINEMA mode. 16:9 FULL ( ) Select to record a picture to be wide. In [CINEMA] mode When viewed on the LCD screen/viewfinder When ...be played back on a 16:9 wide TV. 48 Customizing Your Camcorder Refer also to the manuals supplied with your TV. GOFF Standard setting (to record pictures to play a picture in the wide mode, it appears as you have seen on ...switches to full mode. **Played in 4:3 mode. 16:9 WIDE For TRV128/228/328/428: You can record a cinema-like picture ([CINEMA] mode) or a 16:9 wide picture ([16:9 FULL] mode) to watch on the LCD screen or ...
Camera Operations Guide
Page 49
... in the menu settings when the SteadyShot is working , flashes and the SteadyShot does not function. Select to record a picture to the manuals supplied with the ID-1 signals inserted between video signals in an analog connection. • The SteadyShot does not work . z Tips • The ID-1...inserting signals between video signals. • The ID-2 system sends a copyright protection signal with your camcorder to a TV compatible with the ID-1/ID-2 system and play the tape, the TV switches to the "W" side than recording in [OFF]. screen TVs. • For TRV328/428: The SteadyShot...
... in the menu settings when the SteadyShot is working , flashes and the SteadyShot does not function. Select to record a picture to the manuals supplied with the ID-1 signals inserted between video signals in an analog connection. • The SteadyShot does not work . z Tips • The ID-1...inserting signals between video signals. • The ID-2 system sends a copyright protection signal with your camcorder to a TV compatible with the ID-1/ID-2 system and play the tape, the TV switches to the "W" side than recording in [OFF]. screen TVs. • For TRV328/428: The SteadyShot...
Camera Operations Guide
Page 56
... select [ON], then press the dial. 8 Press MENU to [OFF] in recording time of flowers blooming, etc., with this function. To cancel recording, set to hide the menu settings. flashes. 9 Press REC START/STOP. z Tips • If you adjust the focus manually, you may be able to ± 6 frames from the selected time...
... select [ON], then press the dial. 8 Press MENU to [OFF] in recording time of flowers blooming, etc., with this function. To cancel recording, set to hide the menu settings. flashes. 9 Press REC START/STOP. z Tips • If you adjust the focus manually, you may be able to ± 6 frames from the selected time...
Camera Operations Guide
Page 76
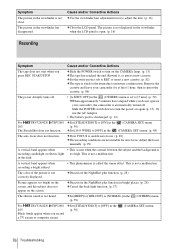
...picture is recording candlelight or electric light too high. Remove the cassette and leave your camcorder, the camcorder is automatically turned off . • [A.SHUT OFF] in the (OTHERS) menu is discharged. (p. 12) For TRV328/428/ TRV260/ cSet [STEADYSHOT] to moisture condensation. Adjust the focus manually. (p. ...clear. cDeactivate the NightShot plus function. (p. 28) Picture appears too bright on the screen, and the subject does not appear on the CAMERA lamp. (p. 15) cThe tape has reached the end. The picture is not displayed in bright places. (p. 28) cCancel the back ...
...picture is recording candlelight or electric light too high. Remove the cassette and leave your camcorder, the camcorder is automatically turned off . • [A.SHUT OFF] in the (OTHERS) menu is discharged. (p. 12) For TRV328/428/ TRV260/ cSet [STEADYSHOT] to moisture condensation. Adjust the focus manually. (p. ...clear. cDeactivate the NightShot plus function. (p. 28) Picture appears too bright on the screen, and the subject does not appear on the CAMERA lamp. (p. 15) cThe tape has reached the end. The picture is not displayed in bright places. (p. 28) cCancel the back ...
Camera Operations Guide
Page 97
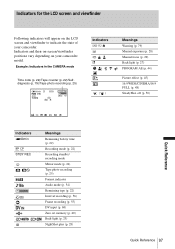
... screen and viewfinder Following indicators will appear on your camcorder. Example: Indicators in the CAMERA mode Time code (p. 22)/Tape counter (p. 22)/Selfdiagnosis (p. 79)/Tape photo recording (p. 25) 60min STBY 0:00:00 Indicators Q E Z 9 . () Meanings Warning (p. 79) Manual exposure (p. 28) Manual focus (p. 29) Back light (p. 27) PROGRAM AE (p. 44) Picture effect (p. 45) 16:9 WIDE/CINEMA...
... screen and viewfinder Following indicators will appear on your camcorder. Example: Indicators in the CAMERA mode Time code (p. 22)/Tape counter (p. 22)/Selfdiagnosis (p. 79)/Tape photo recording (p. 25) 60min STBY 0:00:00 Indicators Q E Z 9 . () Meanings Warning (p. 79) Manual exposure (p. 28) Manual focus (p. 29) Back light (p. 27) PROGRAM AE (p. 44) Picture effect (p. 45) 16:9 WIDE/CINEMA...
Camera Operations Guide
Page 98
...LCD B.L 53 LCD brightness (LCD BRIGHT).......... 16 LCD COLOR 53 LCD screen 3 LP (Long Play) See Recording mode (REC MODE) LTR SIZE 57 M Main sound See HiFi SOUND Menu 43 CAMERA SET 47 LCD SET 53 MANUAL SET........... 44 OTHERS 59 PLAYER SET 51 SETUP MENU 57 TAPE SET 54 VCR SET 51... (CLOCK SET) 17, 57 COMMANDER 60 D Data code (DATA CODE 37, 59 Date search 41 Date/time 37 DEMO MODE 58 Digital program editing (VIDEO EDIT 69 Digital zoom (D ZOOM) ...47 Digital8 system 82 Display DISPLAY 60 Display indicator .........97 DNR 52 Dual sound track tape ........51 Dubbing 61 E ...
...LCD B.L 53 LCD brightness (LCD BRIGHT).......... 16 LCD COLOR 53 LCD screen 3 LP (Long Play) See Recording mode (REC MODE) LTR SIZE 57 M Main sound See HiFi SOUND Menu 43 CAMERA SET 47 LCD SET 53 MANUAL SET........... 44 OTHERS 59 PLAYER SET 51 SETUP MENU 57 TAPE SET 54 VCR SET 51... (CLOCK SET) 17, 57 COMMANDER 60 D Data code (DATA CODE 37, 59 Date search 41 Date/time 37 DEMO MODE 58 Digital program editing (VIDEO EDIT 69 Digital zoom (D ZOOM) ...47 Digital8 system 82 Display DISPLAY 60 Display indicator .........97 DNR 52 Dual sound track tape ........51 Dubbing 61 E ...


