Camera Operations Guide
Page 1
3-087-918-12(1) Camera Operations Guide Read this first Video Camera Recorder/Digital Video Camera Recorder CCD-TRV128/TRV228/TRV328/TRV428 DCR-TRV260/TRV265 © 2004 Sony Corporation
3-087-918-12(1) Camera Operations Guide Read this first Video Camera Recorder/Digital Video Camera Recorder CCD-TRV128/TRV228/TRV328/TRV428 DCR-TRV260/TRV265 © 2004 Sony Corporation

Camera Operations Guide
Page 3
... by turning the equipment off and on the model DCR-TRV265. ,continued 3 Connect the equipment to an outlet on a circuit different from what you need an NTSC system-based TV. • Television programs, films, video tapes, and other device such as follows. Notes on use Note on the LCD panel, viewfinder, and lens • The LCD screen and the viewfinder are manufactured using a digital still camera, and...
... by turning the equipment off and on the model DCR-TRV265. ,continued 3 Connect the equipment to an outlet on a circuit different from what you need an NTSC system-based TV. • Television programs, films, video tapes, and other device such as follows. Notes on use Note on the LCD panel, viewfinder, and lens • The LCD screen and the viewfinder are manufactured using a digital still camera, and...
Camera Operations Guide
Page 5
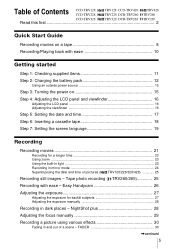
... light 23 Recording in mirror mode 24 Superimposing the date and time on pictures ( TRV128/228/328/428 25 Recording still images - NightShot plus 28 Adjusting the focus manually 29 Recording a picture using various effects 30 Fading in dark places - FADER 30 ,continued 5 Tape photo recording ( TRV260/265 25 Recording with ease 10 Getting started Step 1: Checking supplied items 11 Step 2: Charging the battery pack 12 Using an outside power source 15 Step 3: Turning...
... light 23 Recording in mirror mode 24 Superimposing the date and time on pictures ( TRV128/228/328/428 25 Recording still images - NightShot plus 28 Adjusting the focus manually 29 Recording a picture using various effects 30 Fading in dark places - FADER 30 ,continued 5 Tape photo recording ( TRV260/265 25 Recording with ease 10 Getting started Step 1: Checking supplied items 11 Step 2: Charging the battery pack 12 Using an outside power source 15 Step 3: Turning...
Camera Operations Guide
Page 7
... 85 Specification 88 Quick Reference Identifying parts and controls 91 Index 98 Dubbing/Editing Connecting to a VCR 61 Dubbing to another tape 63 Dubbing a tape easily - WORLD TIME/VIDEO EDIT, etc 59 Troubleshooting Troubleshooting 74 Warning indicators and messages .....79 Additional Information Using your computer cComputer Applications Guide 7 FRAME REC/INT.REC, etc. ......54 Using the (SETUP MENU) - LCD B.L./LCD COLOR, etc 53 Using the (TAPE SET) menu - Advanced operations Customizing Your Camcorder Changing the menu settings 43 Using the (MANUAL SET) menu -
... 85 Specification 88 Quick Reference Identifying parts and controls 91 Index 98 Dubbing/Editing Connecting to a VCR 61 Dubbing to another tape 63 Dubbing a tape easily - WORLD TIME/VIDEO EDIT, etc 59 Troubleshooting Troubleshooting 74 Warning indicators and messages .....79 Additional Information Using your computer cComputer Applications Guide 7 FRAME REC/INT.REC, etc. ......54 Using the (SETUP MENU) - LCD B.L./LCD COLOR, etc 53 Using the (TAPE SET) menu - Advanced operations Customizing Your Camcorder Changing the menu settings 43 Using the (MANUAL SET) menu -

Camera Operations Guide
Page 13
To remove the battery pack BATT (battery) release button POWER switch You can check the battery's current charge level and its current remaining recording time both during charging or when the power is turned off when the battery is fully charged. B Approximate possible recording time using the viewfinder. Battery Info DSPL/BATT INFO OPEN POWER switch BATTERY INFO BATTERY CHARGE LEVEL 0% 50% 100% REC TIME AVAILABLE LCD SCREEN: 81 min VIEWFINDER: 112 min A Battery charge level: Displays approximate remaining amount of the battery pack. See page 83 about...
To remove the battery pack BATT (battery) release button POWER switch You can check the battery's current charge level and its current remaining recording time both during charging or when the power is turned off when the battery is fully charged. B Approximate possible recording time using the viewfinder. Battery Info DSPL/BATT INFO OPEN POWER switch BATTERY INFO BATTERY CHARGE LEVEL 0% 50% 100% REC TIME AVAILABLE LCD SCREEN: 81 min VIEWFINDER: 112 min A Battery charge level: Displays approximate remaining amount of the battery pack. See page 83 about...
Camera Operations Guide
Page 22
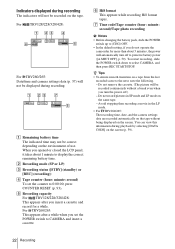
... you turn off .) - G Time code/Tape counter (hour: minute: second)/Tape photo recording b Notes • Before changing the battery pack, slide the POWER switch up to (CHG) OFF. • In the default setting, if you set the counter to select CAMERA, and then press REC START/STOP. To restart recording, slide the POWER switch down to 0:00:00, press COUNTER RESET (p. 93). Do not remove the cassette. (The picture will not be displayed during recording...
... you turn off .) - G Time code/Tape counter (hour: minute: second)/Tape photo recording b Notes • Before changing the battery pack, slide the POWER switch up to (CHG) OFF. • In the default setting, if you set the counter to select CAMERA, and then press REC START/STOP. To restart recording, slide the POWER switch down to 0:00:00, press COUNTER RESET (p. 93). Do not remove the cassette. (The picture will not be displayed during recording...
Camera Operations Guide
Page 23
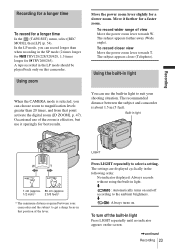
...-in light When the CAMERA mode is selected, you can choose zoom to the ambient brightness. To turn off according to magnification levels greater than when recording in light Press LIGHT repeatedly until no indicator appears on this camcorder. The subject appears farther away (Wide angle). The settings are displayed cyclically in light. Recording for a longer time To record for a slower zoom. The recommended distance between your shooting...
...-in light When the CAMERA mode is selected, you can choose zoom to the ambient brightness. To turn off according to magnification levels greater than when recording in light Press LIGHT repeatedly until no indicator appears on this camcorder. The subject appears farther away (Wide angle). The settings are displayed cyclically in light. Recording for a longer time To record for a slower zoom. The recommended distance between your shooting...
Camera Operations Guide
Page 40
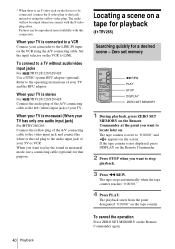
... displayed, press DISPLAY on a tape for playback ( TRV265) Searching quickly for that jack instead of using the A/V connecting cable. When your TV is monaural (When your TV has only one audio input jack) For TRV260/265: Connect the yellow plug of the A/V connecting cable to the video input jack and connect the white or the red plug to the audio input jack of your camcorder to the LINE IN input on the VCR using the yellow video plug...
... displayed, press DISPLAY on a tape for playback ( TRV265) Searching quickly for that jack instead of using the A/V connecting cable. When your TV is monaural (When your TV has only one audio input jack) For TRV260/265: Connect the yellow plug of the A/V connecting cable to the video input jack and connect the white or the red plug to the audio input jack of your camcorder to the LINE IN input on the VCR using the yellow video plug...

Camera Operations Guide
Page 51
... sound. GSTEREO 1 2 Select to play back a stereo tape with the left channel sound or a dual sound track tape with G. You can playback a dual sound track cassette on the power mode of your camcorder for no compensation. b Notes • You can select the items listed below in stereo mode. Customizing Your Camcorder Using the (PLAYER SET)/ (VCR SET) menu - The screen shows the items you dub or edit a tape using the camcorder as the playback device...
... sound. GSTEREO 1 2 Select to play back a stereo tape with the left channel sound or a dual sound track tape with G. You can playback a dual sound track cassette on the power mode of your camcorder for no compensation. b Notes • You can select the items listed below in stereo mode. Customizing Your Camcorder Using the (PLAYER SET)/ (VCR SET) menu - The screen shows the items you dub or edit a tape using the camcorder as the playback device...
Camera Operations Guide
Page 57
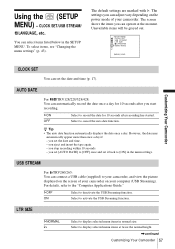
... to display selected menu items in the SETUP MENU. Using the (SETUP MENU) - The settings you start recording. The screen shows the items you eject and insert the tape again. - you set the date and time (p. 17). LTR SIZE GNORMAL 2× Select to cancel the auto date function. Unavailable items will be grayed out. you stop recording within 10 seconds. - you can adjust vary depending on the power mode of your camcorder on the screen of...
... to display selected menu items in the SETUP MENU. Using the (SETUP MENU) - The settings you start recording. The screen shows the items you eject and insert the tape again. - you set the date and time (p. 17). LTR SIZE GNORMAL 2× Select to cancel the auto date function. Unavailable items will be grayed out. you stop recording within 10 seconds. - you can adjust vary depending on the power mode of your camcorder on the screen of...
Camera Operations Guide
Page 59
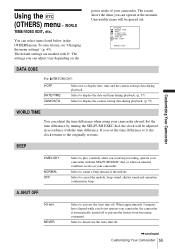
... start/stop recording, operate your camcorder with the SEL/PUSH EXEC dial, or when an unusual condition occurs on the power mode of the melody. To select items, see "Changing the menu settings" (p. 43). SHUT OFF COMMANDER DISPLAY REC LAMP [MENU] : END DATA CODE For TRV260/265: GOFF DATE/TIME CAM DATA Select not to activate the Auto shut off. Select to deactivate the Auto shut off to display the camera setting data during playback...
... start/stop recording, operate your camcorder with the SEL/PUSH EXEC dial, or when an unusual condition occurs on the power mode of the melody. To select items, see "Changing the menu settings" (p. 43). SHUT OFF COMMANDER DISPLAY REC LAMP [MENU] : END DATA CODE For TRV260/265: GOFF DATE/TIME CAM DATA Select not to activate the Auto shut off. Select to deactivate the Auto shut off to display the camera setting data during playback...
Camera Operations Guide
Page 77
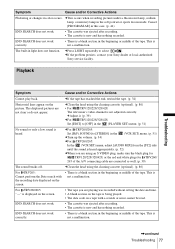
... played. • The data code on a tape with the recording date displayed on the picture. cIf the problem presists, contact your Sony dealer or local authorized Sony service facility. Playback Troubleshooting Symptom Cause and/or Corrective Actions Cannot play back. cAdjust it. (p. 39) cFor TRV128/228/328/428: Set [EDIT] to select . cClean the head using an S VIDEO plug, make sure the black plug for TRV128/228/328/428, or the red and white plugs...
... played. • The data code on a tape with the recording date displayed on the picture. cIf the problem presists, contact your Sony dealer or local authorized Sony service facility. Playback Troubleshooting Symptom Cause and/or Corrective Actions Cannot play back. cAdjust it. (p. 39) cFor TRV128/228/328/428: Set [EDIT] to select . cClean the head using an S VIDEO plug, make sure the black plug for TRV128/228/328/428, or the red and white plugs...
Camera Operations Guide
Page 78
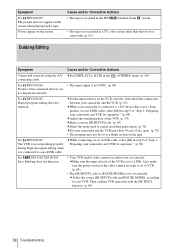
... power switch of "Step 1: Preparing your camcorder and VCR for operation." (p. 69) For TRV128/228/328/428: Easy Dubbing does not function. • Your VCR and/or video camera recorder is not set to your camcorder. (p. 81) Dubbing/Editing Symptom Cause and/or Corrective Actions Cannot dub correctly using the A/V cSet [DISPLAY] to VCR. (p. 64) • The [IR SETUP] code or [PAUSE MODE] is not set to [LCD] in the connecting cable. (OTHERS) menu...
... power switch of "Step 1: Preparing your camcorder and VCR for operation." (p. 69) For TRV128/228/328/428: Easy Dubbing does not function. • Your VCR and/or video camera recorder is not set to your camcorder. (p. 81) Dubbing/Editing Symptom Cause and/or Corrective Actions Cannot dub correctly using the A/V cSet [DISPLAY] to VCR. (p. 64) • The [IR SETUP] code or [PAUSE MODE] is not set to [LCD] in the connecting cable. (OTHERS) menu...
Camera Operations Guide
Page 87
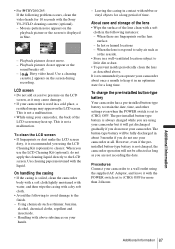
... the sound breaks off. - [ Dirty video head. LCD screen • Do not add excessive pressure on the LCD screen. When you do not apply the cleaning liquid directly to salty air such as it . When the lens is used in an optimum state for a long time. To charge the pre-installed button-type battery Your camcorder has a pre-installed button-type battery to retain the date, time, and other settings even when the POWER switch is always charged...
... the sound breaks off. - [ Dirty video head. LCD screen • Do not add excessive pressure on the LCD screen. When you do not apply the cleaning liquid directly to salty air such as it . When the lens is used in an optimum state for a long time. To charge the pre-installed button-type battery Your camcorder has a pre-installed button-type battery to retain the date, time, and other settings even when the POWER switch is always charged...
Camera Operations Guide
Page 88
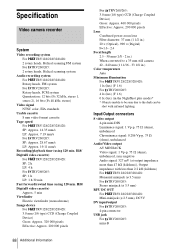
... 1, stereo 2), 16 bits (Fs 48 kHz, stereo) Video signal NTSC color, EIA standards Usable cassette 8 mm video format cassette Tape speed For TRV128/228/328/428: SP: Approx. 14.35 mm/s LP: Approx. 7.19 mm/s For TRV260/265: SP: Approx. 28.67 mm/s LP: Approx. 19.11 mm/s Recording/playback time (using 120 min. Input/Output connectors S video output 4-pin mini DIN Luminance signal: 1 Vp-p, 75 Ω (ohms...
... 1, stereo 2), 16 bits (Fs 48 kHz, stereo) Video signal NTSC color, EIA standards Usable cassette 8 mm video format cassette Tape speed For TRV128/228/328/428: SP: Approx. 14.35 mm/s LP: Approx. 7.19 mm/s For TRV260/265: SP: Approx. 28.67 mm/s LP: Approx. 19.11 mm/s Recording/playback time (using 120 min. Input/Output connectors S video output 4-pin mini DIN Luminance signal: 1 Vp-p, 75 Ω (ohms...
Camera Operations Guide
Page 97
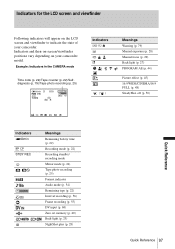
... your camcorder model. Indicators for the LCD screen and viewfinder Following indicators will appear on your camcorder. Example: Indicators in the CAMERA mode Time code (p. 22)/Tape counter (p. 22)/Selfdiagnosis (p. 79)/Tape photo recording (p. 25) 60min STBY 0:00:00 Indicators Q E Z 9 . () Meanings Warning (p. 79) Manual exposure (p. 28) Manual focus (p. 29) Back light (p. 27) PROGRAM AE (p. 44) Picture effect (p. 45) 16:9 WIDE/CINEMA/16:9 FULL (p. 48) SteadyShot off (p. 50) Quick Reference...
... your camcorder model. Indicators for the LCD screen and viewfinder Following indicators will appear on your camcorder. Example: Indicators in the CAMERA mode Time code (p. 22)/Tape counter (p. 22)/Selfdiagnosis (p. 79)/Tape photo recording (p. 25) 60min STBY 0:00:00 Indicators Q E Z 9 . () Meanings Warning (p. 79) Manual exposure (p. 28) Manual focus (p. 29) Back light (p. 27) PROGRAM AE (p. 44) Picture effect (p. 45) 16:9 WIDE/CINEMA/16:9 FULL (p. 48) SteadyShot off (p. 50) Quick Reference...
Camera Operations Guide
Page 98
... A A/V connecting cable 39, 61, 62 AC Adaptor 15 Adjusting the viewfinder... 16 AUDIO MIX 52 AUDIO MODE 54 AUTO DATE 57 AUTO SHTR 46 Auto shut off function (A.SHUT OFF 59 B BACK LIGHT 27 Battery Battery Info 13 Battery pack 12 Remaining battery time 22, 83 BEEP 59 BLACK FADER 30 Built-in light 23 BURN DVD/VCD 93 Button-type battery Commander 87 Remote Commander ... 95 C Camera settings data display 37 Cassette 18, 82 Charging the battery Battery Pack 12 Pre-installed button-type battery...
... A A/V connecting cable 39, 61, 62 AC Adaptor 15 Adjusting the viewfinder... 16 AUDIO MIX 52 AUDIO MODE 54 AUTO DATE 57 AUTO SHTR 46 Auto shut off function (A.SHUT OFF 59 B BACK LIGHT 27 Battery Battery Info 13 Battery pack 12 Remaining battery time 22, 83 BEEP 59 BLACK FADER 30 Built-in light 23 BURN DVD/VCD 93 Button-type battery Commander 87 Remote Commander ... 95 C Camera settings data display 37 Cassette 18, 82 Charging the battery Battery Pack 12 Pre-installed button-type battery...
Camera Operations Guide
Page 99
... 45 Picture search 35 Playing time 14 Power mode 15 PROGRAM AE 44 R Recording capacity Display 22 REMAIN 55 Recording lamp (REC LAMP 60 Recording mode (REC MODE)........22, 54 Recording time 13 Remote Commander ..........95 Remote sensor 92 RESET 93 S S video 40, 62 Self-diagnosis display ........79 Setting the date and time....17 Skip scan 35 SP (Standard Play) See Recording mode (REC MODE) STEADYSHOT 50 Stereo 21, 40 STRIPE FADER 31 Sub sound See HiFi SOUND T Tape counter 22 Tape photo recording...
... 45 Picture search 35 Playing time 14 Power mode 15 PROGRAM AE 44 R Recording capacity Display 22 REMAIN 55 Recording lamp (REC LAMP 60 Recording mode (REC MODE)........22, 54 Recording time 13 Remote Commander ..........95 Remote sensor 92 RESET 93 S S video 40, 62 Self-diagnosis display ........79 Setting the date and time....17 Skip scan 35 SP (Standard Play) See Recording mode (REC MODE) STEADYSHOT 50 Stereo 21, 40 STRIPE FADER 31 Sub sound See HiFi SOUND T Tape counter 22 Tape photo recording...
Marketing Specifications
Page 1
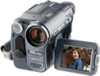
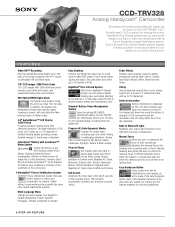
... modes. Manual Focus Allows the user to 10 feet away using either the subject or environment does not allow the cameras auto-focus to a life shortening "memory effect". Sony's exclusive InfoLithium® battery system displays the exact number of your home videos quickly and easily. Stamina® Battery Power Management System Using the optional NP-QM91D InfoLithium® battery the CCD-TRV328 can capture natural looking titles to your battery, so you capture the image...
... modes. Manual Focus Allows the user to 10 feet away using either the subject or environment does not allow the cameras auto-focus to a life shortening "memory effect". Sony's exclusive InfoLithium® battery system displays the exact number of your home videos quickly and easily. Stamina® Battery Power Management System Using the optional NP-QM91D InfoLithium® battery the CCD-TRV328 can capture natural looking titles to your battery, so you capture the image...
Marketing Specifications
Page 2
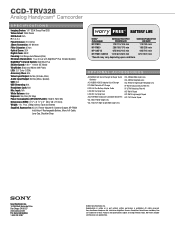
... Pixel CCD Video Actual: 200K Pixels Still Actual: N/A F: 1.6-2.4 Focal Distance: 2.5-50mm 35mm Conversion: 42-840mm Filter Diameter: 37mm Optical Zoom: 20X Digital Zoom: 990X Focusing: Full Range Auto/Manual (Dial) Minimum Illumination: 1 Lux (0 Lux with NightShot® Plus Infrared System) NightShot® Infrared System: NightShot Plus Shutter Speed: 1/60 - 1/4000 (AE Mode) Viewfinder: Black and White, 90K Pixels LCD: 2.5" Color (123K) Accessory Shoe: N/A Video Input/Output: No/Yes (S-Video, Mini) Audio Input/Output...
... Pixel CCD Video Actual: 200K Pixels Still Actual: N/A F: 1.6-2.4 Focal Distance: 2.5-50mm 35mm Conversion: 42-840mm Filter Diameter: 37mm Optical Zoom: 20X Digital Zoom: 990X Focusing: Full Range Auto/Manual (Dial) Minimum Illumination: 1 Lux (0 Lux with NightShot® Plus Infrared System) NightShot® Infrared System: NightShot Plus Shutter Speed: 1/60 - 1/4000 (AE Mode) Viewfinder: Black and White, 90K Pixels LCD: 2.5" Color (123K) Accessory Shoe: N/A Video Input/Output: No/Yes (S-Video, Mini) Audio Input/Output...


