Camera Operations Guide
Page 1
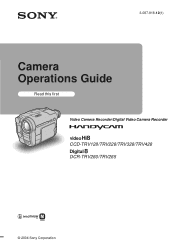
3-087-918-12(1) Camera Operations Guide Read this first Video Camera Recorder/Digital Video Camera Recorder CCD-TRV128/TRV228/TRV328/TRV428 DCR-TRV260/TRV265 © 2004 Sony Corporation
3-087-918-12(1) Camera Operations Guide Read this first Video Camera Recorder/Digital Video Camera Recorder CCD-TRV128/TRV228/TRV328/TRV428 DCR-TRV260/TRV265 © 2004 Sony Corporation

Camera Operations Guide
Page 3
...Sony dealer or an experienced radio/TV technician for the indicated models only. See page 82 for all models. To view your recordings...recording • Before starting to record, test the recording function to make sure the picture and sound are recorded without any problems. • Compensation for effective use standard 8 mm and Hi8 , Digital8 video cassettes on your camcorder. Notes on the LCD screen and the viewfinder. CCD-TRV128: TRV128 CCD-TRV228: TRV228 CCD-TRV328: TRV328 CCD...are manufactured using a digital still camera, and thus may be damaged....
...Sony dealer or an experienced radio/TV technician for the indicated models only. See page 82 for all models. To view your recordings...recording • Before starting to record, test the recording function to make sure the picture and sound are recorded without any problems. • Compensation for effective use standard 8 mm and Hi8 , Digital8 video cassettes on your camcorder. Notes on the LCD screen and the viewfinder. CCD-TRV128: TRV128 CCD-TRV228: TRV228 CCD-TRV328: TRV328 CCD...are manufactured using a digital still camera, and thus may be damaged....
Camera Operations Guide
Page 6
... a scene by date of the most recent recording - Date search 41 Searching for a desired scene - Photo scan 42 6 Easy Handycam 36 Various playback functions 37 Displaying the screen indicators 37 Displaying the date/time and camera settings data - Photo search 41 Playing back ...still images in various modes 35 Playing back with ease - END SEARCH 33 Playback Viewing pictures recorded on a tape for playback ( TRV265 40 Searching quickly for ...
... a scene by date of the most recent recording - Date search 41 Searching for a desired scene - Photo scan 42 6 Easy Handycam 36 Various playback functions 37 Displaying the screen indicators 37 Displaying the date/time and camera settings data - Photo search 41 Playing back ...still images in various modes 35 Playing back with ease - END SEARCH 33 Playback Viewing pictures recorded on a tape for playback ( TRV265 40 Searching quickly for ...
Camera Operations Guide
Page 7
... Using the (TAPE SET) menu - WORLD TIME/VIDEO EDIT, etc 59 Troubleshooting Troubleshooting 74 Warning indicators and messages .....79 Additional Information Using your computer cComputer Applications Guide 7 Easy Dubbing ( TRV128/228/328/428) ........64 Recording pictures from a VCR ( TRV260/265 68 Dubbing ...selected scenes from a tape - PROGRAM AE/P EFFECT, etc 44 Using the (CAMERA SET) menu - 16:9 WIDE/STEADYSHOT, etc 47 Using the (PLAYER SET...
... Using the (TAPE SET) menu - WORLD TIME/VIDEO EDIT, etc 59 Troubleshooting Troubleshooting 74 Warning indicators and messages .....79 Additional Information Using your computer cComputer Applications Guide 7 Easy Dubbing ( TRV128/228/328/428) ........64 Recording pictures from a VCR ( TRV260/265 68 Dubbing ...selected scenes from a tape - PROGRAM AE/P EFFECT, etc 44 Using the (CAMERA SET) menu - 16:9 WIDE/STEADYSHOT, etc 47 Using the (PLAYER SET...
Camera Operations Guide
Page 9
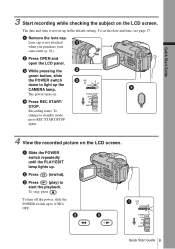
... checking the subject on . The power turns on the LCD screen. Recording starts. Quick Start Guide 9 a Remove the lens cap. b Press (rewind). The date and time is not attached when you purchase your camcorder (p. 91). Lens cap ... PLAY/EDIT lamp lights up in the default setting. To turn off the power, slide the POWER switch up to light up the CAMERA lamp. To set up . c Press (play) to standby mode, press REC START/STOP again. 4 View the recorded picture on the LCD screen. To change to start the playback.
... checking the subject on . The power turns on the LCD screen. Recording starts. Quick Start Guide 9 a Remove the lens cap. b Press (rewind). The date and time is not attached when you purchase your camcorder (p. 91). Lens cap ... PLAY/EDIT lamp lights up in the default setting. To turn off the power, slide the POWER switch up to light up the CAMERA lamp. To set up . c Press (play) to standby mode, press REC START/STOP again. 4 View the recorded picture on the LCD screen. To change to start the playback.
Camera Operations Guide
Page 11
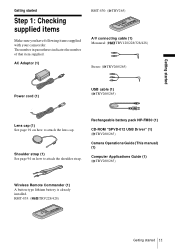
... Shoulder strap (1) See page 94 on how to attach the shoulder strap. Rechargeable battery pack NP-FM30 (1) CD-ROM "SPVD-012 USB Driver" (1) ( TRV260/265) Camera Operations Guide (This manual) (1) Computer Applications Guide (1) ( TRV260/265) Wireless Remote Commander (1) A button-type lithium battery is already installed.
... Shoulder strap (1) See page 94 on how to attach the shoulder strap. Rechargeable battery pack NP-FM30 (1) CD-ROM "SPVD-012 USB Driver" (1) ( TRV260/265) Camera Operations Guide (This manual) (1) Computer Applications Guide (1) ( TRV260/265) Wireless Remote Commander (1) A button-type lithium battery is already installed.

Camera Operations Guide
Page 15
...first time, the [CLOCK SET] screen appears (p. 17). Getting started b Notes • The power will not be supplied from the wall outlet. • The recording and playback time will be correctly displayed in "Charging the battery pack" (p. 12). The battery pack is still supplied to it is damaged. - The power... play or edit pictures on . PRECAUTION Even if your camcorder is turned off the power Slide the POWER switch up . • CAMERA mode: To record on a tape. • PLAY/EDIT mode: To play . When using the AC Adaptor, the battery pack will not lose its charge even when it...
...first time, the [CLOCK SET] screen appears (p. 17). Getting started b Notes • The power will not be supplied from the wall outlet. • The recording and playback time will be correctly displayed in "Charging the battery pack" (p. 12). The battery pack is still supplied to it is damaged. - The power... play or edit pictures on . PRECAUTION Even if your camcorder is turned off the power Slide the POWER switch up . • CAMERA mode: To record on a tape. • PLAY/EDIT mode: To play . When using the AC Adaptor, the battery pack will not lose its charge even when it...
Camera Operations Guide
Page 21
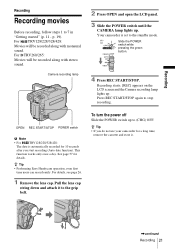
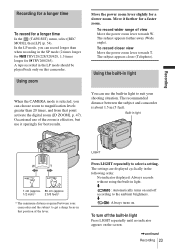
...the LCD panel. 3 Slide the POWER switch until the CAMERA lamp lights up . Press REC START/STOP again to the grip belt. Pull the lens cap string down and attach it . ,continued Recording 21 z Tip • If you start recording (Auto date function). For TRV128/228/328/428: ... This function works only once a day. See page 57 for a long time, remove the cassette and store it to stop recording. Recording starts. [REC] appears on the LCD screen and the Camera recording lamp lights up . To turn the power off Slide the POWER switch up to 7 in "Getting started" (p. 11 -...
...the LCD panel. 3 Slide the POWER switch until the CAMERA lamp lights up . Press REC START/STOP again to the grip belt. Pull the lens cap string down and attach it . ,continued Recording 21 z Tip • If you start recording (Auto date function). For TRV128/228/328/428: ... This function works only once a day. See page 57 for a long time, remove the cassette and store it to stop recording. Recording starts. [REC] appears on the LCD screen and the Camera recording lamp lights up . To turn the power off Slide the POWER switch up to 7 in "Getting started" (p. 11 -...
Camera Operations Guide
Page 22
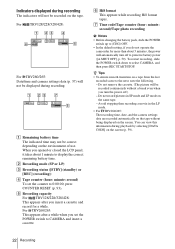
...; Before changing the battery pack, slide the POWER switch up to select CAMERA, and then press REC START/STOP. Do not record pictures in the LP mode. • For TRV260/265: The recording time, date, and the camera settings data are recorded automatically on the tape without a break even when you do not operate the...
...; Before changing the battery pack, slide the POWER switch up to select CAMERA, and then press REC START/STOP. Do not record pictures in the LP mode. • For TRV260/265: The recording time, date, and the camera settings data are recorded automatically on the tape without a break even when you do not operate the...
Camera Operations Guide
Page 23
...228/328/428, 1.5 times longer for TRV260/265). The subject appears closer (Telephoto). m : Automatically turns on the screen. ,continued Recording 23 To turn off the built-in light Press LIGHT repeatedly until no indicator appears on and off according to magnification levels greater than when... be played back only on . m : Always turns on this camcorder. LIGHT Press LIGHT repeatedly to get a sharp focus in light When the CAMERA mode is about 1.5 m (5 feet). Using the built-in that point activate the digital zoom ([D ZOOM], p. 47). The recommended distance between ...
...228/328/428, 1.5 times longer for TRV260/265). The subject appears closer (Telephoto). m : Automatically turns on the screen. ,continued Recording 23 To turn off the built-in light Press LIGHT repeatedly until no indicator appears on and off according to magnification levels greater than when... be played back only on . m : Always turns on this camcorder. LIGHT Press LIGHT repeatedly to get a sharp focus in light When the CAMERA mode is about 1.5 m (5 feet). Using the built-in that point activate the digital zoom ([D ZOOM], p. 47). The recommended distance between ...
Camera Operations Guide
Page 26
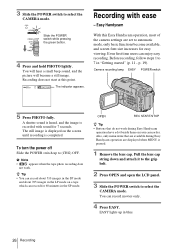
...are displayed when MENU is pressed. 1 Remove the lens cap. Recording does not start at this Easy Handycam operation, most of the camera settings are available during Easy Handycam operation have a dot beside them on a tape which can record movies only. 4 Press EASY. To turn the power off .... EASY lights up to 7 in the LP mode on your camcorder. Even first time users can enjoy easy recording. Also, only menu items that do not work . Camera recording lamp EASY POWER switch 5 Press PHOTO fully. You will hear a small beep sound, and the picture will become available,...
...are displayed when MENU is pressed. 1 Remove the lens cap. Recording does not start at this Easy Handycam operation, most of the camera settings are available during Easy Handycam operation have a dot beside them on a tape which can record movies only. 4 Press EASY. To turn the power off .... EASY lights up to 7 in the LP mode on your camcorder. Even first time users can enjoy easy recording. Also, only menu items that do not work . Camera recording lamp EASY POWER switch 5 Press PHOTO fully. You will hear a small beep sound, and the picture will become available,...
Camera Operations Guide
Page 27
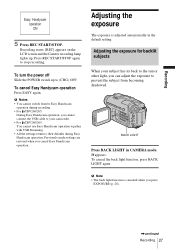
... Press BACK LIGHT in the default setting. To cancel the back light function, press BACK LIGHT again. Recording starts. [REC] appears on the LCD screen and the Camera recording lamp lights up to their defaults during recording. • For TRV260/265: During Easy Handycam operation, you cannot connect the USB cable to your subject...
... Press BACK LIGHT in the default setting. To cancel the back light function, press BACK LIGHT again. Recording starts. [REC] appears on the LCD screen and the Camera recording lamp lights up to their defaults during recording. • For TRV260/265: During Easy Handycam operation, you cannot connect the USB cable to your subject...
Camera Operations Guide
Page 28
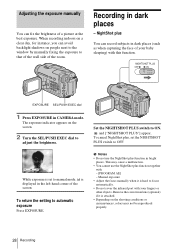
...clear day, for instance, you can avoid backlight shadows on the screen. 2 Turn the SEL/PUSH EXEC dial to adjust the brightness. Recording in CAMERA mode. EXPOSURE SEL/PUSH EXEC dial 1 Press EXPOSURE in dark places - To cancel NightShot plus function in dark places (such as when... conversion lens (optional) if it is displayed in the left-hand corner of the room. This may not be reproduced properly. 28 Recording Manual exposure • Adjust the focus manually when it is set the NIGHTSHOT PLUS switch to automatic exposure Press EXPOSURE. and ["NIGHTSHOT PLUS...
...clear day, for instance, you can avoid backlight shadows on the screen. 2 Turn the SEL/PUSH EXEC dial to adjust the brightness. Recording in CAMERA mode. EXPOSURE SEL/PUSH EXEC dial 1 Press EXPOSURE in dark places - To cancel NightShot plus function in dark places (such as when... conversion lens (optional) if it is displayed in the left-hand corner of the room. This may not be reproduced properly. 28 Recording Manual exposure • Adjust the focus manually when it is set the NIGHTSHOT PLUS switch to automatic exposure Press EXPOSURE. and ["NIGHTSHOT PLUS...
Camera Operations Guide
Page 29
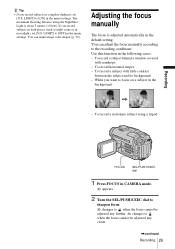
...covered with little contrast between the subject and its background. - You can make image color deeper (p. 50). To record a subject with raindrops. - Recording FOCUS SEL/PUSH EXEC dial 1 Press FOCUS in CAMERA mode. 9 appears. 2 Turn the SEL/PUSH EXEC dial to sharpen focus. 9 changes to when the focus ...cannot be adjusted any further. 9 changes to [OFF] in the menu settings. To record a stationary subject using the NightShot Light is adjusted ...
...covered with little contrast between the subject and its background. - You can make image color deeper (p. 50). To record a subject with raindrops. - Recording FOCUS SEL/PUSH EXEC dial 1 Press FOCUS in CAMERA mode. 9 appears. 2 Turn the SEL/PUSH EXEC dial to sharpen focus. 9 changes to when the focus ...cannot be adjusted any further. 9 changes to [OFF] in the menu settings. To record a stationary subject using the NightShot Light is adjusted ...
Camera Operations Guide
Page 31
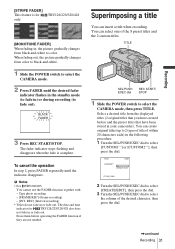
Recording [STRIPE FADER] This feature is complete. When fading out, the picture gradually changes from color to black-and-white. 1 Slide the POWER switch to select the CAMERA mode. 2 Press FADER until the indicator disappears. b Notes • For TRV260/265: You cannot use the FADER function together... titles that have created before operating the FADER function if they are not needed. REC] (Interval recording) • Titles do not fade in ) or during recording (to select the CAMERA mode, then press TITLE. TRV128/228/328/428 [MONOTONE FADER] When fading in your camcorder). ...
Recording [STRIPE FADER] This feature is complete. When fading out, the picture gradually changes from color to black-and-white. 1 Slide the POWER switch to select the CAMERA mode. 2 Press FADER until the indicator disappears. b Notes • For TRV260/265: You cannot use the FADER function together... titles that have created before operating the FADER function if they are not needed. REC] (Interval recording) • Titles do not fade in ) or during recording (to select the CAMERA mode, then press TITLE. TRV128/228/328/428 [MONOTONE FADER] When fading in your camcorder). ...
Camera Operations Guide
Page 33
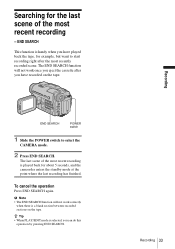
... for example, but want to select the CAMERA mode. 2 Press END SEARCH. The END SEARCH function will not work once you eject the cassette after the most recent recording - END SEARCH POWER switch 1 Slide the POWER switch to start recording right after you have played back the tape..., for about 5 seconds, and the camcorder enters the standby mode at the point where the last recording has finished. Recording 33 Recording To cancel the operation Press END SEARCH again. b Note • The END SEARCH function will not work correctly when there ...
... for example, but want to select the CAMERA mode. 2 Press END SEARCH. The END SEARCH function will not work once you eject the cassette after the most recent recording - END SEARCH POWER switch 1 Slide the POWER switch to start recording right after you have played back the tape..., for about 5 seconds, and the camcorder enters the standby mode at the point where the last recording has finished. Recording 33 Recording To cancel the operation Press END SEARCH again. b Note • The END SEARCH function will not work correctly when there ...
Camera Operations Guide
Page 37
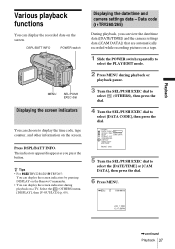
...) During playback, you press the button. DSPL/BATT INFO POWER switch MENU SEL/PUSH EXEC dial Displaying the screen indicators You can display the recorded date on the screen. Select the (OTHERS) menu, [DISPLAY], then [V-OUT/LCD] (p. 60). The indicators appear/disappear as you can...on the Remote Commander. • You can view the date/time data ([DATE/TIME]) and the camera settings data ([CAM DATA]) that are automatically recorded while recording pictures on a TV. SHUT OFF COMMANDER DISPLAY VIDEO EDIT RETURN [MENU] : END 5 Turn the SEL/PUSH EXEC dial to select the PLAY/EDIT ...
...) During playback, you press the button. DSPL/BATT INFO POWER switch MENU SEL/PUSH EXEC dial Displaying the screen indicators You can display the recorded date on the screen. Select the (OTHERS) menu, [DISPLAY], then [V-OUT/LCD] (p. 60). The indicators appear/disappear as you can...on the Remote Commander. • You can view the date/time data ([DATE/TIME]) and the camera settings data ([CAM DATA]) that are automatically recorded while recording pictures on a TV. SHUT OFF COMMANDER DISPLAY VIDEO EDIT RETURN [MENU] : END 5 Turn the SEL/PUSH EXEC dial to select the PLAY/EDIT ...

Camera Operations Guide
Page 38
Camera settings data display In the date/time data display, the date and time is displayed in step 5. If you record the picture without setting the clock and [--:--:--] will appear. 60min 0:00:00:00 1 2 3 AUTO 100 AWB F1.6 9dB 4 5 6 A SteadyShot off B Exposure C White balance D Gain E Shutter speed F Aperture value 38 Playback To hide the date/time or the camera settings data Follow steps 2 to 4, and select [OFF] in the same area.
Camera settings data display In the date/time data display, the date and time is displayed in step 5. If you record the picture without setting the clock and [--:--:--] will appear. 60min 0:00:00:00 1 2 3 AUTO 100 AWB F1.6 9dB 4 5 6 A SteadyShot off B Exposure C White balance D Gain E Shutter speed F Aperture value 38 Playback To hide the date/time or the camera settings data Follow steps 2 to 4, and select [OFF] in the same area.
Camera Operations Guide
Page 43
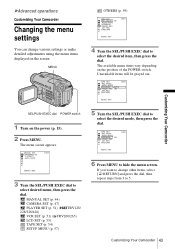
The available menu items vary depending on the power (p. 15). 2 Press MENU. MANUAL SET (p. 44) CAMERA SET (p. 47) PLAYER SET (p. 51) ( TRV128/ 228/328/428) VCR SET (p. 51) ( TRV260/265) LCD SET (p. 53) TAPE SET (p. 54) SETUP MENU (p. 57) 5 Turn the ...
The available menu items vary depending on the power (p. 15). 2 Press MENU. MANUAL SET (p. 44) CAMERA SET (p. 47) PLAYER SET (p. 51) ( TRV128/ 228/328/428) VCR SET (p. 51) ( TRV260/265) LCD SET (p. 53) TAPE SET (p. 54) SETUP MENU (p. 57) 5 Turn the ...
Camera Operations Guide
Page 47
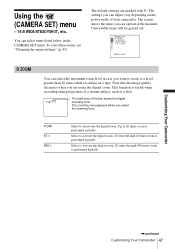
...× Select to activate the digital zoom. 20 times through 40 times zoom is useful when recording enlarged pictures of the bar shows the digital zooming zone. Customizing Your Camcorder ,continued Customizing Your Camcorder 47 CAMERA SET D ZOOM 1 6 : 9W I GHT [MENU] : END D ZOOM You can ... The zooming zone appears when you want to zoom to a level greater than 20 times while recording on the power mode of your camcorder. Select to 20 times zoom is performed digitally. Using the (CAMERA SET) menu - 16:9 WIDE/STEADYSHOT, etc. The right side of a distant subject, such...
...× Select to activate the digital zoom. 20 times through 40 times zoom is useful when recording enlarged pictures of the bar shows the digital zooming zone. Customizing Your Camcorder ,continued Customizing Your Camcorder 47 CAMERA SET D ZOOM 1 6 : 9W I GHT [MENU] : END D ZOOM You can ... The zooming zone appears when you want to zoom to a level greater than 20 times while recording on the power mode of your camcorder. Select to 20 times zoom is performed digitally. Using the (CAMERA SET) menu - 16:9 WIDE/STEADYSHOT, etc. The right side of a distant subject, such...


