
Operating Instructions
Page 4
...CCD-TRV118 : CCD-TRV318 : CCD-TRV418 : DCR-TRV150 : DCR-TRV250 : DCR-TRV350 : DCR-TRV351 : Instructions with icons are for all models. Main Features On the model name indication In this manual, check the model name of your computer - Instructions with no icons are for the indicated models only. USB... 163) •Viewing moving pictures (p. 166) Main Features •Viewing pictures recorded on a tape or live from your camcorder using the USB cable (p. 197) •Viewing images recorded on your camcorder. Before you start reading this manual, camcorder-shape icons are ...
...CCD-TRV118 : CCD-TRV318 : CCD-TRV418 : DCR-TRV150 : DCR-TRV250 : DCR-TRV350 : DCR-TRV351 : Instructions with icons are for all models. Main Features On the model name indication In this manual, check the model name of your computer - Instructions with no icons are for the indicated models only. USB... 163) •Viewing moving pictures (p. 166) Main Features •Viewing pictures recorded on a tape or live from your camcorder using the USB cable (p. 197) •Viewing images recorded on your camcorder. Before you start reading this manual, camcorder-shape icons are ...
Operating Instructions
Page 7
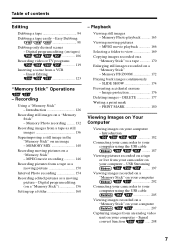
... a tape as a moving pictures - Memory Photo recording ......... 132 Recording images from an analog video unit on a "Memory Stick" - Digital program editing (on an image - MPEG movie playback 166 Selecting a folder to view 169 Copying images recorded on a "Memory Stick" to your computer using the USB cable 205 Viewing images recorded on a "Memory Stick" on your computer - Easy...
... a tape as a moving pictures - Memory Photo recording ......... 132 Recording images from an analog video unit on a "Memory Stick" - Digital program editing (on an image - MPEG movie playback 166 Selecting a folder to view 169 Copying images recorded on a "Memory Stick" to your computer using the USB cable 205 Viewing images recorded on a "Memory Stick" on your computer - Easy...
Operating Instructions
Page 9
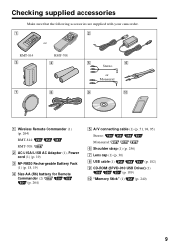
...-708: 2 AC-L15A/L15B AC Adaptor (1), Power cord (1) (p. 19) 3 NP-FM30 Rechargeable Battery Pack (1) (p. 18, 19) 4 Size AA (R6) battery for Remote Commander (2) (p. 264) 5 A/V connecting cable (1) (p. 51, 94, 95) Stereo: Monaural: 6 Shoulder strap (1) (p. 256) 7 Lens cap (1) (p. 30) 8 USB cable (1) (p. 182) 9 CD-ROM (SPVD-010 USB Driver) (1) (p. 189) 0 "Memory Stick" (1) (p. 240) 9
...-708: 2 AC-L15A/L15B AC Adaptor (1), Power cord (1) (p. 19) 3 NP-FM30 Rechargeable Battery Pack (1) (p. 18, 19) 4 Size AA (R6) battery for Remote Commander (2) (p. 264) 5 A/V connecting cable (1) (p. 51, 94, 95) Stereo: Monaural: 6 Shoulder strap (1) (p. 256) 7 Lens cap (1) (p. 30) 8 USB cable (1) (p. 182) 9 CD-ROM (SPVD-010 USB Driver) (1) (p. 189) 0 "Memory Stick" (1) (p. 240) 9
Operating Instructions
Page 16
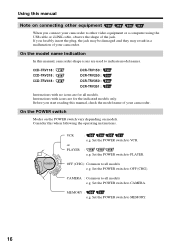
CCD-TRV118 : CCD-TRV318 : CCD-TRV418 : DCR-TRV150 : DCR-TRV250 : DCR-TRV350 : DCR-TRV351 : Instructions with icons are for all models. Consider this when following the operating instructions. MEMORY : e.g. OFF (CHG) : Common to all models e.g. CAMERA : Common to all models e.g. On the ...CAMERA. Set the POWER switch to VCR. : e.g. V POWER EREAMORY CAM M OFCFR(CHG) VCR or PLAYER : e.g. Using this manual Note on models. On the POWER switch Modes on the POWER switch vary depending on connecting other video equipment or a computer using the USB cable or i.LINK cable...
CCD-TRV118 : CCD-TRV318 : CCD-TRV418 : DCR-TRV150 : DCR-TRV250 : DCR-TRV350 : DCR-TRV351 : Instructions with icons are for all models. Consider this when following the operating instructions. MEMORY : e.g. OFF (CHG) : Common to all models e.g. CAMERA : Common to all models e.g. On the ...CAMERA. Set the POWER switch to VCR. : e.g. V POWER EREAMORY CAM M OFCFR(CHG) VCR or PLAYER : e.g. Using this manual Note on models. On the POWER switch Modes on the POWER switch vary depending on connecting other video equipment or a computer using the USB cable or i.LINK cable...

Operating Instructions
Page 126
...OS or Macintosh OS is not guaranteed to be able to play back following images with your camcorder. You can record and play back, record or delete images. You can have additional information such as your camcorder. Files in some areas.) •If you... and Information Technology Industries Association (JEITA). image data modified on a "Memory Stick." You cannot play back the images recorded using the USB cable for Camera File System universal standard established by the JEITA (Japan Electronics and Information Technology Industries Association). See page 240 for still ...
...OS or Macintosh OS is not guaranteed to be able to play back following images with your camcorder. You can record and play back, record or delete images. You can have additional information such as your camcorder. Files in some areas.) •If you... and Information Technology Industries Association (JEITA). image data modified on a "Memory Stick." You cannot play back the images recorded using the USB cable for Camera File System universal standard established by the JEITA (Japan Electronics and Information Technology Industries Association). See page 240 for still ...
Operating Instructions
Page 182
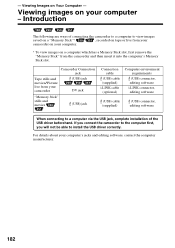
...(USB) jack DV jack "Memory Stick" stills and movies (USB) jack Connection cable (USB) cable (supplied) i.LINK cable (optional) Computer environment requirements (USB) connector, editing software i.LINK connector, editing software (USB) cable (supplied) (USB) connector, editing software When connecting to a computer via the USB ...USB driver correctly. Viewing Images on tape or live from the camcorder and then insert it into the computer's Memory Stick slot. If you connect the camcorder to the computer first, you will not be able to view images saved on a "Memory Stick"* , recorded...
...(USB) jack DV jack "Memory Stick" stills and movies (USB) jack Connection cable (USB) cable (supplied) i.LINK cable (optional) Computer environment requirements (USB) connector, editing software i.LINK connector, editing software (USB) cable (supplied) (USB) connector, editing software When connecting to a computer via the USB ...USB driver correctly. Viewing Images on tape or live from the camcorder and then insert it into the computer's Memory Stick slot. If you connect the camcorder to the computer first, you will not be able to view images saved on a "Memory Stick"* , recorded...
Operating Instructions
Page 183
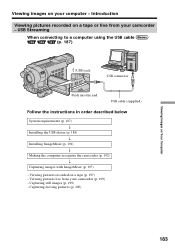
Introduction Viewing pictures recorded on your computer - Viewing pictures live from your camcorder (p. 199) - USB Streaming When connecting to a computer using the USB cable (p. 187) (USB) jack USB connector Push into the end USB cable (supplied) Follow the instructions in order described below System requirements (p. 187) r Installing the USB driver (p. 189) r Installing ImageMixer (p. 191) r Making the computer recognize the camcorder...
Introduction Viewing pictures recorded on your computer - Viewing pictures live from your camcorder (p. 199) - USB Streaming When connecting to a computer using the USB cable (p. 187) (USB) jack USB connector Push into the end USB cable (supplied) Follow the instructions in order described below System requirements (p. 187) r Installing the USB driver (p. 189) r Installing ImageMixer (p. 191) r Making the computer recognize the camcorder...
Operating Instructions
Page 185
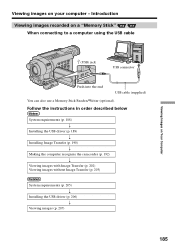
... (p. 203) System requirements (p. 205) r Installing the USB driver (p. 206) r Viewing images (p. 207) 185 Viewing Images on Your Computer Viewing images on a "Memory Stick" When connecting to a computer using the USB cable (USB) jack USB connector Push into the end USB cable (supplied) You can also use a Memory Stick Reader/Writer (optional). Introduction Viewing images recorded on your computer -
... (p. 203) System requirements (p. 205) r Installing the USB driver (p. 206) r Viewing images (p. 207) 185 Viewing Images on Your Computer Viewing images on a "Memory Stick" When connecting to a computer using the USB cable (USB) jack USB connector Push into the end USB cable (supplied) You can also use a Memory Stick Reader/Writer (optional). Introduction Viewing images recorded on your computer -
Operating Instructions
Page 186
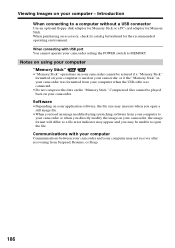
... You cannot operate your camcorder or when you may not recover after recovering from your computer when the USB cable was connected. •Do not compress the data on your camcorder. Introduction When connecting to MEMORY. Viewing images on the "Memory Stick." When connecting with ...
... You cannot operate your camcorder or when you may not recover after recovering from your computer when the USB cable was connected. •Do not compress the data on your camcorder. Introduction When connecting to MEMORY. Viewing images on the "Memory Stick." When connecting with ...
Operating Instructions
Page 187
...When connecting to your computer using the USB cable You must be provided as standard. System requirements To view pictures recorded on Your Computer Connecting your camcorder to a computer using the USB cable Complete installation of the image files edited) Display: 4 MB VRAM video card, Minimum 800 × 600 dot..., this function in the Macintosh environment. 187 You cannot use this product will not be found on the size of the USB driver before connecting the camcorder to install DirectX. Standard installation is necessary to the computer. You cannot hear sound if your ...
...When connecting to your computer using the USB cable You must be provided as standard. System requirements To view pictures recorded on Your Computer Connecting your camcorder to a computer using the USB cable Complete installation of the image files edited) Display: 4 MB VRAM video card, Minimum 800 × 600 dot..., this function in the Macintosh environment. 187 You cannot use this product will not be found on the size of the USB driver before connecting the camcorder to install DirectX. Standard installation is necessary to the computer. You cannot hear sound if your ...

Operating Instructions
Page 188
..., operation is not assured if the above . 188 Windows Media Player must be installed (to a single computer at the same time, or when using the USB cable System requirements To view images recorded on the type of USB equipment that is not displayed.) Others: The USB connector must be provided as standard.
..., operation is not assured if the above . 188 Windows Media Player must be installed (to a single computer at the same time, or when using the USB cable System requirements To view images recorded on the type of USB equipment that is not displayed.) Others: The USB connector must be provided as standard.

Operating Instructions
Page 189
...Windows to load. (2) Insert the supplied CD-ROM in the CD-ROM drive of administrators. If you connect the USB cable before USB driver installation is complete, the USB driver will not be properly registered. If the screen does not appear, double-click "My Computer" and then "...Remove the CD-ROM and then restart the computer, following the instructions on the screen. The application software starts up. Connect the USB cable according to "USB Driver" and click. Click The title screen appears. (4) Move the cursor to "Making the computer recognize the camcorder." Viewing ...
...Windows to load. (2) Insert the supplied CD-ROM in the CD-ROM drive of administrators. If you connect the USB cable before USB driver installation is complete, the USB driver will not be properly registered. If the screen does not appear, double-click "My Computer" and then "...Remove the CD-ROM and then restart the computer, following the instructions on the screen. The application software starts up. Connect the USB cable according to "USB Driver" and click. Click The title screen appears. (4) Move the cursor to "Making the computer recognize the camcorder." Viewing ...
Operating Instructions
Page 190
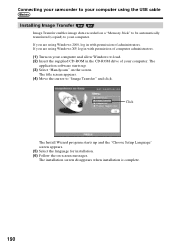
..." on the screen. If you are using Windows XP, log in the CD-ROM drive of administrators. Connecting your camcorder to your computer using the USB cable Installing Image Transfer Image Transfer enables image data recorded on a "Memory Stick" to be automatically transferred (copied) to your computer.
..." on the screen. If you are using Windows XP, log in the CD-ROM drive of administrators. Connecting your camcorder to your computer using the USB cable Installing Image Transfer Image Transfer enables image data recorded on a "Memory Stick" to be automatically transferred (copied) to your computer.
Operating Instructions
Page 191
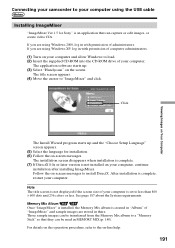
...continue installation after installing ImageMixer. The application software starts up and the "Choose Setup Language" screen appears. (5) Select the language for Sony" is set to load. (2) Insert the supplied CD-ROM into the CD-ROM drive of computer administrators. (1) Turn on your...video CDs. See page 187 about the System requirements. Click The Install Wizard program starts up . (3) Select "Handycam" on -screen messages. Memory Mix Album Once "ImageMixer" is installed, the Memory Mix album is not displayed if the screen size of "ImageMixer" and sample images are using the USB cable...
...continue installation after installing ImageMixer. The application software starts up and the "Choose Setup Language" screen appears. (5) Select the language for Sony" is set to load. (2) Insert the supplied CD-ROM into the CD-ROM drive of computer administrators. (1) Turn on your...video CDs. See page 187 about the System requirements. Click The Install Wizard program starts up . (3) Select "Handycam" on -screen messages. Memory Mix Album Once "ImageMixer" is installed, the Memory Mix album is not displayed if the screen size of "ImageMixer" and sample images are using the USB cable...
Operating Instructions
Page 192
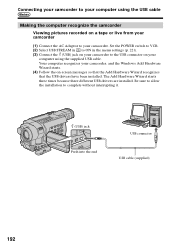
... (1) Connect the AC Adaptor to your camcorder. Connecting your camcorder to your computer using the supplied USB cable. Be sure to allow the installation to the USB connector on your computer using the USB cable Making the computer recognize the camcorder Viewing pictures recorded on -screen messages so that the Add Hardware Wizard recognizes that the...
... (1) Connect the AC Adaptor to your camcorder. Connecting your camcorder to your computer using the supplied USB cable. Be sure to allow the installation to the USB connector on your computer using the USB cable Making the computer recognize the camcorder Viewing pictures recorded on -screen messages so that the Add Hardware Wizard recognizes that the...
Operating Instructions
Page 193
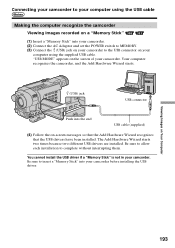
... so that the Add Hardware Wizard recognizes that the USB drivers have been installed. "USB MODE" appears on Your Computer 193 Be sure to allow each installation to the USB connector on your computer using the USB cable Making the computer recognize the camcorder Viewing images recorded on a "Memory Stick" (1) Insert a "Memory Stick" into your camcorder...
... so that the Add Hardware Wizard recognizes that the USB drivers have been installed. "USB MODE" appears on Your Computer 193 Be sure to allow each installation to the USB connector on your computer using the USB cable Making the computer recognize the camcorder Viewing images recorded on a "Memory Stick" (1) Insert a "Memory Stick" into your camcorder...
Operating Instructions
Page 194
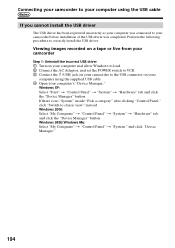
... camcorder to your computer using the supplied USB cable. 4 Open your camcorder before installation of the USB driver was connected to your computer's "Device Manager." Perform the following procedure to classic view" instead. Viewing images recorded on a tape or live from your camcorder Step 1: Uninstall the incorrect USB driver 1 Turn on your computer and allow...
... camcorder to your computer using the supplied USB cable. 4 Open your camcorder before installation of the USB driver was connected to your computer's "Device Manager." Perform the following procedure to classic view" instead. Viewing images recorded on a tape or live from your camcorder Step 1: Uninstall the incorrect USB driver 1 Turn on your computer and allow...
Operating Instructions
Page 195
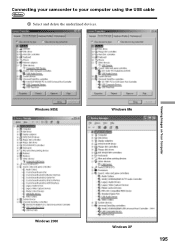
Connecting your camcorder to your computer using the USB cable 5 Select and delete the underlined devices. Windows 98SE Windows Me Viewing Images on Your Computer Windows 2000 Windows XP 195
Connecting your camcorder to your computer using the USB cable 5 Select and delete the underlined devices. Windows 98SE Windows Me Viewing Images on Your Computer Windows 2000 Windows XP 195
Operating Instructions
Page 196
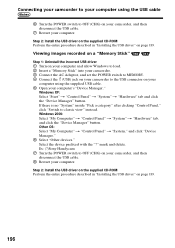
...clicking "Control Panel," click "Switch to OFF (CHG) on your camcorder, and then disconnect the USB cable. 8 Restart your computer. Viewing images recorded on a "Memory Stick" Step 1: Uninstall the incorrect USB driver 1 Turn on your computer and allow Windows to load. 2 Insert a "Memory Stick" into...," and click "Device Manager." 6 Select "Other devices." Step 2: Install the USB driver on the supplied CD-ROM Perform the entire procedure described in "Installing the USB driver" on page 189. Ex: (?)Sony Handycam 7 Turn the POWER switch to classic view" instead. Select the device prefixed...
...clicking "Control Panel," click "Switch to OFF (CHG) on your camcorder, and then disconnect the USB cable. 8 Restart your computer. Viewing images recorded on a "Memory Stick" Step 1: Uninstall the incorrect USB driver 1 Turn on your computer and allow Windows to load. 2 Insert a "Memory Stick" into...," and click "Device Manager." 6 Select "Other devices." Step 2: Install the USB driver on the supplied CD-ROM Perform the entire procedure described in "Installing the USB driver" on page 189. Ex: (?)Sony Handycam 7 Turn the POWER switch to classic view" instead. Select the device prefixed...

Operating Instructions
Page 198
Viewing pictures recorded on a tape or live from your camcorder on your computer - Monitor window (7) Connect the USB connector on your computer to the (USB) jack on your camcorder using the supplied USB cable. (USB) jack Push into the end USB connector USB cable (supplied) 198 USB Streaming (6) Select .
Viewing pictures recorded on a tape or live from your camcorder on your computer - Monitor window (7) Connect the USB connector on your computer to the (USB) jack on your camcorder using the supplied USB cable. (USB) jack Push into the end USB connector USB cable (supplied) 198 USB Streaming (6) Select .


