
Operating Instructions
Page 1
Model No. AC- Serial No. CCD-TRV Model No. Owner's Record The model and serial numbers are located on the bottom. Record the serial number in the space provided below. CCD-TRV608 CCD-TRV107/TRV108/TRV308/ TRV408/TRV608 ©2002 Sony Corporation 3-072-314-13 (1) Video Camera Recorder Operating Instructions Before operating the unit, please read this product. Refer to these numbers whenever you call upon your Sony dealer regarding this manual thoroughly, and retain it for future reference. Serial No.
Model No. AC- Serial No. CCD-TRV Model No. Owner's Record The model and serial numbers are located on the bottom. Record the serial number in the space provided below. CCD-TRV608 CCD-TRV107/TRV108/TRV308/ TRV408/TRV608 ©2002 Sony Corporation 3-072-314-13 (1) Video Camera Recorder Operating Instructions Before operating the unit, please read this product. Refer to these numbers whenever you call upon your Sony dealer regarding this manual thoroughly, and retain it for future reference. Serial No.

Operating Instructions
Page 2
.... Congratulations on your used rechargeable batteries to persons. WARNING To prevent fire or shock hazard, do not expose the unit to the presence of this Sony Handycam VisionTM. With your Handycam VisionTM, you can capture life's precious moments with advanced features, but at the same time it is intended to alert...
.... Congratulations on your used rechargeable batteries to persons. WARNING To prevent fire or shock hazard, do not expose the unit to the presence of this Sony Handycam VisionTM. With your Handycam VisionTM, you can capture life's precious moments with advanced features, but at the same time it is intended to alert...

Operating Instructions
Page 3
...separation between the equipment and receiver. - The supplied interface cable must accept any interference received, including interference that may call: Sony Customer Information Center 1-800-222-SONY (7669). Operation is for a Class B digital device, pursuant to the following measures: - This equipment generates, uses,... on , the user is encouraged to try to Subpart B of Part 15 of Conformity Trade Name: SONY Model No.: CCD-TRV608 Responsible Party: Sony Electronics lnc. CAUTION You are designed to which the receiver is no guarantee that any questions about this ...
...separation between the equipment and receiver. - The supplied interface cable must accept any interference received, including interference that may call: Sony Customer Information Center 1-800-222-SONY (7669). Operation is for a Class B digital device, pursuant to the following measures: - This equipment generates, uses,... on , the user is encouraged to try to Subpart B of Part 15 of Conformity Trade Name: SONY Model No.: CCD-TRV608 Responsible Party: Sony Electronics lnc. CAUTION You are designed to which the receiver is no guarantee that any questions about this ...
Operating Instructions
Page 4
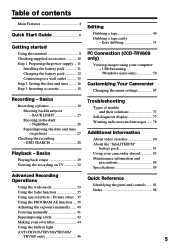
... a picture (p. 19) •Playing back a tape (p. 29) Capturing images on your computer*1) •Viewing images recorded on a tape (p. 59) •Viewing images live from your camcorder (p. 59) Others Functions to adjust exposure in the recording mode •BACK LIGHT (p. 25) •NightShot (p. 26) •PROGRAM AE (p. 38) • Built-in light... and time (p. 16) •ORC [MENU] (p. 70) Function to use after recording •Easy Dubbing (p. 51) Function to make transition smooth •END SEARCH (P.28) *1) CCD-TRV608 only 4 *2) CCD-TRV107/TRV308/TRV408/TRV608 only
... a picture (p. 19) •Playing back a tape (p. 29) Capturing images on your computer*1) •Viewing images recorded on a tape (p. 59) •Viewing images live from your camcorder (p. 59) Others Functions to adjust exposure in the recording mode •BACK LIGHT (p. 25) •NightShot (p. 26) •PROGRAM AE (p. 38) • Built-in light... and time (p. 16) •ORC [MENU] (p. 70) Function to use after recording •Easy Dubbing (p. 51) Function to make transition smooth •END SEARCH (P.28) *1) CCD-TRV608 only 4 *2) CCD-TRV107/TRV308/TRV408/TRV608 only
Operating Instructions
Page 5
... time ........ 16 Step 3 Inserting a cassette 18 Editing Dubbing a tape 49 Dubbing a tape easily - BACK LIGHT 25 Shooting in light (CCD-TRV107/TRV308/TRV408/ TRV608 only 46 5 Picture effect .. 37 Using the PROGRAM AE function .... 38 Adjusting the exposure manually ...... 40 Focusing ... indicators and messages ...... 78 Additional Information About video cassettes 80 About the "InfoLITHIUM" battery pack 81 Using your camcorder abroad 83 Maintenance information and precautions 84 Specifications 89 Advanced Recording Operations Using the wide mode 33 Using the fader ...
... time ........ 16 Step 3 Inserting a cassette 18 Editing Dubbing a tape 49 Dubbing a tape easily - BACK LIGHT 25 Shooting in light (CCD-TRV107/TRV308/TRV408/ TRV608 only 46 5 Picture effect .. 37 Using the PROGRAM AE function .... 38 Adjusting the exposure manually ...... 40 Focusing ... indicators and messages ...... 78 Additional Information About video cassettes 80 About the "InfoLITHIUM" battery pack 81 Using your camcorder abroad 83 Maintenance information and precautions 84 Specifications 89 Advanced Recording Operations Using the wide mode 33 Using the fader ...

Operating Instructions
Page 6
... mark on the cassette compartment. See the page in parentheses "( )" for more information. AC power adaptor (supplied) Inserting a cassette (p. 18) 1 Open the lid of your camcorder outdoors (p. 11). EJECT 2 Insert a cassette into the cassette compartment with its window facing out and the write-protect tab on the cassette up . Close the... cassette compartment. The cassette compartment opens automatically. The cassette compartment automatically goes down. Connecting the power cord (p. 15) Use the battery pack when using your camcorder. Quick Start Guide 6
... mark on the cassette compartment. See the page in parentheses "( )" for more information. AC power adaptor (supplied) Inserting a cassette (p. 18) 1 Open the lid of your camcorder outdoors (p. 11). EJECT 2 Insert a cassette into the cassette compartment with its window facing out and the write-protect tab on the cassette up . Close the... cassette compartment. The cassette compartment opens automatically. The cassette compartment automatically goes down. Connecting the power cord (p. 15) Use the battery pack when using your camcorder. Quick Start Guide 6

Operating Instructions
Page 7
...OFF(CHG) PLAY Note Do not pick up your eyesight (p. 23). Adjust the viewfinder lens to off. Viewfinder When the LCD panel is closed, use the viewfinder placing your camcorder, the clock setting is black and white. RA RA RA Quick Start Guide Recording a picture (p. 19) 1 Remove the ...pressing the POWER small green button. CAME 3 Open the LCD panel while pressing OPEN. The picture appears on the LCD screen (p. 29) 2 Press m to record the date and time for a picture, set to your camcorder by the viewfinder, the LCD panel, or the battery pack. 7 When you want ...
...OFF(CHG) PLAY Note Do not pick up your eyesight (p. 23). Adjust the viewfinder lens to off. Viewfinder When the LCD panel is closed, use the viewfinder placing your camcorder, the clock setting is black and white. RA RA RA Quick Start Guide Recording a picture (p. 19) 1 Remove the ...pressing the POWER small green button. CAME 3 Open the LCD panel while pressing OPEN. The picture appears on the LCD screen (p. 29) 2 Press m to record the date and time for a picture, set to your camcorder by the viewfinder, the LCD panel, or the battery pack. 7 When you want ...
Operating Instructions
Page 8
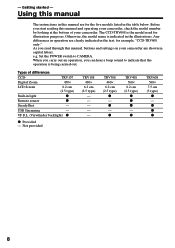
...CCD-TRV608 is being carried out. Types of your camcorder are shown in light z Remote sensor z SteadyShot - Any differences in operation are for illustration purposes. Not provided TRV108 460× 6.2 cm (2.5 type) - - - - - As you start reading this manual, buttons and settings on your camcorder... z - - Getting started - Before you read through this manual and operating your camcorder, check the model number by looking at the bottom of differences CCD- e.g. TRV107 Digital Zoom 450× LCD Screen 6.2 cm (2.5 type) Built-in capital letters. z -
...CCD-TRV608 is being carried out. Types of your camcorder are shown in light z Remote sensor z SteadyShot - Any differences in operation are for illustration purposes. Not provided TRV108 460× 6.2 cm (2.5 type) - - - - - As you start reading this manual, buttons and settings on your camcorder... z - - Getting started - Before you read through this manual and operating your camcorder, check the model number by looking at the bottom of differences CCD- e.g. TRV107 Digital Zoom 450× LCD Screen 6.2 cm (2.5 type) Built-in capital letters. z -

Operating Instructions
Page 9
... tiny black points and/or bright points (white, red, blue or green in color) that constantly appear on the LCD screen and the finder. To view your camcorder away from country to malfunction. Keep your recordings on a TV, you need an NTSC system-based TV. However,... near a window or outdoors. These points are operational for long periods may cause your camcorder to temperatures above 60°C (140°F), such as dusk [d]. [a] [b] [c] [d] 9 Precautions on camcorder care Lens and LCD screen/finder (on TV color systems TV color systems differ from rain and sea water....
... tiny black points and/or bright points (white, red, blue or green in color) that constantly appear on the LCD screen and the finder. To view your camcorder away from country to malfunction. Keep your recordings on a TV, you need an NTSC system-based TV. However,... near a window or outdoors. These points are operational for long periods may cause your camcorder to temperatures above 60°C (140°F), such as dusk [d]. [a] [b] [c] [d] 9 Precautions on camcorder care Lens and LCD screen/finder (on TV color systems TV color systems differ from rain and sea water....
Operating Instructions
Page 10
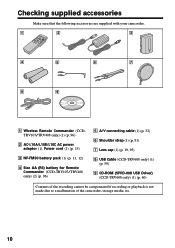
... Make sure that the following accessories are supplied with your camcorder. 1 2 3 4 5 6 7 8 9 1 Wireless Remote Commander (CCDTRV107/TRV408 only) (1) (p. 96) 2 AC-L10A/L10B/L10C AC power adaptor (1), Power cord (1) (p. 15) 3 NP-FM30 battery pack (1) (p. 11, 12) 4 Size AA (R6) battery for Remote Commander (CCD-TRV107/TRV408 only) (2) (p. 96) 5 A/V connecting cable (1) (p. 32) 6 Shoulder strap (1) (p. 91...
... Make sure that the following accessories are supplied with your camcorder. 1 2 3 4 5 6 7 8 9 1 Wireless Remote Commander (CCDTRV107/TRV408 only) (1) (p. 96) 2 AC-L10A/L10B/L10C AC power adaptor (1), Power cord (1) (p. 15) 3 NP-FM30 battery pack (1) (p. 11, 12) 4 Size AA (R6) battery for Remote Commander (CCD-TRV107/TRV408 only) (2) (p. 96) 5 A/V connecting cable (1) (p. 32) 6 Shoulder strap (1) (p. 91...
Operating Instructions
Page 11
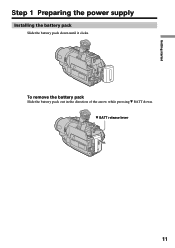
V BATT release lever 11 Getting started Step 1 Preparing the power supply Installing the battery pack Slide the battery pack down . To remove the battery pack Slide the battery pack out in the direction of the arrow while pressing V BATT down until it clicks.
V BATT release lever 11 Getting started Step 1 Preparing the power supply Installing the battery pack Slide the battery pack down . To remove the battery pack Slide the battery pack out in the direction of the arrow while pressing V BATT down until it clicks.
Operating Instructions
Page 12
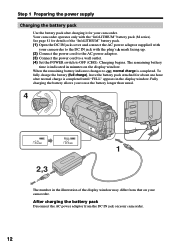
...normal charge is indicated in minutes on the display window. After charging the battery pack Disconnect the AC power adaptor from that on your camcorder. Step 1 Preparing the power supply Charging the battery pack Use the battery pack after charging it for about one hour after normal ...charge is completed until "FULL" appears in the display window. Your camcorder operates only with your camcorder. To fully charge the battery (full charge), leave the battery pack attached for your camcorder to the DC IN jack with the plug's v mark facing up. (2) Connect the...
...normal charge is indicated in minutes on the display window. After charging the battery pack Disconnect the AC power adaptor from that on your camcorder. Step 1 Preparing the power supply Charging the battery pack Use the battery pack after charging it for about one hour after normal ...charge is completed until "FULL" appears in the display window. Your camcorder operates only with your camcorder. To fully charge the battery (full charge), leave the battery pack attached for your camcorder to the DC IN jack with the plug's v mark facing up. (2) Connect the...
Operating Instructions
Page 13
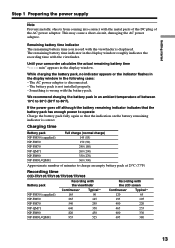
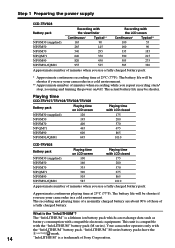
... minutes to charge an empty battery pack at 25°C (77°F) Recording time CCD-TRV107/TRV108/TRV308/TRV408 Battery pack Recording with the viewfinder Continuous* Typical** NP-FM30 (supplied) 165... indicator indicates that the battery pack has enough power to 86°F). Until your camcorder calculates the actual remaining battery time "- - - - Getting started Step 1 Preparing the power... supply Note Prevent metallic objects from coming into contact with the LCD screen Continuous* Typical** 120 65 195 105 400 220 465 255 600 330 695 ...
... minutes to charge an empty battery pack at 25°C (77°F) Recording time CCD-TRV107/TRV108/TRV308/TRV408 Battery pack Recording with the viewfinder Continuous* Typical** NP-FM30 (supplied) 165... indicator indicates that the battery pack has enough power to 86°F). Until your camcorder calculates the actual remaining battery time "- - - - Getting started Step 1 Preparing the power... supply Note Prevent metallic objects from coming into contact with the LCD screen Continuous* Typical** 120 65 195 105 400 220 465 255 600 330 695 ...
Operating Instructions
Page 14
... and playing time of a normally charged battery are about 90% of those of Sony Corporation. This unit is a lithium ion battery pack which can exchange data such ... the "InfoLITHIUM" battery pack (M series). The battery life will be shorter if you use your camcorder in a cold environment. ** Approximate number of minutes when recording while you repeat recording start/ stop...equipment. What is a trademark of a fully charged battery. Playing time CCD-TRV107/TRV108/TRV308/TRV408 Battery pack Playing time on LCD screen NP-FM30 (supplied) 120 NP-FM50 195 NP-FM70 400 NP...
... and playing time of a normally charged battery are about 90% of those of Sony Corporation. This unit is a lithium ion battery pack which can exchange data such ... the "InfoLITHIUM" battery pack (M series). The battery life will be shorter if you use your camcorder in a cold environment. ** Approximate number of minutes when recording while you repeat recording start/ stop...equipment. What is a trademark of a fully charged battery. Playing time CCD-TRV107/TRV108/TRV308/TRV408 Battery pack Playing time on LCD screen NP-FM30 (supplied) 120 NP-FM50 195 NP-FM70 400 NP...
Operating Instructions
Page 15
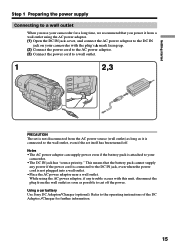
... this unit, disconnect the plug from the wall outlet as soon as possible to cut off . Using a car battery Use Sony DC Adaptor/Charger (optional). This means that you use your camcorder for further information. 15 Getting started Step 1 Preparing the power supply Connecting to a wall outlet When you power it is... adaptor can supply power even if the battery pack is attached to the DC IN jack, even when the power cord is connected to your camcorder. •The DC IN jack has "source priority."
... this unit, disconnect the plug from the wall outlet as soon as possible to cut off . Using a car battery Use Sony DC Adaptor/Charger (optional). This means that you use your camcorder for further information. 15 Getting started Step 1 Preparing the power supply Connecting to a wall outlet When you power it is... adaptor can supply power even if the battery pack is attached to the DC IN jack, even when the power cord is connected to your camcorder. •The DC IN jack has "source priority."
Operating Instructions
Page 16
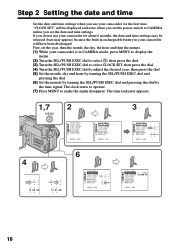
... dial and pressing the dial by the time signal. Step 2 Setting the date and time Set the date and time settings when you use your camcorder will be released (bars may appear) because the built-in rechargeable battery in CAMERA mode, press MENU to display the menu. (2) Turn the SEL/PUSH... CLOCK SET, then press the dial. (4) Turn the SEL/PUSH EXEC dial to make the menu disappear. If you do not use your camcorder is in your camcorder for about 6 months, the date and time settings may be displayed each time when you set the power switch to CAMERA unless you set...
... dial and pressing the dial by the time signal. Step 2 Setting the date and time Set the date and time settings when you use your camcorder will be released (bars may appear) because the built-in rechargeable battery in CAMERA mode, press MENU to display the menu. (2) Turn the SEL/PUSH... CLOCK SET, then press the dial. (4) Turn the SEL/PUSH EXEC dial to make the menu disappear. If you do not use your camcorder is in your camcorder for about 6 months, the date and time settings may be displayed each time when you set the power switch to CAMERA unless you set...
Operating Instructions
Page 17
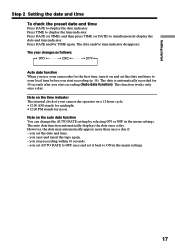
... you start recording (Auto date function). The date and/or time indicator disappears. Press DATE (or TIME) and then press TIME (or DATE) to your camcorder operates on a 12-hour cycle. •12:00 AM stands for midnight. •12:00 PM stands for the first time, turn it back to... and time Press DATE to display the date indicator. Note on the time indicator The internal clock of your local time before you use your camcorder for noon.
... you start recording (Auto date function). The date and/or time indicator disappears. Press DATE (or TIME) and then press TIME (or DATE) to your camcorder operates on a 12-hour cycle. •12:00 AM stands for midnight. •12:00 PM stands for the first time, turn it back to... and time Press DATE to display the date indicator. Note on the time indicator The internal clock of your local time before you use your camcorder for noon.
Operating Instructions
Page 18
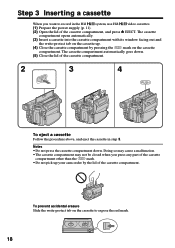
...of the cassette compartment. 2 3 4 EJECT To eject a cassette Follow the procedure above, and eject the cassette in the Hi8 system, use Hi8 video cassettes. (1) Prepare the power supply (p. 11). (2) Open the lid of the cassette compartment. The cassette compartment opens ...automatically. (3) Insert a cassette into the cassette compartment with its window facing out and the write-protect tab on the cassette up your camcorder...
...of the cassette compartment. 2 3 4 EJECT To eject a cassette Follow the procedure above, and eject the cassette in the Hi8 system, use Hi8 video cassettes. (1) Prepare the power supply (p. 11). (2) Open the lid of the cassette compartment. The cassette compartment opens ...automatically. (3) Insert a cassette into the cassette compartment with its window facing out and the write-protect tab on the cassette up your camcorder...
Operating Instructions
Page 19
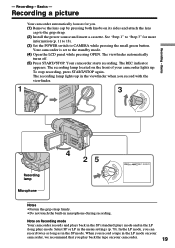
... tape in microphone during recording. To stop recording, press START/STOP again. When you . (1) Remove the lens cap by pressing both knobs on your camcorder lights up in the viewfinder when you record with the viewfinder. 1 3 PL AYER POWER OFF(CHG) CAME RA RA Recording lamp Microphone 4 25 PL... its sides and attach the lens cap to the standby mode. (4) Open the LCD panel while pressing OPEN. In the LP mode, you play ) mode. Recording - The recording lamp located on the front of your camcorder, we recommend that you can record twice as long as in the menu settings ...
... tape in microphone during recording. To stop recording, press START/STOP again. When you . (1) Remove the lens cap by pressing both knobs on your camcorder lights up in the viewfinder when you record with the viewfinder. 1 3 PL AYER POWER OFF(CHG) CAME RA RA Recording lamp Microphone 4 25 PL... its sides and attach the lens cap to the standby mode. (4) Open the LCD panel while pressing OPEN. In the LP mode, you play ) mode. Recording - The recording lamp located on the front of your camcorder, we recommend that you can record twice as long as in the menu settings ...

Operating Instructions
Page 20
...press START/STOP without chainging the POWER switch again to start recording. If you use the LCD screen outdoors in direct sunlight The LCD screen may be normal when recorded. 20 If your camcorder is inserted Your camcorder automatically turns off. To resume the standby mode for 5 minutes while the cassette is in... the mirror mode The picture on the screen (Mirror mode). 180° 90° When closing the LCD panel, set the POWER switch to OFF (CHG). When you leave your camcorder. To set the counter to 0:00:00 Press COUNTER RESET (p. 94).
...press START/STOP without chainging the POWER switch again to start recording. If you use the LCD screen outdoors in direct sunlight The LCD screen may be normal when recorded. 20 If your camcorder is inserted Your camcorder automatically turns off. To resume the standby mode for 5 minutes while the cassette is in... the mirror mode The picture on the screen (Mirror mode). 180° 90° When closing the LCD panel, set the POWER switch to OFF (CHG). When you leave your camcorder. To set the counter to 0:00:00 Press COUNTER RESET (p. 94).