
Primary User Manual
Page 1
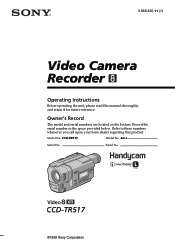
CCD-TR517 Model No. Serial No. AC-L Serial No. 3-868-320-11 (1) Video Camera Recorder Operating Instructions Before operating the unit, please read this product. Model No. CCD-TR517 ©1999 Sony Corporation Owner's Record The model and serial numbers are located on the bottom. Record the serial number in the space provided below. Refer to these numbers whenever you call upon your Sony dealer regarding this manual thoroughly, and retain it for future reference.
CCD-TR517 Model No. Serial No. AC-L Serial No. 3-868-320-11 (1) Video Camera Recorder Operating Instructions Before operating the unit, please read this product. Model No. CCD-TR517 ©1999 Sony Corporation Owner's Record The model and serial numbers are located on the bottom. Record the serial number in the space provided below. Refer to these numbers whenever you call upon your Sony dealer regarding this manual thoroughly, and retain it for future reference.
Primary User Manual
Page 2
... be determined by one or more of important operating and maintenance (servicing) instructions in a particular installation. Note: In some areas the disposal of lithium ion batteries in accordance with the limits for help. For customers in a residential installation. With your nearest Sony Service Center or Factory Service Center. Your Handycam is loaded with superior picture and sound quality. DISPOSE OF PROPERLY. You can return your...
... be determined by one or more of important operating and maintenance (servicing) instructions in a particular installation. Note: In some areas the disposal of lithium ion batteries in accordance with the limits for help. For customers in a residential installation. With your nearest Sony Service Center or Factory Service Center. Your Handycam is loaded with superior picture and sound quality. DISPOSE OF PROPERLY. You can return your...
Primary User Manual
Page 3
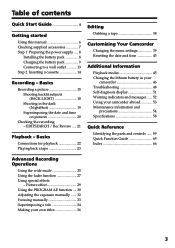
... Quick Function Guide 65 Index 66 Advanced Recording Operations Using the wide mode 25 Using the fader function 27 Using special effects - Basics Recording a picture 15 Shooting backlit subjects (BACK LIGHT 18 Shooting in your camcorder 46 Troubleshooting 48 Self-diagnosis display 51 Warning indicators and messages ...... 52 Using your own titles 36 3 EDITSEARCH / Rec Review ..... 21 Playback - Basics Connections for playback 22 Playing back a tape 23 Editing Dubbing a tape 38 Customizing Your Camcorder Changing the menu settings 39 Resetting the date and time 43...
... Quick Function Guide 65 Index 66 Advanced Recording Operations Using the wide mode 25 Using the fader function 27 Using special effects - Basics Recording a picture 15 Shooting backlit subjects (BACK LIGHT 18 Shooting in your camcorder 46 Troubleshooting 48 Self-diagnosis display 51 Warning indicators and messages ...... 52 Using your own titles 36 3 EDITSEARCH / Rec Review ..... 21 Playback - Basics Connections for playback 22 Playing back a tape 23 Editing Dubbing a tape 38 Customizing Your Camcorder Changing the menu settings 39 Resetting the date and time 43...
Primary User Manual
Page 6
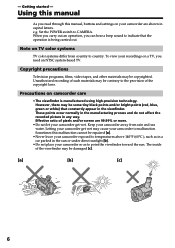
... may cause your recordings on camcorder care •The viewfinder is being carried out. Effective ratio of the viewfinder may be some tiny black points and/or bright points (red, blue, green or white) that the operation is manufactured using high-precision technology. Letting your camcorder so as in a car parked in the viewfinder. Set the POWER switch to point the...
... may cause your recordings on camcorder care •The viewfinder is being carried out. Effective ratio of the viewfinder may be some tiny black points and/or bright points (red, blue, green or white) that the operation is manufactured using high-precision technology. Letting your camcorder so as in a car parked in the viewfinder. Set the POWER switch to point the...
Primary User Manual
Page 7
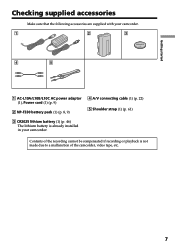
Contents of the recording cannot be compensated if recording or playback is already installed in your camcorder. 1 2 3 4 5 1 AC-L10A/L10B/L10C AC power adaptor (1), Power cord (1) (p. 9) 2 NP-F330 battery pack (1) (p. 8, 9) 4 A/V connecting cable (1) (p. 22) 5 Shoulder strap (1) (p. 61) 3 CR2025 lithium battery (1) (p. 46) The lithium battery is not made due to a malfunction of the camcorder, video tape, etc. 7 Getting started Checking supplied accessories Make sure that the following accessories are supplied with your camcorder.
Contents of the recording cannot be compensated if recording or playback is already installed in your camcorder. 1 2 3 4 5 1 AC-L10A/L10B/L10C AC power adaptor (1), Power cord (1) (p. 9) 2 NP-F330 battery pack (1) (p. 8, 9) 4 A/V connecting cable (1) (p. 22) 5 Shoulder strap (1) (p. 61) 3 CR2025 lithium battery (1) (p. 46) The lithium battery is not made due to a malfunction of the camcorder, video tape, etc. 7 Getting started Checking supplied accessories Make sure that the following accessories are supplied with your camcorder.

Primary User Manual
Page 15
... built-in the standby mode for 5 minutes while the cassette is to save battery power and to LOCK. If you . (1) Installthepowersourceandinsertacassette.See"Step1"and"Step2"for you leave your camcorder lights up again. Recording a picture Your camcorder automatically focuses for more information (p. 8 to 14). (2) Set the POWER switch to STANDBY. (4) Press START/STOP. When you do not eject the cassette. The lens cover opens. (3) Turn STANDBY to CAMERA while pressing the...
... built-in the standby mode for 5 minutes while the cassette is to save battery power and to LOCK. If you . (1) Installthepowersourceandinsertacassette.See"Step1"and"Step2"for you leave your camcorder lights up again. Recording a picture Your camcorder automatically focuses for more information (p. 8 to 14). (2) Set the POWER switch to STANDBY. (4) Press START/STOP. When you do not eject the cassette. The lens cover opens. (3) Turn STANDBY to CAMERA while pressing the...

Primary User Manual
Page 22
... using the A/V connecting cable. Refer to watch the playback picture on the TV to a TV or VCR without Video/Audio input jacks Use an NTSC system RFU adaptor (not supplied). Open the jack cover. Then, set the TV/VCR selector on the TV screen. Basics - Connect your camcorder from a wall outlet using the A/V connecting cable supplied with your camcorder. To connect to VCR. Connections for playback Connect your camcorder to the LINE IN input on the VCR to the operating instructions...
... using the A/V connecting cable. Refer to watch the playback picture on the TV to a TV or VCR without Video/Audio input jacks Use an NTSC system RFU adaptor (not supplied). Open the jack cover. Then, set the TV/VCR selector on the TV screen. Basics - Connect your camcorder from a wall outlet using the A/V connecting cable supplied with your camcorder. To connect to VCR. Connections for playback Connect your camcorder to the LINE IN input on the VCR to the operating instructions...

Primary User Manual
Page 24
... a scene monitoring the picture (picture search) Keep pressing m or M during playback. To resume normal playback, release the button. When the playback pause mode lasts for 5 minutes Your camcorder automatically enters the stop mode. When you play back the tapes recorded in the LP mode Noise may appear during playback pause mode or picture search. In the various playback modes Sound is muted. To view a still picture (playback pause) Press X during playback. Playing back a tape Various playback modes To operate video control buttons, set the POWER switch to PLAYER.
... a scene monitoring the picture (picture search) Keep pressing m or M during playback. To resume normal playback, release the button. When the playback pause mode lasts for 5 minutes Your camcorder automatically enters the stop mode. When you play back the tapes recorded in the LP mode Noise may appear during playback pause mode or picture search. In the various playback modes Sound is muted. To view a still picture (playback pause) Press X during playback. Playing back a tape Various playback modes To operate video control buttons, set the POWER switch to PLAYER.
Primary User Manual
Page 38
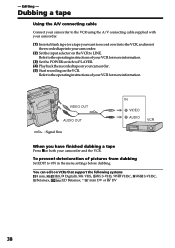
... menu settings before dubbing. To prevent deterioration of your VCR for more information. (3) Set the POWER switch to the operating instructions of your camcorder and the VCR. VIDEO OUT AUDIO OUT : Signal flow IN VIDEO AUDIO When you want to record over) into the VCR, and insert the recorded tape into your camcorder. (2) Set the input selector on VCRs that support the following systems 8 mm, Hi8, Digital8, VHS, S-VHS, VHSC, Betamax, ED Betamax, mini...
... menu settings before dubbing. To prevent deterioration of your VCR for more information. (3) Set the POWER switch to the operating instructions of your camcorder and the VCR. VIDEO OUT AUDIO OUT : Signal flow IN VIDEO AUDIO When you want to record over) into the VCR, and insert the recorded tape into your camcorder. (2) Set the input selector on VCRs that support the following systems 8 mm, Hi8, Digital8, VHS, S-VHS, VHSC, Betamax, ED Betamax, mini...

Primary User Manual
Page 40
... battery is removed, as long as the following icons: CAMERA SET PLAYER SET VF SET TAPE SET SETUP MENU OTHERS Selecting the mode setting of each item z is the default setting. The viewfinder screen shows only the items you have dubbed over and recorded the signal of movement DNR stands for "Time Base Corrector". Changing the menu settings Menu items are held in the 16:9FULL mode N.S.LIGHT z ON To use the NightShot Light function...
... battery is removed, as long as the following icons: CAMERA SET PLAYER SET VF SET TAPE SET SETUP MENU OTHERS Selecting the mode setting of each item z is the default setting. The viewfinder screen shows only the items you have dubbed over and recorded the signal of movement DNR stands for "Time Base Corrector". Changing the menu settings Menu items are held in the 16:9FULL mode N.S.LIGHT z ON To use the NightShot Light function...

Primary User Manual
Page 41
... brighten the viewfinder screen PLAYER CAMERA REC MODE z SP To record in the menu settings. Customizing Your Camcorder Changing the menu settings Icon/item Mode Meaning POWER switch VF B.L. Your camcorder takes about 0.1 seconds appears on the LP mode •When you eject the cassette, the ORC setting will be canceled. Notes on the tape. When you play back the tape on other camcorders or VCRs, noise may occur in pictures or sound. •Noise may...
... brighten the viewfinder screen PLAYER CAMERA REC MODE z SP To record in the menu settings. Customizing Your Camcorder Changing the menu settings Icon/item Mode Meaning POWER switch VF B.L. Your camcorder takes about 0.1 seconds appears on the LP mode •When you eject the cassette, the ORC setting will be canceled. Notes on the tape. When you play back the tape on other camcorders or VCRs, noise may occur in pictures or sound. •Noise may...

Primary User Manual
Page 42
... beep sound REC LAMP z ON To light up the camera recording lamp at the factory and the demonstration starts about 10 minutes after recording has started To cancel the auto date function To display selected menu items in normal size To display selected menu items at twice the normal size To make the demonstration appear To cancel the demonstration mode POWER switch CAMERA CAMERA PLAYER CAMERA CAMERA Notes on your camcorder CAMERA OFF To turn the camera recording...
... beep sound REC LAMP z ON To light up the camera recording lamp at the factory and the demonstration starts about 10 minutes after recording has started To cancel the auto date function To display selected menu items in normal size To display selected menu items at twice the normal size To make the demonstration appear To cancel the demonstration mode POWER switch CAMERA CAMERA PLAYER CAMERA CAMERA Notes on your camcorder CAMERA OFF To turn the camera recording...
Primary User Manual
Page 43
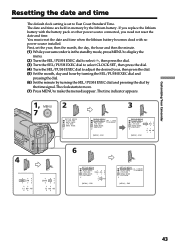
... 4 DEMO MODE RETURN 5 30 PM [MENU] : END SETUP MENU CLOCK SET JUL 4 2000 AUTO DATE 5 : 3 0 : 0 0PM LTR SIZE DEMO MODE RETURN [MENU] : END 43 First, set to East Coast Standard Time. You must reset the date and time when the lithium battery becomes dead with the battery pack or other power source connected, you need not reset the date and time. The clock starts to move. (7) Press MENU to make the menu disappear. Customizing Your Camcorder Resetting the date and time...
... 4 DEMO MODE RETURN 5 30 PM [MENU] : END SETUP MENU CLOCK SET JUL 4 2000 AUTO DATE 5 : 3 0 : 0 0PM LTR SIZE DEMO MODE RETURN [MENU] : END 43 First, set to East Coast Standard Time. You must reset the date and time when the lithium battery becomes dead with the battery pack or other power source connected, you need not reset the date and time. The clock starts to move. (7) Press MENU to make the menu disappear. Customizing Your Camcorder Resetting the date and time...

Primary User Manual
Page 44
... reset the date and time. - you stop recording within 10 seconds. - The date and/or time indicator disappears. The year changes as follows: 1999 ˜ 2000 N n 2029 Auto date function When you use your camcorder for the first time, turn it back ON in the menu settings. Press DATE (or TIME) and then press TIME (or DATE) to your camcorder operates on and reset the date and time to simultaneously display the date and time indicator. Resetting the date and time To check...
... reset the date and time. - you stop recording within 10 seconds. - The date and/or time indicator disappears. The year changes as follows: 1999 ˜ 2000 N n 2029 Auto date function When you use your camcorder for the first time, turn it back ON in the menu settings. Press DATE (or TIME) and then press TIME (or DATE) to your camcorder operates on and reset the date and time to simultaneously display the date and time indicator. Resetting the date and time To check...
Primary User Manual
Page 48
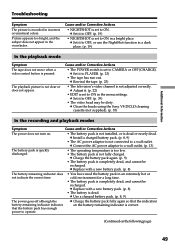
.... c Set FOCUS to MANUAL to acclimatize. (p. 54) • While being operated in the CAMERA mode, your camcorder has been in the standby mode for autofocus. You can also cancel DEMO MODE. (p. 42) 48 Troubleshooting If you run out. The power goes off. The image on the viewfinder screen is not a malfunction. See page 51. The x indicator flashes in the viewfinder, the self-diagnosis display function has worked. c Clean the heads using...
.... c Set FOCUS to MANUAL to acclimatize. (p. 54) • While being operated in the CAMERA mode, your camcorder has been in the standby mode for autofocus. You can also cancel DEMO MODE. (p. 42) 48 Troubleshooting If you run out. The power goes off. The image on the viewfinder screen is not a malfunction. See page 51. The x indicator flashes in the viewfinder, the self-diagnosis display function has worked. c Clean the heads using...
Primary User Manual
Page 49
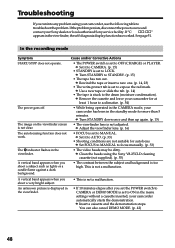
.... c Set it to operate. c Clean the heads using the Sony V8-25CLD cleaning cassette (not supplied). (p. 55) In the recording and playback modes Symptom Cause and/or Corrective Actions The power does not turn on the battery remaining indicator is not adjusted correctly. c Install a charged battery pack. (p. 8, 9) • The AC power adaptor is dead or nearly dead. c Charge the battery pack again. (p. 9) • The battery pack is dead. c Replace with a new battery pack. (p. 8) The battery...
.... c Set it to operate. c Clean the heads using the Sony V8-25CLD cleaning cassette (not supplied). (p. 55) In the recording and playback modes Symptom Cause and/or Corrective Actions The power does not turn on the battery remaining indicator is not adjusted correctly. c Install a charged battery pack. (p. 8, 9) • The AC power adaptor is dead or nearly dead. c Charge the battery pack again. (p. 9) • The battery pack is dead. c Replace with a new battery pack. (p. 8) The battery...
Primary User Manual
Page 52
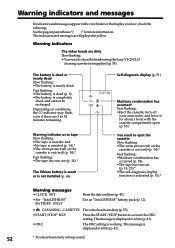
... self-diagnosis display function is activated (p. 51).* Warning messages •CLOCK SET •For "InfoLITHIUM" BATTERY ONLY Reset the date and time (p. 43). Warning indicators The video heads are dirty Slow flashing: •You need to tape Slow flashing: •The tape is near the end. •No tape is not installed (p. 46) Self-diagnosis display (p. 51) C:21:00 Moisture condensation has occurred* Fast flashing: •Eject the cassette, turn off your camcorder, and leave...
... self-diagnosis display function is activated (p. 51).* Warning messages •CLOCK SET •For "InfoLITHIUM" BATTERY ONLY Reset the date and time (p. 43). Warning indicators The video heads are dirty Slow flashing: •You need to tape Slow flashing: •The tape is near the end. •No tape is not installed (p. 46) Self-diagnosis display (p. 51) C:21:00 Moisture condensation has occurred* Fast flashing: •Eject the cassette, turn off your camcorder, and leave...
Primary User Manual
Page 56
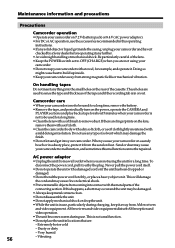
...; Whenyourcamcorderisnottobeusedforalongtime,removethebattery. • Remove the tape, and periodically turn on the power, operate the CAMERA and PLAYER sections and play back a tape for about 5 minutes when your camcorder is in use, particularly during use. Never pull the power cord itself. • Do not operate the unit with a mild detergent solution. When you use your camcorder on a sandy beach or in a dusty place, protect it from a wall...
...; Whenyourcamcorderisnottobeusedforalongtime,removethebattery. • Remove the tape, and periodically turn on the power, operate the CAMERA and PLAYER sections and play back a tape for about 5 minutes when your camcorder is in use, particularly during use. Never pull the power cord itself. • Do not operate the unit with a mild detergent solution. When you use your camcorder on a sandy beach or in a dusty place, protect it from a wall...
Primary User Manual
Page 58
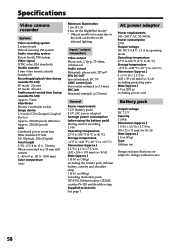
... excluding power cord General Power requirements 7.2 V (battery pack) 8.4 V (AC power adaptor) Average power consumption (when using cassette P6-120) Approx. 5 min. Specifications Video camera recorder System Video recording system 2 rotary heads Helical scanning FM system Audio recording system Rotary heads, FM system Video signal NTSC color, EIA standards Usable cassette 8 mm video format cassette Standard 8 Recording/playback time (using cassette P6-120) SP mode: 2 hours LP mode: 4 hours Fastforward/rewind time (using the battery pack) During camera recording 1.9 W Operating temperature...
... excluding power cord General Power requirements 7.2 V (battery pack) 8.4 V (AC power adaptor) Average power consumption (when using cassette P6-120) Approx. 5 min. Specifications Video camera recorder System Video recording system 2 rotary heads Helical scanning FM system Audio recording system Rotary heads, FM system Video signal NTSC color, EIA standards Usable cassette 8 mm video format cassette Standard 8 Recording/playback time (using cassette P6-120) SP mode: 2 hours LP mode: 4 hours Fastforward/rewind time (using the battery pack) During camera recording 1.9 W Operating temperature...
Primary User Manual
Page 66
... LP mode 41 M, N Manual focus 33 Menu settings 39 Moisture condensation .......... 54 MONOTONE 27 Mosaic fader 27 NIGHTSHOT 19 Normal charge 9 NTSC system 53 O, P, Q Operation indicators 64 ORC 41 Picture effect 29 Picture search 24 Playback pause 24 Power sources (house current 13 (car battery 13 (battery pack 8 Power zoom 17 PROGRAM AE 30 R Rec Review 21 Recording and playback systems 45 Recording mode 41 Recording time 11 Remaining tape indicator ...... 18 Remaining battery time indicator 18 Remote control jack...
... LP mode 41 M, N Manual focus 33 Menu settings 39 Moisture condensation .......... 54 MONOTONE 27 Mosaic fader 27 NIGHTSHOT 19 Normal charge 9 NTSC system 53 O, P, Q Operation indicators 64 ORC 41 Picture effect 29 Picture search 24 Playback pause 24 Power sources (house current 13 (car battery 13 (battery pack 8 Power zoom 17 PROGRAM AE 30 R Rec Review 21 Recording and playback systems 45 Recording mode 41 Recording time 11 Remaining tape indicator ...... 18 Remaining battery time indicator 18 Remote control jack...


