
Primary User Manual
Page 2
... sunlight. This symbol is connected. - LITHIUM ION BATTERY. For customers in CANADA CAUTION TO PREVENT ELECTRIC SHOCK, MATCH WIDE BLADE OF PLUG TO WIDE SLOT, FULLY INSERT. 2 These limits are cautioned that may be producing home video that you can enjoy for help. WARNING To prevent... manual could void your authority to your unwanted lithium ion batteries to operate this equipment. For the Sony Service Center nearest you call 416-499-SONY (Canada only) Caution: Do not handle damaged or leaking lithium ion battery. Consult the dealer or an experienced radio/TV technician for...
... sunlight. This symbol is connected. - LITHIUM ION BATTERY. For customers in CANADA CAUTION TO PREVENT ELECTRIC SHOCK, MATCH WIDE BLADE OF PLUG TO WIDE SLOT, FULLY INSERT. 2 These limits are cautioned that may be producing home video that you can enjoy for help. WARNING To prevent... manual could void your authority to your unwanted lithium ion batteries to operate this equipment. For the Sony Service Center nearest you call 416-499-SONY (Canada only) Caution: Do not handle damaged or leaking lithium ion battery. Consult the dealer or an experienced radio/TV technician for...
Primary User Manual
Page 3
... the date and time 43 Additional Information Playback modes 45 Changing the lithium battery in the dark (NightShot 19 Superimposing the date and time on pictures 20 Checking the recording - EDITSEARCH / Rec Review ..... 21 Playback - Getting started Table of...6 Checking supplied accessories 7 Step 1 Preparing the power supply ..... 8 Installing the battery pack 8 Charging the battery pack 9 Connecting to a wall outlet 13 Step 2 Inserting a cassette 14 Recording - Basics Recording a picture 15 Shooting backlit subjects (BACK LIGHT 18 Shooting in your camcorder 46 ...
... the date and time 43 Additional Information Playback modes 45 Changing the lithium battery in the dark (NightShot 19 Superimposing the date and time on pictures 20 Checking the recording - EDITSEARCH / Rec Review ..... 21 Playback - Getting started Table of...6 Checking supplied accessories 7 Step 1 Preparing the power supply ..... 8 Installing the battery pack 8 Charging the battery pack 9 Connecting to a wall outlet 13 Step 2 Inserting a cassette 14 Recording - Basics Recording a picture 15 Shooting backlit subjects (BACK LIGHT 18 Shooting in your camcorder 46 ...

Primary User Manual
Page 4
Connecting the power cord (p. 13) Use the battery pack when using your camcorder. EJECT AC power adaptor (supplied) Inserting a cassette (p. 14) 1 Slide EJECT in parentheses "( )" for more information. Connect the plug with its v ...
Connecting the power cord (p. 13) Use the battery pack when using your camcorder. EJECT AC power adaptor (supplied) Inserting a cassette (p. 14) 1 Slide EJECT in parentheses "( )" for more information. Connect the plug with its v ...
Primary User Manual
Page 5
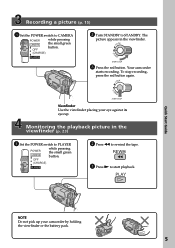
... button. (CHARGE) PLAYER STA 2 Turn STANDBY to PLAYER POWER CAMERA while pressing the small green button. LOCK NDBY START/STOP 3 Press the red button. Your camcorder starts recording. To stop recording, press the red button again. Monitoring the playback picture in the... viewfinder. The picture appears in the viewfinder (p. 23) 1 Set the POWER switch to STANDBY. LOCK STA NDBY START/STOP Viewfinder Use the viewfinder placing your camcorder by holding the viewfinder or the battery...
... button. (CHARGE) PLAYER STA 2 Turn STANDBY to PLAYER POWER CAMERA while pressing the small green button. LOCK NDBY START/STOP 3 Press the red button. Your camcorder starts recording. To stop recording, press the red button again. Monitoring the playback picture in the... viewfinder. The picture appears in the viewfinder (p. 23) 1 Set the POWER switch to STANDBY. LOCK STA NDBY START/STOP Viewfinder Use the viewfinder placing your camcorder by holding the viewfinder or the battery...
Primary User Manual
Page 7
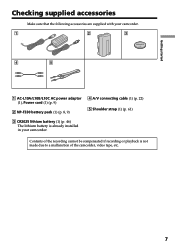
Getting started Checking supplied accessories Make sure that the following accessories are supplied with your camcorder. 1 2 3 4 5 1 AC-L10A/L10B/L10C AC power adaptor (1), Power cord (1) (p. 9) 2 NP-F330 battery pack (1) (p. 8, 9) 4 A/V connecting cable (1) (p. 22) 5 Shoulder strap (1) (p. 61) 3 CR2025 lithium battery (1) (p. 46) The lithium battery is not made due to a malfunction of the camcorder, video tape, etc. 7 Contents of the recording cannot be compensated if recording or playback is already installed in your camcorder.
Getting started Checking supplied accessories Make sure that the following accessories are supplied with your camcorder. 1 2 3 4 5 1 AC-L10A/L10B/L10C AC power adaptor (1), Power cord (1) (p. 9) 2 NP-F330 battery pack (1) (p. 8, 9) 4 A/V connecting cable (1) (p. 22) 5 Shoulder strap (1) (p. 61) 3 CR2025 lithium battery (1) (p. 46) The lithium battery is not made due to a malfunction of the camcorder, video tape, etc. 7 Contents of the recording cannot be compensated if recording or playback is already installed in your camcorder.
Primary User Manual
Page 8
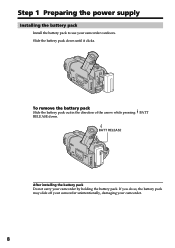
If you do so, the battery pack may slide off your camcorder unintentionally, damaging your camcorder by holding the battery pack. BATT RELEASE After installing the battery pack Do not carry your camcorder. 8 To remove the battery pack Slide the battery pack out in the direction of the arrow while pressing BATT RELEASE down until it clicks. Slide the battery pack down . Step 1 Preparing the power supply Installing the battery pack Install the battery pack to use your camcorder outdoors.
If you do so, the battery pack may slide off your camcorder unintentionally, damaging your camcorder by holding the battery pack. BATT RELEASE After installing the battery pack Do not carry your camcorder. 8 To remove the battery pack Slide the battery pack out in the direction of the arrow while pressing BATT RELEASE down until it clicks. Slide the battery pack down . Step 1 Preparing the power supply Installing the battery pack Install the battery pack to use your camcorder outdoors.
Primary User Manual
Page 9
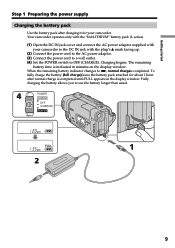
... for your camcorder to the DC IN jack with your camcorder. Fully charging the battery allows you to u, normal chargeis completed. When the remaining battery indicator changes to use the battery longer than usual. 4 POWER CAMERA OFF (CHARGE) PLAYER 1 2 9 The remaining battery time is completed until FULL appears in minutes on the display window. Charging...
... for your camcorder to the DC IN jack with your camcorder. Fully charging the battery allows you to u, normal chargeis completed. When the remaining battery indicator changes to use the battery longer than usual. 4 POWER CAMERA OFF (CHARGE) PLAYER 1 2 9 The remaining battery time is completed until FULL appears in minutes on the display window. Charging...
Primary User Manual
Page 10
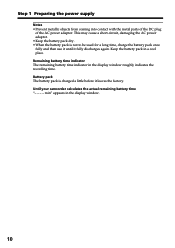
...your camcorder calculates the actual remaining battery time "- - - - min" appears in the display window roughly indicates the recording time. This may cause a short-circuit, damaging the AC power adaptor. •Keep the battery pack dry. •When the battery pack is charged a little ...before it fully discharges again. Keep the battery pack in a cool place. Step 1 ...
...your camcorder calculates the actual remaining battery time "- - - - min" appears in the display window roughly indicates the recording time. This may cause a short-circuit, damaging the AC power adaptor. •Keep the battery pack dry. •When the battery pack is charged a little ...before it fully discharges again. Keep the battery pack in a cool place. Step 1 ...
Primary User Manual
Page 11
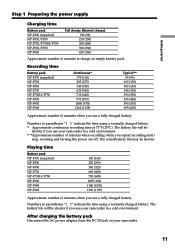
...Normal charge) 150 (90) 210 (150) 300 (240) 390 (330) 420 (360) Approximate number of minutes to charge an empty battery pack Recording time Battery pack NP-F330 (supplied) NP-F530 NP-F550 NP-F730 NP-F730H/F750 NP-F930 NP-F950 NP-F960 Continuous* 170 (160) ... (535) 695 (625) Approximate number of minutes when you use a fully charged battery Numbers in parentheses "( )" indicate the time using a normally charged battery. * Approximate continuous recording time at 77°F (25°C). The actual battery life may be shorter if you use your camcorder in a cold environment. * *Approximate...
...Normal charge) 150 (90) 210 (150) 300 (240) 390 (330) 420 (360) Approximate number of minutes to charge an empty battery pack Recording time Battery pack NP-F330 (supplied) NP-F530 NP-F550 NP-F730 NP-F730H/F750 NP-F930 NP-F950 NP-F960 Continuous* 170 (160) ... (535) 695 (625) Approximate number of minutes when you use a fully charged battery Numbers in parentheses "( )" indicate the time using a normally charged battery. * Approximate continuous recording time at 77°F (25°C). The actual battery life may be shorter if you use your camcorder in a cold environment. * *Approximate...

Primary User Manual
Page 12
... battery. Your camcorder operates only with the "InfoLITHIUM" battery pack (L series). Step 1 Preparing the power supply Note on the remaining battery time indicator during recording The indicator may not be correct, depending on the conditions in which can exchange data such as battery... consumption with compatible electronic equipment. This unit is a lithium ion battery pack which you are recording. "InfoLITHIUM" L series battery packs...
... battery. Your camcorder operates only with the "InfoLITHIUM" battery pack (L series). Step 1 Preparing the power supply Note on the remaining battery time indicator during recording The indicator may not be correct, depending on the conditions in which can exchange data such as battery... consumption with compatible electronic equipment. This unit is a lithium ion battery pack which you are recording. "InfoLITHIUM" L series battery packs...
Primary User Manual
Page 13
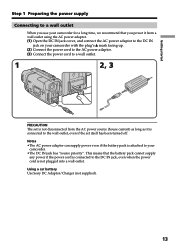
... power if the power cord is connected to the DC IN jack, even when the power cord is not plugged into a wall outlet. Using a car battery Use Sony DC Adaptor/Charger (not supplied). 13 Getting started Step 1 Preparing the power supply Connecting to a wall outlet When you power it from a wall outlet... to the wall outlet, even if the set itself has been turned off. Notes •The AC power adaptor can supply power even if the battery pack is attached to your camcorder. •The DC IN jack has "source priority".
... power if the power cord is connected to the DC IN jack, even when the power cord is not plugged into a wall outlet. Using a car battery Use Sony DC Adaptor/Charger (not supplied). 13 Getting started Step 1 Preparing the power supply Connecting to a wall outlet When you power it from a wall outlet... to the wall outlet, even if the set itself has been turned off. Notes •The AC power adaptor can supply power even if the battery pack is attached to your camcorder. •The DC IN jack has "source priority".

Primary User Manual
Page 15
... between the last scene you recorded and the next scene smooth as long as you . (1) Installthepowersourceandinsertacassette.See"Step1"and"Step2"for 5 minutes while the cassette is to save battery power and to prevent battery and tape wear. To set STANDBY to CAMERA while pressing the small green button.... Basics - Basics - Do not touch the built-in the recording mode, set the counter to STANDBY. (4) Press START/...
... between the last scene you recorded and the next scene smooth as long as you . (1) Installthepowersourceandinsertacassette.See"Step1"and"Step2"for 5 minutes while the cassette is to save battery power and to prevent battery and tape wear. To set STANDBY to CAMERA while pressing the small green button.... Basics - Basics - Do not touch the built-in the recording mode, set the counter to STANDBY. (4) Press START/...
Primary User Manual
Page 18
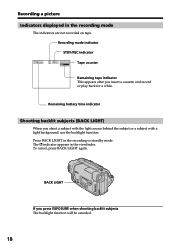
Remaining battery time indicator Shooting backlit subjects (BACK LIGHT) When you press EXPOSURE when shooting backlit subjects The backlight function will be canceled. 18 indicator appears in the recording or standby mode. Press BACK LIGHT in the viewfinder. BACK LIGHT If you shoot a subject with the light ...source behind the subject or a subject with a light background, use the backlight function. Recording mode indicator STBY/REC indicator 40min SP REC 0:00:01 Tape counter Remaining tape indicator This appears after you insert a cassette and...
Remaining battery time indicator Shooting backlit subjects (BACK LIGHT) When you press EXPOSURE when shooting backlit subjects The backlight function will be canceled. 18 indicator appears in the recording or standby mode. Press BACK LIGHT in the viewfinder. BACK LIGHT If you shoot a subject with the light ...source behind the subject or a subject with a light background, use the backlight function. Recording mode indicator STBY/REC indicator 40min SP REC 0:00:01 Tape counter Remaining tape indicator This appears after you insert a cassette and...

Primary User Manual
Page 40
CAMERA CINEMA To record in the CINEMA mode (p. 25) 16:9FULL To record in memory even when the battery is removed, as long as the following icons: CAMERA SET PLAYER SET VF SET TAPE SET SETUP MENU OTHERS Selecting the mode setting of movement DNR stands for "Time Base Corrector". Menu ...items differ according to PLAYER or CAMERA. Up to 20&#...
CAMERA CINEMA To record in the CINEMA mode (p. 25) 16:9FULL To record in memory even when the battery is removed, as long as the following icons: CAMERA SET PLAYER SET VF SET TAPE SET SETUP MENU OTHERS Selecting the mode setting of movement DNR stands for "Time Base Corrector". Menu ...items differ according to PLAYER or CAMERA. Up to 20&#...

Primary User Manual
Page 41
...recommend playing the tape on other than the battery pack, "BRIGHT" is write-protected) •When you set . 41 CAMERA ORC stands for the period of tape rewinding, forwarding or picture search in SP (Standard Play) mode CAMERA LP To increase the recording time to twice the SP mode ORC TO ... check if you have already set the brightness in the viewfinder normal BRIGHT To brighten the viewfinder screen PLAYER CAMERA REC MODE z SP To record in the PLAYER mode PLAYER CAMERA ON To always display the remaining tape bar Note on ORC setting •Each time you play on the...
...recommend playing the tape on other than the battery pack, "BRIGHT" is write-protected) •When you set . 41 CAMERA ORC stands for the period of tape rewinding, forwarding or picture search in SP (Standard Play) mode CAMERA LP To increase the recording time to twice the SP mode ORC TO ... check if you have already set the brightness in the viewfinder normal BRIGHT To brighten the viewfinder screen PLAYER CAMERA REC MODE z SP To record in the PLAYER mode PLAYER CAMERA ON To always display the remaining tape bar Note on ORC setting •Each time you play on the...
Primary User Manual
Page 43
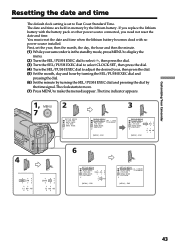
You must reset the date and time when the lithium battery becomes dead with the battery pack or other power source connected, you need not reset the date and time. First, set to East Coast Standard ...Time. The clock starts to move. (7) Press MENU to make the menu disappear. If you replace the lithium battery with no power source installed. Customizing Your Camcorder Resetting the date and time The default clock setting is set the year, then the month... the dial. (6) Set the minute by turning the SEL/PUSH EXEC dial and pressing the dial by the lithium battery.
You must reset the date and time when the lithium battery becomes dead with the battery pack or other power source connected, you need not reset the date and time. First, set to East Coast Standard ...Time. The clock starts to move. (7) Press MENU to make the menu disappear. If you replace the lithium battery with no power source installed. Customizing Your Camcorder Resetting the date and time The default clock setting is set the year, then the month... the dial. (6) Set the minute by turning the SEL/PUSH EXEC dial and pressing the dial by the lithium battery.
Primary User Manual
Page 46
... settings hold in memory by the lithium battery. Discard used batteries according to CAMERA. Do not recharge, disassemble, nor dispose of fire or explosion. Lithium battery • Keepthelithiumbatteryoutofthereachofchildren. • Shouldthebatterybeswallowed,immediatelyconsultadoctor. • Wipethebatterywithadryclothtoensuregoodcontact. Insert the battery with a Sony CR2025 or Duracell DL-2025 lithium battery. In this case, replace the battery with the positive (+) side facing out. Otherwise...
... settings hold in memory by the lithium battery. Discard used batteries according to CAMERA. Do not recharge, disassemble, nor dispose of fire or explosion. Lithium battery • Keepthelithiumbatteryoutofthereachofchildren. • Shouldthebatterybeswallowed,immediatelyconsultadoctor. • Wipethebatterywithadryclothtoensuregoodcontact. Insert the battery with a Sony CR2025 or Duracell DL-2025 lithium battery. In this case, replace the battery with the positive (+) side facing out. Otherwise...
Primary User Manual
Page 47
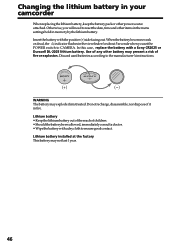
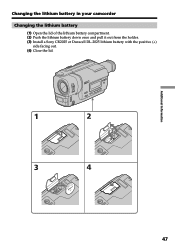
Additional Information Changing the lithium battery in your camcorder Changing the lithium battery (1) Open the lid of the lithium battery compartment. (2) Push the lithium battery down once and pull it out from the holder. (3) Install a Sony CR2025 or Duracell DL-2025 lithium battery with the positive (+) side facing out. (4) Close the lid. 1 2 3 4 47
Additional Information Changing the lithium battery in your camcorder Changing the lithium battery (1) Open the lid of the lithium battery compartment. (2) Push the lithium battery down once and pull it out from the holder. (3) Install a Sony CR2025 or Duracell DL-2025 lithium battery with the positive (+) side facing out. (4) Close the lid. 1 2 3 4 47
Primary User Manual
Page 49
...c Clean the heads using the Sony V8-25CLD cleaning cassette (not supplied). (p. 55) In the recording and playback modes Symptom Cause and...23) • The television's video channel is not fully charged. c Install a charged battery pack. (p. 8, 9) • The AC power adaptor is recorded in a bright place. Additional... Information Troubleshooting Symptom The picture is not connected to a wall outlet. Cause and/or Corrective Actions • The POWER switch is set to CAMERA...
...c Clean the heads using the Sony V8-25CLD cleaning cassette (not supplied). (p. 55) In the recording and playback modes Symptom Cause and...23) • The television's video channel is not fully charged. c Install a charged battery pack. (p. 8, 9) • The AC power adaptor is recorded in a bright place. Additional... Information Troubleshooting Symptom The picture is not connected to a wall outlet. Cause and/or Corrective Actions • The POWER switch is set to CAMERA...
Primary User Manual
Page 50
... has occurred. c Connect it firmly. (p. 9) • Something is dead. c Connect it again, then operate your Sony dealer or local authorized Sony service facility. 50 c Use a charged battery pack. (p. 8, 9) The % and Z indicators flash and no indicator appears or the indicator flashes in your camcorder for...work. • Moisture condensation has occurred. c Remove the cassette and insert it firmly. (p. 8, 13) • The battery is wrong with the battery pack. c Remove the cassette and leave your camcorder for at least 1 hour to acclimatize. (p. 54) • Some troubles...
... has occurred. c Connect it firmly. (p. 9) • Something is dead. c Connect it again, then operate your Sony dealer or local authorized Sony service facility. 50 c Use a charged battery pack. (p. 8, 9) The % and Z indicators flash and no indicator appears or the indicator flashes in your camcorder for...work. • Moisture condensation has occurred. c Remove the cassette and insert it firmly. (p. 8, 13) • The battery is wrong with the battery pack. c Remove the cassette and leave your camcorder for at least 1 hour to acclimatize. (p. 54) • Some troubles...


