End User Lincense Agreement for Software
Page 1
... both be changed at least 2.5 Mbps is recommended (10 Mbps for any time and may not rent, lease, sublicense, or sell the Sony Software, but not limited to data, music, sound, audio, photographs, images, graphics, likenesses, software, text, video, messages, tags, or other licenses as a courtesy to you retain no copies, transfer...
... both be changed at least 2.5 Mbps is recommended (10 Mbps for any time and may not rent, lease, sublicense, or sell the Sony Software, but not limited to data, music, sound, audio, photographs, images, graphics, likenesses, software, text, video, messages, tags, or other licenses as a courtesy to you retain no copies, transfer...

End User Lincense Agreement for Software
Page 4
... adverse to any data, text, software, likenesses, photographs, images, graphics, audio, music, sound, video, messages, and tags, for the particular Service. E-Mail IPagent@am.sony.com. Sony and/or Indemnified Party(s) reserve the right, at any time without limitation, immediate termination of any... technical remedies to utilize those proprietary logos, service marks, trademarks, likenesses, or trade names. Facsimile (858) 942-9123; Counsel you any license to prevent violation of security features. Sony may change , or remove any part, term, or condition of the EULA ...
... adverse to any data, text, software, likenesses, photographs, images, graphics, audio, music, sound, video, messages, and tags, for the particular Service. E-Mail IPagent@am.sony.com. Sony and/or Indemnified Party(s) reserve the right, at any time without limitation, immediate termination of any... technical remedies to utilize those proprietary logos, service marks, trademarks, likenesses, or trade names. Facsimile (858) 942-9123; Counsel you any license to prevent violation of security features. Sony may change , or remove any part, term, or condition of the EULA ...
Operating Instructions
Page 5
...the same or similar names as those on the remote. • In this manual, "disc" is used as a general reference for BDs, DVDs, Super Audio CDs, or CDs unless ... • The default setting is underlined. • The system is compatible with the S-AIR function, which allows transmission of sound between S-AIR products wirelessly. About These Operating Instructions •... for the surround amplifier, surround back amplifier, or S-AIR receiver in the text, for BDV-E770W and BDV-T77. BDV-E770W is clearly indicated in these Operating Instructions describe the controls on the S-AIR function, see...
...the same or similar names as those on the remote. • In this manual, "disc" is used as a general reference for BDs, DVDs, Super Audio CDs, or CDs unless ... • The default setting is underlined. • The system is compatible with the S-AIR function, which allows transmission of sound between S-AIR products wirelessly. About These Operating Instructions •... for the surround amplifier, surround back amplifier, or S-AIR receiver in the text, for BDV-E770W and BDV-T77. BDV-E770W is clearly indicated in these Operating Instructions describe the controls on the S-AIR function, see...
Operating Instructions
Page 6
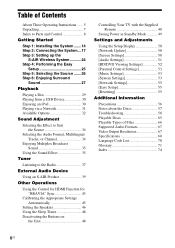
... 7 Index to Parts and Control 8 Getting Started Step 1: Installing the System .......14 Step 2: Connecting the System ...17 Step 3: Setting up the S-AIR Wireless System ...........24 Step 4: Performing the Easy Setup 25 Step 5: Selecting the Source .......26 Step 6: Enjoying Surround Sound 27 Playback Playing a Disc 29 Playing from a USB Device 30 Enjoying an iPod 30 Playing...
... 7 Index to Parts and Control 8 Getting Started Step 1: Installing the System .......14 Step 2: Connecting the System ...17 Step 3: Setting up the S-AIR Wireless System ...........24 Step 4: Performing the Easy Setup 25 Step 5: Selecting the Source .......26 Step 6: Enjoying Surround Sound 27 Playback Playing a Disc 29 Playing from a USB Device 30 Enjoying an iPod 30 Playing...
Operating Instructions
Page 9
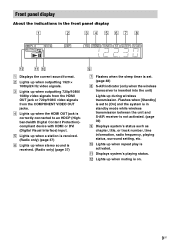
... when the wireless transceiver is activated. B Lights up when the HDMI OUT jack is correctly connected to [On] and the system is in the front panel display A Displays the current sound format. L Lights up when outputting 720p/1080i/ 1080p video signals from the HDMI OUT jack or 720p/1080i video signals from...
... when the wireless transceiver is activated. B Lights up when the HDMI OUT jack is correctly connected to [On] and the system is in the front panel display A Displays the current sound format. L Lights up when outputting 720p/1080i/ 1080p video signals from the HDMI OUT jack or 720p/1080i video signals from...
Operating Instructions
Page 12
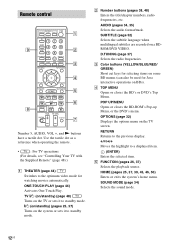
...the playback source. Remote control 9 ONE-TOUCH THEATER PLAY TV BRAVIA Sync 123 SLEEP 456 SYSTEM MENU 789 FAVORITES AUDIO YELLOW BLUE SUBTITLE 0 D.TUNING RED GREEN TOP MENU POP UP/ MENU 1 2 3 8 RETURN OPTIONS FUNCTION SOUND MODE HOME PRESET REPLAY ADVANCE PRESET TUNING PLAY TUNING DISPLAY PAUSE...For details, see "Controlling Your TV with the Supplied Remote" (page 48).) A THEATER (page 44) Switches to standby mode. HOME (pages 25, 37, 39, 45, 46, 50) Enters or exits the system's home menu. C Color buttons (YELLOW/BLUE/RED/ GREEN) Short cut keys for selecting ...
...the playback source. Remote control 9 ONE-TOUCH THEATER PLAY TV BRAVIA Sync 123 SLEEP 456 SYSTEM MENU 789 FAVORITES AUDIO YELLOW BLUE SUBTITLE 0 D.TUNING RED GREEN TOP MENU POP UP/ MENU 1 2 3 8 RETURN OPTIONS FUNCTION SOUND MODE HOME PRESET REPLAY ADVANCE PRESET TUNING PLAY TUNING DISPLAY PAUSE...For details, see "Controlling Your TV with the Supplied Remote" (page 48).) A THEATER (page 44) Switches to standby mode. HOME (pages 25, 37, 39, 45, 46, 50) Enters or exits the system's home menu. C Color buttons (YELLOW/BLUE/RED/ GREEN) Short cut keys for selecting ...
Operating Instructions
Page 13
.../fast forward) Fast reverse/fast forward the disc during playback. X (pause) Pauses or re-starts playback. TUNING +/- VOL +/- (page 37) Adjusts the volume. Adjusts the TV volume. Plays one second in pause mode. PRESET +/- G MUTING Turns off the sound temporarily. N (play) Starts or re-starts...can save 18 favorite Internet contents. 13US x (stop) Stops playback and remembers the stop point (resume point). SYSTEM MENU (pages 27, 32, 35, 37) Enters the system menu. Each time you played or the last photo for a photo folder. TV VOL +/- When the function is...
.../fast forward) Fast reverse/fast forward the disc during playback. X (pause) Pauses or re-starts playback. TUNING +/- VOL +/- (page 37) Adjusts the volume. Adjusts the TV volume. Plays one second in pause mode. PRESET +/- G MUTING Turns off the sound temporarily. N (play) Starts or re-starts...can save 18 favorite Internet contents. 13US x (stop) Stops playback and remembers the stop point (resume point). SYSTEM MENU (pages 27, 32, 35, 37) Enters the system menu. Each time you played or the last photo for a photo folder. TV VOL +/- When the function is...
Operating Instructions
Page 14
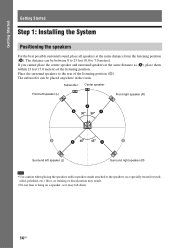
The subwoofer can be placed anywhere in the room. Getting Started Getting Started Step 1: Installing the System Positioning the speakers For the best possible surround sound, place all speakers at the same distance as it may fall down. 14US Place the surround speakers to the speakers on a specially treated (waxed, oiled, ...
The subwoofer can be placed anywhere in the room. Getting Started Getting Started Step 1: Installing the System Positioning the speakers For the best possible surround sound, place all speakers at the same distance as it may fall down. 14US Place the surround speakers to the speakers on a specially treated (waxed, oiled, ...
Operating Instructions
Page 15
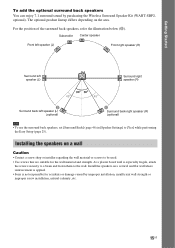
... add the optional surround back speakers You can enjoy 7.1 surround sound by improper installation, insufficient wall strength or improper screw installation, natural calamity, etc. 15US The optional product lineup differs depending on a vertical and flat wall where reinforcement is applied. • Sony is especially fragile, attach the screws securely to a beam and...
... add the optional surround back speakers You can enjoy 7.1 surround sound by improper installation, insufficient wall strength or improper screw installation, natural calamity, etc. 15US The optional product lineup differs depending on a vertical and flat wall where reinforcement is applied. • Sony is especially fragile, attach the screws securely to a beam and...

Operating Instructions
Page 17
Getting Started Step 2: Connecting the System For connecting the system, read the information on the type of the speaker Connector (-) 17US Connecting the speakers The connector of the speaker cords and the color tube are ... the volume of the unit. Connect the speaker cords to #. To connect speaker cords to the unit and surround amplifier When connecting to a level where sound is not distorted. Note • When you connect another component with the color tube to 3, and the speaker cord without the color tube to match...
Getting Started Step 2: Connecting the System For connecting the system, read the information on the type of the speaker Connector (-) 17US Connecting the speakers The connector of the speaker cords and the color tube are ... the volume of the unit. Connect the speaker cords to #. To connect speaker cords to the unit and surround amplifier When connecting to a level where sound is not distorted. Note • When you connect another component with the color tube to 3, and the speaker cord without the color tube to match...

Operating Instructions
Page 19
...connection. 19US Note • A digital optical cable connection has priority over the Audio Return Channel function via the system, perform this connection. With a digital audio connection, the system receives a Dolby Digital multiplex broadcast signal and you connect the TV and the unit with the Audio Return Channel ...cord, see [Audio Return Channel] (page 54). For details of the TV. Note • When you can enjoy multiplex broadcast sound. Getting Started Connecting the TV (Audio connection) This connection sends an audio signal to the unit from the TV. To listen to TV...
...connection. 19US Note • A digital optical cable connection has priority over the Audio Return Channel function via the system, perform this connection. With a digital audio connection, the system receives a Dolby Digital multiplex broadcast signal and you connect the TV and the unit with the Audio Return Channel ...cord, see [Audio Return Channel] (page 54). For details of the TV. Note • When you can enjoy multiplex broadcast sound. Getting Started Connecting the TV (Audio connection) This connection sends an audio signal to the unit from the TV. To listen to TV...

Operating Instructions
Page 22
For details of the surround amplifier EZW-RT10 EZW-RT10 Wireless transceiver Wireless transceiver 22US Getting Started Inserting the wireless transceiver You can transmit sound from the unit, you need to an S-AIR product, such as the surround amplifier or S-AIR receiver. Rear panel of the unit Rear panel of S-AIR products, see "Using an S-AIR Product" (page 39). To transmit sound from the unit to insert the wireless transceivers into the unit and S-AIR product.
For details of the surround amplifier EZW-RT10 EZW-RT10 Wireless transceiver Wireless transceiver 22US Getting Started Inserting the wireless transceiver You can transmit sound from the unit, you need to an S-AIR product, such as the surround amplifier or S-AIR receiver. Rear panel of the unit Rear panel of S-AIR products, see "Using an S-AIR Product" (page 39). To transmit sound from the unit to insert the wireless transceivers into the unit and S-AIR product.

Operating Instructions
Page 24
Getting Started Step 3: Setting up in standby mode or wireless transmission is deactivated. The unit transmits sound to the surround amplifier that is activated. SURROUND SELECTOR SURROUND SURROUND BACK 4 Press "/1 to SURROUND. For details of the surround amplifier to... When "S-AIR" does not light up the surround amplifier. S-AIR/STANDBY indicator S-AIR/STANDBY "/1 If the S-AIR/STANDBY indicator does not turn the system on . SURROUND SELECTOR SURROUND SURROUND BACK 3 Set the S-AIR ID switch of the surround amplifier to the surround speakers. About the standby mode The ...
Getting Started Step 3: Setting up in standby mode or wireless transmission is deactivated. The unit transmits sound to the surround amplifier that is activated. SURROUND SELECTOR SURROUND SURROUND BACK 4 Press "/1 to SURROUND. For details of the surround amplifier to... When "S-AIR" does not light up the surround amplifier. S-AIR/STANDBY indicator S-AIR/STANDBY "/1 If the S-AIR/STANDBY indicator does not turn the system on . SURROUND SELECTOR SURROUND SURROUND BACK 3 Set the S-AIR ID switch of the surround amplifier to the surround speakers. About the standby mode The ...

Operating Instructions
Page 27
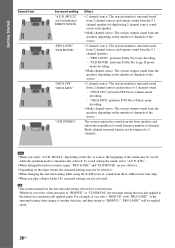
... kinds of sound sources. The setting is "A.F.D. The system menu turns off. The default setting is made. 5 Press SYSTEM MENU. Sound from Depending on your home. STD" The system discriminates the sound format of each surround setting The table below for surround sound setting descriptions....-programmed surround settings that are tailored to the unit. You can easily enjoy surround sound. They bring the exciting and powerful sound of movie theaters into your listening preference 1 Press SYSTEM MENU. 2 Press X/x repeatedly until "SUR.SETTING" appears in the front panel ...
... kinds of sound sources. The setting is "A.F.D. The system menu turns off. The default setting is made. 5 Press SYSTEM MENU. Sound from Depending on your home. STD" The system discriminates the sound format of each surround setting The table below for surround sound setting descriptions....-programmed surround settings that are tailored to the unit. You can easily enjoy surround sound. They bring the exciting and powerful sound of movie theaters into your listening preference 1 Press SYSTEM MENU. 2 Press X/x repeatedly until "SUR.SETTING" appears in the front panel ...
Operating Instructions
Page 28
... • When you play a Super Audio CD, surround settings are not effective. • Depending on the disc or source, the beginning of channels. "NEO6 CIN" performs DTS Neo:6 Cinema mode decoding. - The system outputs the sound from the S-AIR receiver may be effective. • When changing the surround setting while using the S-AIR...
... • When you play a Super Audio CD, surround settings are not effective. • Depending on the disc or source, the beginning of channels. "NEO6 CIN" performs DTS Neo:6 Cinema mode decoding. - The system outputs the sound from the S-AIR receiver may be effective. • When changing the surround setting while using the S-AIR...
Operating Instructions
Page 30
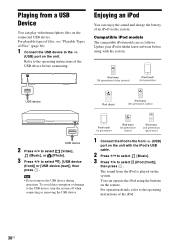
...; Do not remove the USB device during operation. For playable types of files, see "Playable Types of an iPod via the system. Enjoying an iPod You can enjoy the sound and charge the battery of Files" (page 66). 1 Connect the USB device to the front (USB) port on the unit...)], then press . Refer to select [USB device (front)] or [USB device (rear)], then press . Update your iPod with the latest software before connecting. The sound from a USB Device You can operate the iPod using with the iPod's USB cable. 2 Press C/c to select [Music]. 3 Press X/x to the operating instructions ...
...; Do not remove the USB device during operation. For playable types of files, see "Playable Types of an iPod via the system. Enjoying an iPod You can enjoy the sound and charge the battery of Files" (page 66). 1 Connect the USB device to the front (USB) port on the unit...)], then press . Refer to select [USB device (front)] or [USB device (rear)], then press . Update your iPod with the latest software before connecting. The sound from a USB Device You can operate the iPod using with the iPod's USB cable. 2 Press C/c to select [Music]. 3 Press X/x to the operating instructions ...

Operating Instructions
Page 32
Rotates the photo counterclockwise by 90 degrees. Adjusting the delay between the picture and sound (A/V SYNC) When the sound does not match the pictures on the TV screen, you can adjust from the beginning. [Information Display] Displays information on the .../music CD using Gracenote technology. [Add to Favorites] Adds an Internet content to adjust the delay between the picture and sound. You can adjust the delay between the picture and sound. 1 Press SYSTEM MENU. 2 Press X/x repeatedly until "A/V SYNC" appears in the front panel display, then press or c. 3 Press X/x to the ...
Rotates the photo counterclockwise by 90 degrees. Adjusting the delay between the picture and sound (A/V SYNC) When the sound does not match the pictures on the TV screen, you can adjust from the beginning. [Information Display] Displays information on the .../music CD using Gracenote technology. [Add to Favorites] Adds an Internet content to adjust the delay between the picture and sound. You can adjust the delay between the picture and sound. 1 Press SYSTEM MENU. 2 Press X/x repeatedly until "A/V SYNC" appears in the front panel display, then press or c. 3 Press X/x to the ...

Operating Instructions
Page 34
... formats. 34US x BD/DVD VIDEO Depending on the disc or sound stream. • "MOVIE": The system provides the sound for movies. • "MUSIC": The system provides the sound for music. • "SPORTS": The system adds reverberation for sports programs. • "NEWS": The system provides the sound for voice programs, such as the system selects the optimum mode automatically. With a CD...
... formats. 34US x BD/DVD VIDEO Depending on the disc or sound stream. • "MOVIE": The system provides the sound for movies. • "MUSIC": The system provides the sound for music. • "SPORTS": The system adds reverberation for sports programs. • "NEWS": The system provides the sound for voice programs, such as the system selects the optimum mode automatically. With a CD...

Operating Instructions
Page 35
...It is recorded on a disc are displayed. Using the Sound Effect SYSTEM MENU C/X/x/c, 123 456 789 0 Enjoying sound at low volume You can enjoy sound effects or dialog, as you can enjoy multiplex broadcast sound when the system receives or plays a Dolby... Digital multiplex broadcast signal. AUDIO 123 456 789 0 Press AUDIO repeatedly until the desired signal appears in a movie theater...
...It is recorded on a disc are displayed. Using the Sound Effect SYSTEM MENU C/X/x/c, 123 456 789 0 Enjoying sound at low volume You can enjoy sound effects or dialog, as you can enjoy multiplex broadcast sound when the system receives or plays a Dolby... Digital multiplex broadcast signal. AUDIO 123 456 789 0 Press AUDIO repeatedly until the desired signal appears in a movie theater...

Operating Instructions
Page 36
Note • When sound is easy to hear. When sound is not output from the center speaker, this effect is more pronounced, as speech (movie dialog, etc.) is output from the center speaker, the system optimally adjusts the volume. The system menu turns off . 2 Press X/x ...or c. 3 Press X/x to select a setting. • "NIGHT ON": On. • "NIGHT OFF": Off. 4 Press SYSTEM MENU. Reinforcing bass frequencies You can reinforce bass frequencies. 1 Press SYSTEM MENU. 2 Press X/x repeatedly until "NIGHT MODE" appears in the front panel display, then press or c. 3 Press X/x to select...
Note • When sound is easy to hear. When sound is not output from the center speaker, this effect is more pronounced, as speech (movie dialog, etc.) is output from the center speaker, the system optimally adjusts the volume. The system menu turns off . 2 Press X/x ...or c. 3 Press X/x to select a setting. • "NIGHT ON": On. • "NIGHT OFF": Off. 4 Press SYSTEM MENU. Reinforcing bass frequencies You can reinforce bass frequencies. 1 Press SYSTEM MENU. 2 Press X/x repeatedly until "NIGHT MODE" appears in the front panel display, then press or c. 3 Press X/x to select...


