Operating Instructions
Page 6
...39 Other Operations Using the Control for HDMI Function for "BRAVIA" Sync 43 Calibrating the Appropriate Settings Automatically 45 Setting the Speakers 46 Using the Sleep Timer 48 Deactivating the Buttons on the Unit 48 Controlling Your TV with the Supplied Remote 48 Saving... Viewing Settings 52 [Parental Control Settings 53 [Music Settings 53 [System Settings 53 [Network Settings 55 [Easy Setup 55 [Resetting 55 Additional Information Precautions 56 Notes about the Discs 57 Troubleshooting 58 Playable Discs 65 Playable Types of Files 66 Supported Audio Formats 67 Video Output...
...39 Other Operations Using the Control for HDMI Function for "BRAVIA" Sync 43 Calibrating the Appropriate Settings Automatically 45 Setting the Speakers 46 Using the Sleep Timer 48 Deactivating the Buttons on the Unit 48 Controlling Your TV with the Supplied Remote 48 Saving... Viewing Settings 52 [Parental Control Settings 53 [Music Settings 53 [System Settings 53 [Network Settings 55 [Easy Setup 55 [Resetting 55 Additional Information Precautions 56 Notes about the Discs 57 Troubleshooting 58 Playable Discs 65 Playable Types of Files 66 Supported Audio Formats 67 Video Output...
Operating Instructions
Page 7
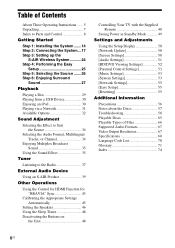
Unpacking • Front speakers (2) • Surround speakers (2) • Center speaker (1) • Subwoofer (1) • Speaker cords (6, white/red/ • Wireless transceivers (2) blue/gray/green/purple) • Video cord (1) • Remote commander (remote) (1) • Operating Instructions • Quick Setup Guide • To stabilize S-AIR reception • End user license agreement • Easy Setup Disc (DVD) • USB Wireless...
Unpacking • Front speakers (2) • Surround speakers (2) • Center speaker (1) • Subwoofer (1) • Speaker cords (6, white/red/ • Wireless transceivers (2) blue/gray/green/purple) • Video cord (1) • Remote commander (remote) (1) • Operating Instructions • Quick Setup Guide • To stabilize S-AIR reception • End user license agreement • Easy Setup Disc (DVD) • USB Wireless...

Operating Instructions
Page 10
Rear panel SPEAKERS FRONT R FRONT L SUBWOOFER CENTER LAN(100) VIDEO OUT Y PB / CB PR / CR COMPONENT VIDEO OUT SAT/CABLE TV DIGITAL IN DIGITAL IN ARC OUT COAXIAL ... 25, 45) J ANTENNA (FM COAXIAL 75Ω) jack (page 21) K TV (DIGITAL IN OPTICAL) jack (page 19) L SAT/CABLE (DIGITAL IN COAXIAL) jack (page 20) M SPEAKERS jacks (page 17) 10US
Rear panel SPEAKERS FRONT R FRONT L SUBWOOFER CENTER LAN(100) VIDEO OUT Y PB / CB PR / CR COMPONENT VIDEO OUT SAT/CABLE TV DIGITAL IN DIGITAL IN ARC OUT COAXIAL ... 25, 45) J ANTENNA (FM COAXIAL 75Ω) jack (page 21) K TV (DIGITAL IN OPTICAL) jack (page 19) L SAT/CABLE (DIGITAL IN COAXIAL) jack (page 20) M SPEAKERS jacks (page 17) 10US

Operating Instructions
Page 11
... R A B C PAIRING S-AIR ID IMPEDANCE USE SURROUND SURROUND BACK 3-16 SPEAKERS EZW-RT10 A "/1 (Power) Turns the surround amplifier on , wireless transmission is activated and surround signals are not transmitting. The system is turned on /off. Flashes orange. Flashes red. C S-AIR ID switch ...Selects the S-AIR ID. G SPEAKERS jacks H Wireless transceiver (EZW-RT10) slot 11US The system is turned on and wireless transmission is turned ...
... R A B C PAIRING S-AIR ID IMPEDANCE USE SURROUND SURROUND BACK 3-16 SPEAKERS EZW-RT10 A "/1 (Power) Turns the surround amplifier on , wireless transmission is activated and surround signals are not transmitting. The system is turned on /off. Flashes orange. Flashes red. C S-AIR ID switch ...Selects the S-AIR ID. G SPEAKERS jacks H Wireless transceiver (EZW-RT10) slot 11US The system is turned on and wireless transmission is turned ...
Operating Instructions
Page 14
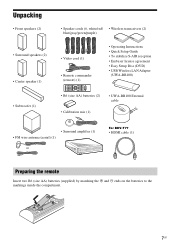
Subwoofer Center speaker Front left speaker (L) Front right speaker (R) A A A 30 30 B A 45 45 A B Surround left speaker (L) Surround right speaker (R) Note • Use caution when placing the speakers and/or speaker stands attached to the rear of the listening position. Getting Started Getting Started Step 1: Installing the System Positioning the speakers For the best possible surround sound, place all speakers at the...
Subwoofer Center speaker Front left speaker (L) Front right speaker (R) A A A 30 30 B A 45 45 A B Surround left speaker (L) Surround right speaker (R) Note • Use caution when placing the speakers and/or speaker stands attached to the rear of the listening position. Getting Started Getting Started Step 1: Installing the System Positioning the speakers For the best possible surround sound, place all speakers at the...
Operating Instructions
Page 15
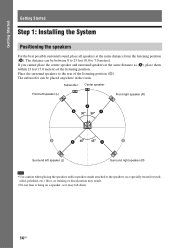
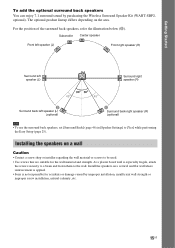
... Center speaker Front left speaker (L) Front right speaker (R) Surround left speaker (L) Surround right speaker (R) 30 30 45 45 C Surround back left speaker (L) (optional) C Surround back right speaker (R) (optional) Note • To use the surround back speakers, set [Surround Back] (page 46) in [Speaker Settings] to the wall. Install the speakers on a vertical and flat wall where reinforcement is applied. • Sony...
... Center speaker Front left speaker (L) Front right speaker (R) Surround left speaker (L) Surround right speaker (R) 30 30 45 45 C Surround back left speaker (L) (optional) C Surround back right speaker (R) (optional) Note • To use the surround back speakers, set [Surround Back] (page 46) in [Speaker Settings] to the wall. Install the speakers on a vertical and flat wall where reinforcement is applied. • Sony...

Operating Instructions
Page 16
... inch) 10 mm (13/32 inch) Hole on the back of the speaker 2 Fasten the screws to the speaker. Color tube Front left speaker (L): White Front right speaker (R): Red Center speaker: Green Surround left speaker (L): Blue Surround right speaker (R): Gray 1 Prepare screws (not supplied) that are suitable for the hole... on the back of the speaker 16US Rear of each speaker. Getting Started To install the speakers on a wall Before installing the speakers on a wall, connect the speaker cord to the wall. For the center speaker 219 mm (8 5/8 inches) For the other speakers 8 to 10 mm (11/...
... inch) 10 mm (13/32 inch) Hole on the back of the speaker 2 Fasten the screws to the speaker. Color tube Front left speaker (L): White Front right speaker (R): Red Center speaker: Green Surround left speaker (L): Blue Surround right speaker (R): Gray 1 Prepare screws (not supplied) that are suitable for the hole... on the back of the speaker 16US Rear of each speaker. Getting Started To install the speakers on a wall Before installing the speakers on a wall, connect the speaker cord to the wall. For the center speaker 219 mm (8 5/8 inches) For the other speakers 8 to 10 mm (11/...

Operating Instructions
Page 17
...) of the unit to match the color of the SPEAKERS jacks of the surround amplifier Gray (Surround right speaker (R)) Green (Center speaker) Purple (Subwoofer) R L IMPEDANC3E-1U6SE SPEAKERS Blue (Surround left speaker (L)) To connect speaker cords to the unit and surround amplifier, insert the ... volume of the speaker Connector (-) 17US To connect speaker cords to the unit and surround amplifier When connecting to the speaker Color tube (+) Rear or bottom of the other connections are made. Getting Started Step 2: Connecting the System For connecting the system, read the information...
...) of the unit to match the color of the SPEAKERS jacks of the surround amplifier Gray (Surround right speaker (R)) Green (Center speaker) Purple (Subwoofer) R L IMPEDANC3E-1U6SE SPEAKERS Blue (Surround left speaker (L)) To connect speaker cords to the unit and surround amplifier, insert the ... volume of the speaker Connector (-) 17US To connect speaker cords to the unit and surround amplifier When connecting to the speaker Color tube (+) Rear or bottom of the other connections are made. Getting Started Step 2: Connecting the System For connecting the system, read the information...

Operating Instructions
Page 20
... the components are sent to the TV, and audio signals from the components are sent to the system as follows. TV System Signal flow : Video signal : Audio signal You can enjoy connected components via the system's speakers. • VCR or digital satellite receiver, etc. (not supplied), which has a digital coaxial output jack: D • VCR...
... the components are sent to the TV, and audio signals from the components are sent to the system as follows. TV System Signal flow : Video signal : Audio signal You can enjoy connected components via the system's speakers. • VCR or digital satellite receiver, etc. (not supplied), which has a digital coaxial output jack: D • VCR...
Operating Instructions
Page 23
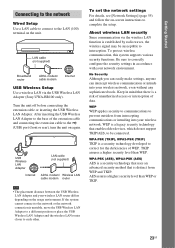
... via the wireless LAN function is distinct from intercepting communications or intruding into your wireless network. To protect wireless communication, this system supports various security functions. Be sure to be susceptible to each other. WEP is a legacy security technology that enables older devices...LAN(100) VIDEO OUT SPEAKERS Y PB / CB PR / CR COMPONENT VIDEO OUT SAT/CABLE TV DIGITAL IN DIGITAL IN ARC OUT SUR R SUR L COAXIAL OPTICAL FM COAXIAL 75 ANTENNA A. About wireless LAN security Since communication via the USB Wireless LAN Adapter (Sony UWA-BR100 only). ...
... via the wireless LAN function is distinct from intercepting communications or intruding into your wireless network. To protect wireless communication, this system supports various security functions. Be sure to be susceptible to each other. WEP is a legacy security technology that enables older devices...LAN(100) VIDEO OUT SPEAKERS Y PB / CB PR / CR COMPONENT VIDEO OUT SAT/CABLE TV DIGITAL IN DIGITAL IN ARC OUT SUR R SUR L COAXIAL OPTICAL FM COAXIAL 75 ANTENNA A. About wireless LAN security Since communication via the USB Wireless LAN Adapter (Sony UWA-BR100 only). ...

Operating Instructions
Page 24
...surround amplifier that the wireless transceiver is inserted into the unit correctly. 2 Set the SURROUND SELECTOR switch of the surround amplifier to the surround speakers. "/1 Make sure that "S-AIR" light up , make sure that is activated, the S-AIR/STANDBY indicator turns green. When "S-AIR" ..."Using an S-AIR Product" (page 39). The surround amplifier is turned on automatically (the S-AIR/STANDBY indicator turns green) when the system is turned on . About the standby mode The surround amplifier enters standby mode automatically (the S-AIR/STANDBY indicator turns red) when the main...
...surround amplifier that the wireless transceiver is inserted into the unit correctly. 2 Set the SURROUND SELECTOR switch of the surround amplifier to the surround speakers. "/1 Make sure that "S-AIR" light up , make sure that is activated, the S-AIR/STANDBY indicator turns green. When "S-AIR" ..."Using an S-AIR Product" (page 39). The surround amplifier is turned on automatically (the S-AIR/STANDBY indicator turns green) when the system is turned on . About the standby mode The surround amplifier enters standby mode automatically (the S-AIR/STANDBY indicator turns red) when the main...
Operating Instructions
Page 25
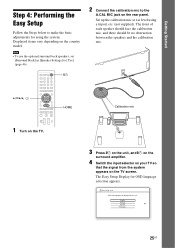
... on your TV so that the signal from the system appears on the country model. Note • To use the optional surround back speakers, set [Surround Back] in [Speaker Settings] to [Yes] (page 46). 123 456 789 0 "/1 C/X/x/c, HOME 2 Connect the calibration mic to be no obstruction ...between the speakers and the calibration mic. Easy Setup - English Français...
... on your TV so that the signal from the system appears on the country model. Note • To use the optional surround back speakers, set [Surround Back] in [Speaker Settings] to [Yes] (page 46). 123 456 789 0 "/1 C/X/x/c, HOME 2 Connect the calibration mic to be no obstruction ...between the speakers and the calibration mic. Easy Setup - English Français...

Operating Instructions
Page 27
... 456 789 0 Selecting surround settings based on the source. About speaker output of movie theaters into your listening preference 1 Press SYSTEM MENU. 2 Press X/x repeatedly until "SUR.SETTING" appears in the front panel display. Sound from Depending on your home. Getting Started Step 6: Enjoying Surround Sound After performing the previous Steps and starting playback, you...
... 456 789 0 Selecting surround settings based on the source. About speaker output of movie theaters into your listening preference 1 Press SYSTEM MENU. 2 Press X/x repeatedly until "SUR.SETTING" appears in the front panel display. Sound from Depending on your home. Getting Started Step 6: Enjoying Surround Sound After performing the previous Steps and starting playback, you...
Operating Instructions
Page 28
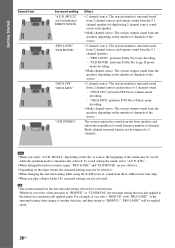
...disc or source, the beginning of channels. Note • When you select a function such as the surround setting, then change to another function, and then return to "BD/DVD," "PRO LOGIC" will be effective. • When changing the surround setting while using the S-AIR receiver, sound from the 5.1 channel speakers. - The system... the source. "PLII MOVIE" performs Dolby Pro Logic II movie mode decoding. • Multi-channel source: The system outputs sound from the speakers depending on the input stream, the surround settings may skip. • When you select "BD/DVD" with "PRO...
...disc or source, the beginning of channels. Note • When you select a function such as the surround setting, then change to another function, and then return to "BD/DVD," "PRO LOGIC" will be effective. • When changing the surround setting while using the S-AIR receiver, sound from the 5.1 channel speakers. - The system... the source. "PLII MOVIE" performs Dolby Pro Logic II movie mode decoding. • Multi-channel source: The system outputs sound from the speakers depending on the input stream, the surround settings may skip. • When you select "BD/DVD" with "PRO...

Operating Instructions
Page 34
...other than "AUTO." • Depending on the disc or sound stream. • "MOVIE": The system provides the sound for movies. • "MUSIC": The system provides the sound for music. • "SPORTS": The system adds reverberation for sports programs. • "NEWS": The system provides the sound for voice programs, such as...receiver, sound from the right or left channel and listen to the sound of the selected channel through both the right and left speakers. Sound Adjustment Selecting the Effect to Suit the Source You can select a suitable sound mode for music/rhythm games. Press SOUND MODE...
...other than "AUTO." • Depending on the disc or sound stream. • "MOVIE": The system provides the sound for movies. • "MUSIC": The system provides the sound for music. • "SPORTS": The system adds reverberation for sports programs. • "NEWS": The system provides the sound for voice programs, such as...receiver, sound from the right or left channel and listen to the sound of the selected channel through both the right and left speakers. Sound Adjustment Selecting the Effect to Suit the Source You can select a suitable sound mode for music/rhythm games. Press SOUND MODE...

Operating Instructions
Page 36
... effect is more pronounced, as speech (movie dialog, etc.) is not output from the center speaker, the system optimally adjusts the volume. Reinforcing bass frequencies You can reinforce bass frequencies. 1 Press SYSTEM MENU. 2 Press X/x repeatedly until "NIGHT MODE" appears in the front panel display, then press or... c. 3 Press X/x to select a setting. • "NIGHT ON": On. • "NIGHT OFF": Off. 4 Press SYSTEM MENU. When sound is easy to hear. The system menu turns off . 36US 2 Press X/x repeatedly until "D.BASS" appears in the front panel display, then press or c. 3 Press ...
... effect is more pronounced, as speech (movie dialog, etc.) is not output from the center speaker, the system optimally adjusts the volume. Reinforcing bass frequencies You can reinforce bass frequencies. 1 Press SYSTEM MENU. 2 Press X/x repeatedly until "NIGHT MODE" appears in the front panel display, then press or... c. 3 Press X/x to select a setting. • "NIGHT ON": On. • "NIGHT OFF": Off. 4 Press SYSTEM MENU. When sound is easy to hear. The system menu turns off . 36US 2 Press X/x repeatedly until "D.BASS" appears in the front panel display, then press or c. 3 Press ...

Operating Instructions
Page 37
...If an FM program is noisy, you can enjoy radio sound with the system's speakers. Automatic tuning Press and hold TUNING +/- or x. There will be no stereo effect, but reception will improve. 1 Press SYSTEM MENU. 2 Press X/x repeatedly until the auto scanning starts. [Auto Tuning...until the auto scanning starts. A preset number appears in a station. repeatedly. 3 Adjust the volume by pressing VOL +/-. SYSTEM MENU 123 456 789 0 "/1 Number buttons D.TUNING C/X/x/c, HOME FUNCTION VOL +/- Before tuning, make sure to turn off . To turn down the volume to 20 stations. x Current...
...If an FM program is noisy, you can enjoy radio sound with the system's speakers. Automatic tuning Press and hold TUNING +/- or x. There will be no stereo effect, but reception will improve. 1 Press SYSTEM MENU. 2 Press X/x repeatedly until the auto scanning starts. [Auto Tuning...until the auto scanning starts. A preset number appears in a station. repeatedly. 3 Adjust the volume by pressing VOL +/-. SYSTEM MENU 123 456 789 0 "/1 Number buttons D.TUNING C/X/x/c, HOME FUNCTION VOL +/- Before tuning, make sure to turn off . To turn down the volume to 20 stations. x Current...
Operating Instructions
Page 39
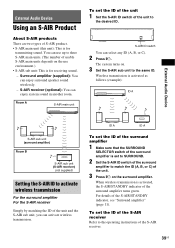
S-AIR ID ABC S-AIR ID switch You can enjoy system sound in another room. Wireless transmission is activated, the S-AIR/STANDBY indicator of the surround amplifier ... ID switch of the unit to the desired ID. S-AIR receiver (optional): You can select any ID (A, B, or C). 2 Press "/1. The system turns on the use environment.) • S-AIR sub unit: This is for transmitting sound. For details of usable S-AIR main units depends on ...up to the operating instructions of the surround amplifier is for receiving sound. - You can enjoy surround speaker sound wirelessly. -
S-AIR ID ABC S-AIR ID switch You can enjoy system sound in another room. Wireless transmission is activated, the S-AIR/STANDBY indicator of the surround amplifier ... ID switch of the unit to the desired ID. S-AIR receiver (optional): You can select any ID (A, B, or C). 2 Press "/1. The system turns on the use environment.) • S-AIR sub unit: This is for transmitting sound. For details of usable S-AIR main units depends on ...up to the operating instructions of the surround amplifier is for receiving sound. - You can enjoy surround speaker sound wirelessly. -
Operating Instructions
Page 40
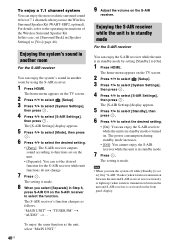
... on the TV screen. 2 Press C/c to select [Setup]. 3 Press X/x to select [System Settings], then press . 4 Press X/x to [Yes] (page 46). The home menu appears on . To enjoy a 7.1 channel system You can enjoy the more realistic surround sound effect of the Wireless Surround Speaker Kit. For details, refer to the operating instructions of 7.1 channels when...
... on the TV screen. 2 Press C/c to select [Setup]. 3 Press X/x to select [System Settings], then press . 4 Press X/x to [Yes] (page 46). The home menu appears on . To enjoy a 7.1 channel system You can enjoy the more realistic surround sound effect of the Wireless Surround Speaker Kit. For details, refer to the operating instructions of 7.1 channels when...
Operating Instructions
Page 44
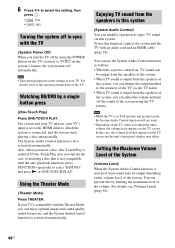
...by using the TV remote. If One-Touch Play does not start (in the case of inserting a disc that is output from the speakers in PAP (picture and picture) mode, the System Audio Control function will not work. • Depending on the TV, when you turn off automatically. Enjoying... the POWER button on the TV's remote or TV "/1 on the TV screen. Using the Theater Mode (Theater Mode) Press THEATER. For details, see [Volume Limit] (page 54). 44US The System Audio Control function is activated, loud sound may differ. 6 Press X/x to enjoy TV sound via the TV menu. •...
...by using the TV remote. If One-Touch Play does not start (in the case of inserting a disc that is output from the speakers in PAP (picture and picture) mode, the System Audio Control function will not work. • Depending on the TV, when you turn off automatically. Enjoying... the POWER button on the TV's remote or TV "/1 on the TV screen. Using the Theater Mode (Theater Mode) Press THEATER. For details, see [Volume Limit] (page 54). 44US The System Audio Control function is activated, loud sound may differ. 6 Press X/x to enjoy TV sound via the TV menu. •...


