
Operating Instructions
Page 3
However, there is connected. - IC Radiation Exposure Statement: This equipment complies with IC radiation exposure limits set forth for an uncontrolled environment and meets the FCC radio frequency (RF) ..., bracket, or table specified by the manufacturer, or sold with the apparatus. A polarized plug has two blades with one or more of the following measures: - Connect the equipment into your safety. Install in accordance with the manufacturer's instructions. 8) Do not install near water. 6) Clean only with dry cloth. 7) Do not block...
However, there is connected. - IC Radiation Exposure Statement: This equipment complies with IC radiation exposure limits set forth for an uncontrolled environment and meets the FCC radio frequency (RF) ..., bracket, or table specified by the manufacturer, or sold with the apparatus. A polarized plug has two blades with one or more of the following measures: - Connect the equipment into your safety. Install in accordance with the manufacturer's instructions. 8) Do not install near water. 6) Clean only with dry cloth. 7) Do not block...
Operating Instructions
Page 4
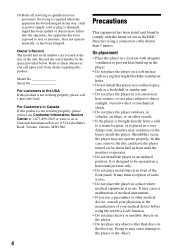
... place where medical equipment is designed to them whenever you call 1-866-909-7669. Should this product. Doing so may limit reception of your Sony dealer regarding this occur, the player may cause a malfunction of medical instruments. • If you use . For Customers in Canada If this ...not place the player on the disc tray. In this product is not working properly, please call upon your medical device before using a connection cable shorter than discs on a soft surface such as power-supply cord or plug is required when the apparatus has been damaged in a ...
... place where medical equipment is designed to them whenever you call 1-866-909-7669. Should this product. Doing so may limit reception of your Sony dealer regarding this occur, the player may cause a malfunction of medical instruments. • If you use . For Customers in Canada If this ...not place the player on the disc tray. In this product is not working properly, please call upon your medical device before using a connection cable shorter than discs on a soft surface such as power-supply cord or plug is required when the apparatus has been damaged in a ...

Operating Instructions
Page 5
...upside down or tilted. • Be sure to disconnect the HDMI cable when moving the player. • Hold the HDMI connector straight when connecting or disconnecting the HDMI cable. On cleaning Clean the cabinet, panel, and controls with very low level inputs or no audio signals. IMPORTANT ...or force the HDMI connector into the HDMI OUT jack. If you have any questions or problems concerning your player, please consult your nearest Sony dealer. 5 Plasma display panel televisions and projection televisions are not going to prevent the AC power cord being damaged. If you don't,...
...upside down or tilted. • Be sure to disconnect the HDMI cable when moving the player. • Hold the HDMI connector straight when connecting or disconnecting the HDMI cable. On cleaning Clean the cabinet, panel, and controls with very low level inputs or no audio signals. IMPORTANT ...or force the HDMI connector into the HDMI OUT jack. If you have any questions or problems concerning your player, please consult your nearest Sony dealer. 5 Plasma display panel televisions and projection televisions are not going to prevent the AC power cord being damaged. If you don't,...
Operating Instructions
Page 9
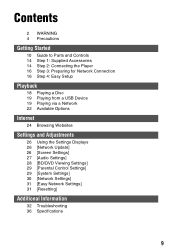
Contents 2 WARNING 4 Precautions Getting Started 10 Guide to Parts and Controls 14 Step 1: Supplied Accessories 14 Step 2: Connecting the Player 16 Step 3: Preparing for Network Connection 16 Step 4: Easy Setup Playback 18 Playing a Disc 19 Playing from a USB Device 19 Playing via a Network 22 Available Options Internet 24 Browsing Websites Settings ...
Contents 2 WARNING 4 Precautions Getting Started 10 Guide to Parts and Controls 14 Step 1: Supplied Accessories 14 Step 2: Connecting the Player 16 Step 3: Preparing for Network Connection 16 Step 4: Easy Setup Playback 18 Playing a Disc 19 Playing from a USB Device 19 Playing via a Network 22 Available Options Internet 24 Browsing Websites Settings ...

Operating Instructions
Page 10
Use the tactile dot as a reference when operating the player. G Remote sensor To lock the disc tray (Child Lock) You can lock the disc tray to lock or unlock the tray. 10 While the player is turned on, hold down the N button on the player, or sets to Parts and Controls Front panel z The N button has a tactile dot. A Disc tray B Z (open/close) C N (play) D x (stop) E [/1 (on/standby) / Power indicator Turns on the player for more than 10 seconds to avoid accidental opening of the tray. Getting Started Guide to standby mode. F (USB) jack Connect a USB device to this jack.
Use the tactile dot as a reference when operating the player. G Remote sensor To lock the disc tray (Child Lock) You can lock the disc tray to lock or unlock the tray. 10 While the player is turned on, hold down the N button on the player, or sets to Parts and Controls Front panel z The N button has a tactile dot. A Disc tray B Z (open/close) C N (play) D x (stop) E [/1 (on/standby) / Power indicator Turns on the player for more than 10 seconds to avoid accidental opening of the tray. Getting Started Guide to standby mode. F (USB) jack Connect a USB device to this jack.
Operating Instructions
Page 14
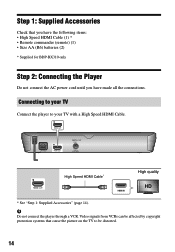
...: • High Speed HDMI Cable (1) * • Remote commander (remote) (1) • Size AA (R6) batteries (2) * Supplied for BDP-BX310 only Step 2: Connecting the Player Do not connect the AC power cord until you have made all the connections. Video signals from VCRs can be distorted. 14 Step 1: Supplied Accessories Check that cause the picture on...
...: • High Speed HDMI Cable (1) * • Remote commander (remote) (1) • Size AA (R6) batteries (2) * Supplied for BDP-BX310 only Step 2: Connecting the Player Do not connect the AC power cord until you have made all the connections. Video signals from VCRs can be distorted. 14 Step 1: Supplied Accessories Check that cause the picture on...
Operating Instructions
Page 15
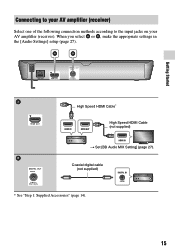
When you select A or B, make the appropriate settings in the [Audio Settings] setup (page 27). Coaxial digital cable (not supplied) * See "Step 1: Supplied Accessories" (page 14). 15 High Speed HDMI Cable* High Speed HDMI Cable (not supplied) t Set [BD Audio MIX Setting] (page 27). Getting Started Connecting to your AV amplifier (receiver) Select one of the following connection methods according to the input jacks on your AV amplifier (receiver).
When you select A or B, make the appropriate settings in the [Audio Settings] setup (page 27). Coaxial digital cable (not supplied) * See "Step 1: Supplied Accessories" (page 14). 15 High Speed HDMI Cable* High Speed HDMI Cable (not supplied) t Set [BD Audio MIX Setting] (page 27). Getting Started Connecting to your AV amplifier (receiver) Select one of the following connection methods according to the input jacks on your AV amplifier (receiver).
Operating Instructions
Page 16
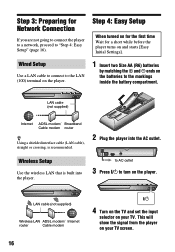
... the wireless LAN that is recommended. 2 Plug the player into the player. Step 4: Easy Setup When turned on for the first time Wait for Network Connection If you are not going to connect the player to a network, proceed to the markings inside the battery compartment. Wired Setup Use a LAN cable to... connect to the LAN (100) terminal on the player. 1 Insert two Size AA (R6) batteries by matching the 3 and # ends on the batteries to "Step 4: Easy ...
... the wireless LAN that is recommended. 2 Plug the player into the player. Step 4: Easy Setup When turned on for the first time Wait for Network Connection If you are not going to connect the player to a network, proceed to the markings inside the battery compartment. Wired Setup Use a LAN cable to... connect to the LAN (100) terminal on the player. 1 Insert two Size AA (R6) batteries by matching the 3 and # ends on the batteries to "Step 4: Easy ...
Operating Instructions
Page 18
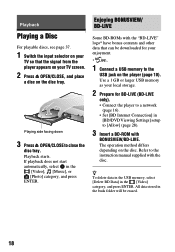
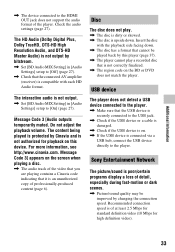
...28). 3 Insert a BD-ROM with BONUSVIEW/BD-LIVE. Playback starts. Use a 1 GB or larger USB memory as your local storage. 2 Prepare for your enjoyment. * 1 Connect a USB memory to close the disc tray. z To delete data in the USB memory, select [Delete BD Data] in the [Video], [Music], or [Photo] category...erased. 18 All data stored in the buda folder will be downloaded for BD-LIVE (BD-LIVE only). • Connect the player to a network (page 16). • Set [BD Internet Connection] in [BD/DVD Viewing Settings] setup to the instruction manual supplied with the "BD-LIVE" logo* have bonus ...
...28). 3 Insert a BD-ROM with BONUSVIEW/BD-LIVE. Playback starts. Use a 1 GB or larger USB memory as your local storage. 2 Prepare for your enjoyment. * 1 Connect a USB memory to close the disc tray. z To delete data in the USB memory, select [Delete BD Data] in the [Video], [Music], or [Photo] category...erased. 18 All data stored in the buda folder will be downloaded for BD-LIVE (BD-LIVE only). • Connect the player to a network (page 16). • Set [BD Internet Connection] in [BD/DVD Viewing Settings] setup to the instruction manual supplied with the "BD-LIVE" logo* have bonus ...
Operating Instructions
Page 19
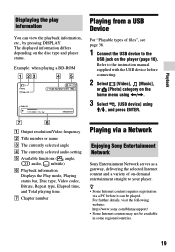
Playback Displaying the play information You can view the playback information, etc., by pressing DISPLAY. Refer to the USB jack on the home menu using Example: when playing a BD-ROM Playing from a USB Device For "Playable types of files", see page 38. 1 Connect the USB device to the instruction manual supplied with the USB device before connecting. 2 Select [Video], [Music], or [Photo] category on the player (page 10). The displayed information differs depending on the disc type and player status.
Playback Displaying the play information You can view the playback information, etc., by pressing DISPLAY. Refer to the USB jack on the home menu using Example: when playing a BD-ROM Playing from a USB Device For "Playable types of files", see page 38. 1 Connect the USB device to the instruction manual supplied with the USB device before connecting. 2 Select [Video], [Music], or [Photo] category on the player (page 10). The displayed information differs depending on the disc type and player status.
Operating Instructions
Page 20
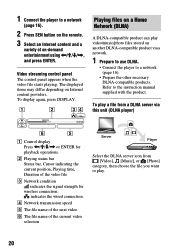
1 Connect the player to a network (page 16). 2 Press SEN button on the remote. 3 Select an Internet content and a variety of on-demand entertainment using
1 Connect the player to a network (page 16). 2 Press SEN button on the remote. 3 Select an Internet content and a variety of on-demand entertainment using
Operating Instructions
Page 21
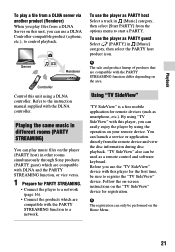
...on-screen instructions on the "TV SideView" device for remote devices (such as PARTY guest Select [PARTY] in other rooms simultaneously through Sony products (PARTY guest) which are compatible with the PARTY STREAMING function differ depending on the area. To use the "TV SideView" device... disc playback. b The registration can play files from a DLNA Server on this player for PARTY STREAMING. • Connect the player to a network (page 16). • Connect the products which are compatible with the DLNA controller. Playback To play a file from a DLNA server via another product...
...on-screen instructions on the "TV SideView" device for remote devices (such as PARTY guest Select [PARTY] in other rooms simultaneously through Sony products (PARTY guest) which are compatible with the PARTY STREAMING function differ depending on the area. To use the "TV SideView" device... disc playback. b The registration can play files from a DLNA Server on this player for PARTY STREAMING. • Connect the player to a network (page 16). • Connect the products which are compatible with the DLNA controller. Playback To play a file from a DLNA server via another product...
Operating Instructions
Page 24
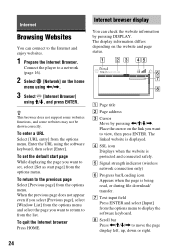
Connect the player to the Internet and enjoy websites. 1 Prepare the Internet Browser. Internet Browsing Websites You can connect to a network (page 16). 2 Select [Network] on the home menu using
Connect the player to the Internet and enjoy websites. 1 Prepare the Internet Browser. Internet Browsing Websites You can connect to a network (page 16). 2 Select [Network] on the home menu using
Operating Instructions
Page 26
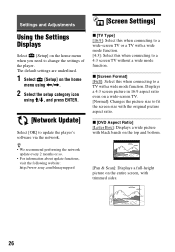
The default settings are underlined. 1 Select [Setup] on the home menu when you need to change the settings of the player. Settings and Adjustments [Screen Settings] Using the Settings Displays Select [Setup] on the home menu using
The default settings are underlined. 1 Select [Setup] on the home menu when you need to change the settings of the player. Settings and Adjustments [Screen Settings] Using the Settings Displays Select [Setup] on the home menu using

Operating Instructions
Page 27
... Deep Color. [Off]: Select this when your TV is unstable or colors appear unnatural. x [YCbCr/RGB (HDMI)] [Auto]: Automatically detects the connected TV type, and switches to the primary audio. [Off]: Outputs the primary audio only. x [Cinema Conversion Mode] [Auto]: Normally select this ...HD audio signals to the appropriate conversion method. [Video]: The conversion method suited for video-based material will always be selected regardless of the connected devices. [PCM]: Outputs PCM signals from the DIGITAL OUT (COAXIAL)/HDMI OUT jack. x [DVD-ROM 24p Output] [Auto]: Outputs ...
... Deep Color. [Off]: Select this when your TV is unstable or colors appear unnatural. x [YCbCr/RGB (HDMI)] [Auto]: Automatically detects the connected TV type, and switches to the primary audio. [Off]: Outputs the primary audio only. x [Cinema Conversion Mode] [Auto]: Normally select this ...HD audio signals to the appropriate conversion method. [Video]: The conversion method suited for video-based material will always be selected regardless of the connected devices. [PCM]: Outputs PCM signals from the DIGITAL OUT (COAXIAL)/HDMI OUT jack. x [DVD-ROM 24p Output] [Auto]: Outputs ...
Operating Instructions
Page 28
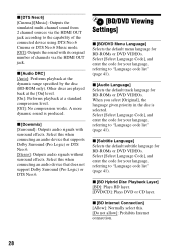
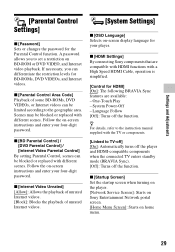
... code list" (page 41). When you select [Original], the language given priority in the disc is produced. x [BD Internet Connection] [Allow]: Normally select this when connecting an audio device that does not support Dolby Surround (Pro Logic) or DTS Neo:6. [BD/DVD Viewing Settings] x [BD/DVD...DTS Neo:6] [Cinema]/[Music]: Outputs the simulated multi-channel sound from 2 channel sources via the HDMI OUT jack according to the capability of the connected device using DTS Neo:6 Cinema or DTS Neo:6 Music mode. [Off]: Outputs the sound with surround effects. x [Audio Language] Selects the ...
... code list" (page 41). When you select [Original], the language given priority in the disc is produced. x [BD Internet Connection] [Allow]: Normally select this when connecting an audio device that does not support Dolby Surround (Pro Logic) or DTS Neo:6. [BD/DVD Viewing Settings] x [BD/DVD...DTS Neo:6] [Cinema]/[Music]: Outputs the simulated multi-channel sound from 2 channel sources via the HDMI OUT jack according to the capability of the connected device using DTS Neo:6 Cinema or DTS Neo:6 Music mode. [Off]: Outputs the sound with surround effects. x [Audio Language] Selects the ...
Operating Instructions
Page 29
x [HDMI Settings] By connecting Sony components that are compatible with HDMI functions with different scenes....z For details, refer to TV-off] [On]: Automatically turns off the player and HDMI-compatible components when the connected TV enters standby mode (BRAVIA Sync). [Off]: Turns off the function. x [Internet Video Unrated] [Allow]: Allows... x [Startup Screen] Set the startup screen when turning on the player. [Network Service Screen]: Starts on Sony Entertainment Network portal screen. [Home Menu Screen]: Starts on -screen instructions and enter your four-digit password. x...
x [HDMI Settings] By connecting Sony components that are compatible with HDMI functions with different scenes....z For details, refer to TV-off] [On]: Automatically turns off the player and HDMI-compatible components when the connected TV enters standby mode (BRAVIA Sync). [Off]: Turns off the function. x [Internet Video Unrated] [Allow]: Allows... x [Startup Screen] Set the startup screen when turning on the player. [Network Service Screen]: Starts on Sony Entertainment Network portal screen. [Home Menu Screen]: Starts on -screen instructions and enter your four-digit password. x...
Operating Instructions
Page 30
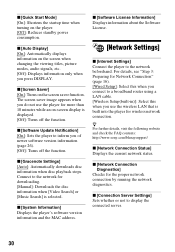
... playback stops. z For further details, visit the following website and check the FAQ contents: http://www.sony.com/bluraysupport/ x [Network Connection Status] Displays the current network status. x [Software Update Notification] [On]: Sets the player to display the connected server. 30 x [Software License Information] Displays information about the Software License. [Network Settings] x [Internet Settings...
... playback stops. z For further details, visit the following website and check the FAQ contents: http://www.sony.com/bluraysupport/ x [Network Connection Status] Displays the current network status. x [Software Update Notification] [On]: Sets the player to display the connected server. 30 x [Software License Information] Displays information about the Software License. [Network Settings] x [Internet Settings...
Operating Instructions
Page 32
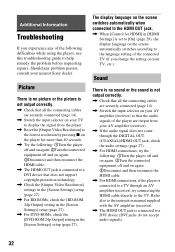
... switches automatically when connected to the HDMI OUT...connected equipment off and on again. 3Disconnect and then reconnect the HDMI cable. , For HDMI connections, if the player is connected...connected to a DVI device that all the connecting cables are securely connected... Check that all the connecting cables are output from ...connected equipment off and on again. 3Disconnect and then reconnect the ...connected to a TV through an AV amplifier (receiver), try connecting the HDMI cable directly to the language setting of the player are securely connected...). , For HDMI connections, try the following ...
... switches automatically when connected to the HDMI OUT...connected equipment off and on again. 3Disconnect and then reconnect the HDMI cable. , For HDMI connections, if the player is connected...connected to a DVI device that all the connecting cables are securely connected... Check that all the connecting cables are output from ...connected equipment off and on again. 3Disconnect and then reconnect the ...connected to a TV through an AV amplifier (receiver), try connecting the HDMI cable directly to the language setting of the player are securely connected...). , For HDMI connections, try the following ...
Operating Instructions
Page 33
... Setting] in [Audio Settings] setup to [Off] (page 27). , Check that the connected AV amplifier (receiver) is not authorized for high definition video). 33 Check the audio settings (page 27). Sony Entertainment Network The picture/sound is poor/certain programs display a loss of the player. Do... not adjust the playback volume. The interactive audio is connected via a USB hub, connect the USB device directly to [On] (page 27...
... Setting] in [Audio Settings] setup to [Off] (page 27). , Check that the connected AV amplifier (receiver) is not authorized for high definition video). 33 Check the audio settings (page 27). Sony Entertainment Network The picture/sound is poor/certain programs display a loss of the player. Do... not adjust the playback volume. The interactive audio is connected via a USB hub, connect the USB device directly to [On] (page 27...


