

Instruction Manual
Page 5
... - 13 Threading the bobbin thread 14 - 15 Threading the top thread 16 - 17 Using automatic needle threader 18 - 19 Needle, thread and fabric chart 20 - 21 Adjusting top thread tension 22 - 23 Changing presser foot 22 - 23 Control panel function 24 - 27 Functions of the equipment: 3.0 kg Rated Voltage: 230 V ~ Rated Frequency... stitch Decorative Stitching 48 - 49 Continuous patterns 50 - 51 Sewing on a button 50 - 51 Buttonholes 52 - 57 Using buttonhole foot, Procedure, Corded buttonholes Buttonholing with Futura Multi hoop 88 - 95 Helpful messages when embroidering 96 - 97 4.
... - 13 Threading the bobbin thread 14 - 15 Threading the top thread 16 - 17 Using automatic needle threader 18 - 19 Needle, thread and fabric chart 20 - 21 Adjusting top thread tension 22 - 23 Changing presser foot 22 - 23 Control panel function 24 - 27 Functions of the equipment: 3.0 kg Rated Voltage: 230 V ~ Rated Frequency... stitch Decorative Stitching 48 - 49 Continuous patterns 50 - 51 Sewing on a button 50 - 51 Buttonholes 52 - 57 Using buttonhole foot, Procedure, Corded buttonholes Buttonholing with Futura Multi hoop 88 - 95 Helpful messages when embroidering 96 - 97 4.
Instruction Manual
Page 8
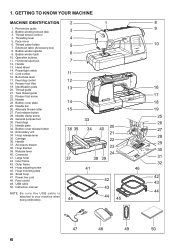
Thread tension control 4. Face cover 6. Bobbin winder spindle 9. Horizontal spool pin 7 12. Power/light switch 15. Identification plate 20. Bobbin cover plate 14 18 25. Alternate thread cutter 15 19 27. Feed dogs 26 31. Carriage 36. Inner ... guide 13 16 21. Needle clamp screw 25 29. Accessory drawer 38. Hoop adjusting screw 45. Pre-tension guide 2. Bobbin winding tension disk 3 9 3. Handle 37. Hoop bracket 39. Cord socket 11 16. Bobbin cover release button 33. Embroidery unit 34 Hoop release lever 35. 1. GETTING TO KNOW YOUR MACHINE MACHINE IDENTIFICATION...
Thread tension control 4. Face cover 6. Bobbin winder spindle 9. Horizontal spool pin 7 12. Power/light switch 15. Identification plate 20. Bobbin cover plate 14 18 25. Alternate thread cutter 15 19 27. Feed dogs 26 31. Carriage 36. Inner ... guide 13 16 21. Needle clamp screw 25 29. Accessory drawer 38. Hoop adjusting screw 45. Pre-tension guide 2. Bobbin winding tension disk 3 9 3. Handle 37. Hoop bracket 39. Cord socket 11 16. Bobbin cover release button 33. Embroidery unit 34 Hoop release lever 35. 1. GETTING TO KNOW YOUR MACHINE MACHINE IDENTIFICATION...

Instruction Manual
Page 24
A balanced tension (identical stitches both top and bobbin threads. Under side Côté de dessous Reverso Well balanced Correct Bien equilibrada Top side Côté de dessus Cara Top stitch too tight Fil ... that for buttonholes to adjust it. Make all adjustments with the word "S" exposed on the tension control dial on the bottom side of your sewing will need to set at E. BOBBIN TENSION The bobbin tension has been correctly set thread tension at the factory, so you find that the stitching is correctly threaded (see page 7). Raise...
A balanced tension (identical stitches both top and bobbin threads. Under side Côté de dessous Reverso Well balanced Correct Bien equilibrada Top side Côté de dessus Cara Top stitch too tight Fil ... that for buttonholes to adjust it. Make all adjustments with the word "S" exposed on the tension control dial on the bottom side of your sewing will need to set at E. BOBBIN TENSION The bobbin tension has been correctly set thread tension at the factory, so you find that the stitching is correctly threaded (see page 7). Raise...
Instruction Manual
Page 34
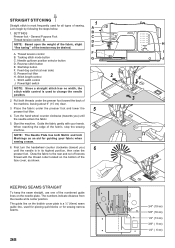
...guiding your hands. Guide the fabric gently with the thread cutter located on the bottom of the numbered guide lines on the bobbin cover plate is in its center position. Presser foot lifter H. Pull both Metric and Inch Markings as shown. Start the machine... J. Turn the hand wheel counter clockwise (towards you ) until the needle enters the fabric. 5. First turn the handwheel counter clockwise (toward the back of the tension may be desired. 1 A B C D E A. Start/stop the sewing machine. Power/light switch F G 2 H I . Draw the fabric to change the needle ...
...guiding your hands. Guide the fabric gently with the thread cutter located on the bottom of the numbered guide lines on the bobbin cover plate is in its center position. Presser foot lifter H. Pull both Metric and Inch Markings as shown. Start the machine... J. Turn the hand wheel counter clockwise (towards you ) until the needle enters the fabric. 5. First turn the handwheel counter clockwise (toward the back of the tension may be desired. 1 A B C D E A. Start/stop the sewing machine. Power/light switch F G 2 H I . Draw the fabric to change the needle ...

Instruction Manual
Page 36
... that is designed to sew. 34 Start to look like hand sewing for the piping. Helpful Hint: Slight adjusting of fabric. Thread bobbin with the Stitch Width Control. Increase thread tension toward 6 or higher until you achieve the desired appearance. 4. INSERTING ZIPPERS To sew down the left of foot Aiguille à gauche...
... that is designed to sew. 34 Start to look like hand sewing for the piping. Helpful Hint: Slight adjusting of fabric. Thread bobbin with the Stitch Width Control. Increase thread tension toward 6 or higher until you achieve the desired appearance. 4. INSERTING ZIPPERS To sew down the left of foot Aiguille à gauche...

Instruction Manual
Page 38
S The top thread may appear on the bottom depending on the thread, fabric, type of stitch and sewing speed, but the bobbin thread must never appear on the weight of the fabric. Use a backing of pattern increases from center needle position as illustrated. ...and the stitch width is the selection range when setting the value manually. Slightly loosen the top thread tension for appliqué, bar-tacking, etc. ZIGZAG STITCHING SETTINGS :Presser foot - General Purpose Foot :Thread tension control - is about 5 mm. Under side Côté de dessous Reverso Top side Cô...
S The top thread may appear on the bottom depending on the thread, fabric, type of stitch and sewing speed, but the bobbin thread must never appear on the weight of the fabric. Use a backing of pattern increases from center needle position as illustrated. ...and the stitch width is the selection range when setting the value manually. Slightly loosen the top thread tension for appliqué, bar-tacking, etc. ZIGZAG STITCHING SETTINGS :Presser foot - General Purpose Foot :Thread tension control - is about 5 mm. Under side Côté de dessous Reverso Top side Cô...
Instruction Manual
Page 50
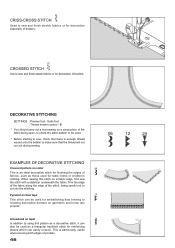
... both edges of the fabric being careful not to make sure that there is enough thread wound onto the bobbin to cut into the stitching. DECORATIVE STITCHING SETTINGS :Presser foot - Satin foot :Thread tension control - EXAMPLES OF DECORATIVE STITCHING Crescent pattern on a fabric edge, first sew the stitch with a stabilizer underneath the...
... both edges of the fabric being careful not to make sure that there is enough thread wound onto the bobbin to cut into the stitching. DECORATIVE STITCHING SETTINGS :Presser foot - Satin foot :Thread tension control - EXAMPLES OF DECORATIVE STITCHING Crescent pattern on a fabric edge, first sew the stitch with a stabilizer underneath the...
Instruction Manual
Page 102
...- Shorten stitch length. (see page 52 - 55). * Buttonhole lever is being pulled or pushed against machine feeding action. - Fabric puckers. * Top thread tension is not lowered - Raise buttonhole lever. (see page 24 - 27). 100 Clean hook. (see page 12 - 13). Needle breaks. * Fabric is not... lowered when sewing buttonhole. - Rewind bobbin. (see page 102 - 103). * Needle is too long for thread and fabric. (see page 20 - 21). * Needle is turned off.- Adjust thread tension. (see page 102 - 103). Clean hook. (see page 22 - 23). * ...
...- Shorten stitch length. (see page 52 - 55). * Buttonhole lever is being pulled or pushed against machine feeding action. - Fabric puckers. * Top thread tension is not lowered - Raise buttonhole lever. (see page 24 - 27). 100 Clean hook. (see page 12 - 13). Needle breaks. * Fabric is not... lowered when sewing buttonhole. - Rewind bobbin. (see page 102 - 103). * Needle is too long for thread and fabric. (see page 20 - 21). * Needle is turned off.- Adjust thread tension. (see page 102 - 103). Clean hook. (see page 22 - 23). * ...
Instruction Manual
Page 108
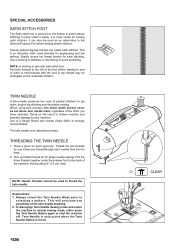
... clear. This is strongly recommended. TWIN NEEDLE A twin-needle produces two rows of a Singer Brand twin needle (Style 2025) is an attractive stitch used to your machine. Slightly loosen top thread tension for single needle sewing. When using twin-needles, the stitch width should never be used... primarily for sewing satin stitches. Twin Needle is only active when the Twin Needle Switch is an optional purchase. Pick up bobbin thread as one thread...
... clear. This is strongly recommended. TWIN NEEDLE A twin-needle produces two rows of a Singer Brand twin needle (Style 2025) is an attractive stitch used to your machine. Slightly loosen top thread tension for single needle sewing. When using twin-needles, the stitch width should never be used... primarily for sewing satin stitches. Twin Needle is only active when the Twin Needle Switch is an optional purchase. Pick up bobbin thread as one thread...


