
Instruction Manual
Page 62
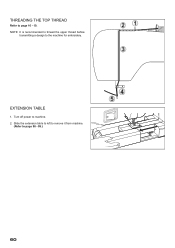
Turn off power to page 98 - 99.) 60 Slide the extension table to left to remove it from machine. (Refer to machine. 2. THREADING THE TOP THREAD Refer to the machine for embroidery. EXTENSION TABLE 1. NOTE: It is recommended to thread the upper thread before transmitting a design to page 16 - 19.
Turn off power to page 98 - 99.) 60 Slide the extension table to left to remove it from machine. (Refer to machine. 2. THREADING THE TOP THREAD Refer to the machine for embroidery. EXTENSION TABLE 1. NOTE: It is recommended to thread the upper thread before transmitting a design to page 16 - 19.

Instruction Manual
Page 76
... all the selections made during the installation set-up. If the installation utility identifies a lack of the FUTURA software files to your embroidery unit. 3. CORRECT START-UP PROCEDURE WHEN EMBROIDERING The following steps must be stored. Double click on the...transmit a design to use your computer and then follow steps 1 through 4 above. 74 Pressing the "Next" button will finally start -up the Futura Software. 4. A progress bar will automatically close the Futura software and then turn on "Cancel". Next attach the embroidery unit to open the Futura software. ...
... all the selections made during the installation set-up. If the installation utility identifies a lack of the FUTURA software files to your embroidery unit. 3. CORRECT START-UP PROCEDURE WHEN EMBROIDERING The following steps must be stored. Double click on the...transmit a design to use your computer and then follow steps 1 through 4 above. 74 Pressing the "Next" button will finally start -up the Futura Software. 4. A progress bar will automatically close the Futura software and then turn on "Cancel". Next attach the embroidery unit to open the Futura software. ...
Instruction Manual
Page 78
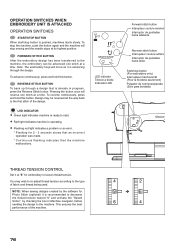
... position. NOTE: When sewing designs created by checking the box in progress, press the Reverse Stitch button. To advance continuously, press and hold this button. FORWARD STITCH BUTTON After the embroidery design has been transferred to the machine, the embroidery can be reversed all the ...way back to the type of the machine. 76 OPERATION SWITCHES WHEN EMBROIDERY UNIT IS ATTACHED OPERATION SWITCHES START/STOP BUTTON When start ...
... position. NOTE: When sewing designs created by checking the box in progress, press the Reverse Stitch button. To advance continuously, press and hold this button. FORWARD STITCH BUTTON After the embroidery design has been transferred to the machine, the embroidery can be reversed all the ...way back to the type of the machine. 76 OPERATION SWITCHES WHEN EMBROIDERY UNIT IS ATTACHED OPERATION SWITCHES START/STOP BUTTON When start ...

Instruction Manual
Page 90
... precisión del resultado final de la bordadora. Multi-Hoop Multi-Hooping is a special feature in the Futura software that will allow embroidery data which is larger than a single embroidery hoop to be difficult to re-hoop the fabric with #1 in the upper left corner. 88 Please note... out, while making it and sew accordingly. Fig. 1 Fig. 1 Fig. 1 When stitching an embroidery design that each other . When these points are input on the screen marked with exact alignment. This embroidery data may be at perfect 90 degree angles. Using a very fine-lined water soluble marker, mark a...
... precisión del resultado final de la bordadora. Multi-Hoop Multi-Hooping is a special feature in the Futura software that will allow embroidery data which is larger than a single embroidery hoop to be difficult to re-hoop the fabric with #1 in the upper left corner. 88 Please note... out, while making it and sew accordingly. Fig. 1 Fig. 1 Fig. 1 When stitching an embroidery design that each other . When these points are input on the screen marked with exact alignment. This embroidery data may be at perfect 90 degree angles. Using a very fine-lined water soluble marker, mark a...

Instruction Manual
Page 92
...Machine" tool on the screen. The grey area (#1 Hoop) is the first of the embroidery data that is a Center Hoop line which together define the maximum sewing area for Multiple Hooping. The design data is sent to be set on the horizontal and vertical cross lines on the inner ...guide line markings of the first hoop section). 4. These marks are to the machine for sewing one section at a time. Select a large design or individual design elements and arrange them in the hoop area on the tool bar. 5. Set fabric and stabilizer into the software. (Additional numbered hoops will ...
...Machine" tool on the screen. The grey area (#1 Hoop) is the first of the embroidery data that is a Center Hoop line which together define the maximum sewing area for Multiple Hooping. The design data is sent to be set on the horizontal and vertical cross lines on the inner ...guide line markings of the first hoop section). 4. These marks are to the machine for sewing one section at a time. Select a large design or individual design elements and arrange them in the hoop area on the tool bar. 5. Set fabric and stabilizer into the software. (Additional numbered hoops will ...


