
Singer Futura XL-400 Support Question
Singer Futura XL-400 Support Question
Find answers below for this question about Singer Futura XL-400.Need a Singer Futura XL-400 manual? We have 1 online manual for this item!
Question posted by ebroughton36 on July 14th, 2018
Embroidery Error 10
After connecting the embroidery arm and turning it on my machine gives me an error #10 and the arm does not move. I have tried to attach both size hoops that i have and still no results.
Current Answers
Answer #1: Posted by Odin on July 14th, 2018 9:39 AM
Odin

Member since:
April 10th, 2010 Points: 41,236,660

Member since:
April 10th, 2010 Points: 41,236,660
See the answer by Noel at http://www.fixya.com/support/t26783491-singer_futura_quintet_error_10.
Hope this is useful. Please don't forget to click the Accept This Answer button if you do accept it. My aim is to provide reliable helpful answers, not just a lot of them. See https://www.helpowl.com/profile/Odin.
Related Singer Futura XL-400 Manual Pages
Instruction Manual - Page 2
... or
replacing lamps." 12. "Never operate the sewing machine with any maintenance." Keep ventilation openings of the sewing machine and foot control free from the electrical outlet when removing covers, lubricating, or when making any other user
servicing adjustments mentioned in the instruction manual." 19. "To disconnect, turn switch to ensure that on cord. To...
Instruction Manual - Page 5

...-to free-arm sewing 98 - 99 Performance checklist 100 - 101 Cleaning hook area and feed dogs 102 - 103 Oiling inside the face cover 104 - 105 Special accessories 106 - 107 Helpful messages 108 - 109
For European version
Sewing machine Dimensions: 567 mm × 240 mm × 317 mm Mass of the equipment: 10.8 kg
Embroidery unit Dimensions...
Instruction Manual - Page 8
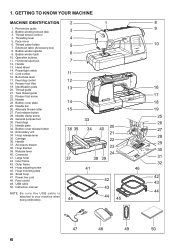
.... Accessory drawer 38. Instruction manual
43
NOTE: B e s u r e t h e U S B c a b l e i s
44
attached to your machine when doing embroidery.
45
44 45
47
48
49
50
6 Bobbin winder spindle 9. Cord socket
11
16. Buttonhole lever
17. Identification plate 20. Presser foot screw
17
23. Handle 37. Release lever 40. Hoop adjusting screw 45. Outer frame
32
44. Power...
Instruction Manual - Page 10

...
1
16. Embroidery software CD
19
FUTURA embroidery is called the
General Purpose Foot and will
be used for the majority of your
7
Sewing machine is "system" of the machine and the software providing powerful option and capabilities. Spool pin cap (small)
7. Screwdriver for more information.
8
2
3
4
5
6
8
9
10
11
13
14
15
17
18
20
21
22
23 Screwdriver...
Instruction Manual - Page 12
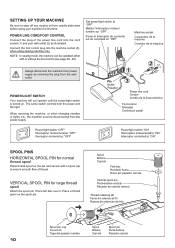
... needle plate area before using sewing machine only. Set power/light switch at "OFF"
Mettez l'interrupteur moteur/ lumière sur "OFF". VERTICAL SPOOL PIN for normal thread spool
Place thread spool on the pin and secure with or without the foot control (see page 28 - 29). Connect the foot control plug into...
Instruction Manual - Page 28

...The LED turns on when twin needle sewing is activated. Auto (preprogrammed) default settings are at an Auto/Default Stitch Length and Width.
LED turns on when twin needle sewing is ...Control Knob. Stitch length and width/needle position controls
*Auto/Default settings Your sewing machine will produce most of your preference.
Some patterns offer more opportunities for a ...
Instruction Manual - Page 30
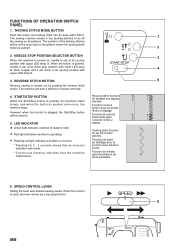
... SELECTOR BUTTON
3
When the machine is turned on all patterns. When the...sewing machine makes 4 tiny tacking stitches to its up -stop
position with
4
upper LED lamp lit.
3. FUNCTIONS OF OPERATION SWITCH PANEL
1.
Push it again and it will sew 4 stitches in the pattern where the tacking stitch button is operating.
Flashing red light indicates a problem or an error...
Instruction Manual - Page 34
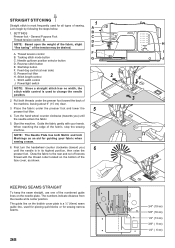
...under the presser foot and lower the presser foot lifter.
5
4. First turn the handwheel counter clockwise (toward the back of sewing. The numbers indicate distance from the needle at rear side) G. Reverse stitch... stitch mode button C. Start the machine. Pull both Metric and Inch Markings as shown. Start/stop the sewing machine. Guide the fabric gently with the thread...
Instruction Manual - Page 60

... to page 14 - 15. * A large amount of thread is required for embroidering, so
be sure to turn off power to use full bobbin.
PREPARATION FOR EMBROIDERY SEWING
BEFORE ATTACHING EMBROIDERY UNIT ATTACHING EMBROIDERY FOOT
Foot holder Support du pied Sujetador prensatelas
Always be sure to machine CAUTION before changing presser foot.
* Raise presser foot lifter. Screw Vis Guia...
Instruction Manual - Page 64
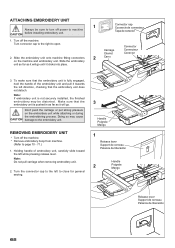
...the left to open. Make sure that the embroidery unit does not detach. Turn off the machine. * Remove embroidery hoop from machine.
(Refer to machine CAUTION before installing embroidery unit. Slide the embroidery unit onto machine fitting connectors
2
Carro
on the embroidery unit while attaching or during the embroidering process. Note: If embroidery unit is pushed in as far as it...
Instruction Manual - Page 72
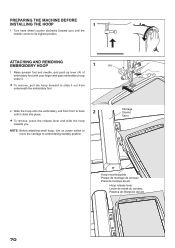
... MACHINE BEFORE
INSTALLING THE HOOP
1
1. Turn hand wheel counter clockwise (toward you) until it clicks into place.
2
To remove, press the release lever and slide the hoop towards you.
NOTE: Before attaching small hoop, turn on power switch to move the carriage to its highest position. Raise presser foot and needle, and push up lever (A) of embroidery...
Instruction Manual - Page 76

...close the Futura software and then turn on your desktop to open the Futura software.
Next attach the embroidery unit to your sewing machine and connect the USB cable between your sewing machine. Attach the hoop that ... an error message will prompt you to free some hard disk space before proceeding with to continue.
If the installation utility identifies a lack of the FUTURA software...
Instruction Manual - Page 78
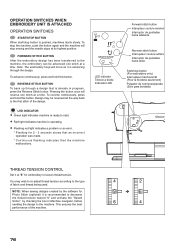
...", by checking the box in progress, press the Reverse Stitch button. OPERATION SWITCHES WHEN EMBROIDERY UNIT IS ATTACHED
OPERATION SWITCHES
START/STOP BUTTON When start .
Red light indicates machine is operating.
Flashing red light indicates a problem or an error. * Flashing for 2 - 3 seconds shows that an incorrect operation was made. * Continuous flashing indicates...
Instruction Manual - Page 82

... needle. If the thread is tapped with the hoop mounting screws.
Attach stabilizer to pucker and result in the frames so that when the fabric is tangled on the spool pin or somewhere along the thread path. Embroidery hoop is tangled.
EMBROIDERY PATTERN IS MIS-ALIGNED
MACHINE SIDE
HOOP SIDE
Embroidering is continuing when thread is not correctly...
Instruction Manual - Page 84

...screen says thread is broken, machine lights are missing
If the embroidery machine detects that the thread is ...
automatically stop S'arrête automatiquement Para automáticamente
Blank stitches resulting from thread breakage Points vides résultant d'une rupture du fil Puntadas...embroidery data. The hoop will move back one stitch at a time. HELPFUL INFORMATION FOR ...
Instruction Manual - Page 90

...Hoop
Multi-Hooping is a special feature in the Futura software that will allow embroidery data which is larger than a single embroidery hoop to be sent to the machine to stitch out, while making it easy to re-hoop the fabric so that each other . When re-hooping... Tools from the horizontal tool bar, select Hoop and then select Multiple. 2. Please try to stitch out the design.
1. Fig....
Instruction Manual - Page 92

... design elements and arrange them in the hoop area on the tool bar.
5. The grey area (#1 Hoop) is the first of the embroidery data that is sent to the machine for sewing one section at a time.
Guide lines are markings which indicates the exact center of the first hoop section).
4. The example shown uses lettering and...
Instruction Manual - Page 94

... where the crosslines are accurately input on the vertical cross line. It is extremely important that the points are positioned in the hoop. The machine is indicating the point to be input.
and then re-enter point(s).
92
Upward
Vers le haut Hacia arriba Downward
Vers le bas
Leftward Hacia ...
Instruction Manual - Page 104
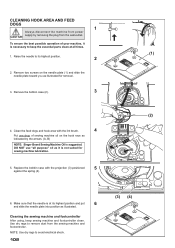
... removing the plug from the wall-outlet. Make sure that the needle is at all purpose" oil as illustrated. Remove the bobbin case (2).
3
4. Cleaning the sewing machine and footcontroller
After using, keep the essential parts clean at its highest position.
2
2. DO NOT use "all times.
(1)
1. Replace the bobbin case with the lint...
Instruction Manual - Page 106
... Guia
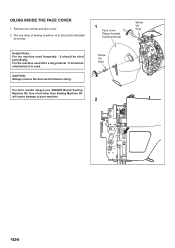
104 Remove two screws and face cover. 2. For the machine used after a long interval : It should be oiled before oiling.
For best results always use SINGER Brand Sewing Machine Oil.
Use of sewing machine oil to your machine. Put one drop of oil other than Sewing Machine Oil will cause damage to the points indicated
by arrows.
1 Face...
Similar Questions

Replacement Part For Singer Futura Xl 400
I am looking for the embroidery arm unit for a Singer Futura Xl 400. Can you assist me in locating t...
I am looking for the embroidery arm unit for a Singer Futura Xl 400. Can you assist me in locating t...
(Posted by sjh4ba 3 years ago)

Singer Futura Xl-400
I am in need of a Singer Futura XL-400 Startup disc. Any idea where I can get one
I am in need of a Singer Futura XL-400 Startup disc. Any idea where I can get one
(Posted by fayevb 4 years ago)

I Get E7 Error Message On My Singer Model 7258 Sewing Machine. There Is No Refe
Error message E7 is up on my Singer Stylist model 7258 sewing machine. It is not working at all. I t...
Error message E7 is up on my Singer Stylist model 7258 sewing machine. It is not working at all. I t...
(Posted by ebellamybellamy9 5 years ago)

Beeping From Singer Sewing Machine Stylist Ii 5625
My sewing machine will beep and stop sewing after three inches of sewing. I have taken it to be repa...
My sewing machine will beep and stop sewing after three inches of sewing. I have taken it to be repa...
(Posted by arusheria 9 years ago)
Hoop Size Is Smaller Than Embroidery Data. Attach Appropriate Hoop And Restart
(Posted by ann393bla 11 years ago)