

Instruction Manual
Page 5
...- 37 Adjusting stitch width and length, Satin stitch Placement of operation switch panel 28 - 29 2. TABLE OF CONTENTS 1.GETTING TO KNOW YOUR MACHINE Machine identification 6 - 7 Accessories 8 - 9 Setting up your machine 10 - 11 Spool pins 10 - 11 Winding bobbin 12 - 13 Threading the bobbin thread 14 - 15 Threading the top thread 16... Decorative Stitching 48 - 49 Continuous patterns 50 - 51 Sewing on a button 50 - 51 Buttonholes 52 - 57 Using buttonhole foot, Procedure, Corded buttonholes Buttonholing with Futura Multi hoop 88 - 95 Helpful messages when embroidering 96 - 97 4.
...- 37 Adjusting stitch width and length, Satin stitch Placement of operation switch panel 28 - 29 2. TABLE OF CONTENTS 1.GETTING TO KNOW YOUR MACHINE Machine identification 6 - 7 Accessories 8 - 9 Setting up your machine 10 - 11 Spool pins 10 - 11 Winding bobbin 12 - 13 Threading the bobbin thread 14 - 15 Threading the top thread 16... Decorative Stitching 48 - 49 Continuous patterns 50 - 51 Sewing on a button 50 - 51 Buttonholes 52 - 57 Using buttonhole foot, Procedure, Corded buttonholes Buttonholing with Futura Multi hoop 88 - 95 Helpful messages when embroidering 96 - 97 4.
Instruction Manual
Page 8
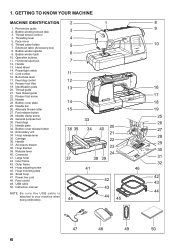
... guide 2. Face cover 6. Thread guide 13 16 21. Twin thread guide 22. Bobbin cover release button 33. Outer frame 32 44. Extension table (Accessory box) 5 10 8. Operation buttons 11. Power/light switch 15. Foot release button 28. General purpose foot 33 30. Large hoop 36 35 37 34... Embroidery unit 34 Hoop release lever 35. Hoop bracket 39. 1. Needle 24. GETTING TO KNOW YOUR MACHINE MACHINE IDENTIFICATION 2 1 8 1. Buttonhole lever 17. Accessory drawer 38. Release lever 40. Hand wheel 14. Presser foot screw 17 23. Carriage 36. Foot control 49.
... guide 2. Face cover 6. Thread guide 13 16 21. Twin thread guide 22. Bobbin cover release button 33. Outer frame 32 44. Extension table (Accessory box) 5 10 8. Operation buttons 11. Power/light switch 15. Foot release button 28. General purpose foot 33 30. Large hoop 36 35 37 34... Embroidery unit 34 Hoop release lever 35. Hoop bracket 39. 1. Needle 24. GETTING TO KNOW YOUR MACHINE MACHINE IDENTIFICATION 2 1 8 1. Buttonhole lever 17. Accessory drawer 38. Release lever 40. Hand wheel 14. Presser foot screw 17 23. Carriage 36. Foot control 49.

Instruction Manual
Page 10
... sewing. Spool pin cap (mini) 6. Satin foot 15. Vinyl bag 20. Embroidery presser foot 23. Buttonhole opener/Brush 9. To install the FUTURA software, refer to the CD insert for needle plate 10. Spool pin felt discs 5. Button sewing foot 1 16. Bobbins 21. Spool pin cap...powerful option and capabilities. Zipper foot 13. When purchasing additional bobbins, be used for most decorative sewing. Embroidery software CD 19 FUTURA embroidery is another 12 very useful foot and should be sure they are Class I5 J. 16 FOR EMBROIDERY 19. Screwdriver (large)...
... sewing. Spool pin cap (mini) 6. Satin foot 15. Vinyl bag 20. Embroidery presser foot 23. Buttonhole opener/Brush 9. To install the FUTURA software, refer to the CD insert for needle plate 10. Spool pin felt discs 5. Button sewing foot 1 16. Bobbins 21. Spool pin cap...powerful option and capabilities. Zipper foot 13. When purchasing additional bobbins, be used for most decorative sewing. Embroidery software CD 19 FUTURA embroidery is another 12 very useful foot and should be sure they are Class I5 J. 16 FOR EMBROIDERY 19. Screwdriver (large)...

Instruction Manual
Page 84
HELPFUL INFORMATION FOR EMBROIDERING WITH FUTURA 1. Step back through the embroidery data. Embroidering direction Direction de broderie Dirección de bordado Embroidered section Section brodée Sección bordada 1357 2468 ... the thread is unwinding properly. Rethread upper thread, (see page 16 - 17 "Threading the Top Thread".) Placing the small net that is supplied with the accessories over . 2. Reverse stitch button Interrupteur couture arrière interruptor de puntadas hacia atrás 82 If stitches are flashing lights and making a beeping sound...
HELPFUL INFORMATION FOR EMBROIDERING WITH FUTURA 1. Step back through the embroidery data. Embroidering direction Direction de broderie Dirección de bordado Embroidered section Section brodée Sección bordada 1357 2468 ... the thread is unwinding properly. Rethread upper thread, (see page 16 - 17 "Threading the Top Thread".) Placing the small net that is supplied with the accessories over . 2. Reverse stitch button Interrupteur couture arrière interruptor de puntadas hacia atrás 82 If stitches are flashing lights and making a beeping sound...
Instruction Manual
Page 108
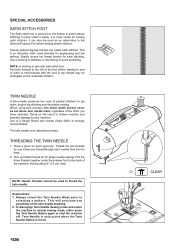
.... When using twin-needles, the stitch width should never be entangled on the underside of fabric. Doing so will preclude any possibility of a Singer Brand twin needle (Style 2025) is most useful for sewing satin stitches. Use of the twin needle breaking. 2. Thread the two threads as... an alternative to the General Purpose Foot when sewing stretch stitches. Draw one . SPECIAL ACCESSORIES SATIN STITCH FOOT The Satin stitch foot is grooved on each needle from front to back. 2. It is strongly recommended. Slightly loosen top thread...
.... When using twin-needles, the stitch width should never be entangled on the underside of fabric. Doing so will preclude any possibility of a Singer Brand twin needle (Style 2025) is most useful for sewing satin stitches. Use of the twin needle breaking. 2. Thread the two threads as... an alternative to the General Purpose Foot when sewing stretch stitches. Draw one . SPECIAL ACCESSORIES SATIN STITCH FOOT The Satin stitch foot is grooved on each needle from front to back. 2. It is strongly recommended. Slightly loosen top thread...

