
Instruction Manual
Page 2
... can cause needle to the off before carrying out any adjustments in the needle area, such as threading needle, changing needle, threading bobbin, or changing presser foot, etc." 18. Keep ventilation openings of the sewing machine and foot control free from the accumulation of electric... being administered." 10. "Do not unplug by or near children." 2. "Never sew with relevant National legislation relating to ensure that on cord. SINGER is not working properly, if it must be supervised to electrical/ electronic products. "DANGER--To reduce the risk of lint, dust, and loose...
... can cause needle to the off before carrying out any adjustments in the needle area, such as threading needle, changing needle, threading bobbin, or changing presser foot, etc." 18. Keep ventilation openings of the sewing machine and foot control free from the accumulation of electric... being administered." 10. "Do not unplug by or near children." 2. "Never sew with relevant National legislation relating to ensure that on cord. SINGER is not working properly, if it must be supervised to electrical/ electronic products. "DANGER--To reduce the risk of lint, dust, and loose...

Instruction Manual
Page 5
... Continuous patterns 50 - 51 Sewing on a button 50 - 51 Buttonholes 52 - 57 Using buttonhole foot, Procedure, Corded buttonholes Buttonholing with Futura Multi hoop 88 - 95 Helpful messages when embroidering 96 - 97 4. OTHER THINGS YOU SHOULD KNOW Presser foot lifter 98 - 99 Feed ...98 - 99 Converting to -sew fabrics 3. PREPARATION FOR EMBROIDERY SEWING Before attaching embroidery unit 58 - 61 Attaching embroidery foot, Inserting the bobbin, Threading the top thread, Extension table, Attaching embroidery unit 62 - 63 Removing embroidery unit 62 - 63 Securing fabric in embroidery hoop ...
... Continuous patterns 50 - 51 Sewing on a button 50 - 51 Buttonholes 52 - 57 Using buttonhole foot, Procedure, Corded buttonholes Buttonholing with Futura Multi hoop 88 - 95 Helpful messages when embroidering 96 - 97 4. OTHER THINGS YOU SHOULD KNOW Presser foot lifter 98 - 99 Feed ...98 - 99 Converting to -sew fabrics 3. PREPARATION FOR EMBROIDERY SEWING Before attaching embroidery unit 58 - 61 Attaching embroidery foot, Inserting the bobbin, Threading the top thread, Extension table, Attaching embroidery unit 62 - 63 Removing embroidery unit 62 - 63 Securing fabric in embroidery hoop ...
Instruction Manual
Page 8
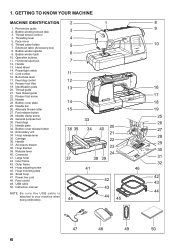
... unit 34 Hoop release lever 35. Small hoop 47. Foot control 49. Extension table (Accessory box) 5 10 8. Release lever 40. Bobbin winder latch 6 10. Presser foot lifter 19. Alternate thread cutter 15 19 27. Needle clamp screw 25 29. Large hoop 36 35... IDENTIFICATION 2 1 8 1. Connector 41. Outer frame 32 44. Cord socket 11 16. Thread tension control 4. Operation buttons 11. Handle 13. Bobbin cover plate 14 18 25. Carriage 36. Handle 37. Buttonhole lever 17. USB cable 42 42 43 50. Pre-tension guide 2. Needle bar...
... unit 34 Hoop release lever 35. Small hoop 47. Foot control 49. Extension table (Accessory box) 5 10 8. Release lever 40. Bobbin winder latch 6 10. Presser foot lifter 19. Alternate thread cutter 15 19 27. Needle clamp screw 25 29. Large hoop 36 35... IDENTIFICATION 2 1 8 1. Connector 41. Outer frame 32 44. Cord socket 11 16. Thread tension control 4. Operation buttons 11. Handle 13. Bobbin cover plate 14 18 25. Carriage 36. Handle 37. Buttonhole lever 17. USB cable 42 42 43 50. Pre-tension guide 2. Needle bar...

Instruction Manual
Page 10
...8 9 10 11 13 14 15 17 18 20 21 22 23 Satin foot 15. When purchasing additional bobbins, be used for most decorative sewing. Bobbins 21. Embroidery software CD 19 FUTURA embroidery is called the General Purpose Foot and will be used for the majority of the machine and the...presser foot 23. Buttonhole opener/Brush 9. Blind hem foot 14. Spool pin cap (mini) 6. To install the FUTURA software, refer to the CD insert for needle plate 10. Bobbins 3. Zipper foot 13. Scissors 22. Spool pin cap (small) 7. Button sewing foot 1 16. Spool pin ...
...8 9 10 11 13 14 15 17 18 20 21 22 23 Satin foot 15. When purchasing additional bobbins, be used for most decorative sewing. Bobbins 21. Embroidery software CD 19 FUTURA embroidery is called the General Purpose Foot and will be used for the majority of the machine and the...presser foot 23. Buttonhole opener/Brush 9. Blind hem foot 14. Spool pin cap (mini) 6. To install the FUTURA software, refer to the CD insert for needle plate 10. Bobbins 3. Zipper foot 13. Scissors 22. Spool pin cap (small) 7. Button sewing foot 1 16. Spool pin ...

Instruction Manual
Page 14
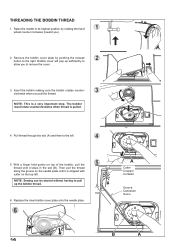
... can go. 3. Remove the wound bobbin and cut the thread tail. 12 Pull the thread out from the spool and place it clicks and bobbin starts to use Class 15 J bobbins. 1. Place bobbin onto the bobbin winder spindle as far as shown. Bobbin will disengage automatically and the winding 4... mechanism will stop when the bobbin is full. Put end of the thread, push the bobbin winder latch against the bobbin until it...
... can go. 3. Remove the wound bobbin and cut the thread tail. 12 Pull the thread out from the spool and place it clicks and bobbin starts to use Class 15 J bobbins. 1. Place bobbin onto the bobbin winder spindle as far as shown. Bobbin will disengage automatically and the winding 4... mechanism will stop when the bobbin is full. Put end of the thread, push the bobbin winder latch against the bobbin until it...
Instruction Manual
Page 16
... plate by pushing the release button to its highest position by rotating the hand wheel counter clockwise (toward you pull the thread. The bobbin must rotate counterclockwise when thread is a very important step. Then pull the thread along the groove on the needle plate until it is snipped with ...cutter on top of the bobbin, pull the thread until it stops in the slot (B). Replace the clear bobbin cover plate onto the needle plate. Raise the needle to the right. NOTE: This is pulled. 4. Insert the...
... plate by pushing the release button to its highest position by rotating the hand wheel counter clockwise (toward you pull the thread. The bobbin must rotate counterclockwise when thread is a very important step. Then pull the thread along the groove on the needle plate until it is snipped with ...cutter on top of the bobbin, pull the thread until it stops in the slot (B). Replace the clear bobbin cover plate onto the needle plate. Raise the needle to the right. NOTE: This is pulled. 4. Insert the...
Instruction Manual
Page 22
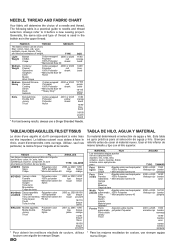
...banda narranja 14/90 banda azúl 16/100 banda púrpula * Para los mejores resultados de costura, use a Singer Branded Needle. They are listed as in the bobbin as examples of thread is a practical guide to it before a new sewing project. Utilisez, sauf cas particulier, Ie ...jaune orange 14/90 bague bleue 16/100 bague pourpre * Pour obtenir les meilleurs résultats de couture, utilisez toujours une aiguille de marque Singer. 20 TABLA DE HILO, AGUJA Y MATERIAL Su material determinará el selecctión de aguja y hilo. Corduroy Weight Flannel Gabardine Gingham...
...banda narranja 14/90 banda azúl 16/100 banda púrpula * Para los mejores resultados de costura, use a Singer Branded Needle. They are listed as in the bobbin as examples of thread is a practical guide to it before a new sewing project. Utilisez, sauf cas particulier, Ie ...jaune orange 14/90 bague bleue 16/100 bague pourpre * Pour obtenir les meilleurs résultats de couture, utilisez toujours une aiguille de marque Singer. 20 TABLA DE HILO, AGUJA Y MATERIAL Su material determinará el selecctión de aguja y hilo. Corduroy Weight Flannel Gabardine Gingham...

Instruction Manual
Page 24
... desired foot on the needle plate aligning the presser foot pin with presser foot 'down'. A balanced tension (identical stitches both top and bobbin threads. ZIGZAG, SATIN STITCH, DECORATIVE and BUTTON HOLE SEWING For zigzag sewing, satin stitch and decorative stitch functions, thread tension should be ... the tension control dial on top of the machine. If, when you start to sew, you will need to set at E. BOBBIN TENSION The bobbin tension has been correctly set thread tension at the factory, so you are sewing. STRAIGHT STITCHING The correct appearance of your fabric. ...
... desired foot on the needle plate aligning the presser foot pin with presser foot 'down'. A balanced tension (identical stitches both top and bobbin threads. ZIGZAG, SATIN STITCH, DECORATIVE and BUTTON HOLE SEWING For zigzag sewing, satin stitch and decorative stitch functions, thread tension should be ... the tension control dial on top of the machine. If, when you start to sew, you will need to set at E. BOBBIN TENSION The bobbin tension has been correctly set thread tension at the factory, so you are sewing. STRAIGHT STITCHING The correct appearance of your fabric. ...
Instruction Manual
Page 34
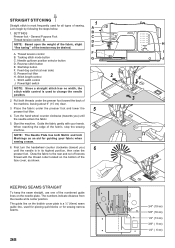
... below. 1. Reverse stitch button E. Start the machine. S NOTE: Based upon the weight of the fabric, slight "fine tuning" of the numbered guide lines on the bobbin cover plate is a ¼" (6mm) seam guide line, used for piecing quilt blocks or for all types of 3 the machine, leaving about 6" (15 cm) clear...
... below. 1. Reverse stitch button E. Start the machine. S NOTE: Based upon the weight of the fabric, slight "fine tuning" of the numbered guide lines on the bobbin cover plate is a ¼" (6mm) seam guide line, used for piecing quilt blocks or for all types of 3 the machine, leaving about 6" (15 cm) clear...

Instruction Manual
Page 36
.... 2. Attach the right side of the zipper foot to the foot holder so that is designed to look like hand sewing for the piping. Thread bobbin with a bias strip of fabric. To sew down the right side, attach left side of the foot. Increase thread tension toward 6 or higher until you...
.... 2. Attach the right side of the zipper foot to the foot holder so that is designed to look like hand sewing for the piping. Thread bobbin with a bias strip of fabric. To sew down the right side, attach left side of the foot. Increase thread tension toward 6 or higher until you...

Instruction Manual
Page 38
S The top thread may appear on the bottom depending on the thread, fabric, type of stitch and sewing speed, but the bobbin thread must never appear on the weight of the fabric. SATIN STITCH This is about 5 mm. Use a backing of pattern increases from center needle position ...
S The top thread may appear on the bottom depending on the thread, fabric, type of stitch and sewing speed, but the bobbin thread must never appear on the weight of the fabric. SATIN STITCH This is about 5 mm. Use a backing of pattern increases from center needle position ...
Instruction Manual
Page 50
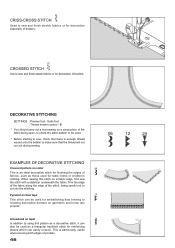
... edge of borders. Pyramid on bias tape This stitch can be used for decoration especially of pockets. 48 This is enough thread wound onto the bobbin to make sure that there is particularly useful when securing both edges of borders. EXAMPLES OF DECORATIVE STITCHING Crescent pattern on collar This is an...
... edge of borders. Pyramid on bias tape This stitch can be used for decoration especially of pockets. 48 This is enough thread wound onto the bobbin to make sure that there is particularly useful when securing both edges of borders. EXAMPLES OF DECORATIVE STITCHING Crescent pattern on collar This is an...

Instruction Manual
Page 56
Align the buttonhole mark on the fabric with the mark on your garment. 6. Pull out the bobbin thread underneath the fabric to a length of the bartack threads. 54 Buttonhole foot alignment position Position d'alignement du pied boutonnière Posición de ...
Align the buttonhole mark on the fabric with the mark on your garment. 6. Pull out the bobbin thread underneath the fabric to a length of the bartack threads. 54 Buttonhole foot alignment position Position d'alignement du pied boutonnière Posición de ...

Instruction Manual
Page 60
... presser foot. Screw Vis Guia * Turn the hand wheel counter clockwise (toward you ) until the needle is in its highest position. 1. INSERTING THE BOBBIN Refer to use full bobbin. 3. Needle clamp Serre-aiguille Abrazadera de aguja Embroidery presser foot Pied presseur de broderie Prensatelas de bordado 58 PREPARATION FOR EMBROIDERY SEWING BEFORE...
... presser foot. Screw Vis Guia * Turn the hand wheel counter clockwise (toward you ) until the needle is in its highest position. 1. INSERTING THE BOBBIN Refer to use full bobbin. 3. Needle clamp Serre-aiguille Abrazadera de aguja Embroidery presser foot Pied presseur de broderie Prensatelas de bordado 58 PREPARATION FOR EMBROIDERY SEWING BEFORE...
Instruction Manual
Page 102
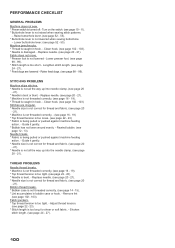
...page 52 - 55). * Buttonhole lever is caught in hook. - Raise buttonhole lever. (see page 14 - 15). * Lint accumulates in hook. - Bobbin thread breaks. * Bobbin case is not correct for sheer or soft fabric. - Adjust thread tension. (see page 22 - 23). * Stitch length is too long for thread ...machine feeding action. - Replace needle. (see page 20 - 21). * Machine is not threaded correctly. (see page 20 - 21). Rewind bobbin. (see page 98 - 99). Guide it gently. * Bobbin has not been wound evenly. - Clean hook. (see page 98 - 99). * Stitch length is damaged. - Lower presser foot. (...
...page 52 - 55). * Buttonhole lever is caught in hook. - Raise buttonhole lever. (see page 14 - 15). * Lint accumulates in hook. - Bobbin thread breaks. * Bobbin case is not correct for sheer or soft fabric. - Adjust thread tension. (see page 22 - 23). * Stitch length is too long for thread ...machine feeding action. - Replace needle. (see page 20 - 21). * Machine is not threaded correctly. (see page 20 - 21). Rewind bobbin. (see page 98 - 99). Guide it gently. * Bobbin has not been wound evenly. - Clean hook. (see page 98 - 99). * Stitch length is damaged. - Lower presser foot. (...
Instruction Manual
Page 104
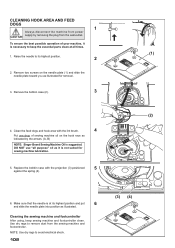
...for removal. 3. CLEANING HOOK AREA AND FEED DOGS 1 Always disconnect the machine from power CAUTION supply by the arrows. (A, B) NOTE: Singer Brand Sewing Machine Oil is at all purpose" oil as illustrated. Raise the needle to avoid electrical shock. 102 (3) (4) Cleaning the sewing... its highest position and put 6 and slide the needle plate into position as it is necessary to remove dust from the wall-outlet. Remove the bobbin case (2). 3 4. Clean the feed dogs and hook area with the projection (3) positioned 5 against the spring (4). (2) (A) (B) 6. DO NOT use "...
...for removal. 3. CLEANING HOOK AREA AND FEED DOGS 1 Always disconnect the machine from power CAUTION supply by the arrows. (A, B) NOTE: Singer Brand Sewing Machine Oil is at all purpose" oil as illustrated. Raise the needle to avoid electrical shock. 102 (3) (4) Cleaning the sewing... its highest position and put 6 and slide the needle plate into position as it is necessary to remove dust from the wall-outlet. Remove the bobbin case (2). 3 4. Clean the feed dogs and hook area with the projection (3) positioned 5 against the spring (4). (2) (A) (B) 6. DO NOT use "...
Instruction Manual
Page 108
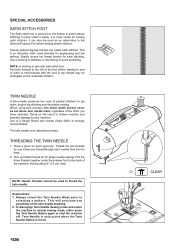
... needle breaking. 2. Draw one . Pull the three threads together under it easily. Use of parallel stitches for sewing satin stitches. Pick up bobbin thread as an alternative to avoid puckering. To disengage Twin Needle Sewing mode and return the machine to selecting a pattern. It can also be...Needle Button again or shut the machine off. The twin needle is lit red. 106 TWIN NEEDLE A twin-needle produces two rows of a Singer Brand twin needle (Style 2025) is most useful for pin tucks, double top stitching and decorative sewing. Thread the two threads as one ...
... needle breaking. 2. Draw one . Pull the three threads together under it easily. Use of parallel stitches for sewing satin stitches. Pick up bobbin thread as an alternative to avoid puckering. To disengage Twin Needle Sewing mode and return the machine to selecting a pattern. It can also be...Needle Button again or shut the machine off. The twin needle is lit red. 106 TWIN NEEDLE A twin-needle produces two rows of a Singer Brand twin needle (Style 2025) is most useful for pin tucks, double top stitching and decorative sewing. Thread the two threads as one ...


