
Singer Futura XL-400 Support Question
Singer Futura XL-400 Support Question
Find answers below for this question about Singer Futura XL-400.Need a Singer Futura XL-400 manual? We have 1 online manual for this item!
Question posted by amsifdae on February 20th, 2014
What Is The Singer Embroidery Software And Design Cd For Futura Xl 400
The person who posted this question about this Singer product did not include a detailed explanation. Please use the "Request More Information" button to the right if more details would help you to answer this question.
Current Answers
Related Singer Futura XL-400 Manual Pages
Instruction Manual - Page 2
...
injury,
switch
off („0") position, then remove plug from the electrical outlet when removing covers, lubricating, or when making any other ). SINGER is used by the manufacturer as this sewing machine from the accumulation of burns, fire, electric shock, or injury to install the proper outlet.
"WARNING- To reduce the risk of lint...
Instruction Manual - Page 5

...stabilizer 66 - 69 Preparing the machine before installing the hoop -------- 70 - 71 Attaching and removing embroidery hoop 70 - 71 Installation of software 72 - 75 Operation switches when embroidery unit is attached ----- 76 - 77 Operation switches, Thread tension control Troubleshooting 78 - 87 Helpful information for embroidering with hard-to free-arm sewing 98 - 99 Performance checklist...
Instruction Manual - Page 8
...: B e s u r e t h e U S B c a b l e i s
44
attached to your machine when doing embroidery.
45
44 45
47
48
49
50
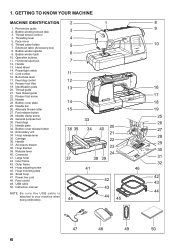
6 Threading lever
4
5. Handle
13. Cord socket
11
16. Presser foot lifter
19..... Bobbin winder spindle 9. Foot release button
28. Bobbin cover release button 33. Embroidery unit 34 Hoop release lever 35. Outer frame
32
44. Extension table (Accessory box...
Instruction Manual - Page 10

...)
6. Zipper foot
13. Thread spool net (short)
The Foot that comes on your
7
Sewing machine is "system" of your
sewing. Scissors 22. Embroidery software CD
19
FUTURA embroidery is called the
General Purpose Foot and will
be used for the majority of the machine and the software providing powerful option and capabilities. Spool pin cap (large)
8. Satin foot
15. Thread...
Instruction Manual - Page 12
...sewing machine only.
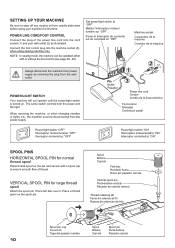
SETTING UP YOUR MACHINE
Be sure to ensure smooth flow of the power line cord into the machine socket (3), when using your wall outlet (2) as illustrated. NOTE: In sewing mode, the machine... de la machine Conector de la máquina
2 1
Pin Butée Pasador
3
Power line cord Cordon Cordón de la linea eléctrica
Foot control Rhéostat
XL-550-P04-1....
Instruction Manual - Page 22
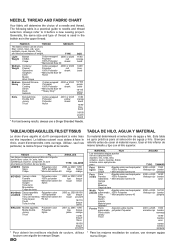
...orange band 14/90
blue band 16/100 purple band
* For best sewing results, always use siempre agujas marca Singer.
MATERIAL
HILO
Los materiales abajos pueden ser de cualquiera fibra: algodón,...Generally, the same size and type of thread is a practical guide to it before a new sewing project.
Peso Batista ligero Gasa
Crepé
Algodón sobre mecha polyester 100% Polyester * ...
Instruction Manual - Page 36

... toward 6 or higher until you achieve the desired appearance.
4.
Helpful Hint: Slight adjusting of the needle position to sew closer to presser foot holder so that is designed to a cord. INSERTING ZIPPERS To sew down the left side, attach right side of foot to the foot holder so that the needle passes through...
Instruction Manual - Page 44
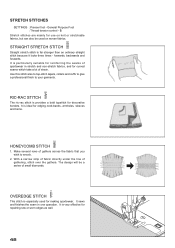
... :Presser foot - forwards, backwards and forwards. With a narrow strip of fabric directly under the line of strain. The design will be used for repairing raw or worn edges as well.
42 It sews and finishes the seam in stretch and non-stretch fabrics, and for curved seams which take a lot of gathering...
Instruction Manual - Page 48

SLANT PIN STITCH
Excellent for hemstitching table and bed covers with a Wing Needle (SINGER Style 2040) to create holes in the stitch pattern.
46 GREEK KEY STITCH
A traditional pattern ... one operation to produce a narrow, supple seam, particularly suited to the outside of the stitching.
Sew along the raw edge of fabric and trim close to swimwear, sportswear, T-shirts, babywear in heirloom...
Instruction Manual - Page 62
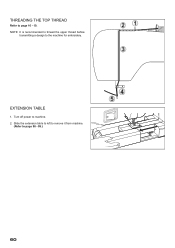
Slide the extension table to left to remove it from machine.
(Refer to machine. 2. Turn off power to page 98 - 99.)
60 EXTENSION TABLE
1.
NOTE: It is recommended to thread the upper thread before
transmitting a design to page 16 - 19. THREADING THE TOP THREAD
Refer to the machine for embroidery.
Instruction Manual - Page 74
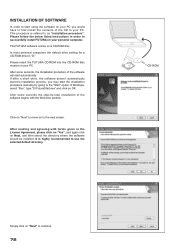
... to use the selected default directory.
After reading and agreeing with the Welcome window.
The FUTURA software comes on "Next" to continue.
72 After some seconds, the Installation procedure of the CD to your PC. CD-ROM
Simply click on a CD-ROM disc. Please follow the below listed instructions in the License Agreement, please click...
Instruction Manual - Page 76

..." error message. Boot up the Futura Software.
4.
Attach the hoop that you are now ready to continue. Finally you plan to your sewing machine and connect the USB cable between your machine, close after finish. CORRECT START-UP PROCEDURE WHEN EMBROIDERING
The following steps must be stored. Next attach the embroidery unit to work with the...
Instruction Manual - Page 78
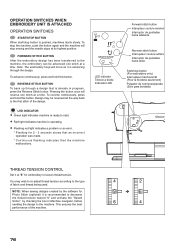
... SWITCHES
START/STOP BUTTON When start .
Red light indicates machine is ready to the first stitch of the machine.
76 FORWARD STITCH BUTTON After the embroidery design has been transferred to the machine, the embroidery can be reversed all the way back to start /stop sewing and the needle stops at its highest position. This ensures...
Instruction Manual - Page 84

... d'une rupture du fil Puntadas en blanco resultantes de ruptura de hilo
2. Computer screen says thread is broken, machine lights are missing
If the embroidery machine detects that the thread is supplied with the accessories over .
2. Rethread upper thread, (see page 16 - 17... arrière interruptor de puntadas hacia atrás
82 HELPFUL INFORMATION FOR EMBROIDERING WITH FUTURA
1.
Instruction Manual - Page 86
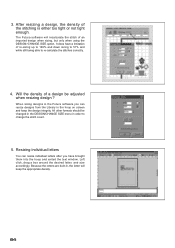
... hoop on screen and keep the appropriate density.
84 Because the letters are built-in order to re-calculate the stitches correctly.
4. 3. The Futura software will keep the design integrity.
Will the density of the stitching is either too tight or not tight enough. Left click, drag a box around the desired letter, and...
Instruction Manual - Page 90

...design. Multi-Hoop
Multi-Hooping is a special feature in the Futura software that will allow embroidery data which is larger than a single embroidery hoop to be sent to the machine... apparaîtront selon les exigences du dessin de broderie. and then sews them precisely, matching one section to stitch out the design.
1. Mark a line horizontally across the center of the fabric.
2....
Instruction Manual - Page 92

... the first of the embroidery data that is sent to the machine for sewing. In each side of the hoop. (See figures 2 and 3). Guide lines are markings which indicates the exact center of the first hoop section).
4. Set fabric and stabilizer into the software. (Additional numbered hoops will appear as the design parts flow out...
Instruction Manual - Page 96
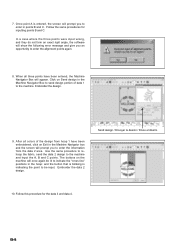
... screen will prompt you to send design portion of the design from the data 2 area.
In a case where the three points were input wrong, and they do not form an exact right angle, the software will once again be lit to indicate the "cross line" positions in the Machine Navigator Box to enter the...
Instruction Manual - Page 104
...6
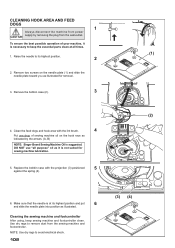
and slide the needle plate into position as illustrated for sewing machine lubrication.
5.
Raise the needle to remove dust from the wall...sewing machine oil on the needle plate (1) and slide the needle plate toward you as illustrated. CLEANING HOOK AREA AND FEED DOGS
1
Always disconnect the machine from power CAUTION supply by the arrows. (A, B)
NOTE: Singer Brand Sewing Machine...
Instruction Manual - Page 106
... indicated
by arrows.
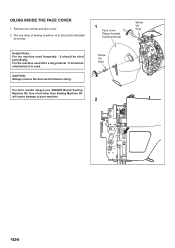
1 Face cover Plaque frontale Cubierta frontal
Helpful Hints : For the machine used . Use of sewing machine oil to your machine. For the machine used after a long interval : It should be oiled before oiling.
For best results always use SINGER Brand Sewing Machine Oil.
Screw Vis Guia
2
Screw Vis Guia
104 OILING INSIDE THE FACE COVER...
Similar Questions

Copy Of Software For Singer Futura Xl 400
Can Anyone Help Me To Get A Copy Of Software For Singer Futura XL 400. Mine got damaged..?
Can Anyone Help Me To Get A Copy Of Software For Singer Futura XL 400. Mine got damaged..?
(Posted by amalilranaweera 3 years ago)

Replacement Part For Singer Futura Xl 400
I am looking for the embroidery arm unit for a Singer Futura Xl 400. Can you assist me in locating t...
I am looking for the embroidery arm unit for a Singer Futura Xl 400. Can you assist me in locating t...
(Posted by sjh4ba 3 years ago)

Singer Futura Xl-400
I am in need of a Singer Futura XL-400 Startup disc. Any idea where I can get one
I am in need of a Singer Futura XL-400 Startup disc. Any idea where I can get one
(Posted by fayevb 4 years ago)


Software Futura Xl-400 And Usb Cable
How can I get Futura XL-400 software to work. Currently, I cannot open software because the (I think...
How can I get Futura XL-400 software to work. Currently, I cannot open software because the (I think...
(Posted by idesktype 10 years ago)