Get support for Singer 4411 Heavy Duty

Singer 4411 Heavy Duty Support Question

Singer 4411 Heavy Duty Support Question

Find answers below for this question about Singer 4411 Heavy Duty.
Need a Singer 4411 Heavy Duty manual? We have 1 online manual for this item!
Question posted by dwdsad on January 25th, 2017

Reverse Caused Nesting?

Works fine stitching in forward, when reverse material rolls up and stitching nests. Have new needle, doesn't effect anything?

Current Answers

Answer #1: Posted by Troubleshooter101 on January 25th, 2017 9:34 AM
This answer was accepted by the poster of the original question.
Troubleshooter101

Member since:
September 30th, 2015

Points: 2,927,040
1,100
points
The dreaded "bird nesting" syndrome is a common sewing machine problem many of us have experienced at one time or another while sewing, either on the top or underneath the fabric. There are lots of reasons for sewing machine thread bunching up, and luckily, many of the solutions are easy and do not require a trip to your favorite sewing machine mechanic.

sewing machine thread bunching up

ANYTIME THE SEWING MACHINE THREAD IS BUNCHING UP, OR BIRD NESTING, ON THE TOP OF YOUR FABRIC, THE CULPRIT HAS SOMETHING TO DO WITH YOUR BOBBIN. HERE ARE SOME THINGS TO CHECK BEFORE CALLING SEWING REPAIR 911:

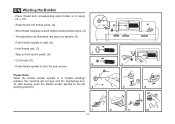
1. IS YOUR BOBBIN THREADED CORRECTLY?

If your machine uses a bobbin case, take the bobbin completely out of the case and re-thread it. Be careful to follow the instructions for your machine, and make sure you have the bobbin thread engaged in the bobbin tension. A good test for this is to hold onto the bobbin thread with one hand. If the bobbin drops all the way to the floor, you missed the tension spring in the bobbin case.

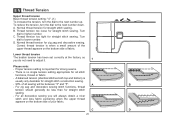
2. IS YOUR BOBBIN CASE TENSION TOO LOOSE?

If you have loosened the screw on your bobbin case to accommodate thicker threads for surface design work, you might not have re-adjusted it correctly for regular thread. After correctly threading the bobbin case, tug gently on the bobbin thread. You should feel some resistance, but the thread should move freely. If you have not made any changes to this tension setting, it is likely not to be the cause of any thread bunches, as it is set correctly at the factory. If you do adjust it, be sure to do so in small increments to avoid dislodging the entire screw.

CONVERSELY, THE REASONS THAT THREAD CAN BUNCH UP UNDERNEATH YOUR FABRIC HAVE ALL TO DO WITH YOUR NEEDLE TENSION.

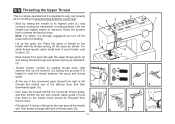
1. IS THE NEEDLE THREAD THREADED CORRECTLY?

Cut the thread a few inches from the spool, and pull it through the needle. Re-thread, taking care to engage the upper thread completely in the tension discs. I always suggest to my students that they hold the thread on either side of the tension disc, and slide it back and forth a bit between the plates with a flossing motion. The tension discs need to "grasp" the thread snugly.

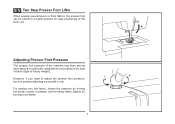
2. IS THE PRESSER FOOT UP?

Duh. We've all done it!

3. IS YOUR MACHINE CLEAN?

Frequent dusting underneath the throat plate and along the thread path will prevent all sorts of stitching and machine problems. Of course, good quality thread, a new, sharp sewing machine needle, and the correct bobbins for your make and model of sewing machine are basic requirements for producing good quality stitches. Frequent dusting, cleaning and oiling will also prevent these and many other stitching problems you might encounter.

Thanks


Please respond to my effort to provide you with the best possible solution by using the "Acceptable Solution" and/or the "Helpful" buttons when the answer has proven to be helpful. Please feel free to submit further info for your question, if a solution was not provided. I appreciate the opportunity to serve you!
Troublshooter101

Related Singer 4411 Heavy Duty Manual Pages

Instruction Manual - Page 2

..., or injury to the off the machine or unplug when the machine is not working properly, if it must be replaced by...appliance is required around the sewing machine needle. 6. Do not pull or push fabric while stitching. Never drop or insert any... this manual. 3. The wrong plate can cause the needle to break. 9. Use this sewing machine. WARNING - EN IMPORTANT SAFETY INSTRUCTIONS When ...
Instruction Manual - Page 6

... Pressure 8 Accessories ...10 Threading the Machine Winding the Bobbin ...12 Inserting the Bobbin ...14 Threading the Upper Thread ...16 Raising the Bobbin Thread ...18 Thread Tension...20 Sewing How to Choose Your Pattern ...22 Three Needle Position Dial...24 Stitch Width Dial & Stitch Length Dial ...26 Sewing Straight Stitch ...28 Reverse Sewing/ Removing the Work/ Cutting the Thread 30 Blind...
Instruction Manual - Page 9

...2 10 11 7. Stitch width dial 13 12. Pattern selector dial 7 8 2 EN Principal Parts of the Machine 1. Thread cutter 1 9 6. Three needle position dial 10. Needle plate cover 3 8. Removable extension table/ accessory storage 4 12 9. Presser foot pressure adjustment 3. Bobbin stopper 5 11. Thread tension dial 2. Stitch length dial 6 13. Reverse sewing lever...
Instruction Manual - Page 11

...20. Bobbin thread guide 22. Upper thread guide 23. Horizontal spool pin 15. Hole for auxiliary spool pin 15 17. Buttonhole stitch balance adjustment slot 16 19. Foot speed control 28. Face plate 18 24. Handwheel 18. Presser foot lifter 20 26. Power ... spindle 14 16. Drop feed control 27. Main plug socket 21. EN Principal Parts of the Machine 14. Handle 19 25.
Instruction Manual - Page 13

... not fit fully in use . Foot control The foot control pedal regulates the sewing speed. (3) Attention: Consult a qualified electrician if in doubt of electric shock, this plug is not in the outlet, reverse the plug. Unplug power cord when machine is intended to install the proper outlet. If it still does not fit...
Instruction Manual - Page 15

... can be raised to a higher position for heavy fabric, tighten by turning it clockwise. 8 For sewing very thin fabric, loosen the pressure by turning the screw counter clockwise, and for easy positioning of the work. (A) A Adjusting Presser Foot Pressure The presser foot pressure of the machine has been pre-set and requires no particular...
Instruction Manual - Page 17

...straight stitch foot t. Zipper foot c. Satin stitch foot o. Cording foot r. Spool pin felt m. Hemmer foot q. Even Feed foot w. EN Accessories Standard accessories (1) a. Seam ripper/ brush f. Spool holders i. Edge/ quilting guide g. Darning/ embroidery foot v. they are not supplied with this machine; Blind hem foot s. Gathering foot u. Twin needle 2 Optional...
Instruction Manual - Page 19

.... (8) - Step on spindle. (5) - Please Note: When the bobbin winder spindle is in "bobbin winding" position, the machine will not sew and the handwheel turn. EN Winding the Bobbin - Place thread and corresponding spool holder on to left (sewing position). 4 3 5 6 7 8 9 10 12 Wind thread clockwise around bobbin winder tension discs. (4) - Push bobbin spindle to...
Instruction Manual - Page 23

... be threaded from spool through the upper thread guide (3) and pulling thread through the slotted eye of thread to the rear beyond the needle eye. Thread tension module by not doing so several sewing problems could result. - Now pass the thread behind the horizontal thread guide, and then behind the thin wire...
Instruction Manual - Page 27

... dial to higher number. A B - C. Proper tension setting is no single tension setting appropriate for strong seams. - Correct thread tension is usually only desirable for straight stitch sewing. - Lower thread tension The bobbin tension has been set correctly at the factory, so you will be between "3" and "5". EN Thread Tension Upper thread tension...
Instruction Manual - Page 29

... on the machine. a b c d e a. Stitch Width Dial d. Use the Stitch Length Dial (d) to adjust the width of the stitch as desired for the project. Pattern Selector Dial ABCDE FGH I J 3 4 2 1 22 The Pattern Selector Dial may be turned in either direction. Use the Stitch Width Dial (c) to adjust the stitch length as desired. Three Needle Position Dial c. Reverse Sewing Lever...
Instruction Manual - Page 31

... work, the needle position is middle. a. Middle Needle Position R. For twin needle stitching, needle position is middle. Right Needle Position 24 L M R a b For edge stitching or sewing parallel lines of top stitch, select needle position left or right. Straight b. Left Needle Position M. EN Three Needle Position Dial The needle position can be altered with the "Three needle...
Instruction Manual - Page 35

EN Sewing Straight Stitch To begin sewing, set the machine for straight stitch. (1) Place the fabric under the presser foot with the fabric edge lined up with the desired seam guide line on the needle plate. (2) Lower the presser foot lifter, and then step on the foot controller to start sewing. (3) 1 2 3 28
Instruction Manual - Page 37

... to the side of a seam, press down the reverse sewing lever (A). Sew a few reverse stitches. Guide the threads to cut. (3) 30 B 3 EN Reverse Sewing To secure the beginning and the end of the face plate and into thread cutter (B). A Release the lever and the machine will sew forward again. (1) Removing the Work Turn the handwheel toward you (counterclockwise) to bring the...
Instruction Manual - Page 39

... folded fabric. 1 Start to sew slowly on the fold, making sure the needle touches slightly the folded top to catch one or two fabric threads. (2) Unfold the fabric when hemming is used for lighter weight fabrics, and a wider stitch is completed and press. 2 Note: To make sure the machine settings are normally sewn with...
Instruction Manual - Page 41

... the needle is advisable to set stitch density....sew over the heavy thread or cord. (A) 34 M (a) (b) When moving from both ends towards the middle. Tips: - Slightly reducing upper thread tension will produce better results. - It is raised before turning the Pattern Selector Dial to another with the center of button and add 0.3 cm (1/8") for fine or stretchy fabrics. - Adjust the Stitch...
Instruction Manual - Page 45

.... (1) Change the all purpose foot to the button sewing foot. (2) Set the stitch length to check that the needle goes cleanly into the left and right holes of the fabric. Slowly sew on the button with 4 holes, sew through the front two holes first, push the work forward and then sew through the back two holes. 3 4 38 Raise...
Instruction Manual - Page 51

...Knits-polyesters, interlocks, tricot, single and double knits. leathers and vinyls. NEEDLE, FABRIC SELECTION NEEDLES EXPLANATION TYPE OF FABRIC SINGER® 2020 Standard sharp needles. SINGER® 2045 Semi-ball point needle, scarfed. 9 (70) to 18 (110). Heavy woolen, overcoat fabrics, upholstery fabrics, some Heavy duty thread, carpet thread. thin to large. 9 (70) to thread size...
Instruction Manual - Page 56

... screw and tighten again after inserting the new needle. (1) B. Insert the needle as illustrated as it is showing signs of the shaft should be in perfect condition. (2) Problems can occur with: A. The flat side of wear and causing problems. For best sewing results always use SINGER® Brand Needles. Attention: Turn power switch to off ("O") before...
Instruction Manual - Page 60

... Cause 1. Lower thread breaks 1. Skipped stitches Needle breaks Loose stitches Seams gather or pucker Uneven stitches, uneven feed 1. The wrong size needle has been used. 4. The machine is noisy The machine jams 1. The needle is too thick for the needle. 4. Fabric has been pulled. The machine is not correctly threaded. 2. Lint or oil have collected on the fabric while sewing...

Similar Questions

I Get E7 Error Message On My Singer Model 7258 Sewing Machine. There Is No Refe
Error message E7 is up on my Singer Stylist model 7258 sewing machine. It is not working at all. I t...
(Posted by ebellamybellamy9 5 years ago)
Thread Underneath Fabric In Large Loops.
When sewing the thread under the fabric comes in large loops. The tension wheel of the upper thread ...
(Posted by hanserikjohansson 7 years ago)
Beeping From Singer Sewing Machine Stylist Ii 5625
My sewing machine will beep and stop sewing after three inches of sewing. I have taken it to be repa...
(Posted by arusheria 9 years ago)
Ask a New Question
Use the box below to post a new question about this Singer product .
Points & Prizes
  • You can earn points for nearly everything you do on HelpOwl.com
  • You can trade in those points for gift cards at leading retailers such as Amazon.com and Walmart
  • It's that simple!
See How it Works
Create a Free Account

Singer Manuals

Find free Singer 4411 Heavy Duty manuals and user guides available at ManualOwl.com. Try out our unique manual viewer allowing you to interact with manuals from directly within your browser!

Singer Reviews

View thousands of Singer user reviews and customer ratings available at ReviewOwl.com.

Contact Information

Complete Singer customer service contact information including steps to reach representatives, hours of operation, customer support links and more from ContactHelp.com.

Scoreboard Ratings

See detailed Singer customer service rankings, employee comments and much more from our sister site.