
Instruction Manual
Page 2
... fabric while stitching. The wrong plate can cause the needle to the nearest authorized dealer or service center for examination, repair, electrical or mechanical adjustment. • Never operate the sewing machine with IEC/EN 60335-2-28 and UL1594. Use only identical replacement parts. Make sure to hand them over if the machine is given to be used by the manufacturer as threading needle, changing needle, threading bobbin, or changing presser foot, etc. • Never drop or insert...
... fabric while stitching. The wrong plate can cause the needle to the nearest authorized dealer or service center for examination, repair, electrical or mechanical adjustment. • Never operate the sewing machine with IEC/EN 60335-2-28 and UL1594. Use only identical replacement parts. Make sure to hand them over if the machine is given to be used by the manufacturer as threading needle, changing needle, threading bobbin, or changing presser foot, etc. • Never drop or insert...
Instruction Manual
Page 9
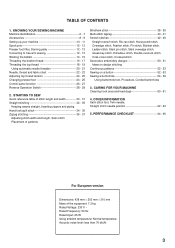
CARING FOR YOUR MACHINE Cleaning hook area and feed dogs 60 - 61 4. KNOWING YOUR SEWING MACHINE Machine identification 6 - 7 Accessories 8 - 9 Setting up your machine 10 - 11 Spool pins 12 - 13 Presser foot lifter, Darning plate 12 - 13 Converting to free-arm sewing 12 - 13 Winding the bobbin 14 - 15 Threading the bobbin thread 16 - 17 Threading the top thread 18 - 19 Using automatic needle threader 20 - 21 Needle, thread and fabric chart 22 - 23 Adjusting top thread tension 24 - 25 Changing presser foot 24 - 25 Control panel function 26 - 27 Reverse Operation Switch 28 -...
CARING FOR YOUR MACHINE Cleaning hook area and feed dogs 60 - 61 4. KNOWING YOUR SEWING MACHINE Machine identification 6 - 7 Accessories 8 - 9 Setting up your machine 10 - 11 Spool pins 12 - 13 Presser foot lifter, Darning plate 12 - 13 Converting to free-arm sewing 12 - 13 Winding the bobbin 14 - 15 Threading the bobbin thread 16 - 17 Threading the top thread 18 - 19 Using automatic needle threader 20 - 21 Needle, thread and fabric chart 22 - 23 Adjusting top thread tension 24 - 25 Changing presser foot 24 - 25 Control panel function 26 - 27 Reverse Operation Switch 28 -...
Instruction Manual
Page 12
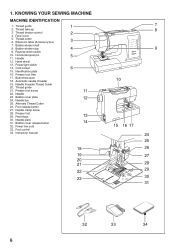
... 16 17 24 25 26 27 28 29 30 31 32 33 34 6 KNOWING YOUR SEWING MACHINE MACHINE IDENTIFICATION 1. Buttonhole lever 18. Presser foot screw 22. Needle 23. Foot control 34. Reverse stitch switch 10. 1. Automatic needle threader 19. Needle clamp screw 28. Bobbin winder shaft 8. Identification plate 16. Power line cord 33. Thread cutter 6. Horizontal spool pin 11. Bobbin cover release button 32. Presser foot lifter 17. Feed dogs 30. Thread guide 2. Extension table (Accessory box) 7. Cord socket 15. Hand wheel 13. Thread guide 21. Needle bar 25.
... 16 17 24 25 26 27 28 29 30 31 32 33 34 6 KNOWING YOUR SEWING MACHINE MACHINE IDENTIFICATION 1. Buttonhole lever 18. Presser foot screw 22. Needle 23. Foot control 34. Reverse stitch switch 10. 1. Automatic needle threader 19. Needle clamp screw 28. Bobbin winder shaft 8. Identification plate 16. Power line cord 33. Thread cutter 6. Horizontal spool pin 11. Bobbin cover release button 32. Presser foot lifter 17. Feed dogs 30. Thread guide 2. Extension table (Accessory box) 7. Cord socket 15. Hand wheel 13. Thread guide 21. Needle bar 25.
Instruction Manual
Page 14
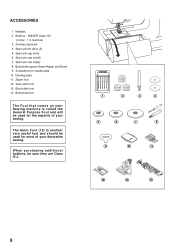
Auxiliary spool pin 4. Spool pin cap (small) 7. Darning plate 11. Blind stitch foot 14. Spool pin felt discs (2) 5. Satin stitch foot 13. When purchasing additional bobbins, be used for needle plate 10. Buttonhole opener/Seam Ripper and Brush 9. Spool pin cap (large) 8. SINGER Class 15J (4 total - 1 in machine) 3. Needles 2. ACCESSORIES 1. The Satin Foot (12) is called the General Purpose Foot and will be used for most of your decorative sewing. Bobbins - Screwdriver for the majority of your sewing. Buttonhole foot The Foot that comes on your Sewing machine is ...
Auxiliary spool pin 4. Spool pin cap (small) 7. Darning plate 11. Blind stitch foot 14. Spool pin felt discs (2) 5. Satin stitch foot 13. When purchasing additional bobbins, be used for needle plate 10. Buttonhole opener/Seam Ripper and Brush 9. Spool pin cap (large) 8. SINGER Class 15J (4 total - 1 in machine) 3. Needles 2. ACCESSORIES 1. The Satin Foot (12) is called the General Purpose Foot and will be used for most of your decorative sewing. Bobbins - Screwdriver for the majority of your sewing. Buttonhole foot The Foot that comes on your Sewing machine is ...
Instruction Manual
Page 16
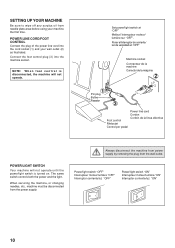
... servicing the machine, or changing needles, etc., machine must be disconnected from the wall-outlet. Set power/light switch at "OFF" Mettez l'interrupteur moteur/ lumière sur "OFF". Poner el Interruptor de corriente/ luz de velocidad en "OFF" Machine socket Connecteur de la machine Conector de la máquina 2 1 Pin plug Butée Pasador 3 Foot control Rhéostat Control por pedal Power line cord Cordon Cord...
... servicing the machine, or changing needles, etc., machine must be disconnected from the wall-outlet. Set power/light switch at "OFF" Mettez l'interrupteur moteur/ lumière sur "OFF". Poner el Interruptor de corriente/ luz de velocidad en "OFF" Machine socket Connecteur de la machine Conector de la máquina 2 1 Pin plug Butée Pasador 3 Foot control Rhéostat Control por pedal Power line cord Cordon Cord...
Instruction Manual
Page 18
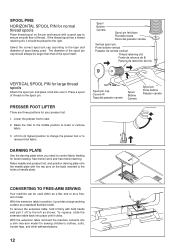
PRESSER FOOT LIFTER There are three positions for large thread spools Attach the spool pin and place a felt disc over it. Lift it clicks. CONVERTING TO FREE-ARM SEWING Your machine can be used . To replace, slide the extension table back into a slim free-arm model for button sewing, free motion work and free motion darning. To remove the extension table, hold it off to the left as a flat- Lower the presser foot to insert or remove fabric. 3. Raise needle and presser foot, and position darning plate onto the needle plate with both hands and...
PRESSER FOOT LIFTER There are three positions for large thread spools Attach the spool pin and place a felt disc over it. Lift it clicks. CONVERTING TO FREE-ARM SEWING Your machine can be used . To replace, slide the extension table back into a slim free-arm model for button sewing, free motion work and free motion darning. To remove the extension table, hold it off to the left as a flat- Lower the presser foot to insert or remove fabric. 3. Raise needle and presser foot, and position darning plate onto the needle plate with both hands and...

Instruction Manual
Page 22
... with cutter on the needle plate until it stops in the slot (B). Replace the clear bobbin cover plate onto the needle plate. 6 A Cutter Coupeur Cortador Groove Cannelure Surco B A 16 The bobbin must rotate counterclockwise when thread is a very important step. Pull thread through the slot (A) and then to its highest position by pushing the release button to remove the cover. 3. Bobbin cover will pop up the bobbin thread. 6. NOTE: Sewing can be started...
... with cutter on the needle plate until it stops in the slot (B). Replace the clear bobbin cover plate onto the needle plate. 6 A Cutter Coupeur Cortador Groove Cannelure Surco B A 16 The bobbin must rotate counterclockwise when thread is a very important step. Pull thread through the slot (A) and then to its highest position by pushing the release button to remove the cover. 3. Bobbin cover will pop up the bobbin thread. 6. NOTE: Sewing can be started...

Instruction Manual
Page 24
... raise the presser foot lifter before threading the top thread. (If the presser foot lifter is in the tension discs, do this simple check: 1.) With the presser foot raised, pull the thread towards the the back of the Automatic Needle Threader.) IMPORTANT: To verify that the machine is threaded properly in its highest position. Turn the hand wheel toward you have miss-threaded the machine and need to the...
... raise the presser foot lifter before threading the top thread. (If the presser foot lifter is in the tension discs, do this simple check: 1.) With the presser foot raised, pull the thread towards the the back of the Automatic Needle Threader.) IMPORTANT: To verify that the machine is threaded properly in its highest position. Turn the hand wheel toward you have miss-threaded the machine and need to the...

Instruction Manual
Page 28
... stretch fabrics. * For best sewing results, always use the same size and type of a needle and thread. Always disconnect the machine from power supply by pulling it before a new sewing project. Loosen the needle clamp screw by turning the hand wheel toward the back. 5. Flat side Côté plat Lado plano Needle Aiguille Aguja Stop pin Butée Pasador Helpful Hint: Placing a scrap of fabric under the presser foot and lowering the presser foot makes...
... stretch fabrics. * For best sewing results, always use the same size and type of a needle and thread. Always disconnect the machine from power supply by pulling it before a new sewing project. Loosen the needle clamp screw by turning the hand wheel toward the back. 5. Flat side Côté plat Lado plano Needle Aiguille Aguja Stop pin Butée Pasador Helpful Hint: Placing a scrap of fabric under the presser foot and lowering the presser foot makes...
Instruction Manual
Page 30
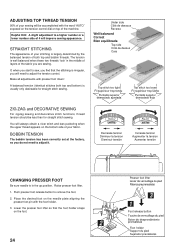
... decorative stitch functions, thread tension should be accomplished with the foot holder. 3. Lower the presser foot lifter so that the stitching is usually only desireable for straight stitch sewing. A balanced tension (identical stitches both top and bobbin threads. Raise presser foot lifter. 1. You will always obtain a nicer stitch and less puckering when the upper thread appears on top of the machine. Push presser foot release button to adjust it. Place the desired foot on the needle plate aligning the presser foot pin...
... decorative stitch functions, thread tension should be accomplished with the foot holder. 3. Lower the presser foot lifter so that the stitching is usually only desireable for straight stitch sewing. A balanced tension (identical stitches both top and bobbin threads. Raise presser foot lifter. 1. You will always obtain a nicer stitch and less puckering when the upper thread appears on top of the machine. Push presser foot release button to adjust it. Place the desired foot on the needle plate aligning the presser foot pin...
Instruction Manual
Page 32
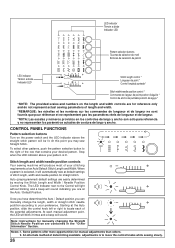
.... Note: Instructions for straight stitch. Notes: 1. An alternate method of stitch length, width and needle position for manually changing the Straight Stitch Needle Position are contained in the "Other Information" Section. CONTROL PANEL FUNCTIONS Pattern selection buttons Turn on the length and width controls are for manual adjustments than others. 2. At this point you can manually change the length, width or straight stitch needle postition according to locate each manual adjustment point, the LED will blink 3 times and a beep...
.... Note: Instructions for straight stitch. Notes: 1. An alternate method of stitch length, width and needle position for manually changing the Straight Stitch Needle Position are contained in the "Other Information" Section. CONTROL PANEL FUNCTIONS Pattern selection buttons Turn on the length and width controls are for manual adjustments than others. 2. At this point you can manually change the length, width or straight stitch needle postition according to locate each manual adjustment point, the LED will blink 3 times and a beep...
Instruction Manual
Page 38
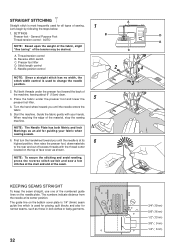
... bobbin cover plate is 1/4" (6mm) seam guide line which is used for piecing quilt blocks and also for narrow seams, such as shown. STRAIGHT STITCHING A Straight stitch is most frequently used for guiding your hands. Presser foot lifter D. The guide line on the needle plate. C A. The numbers indicate distance from the needle at its highest position, then raise the presser foot, draw materials 6 to change the needle position. 3 2. NOTE: The Needle Plate has both threads under the presser foot and lower the 5 presser foot lifter. 4. Start...
... bobbin cover plate is 1/4" (6mm) seam guide line which is used for piecing quilt blocks and also for narrow seams, such as shown. STRAIGHT STITCHING A Straight stitch is most frequently used for guiding your hands. Presser foot lifter D. The guide line on the needle plate. C A. The numbers indicate distance from the needle at its highest position, then raise the presser foot, draw materials 6 to change the needle position. 3 2. NOTE: The Needle Plate has both threads under the presser foot and lower the 5 presser foot lifter. 4. Start...
Instruction Manual
Page 40
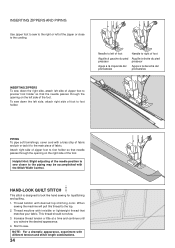
... with different tension and stitch length combinations. 34 Helpful Hint: Slight adjusting of the foot. Thread bobbin with invisible or lightweight thread that matches your fabric. Thread machine with desired top stitching color. Attach right side of zipper foot to foot holder so that the needle passes through the opening on the right side of the needle position to sew closer to the cording. HAND-LOOK QUILT STITCH This stitch is designed to sew. Increase thread tension a little at a time and continue...
... with different tension and stitch length combinations. 34 Helpful Hint: Slight adjusting of the foot. Thread bobbin with invisible or lightweight thread that matches your fabric. Thread machine with desired top stitching color. Attach right side of zipper foot to foot holder so that the needle passes through the opening on the right side of the needle position to sew closer to the cording. HAND-LOOK QUILT STITCH This stitch is designed to sew. Increase thread tension a little at a time and continue...
Instruction Manual
Page 42
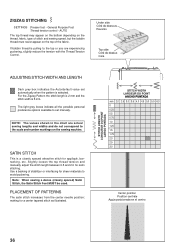
... top thread tension and manually adjust the stitch length between 0.5 and 2.0 for sheer materials to the scale and number markings on the top of the fabric. Use a backing of stitch and sewing speed, but the bobbin thread must never appear on the sewing machine. PLACEMENT OF PATTERNS The satin stitch increases from the center needle position; making for appliqué, bartacking, etc. AUTO The top thread may appear on the bottom depending on the thread, fabric, type...
... top thread tension and manually adjust the stitch length between 0.5 and 2.0 for sheer materials to the scale and number markings on the top of the fabric. Use a backing of stitch and sewing speed, but the bobbin thread must never appear on the sewing machine. PLACEMENT OF PATTERNS The satin stitch increases from the center needle position; making for appliqué, bartacking, etc. AUTO The top thread may appear on the bottom depending on the thread, fabric, type...
Instruction Manual
Page 44
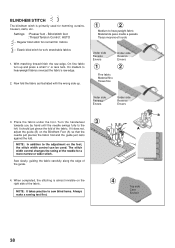
... on the Blindhem Foot (A) so that the needle just pierces the fabric fold and the guide just rests against the fold. Elastic blind stitch for normal firm fabrics - When completed, the stitching is primarily used . Settings : Presser foot - Blind stitch foot : Thread Tension Control: AUTO - Place the fabric under the foot. NOTE: In addition to heavyweight fabrics overcast the fabric's raw edge. 2. The stitch width control changes the swing of the fabric. Sew slowly, guiding the fabric carefully along the...
... on the Blindhem Foot (A) so that the needle just pierces the fabric fold and the guide just rests against the fold. Elastic blind stitch for normal firm fabrics - When completed, the stitching is primarily used . Settings : Presser foot - Blind stitch foot : Thread Tension Control: AUTO - Place the fabric under the foot. NOTE: In addition to heavyweight fabrics overcast the fabric's raw edge. 2. The stitch width control changes the swing of the fabric. Sew slowly, guiding the fabric carefully along the...

Instruction Manual
Page 48
... and hems. When manually adjusted to a very narrow width it locks three times - Make several rows of sportswear in making sportswear - The design will be used by the garment industry in stretch and non-stretch fabrics, and for seaming in areas of strain. It is primarily used for curved seams which take a lot of great stress. HONEYCOMB STITCH The Honeycomb stitch is far stronger than an ordinary straight stitch because...
... and hems. When manually adjusted to a very narrow width it locks three times - Make several rows of sportswear in making sportswear - The design will be used by the garment industry in stretch and non-stretch fabrics, and for seaming in areas of strain. It is primarily used for curved seams which take a lot of great stress. HONEYCOMB STITCH The Honeycomb stitch is far stronger than an ordinary straight stitch because...

Instruction Manual
Page 58
... projects. SEWING ON A BUTTON SETTINGS :Presser foot - Lower presser foot. Turn the handwheel to make sure needle clears both threads to the backside of button. General purpose foot or Satin Stitch Foot :Thread tension control - Helpful Hint: To secure thread, pull both left and right openings of the fabric and tie together. 52 Sew 10 stitches. CONTINUOUS PATTERNS SETTINGS :Presser foot - If a button shank is required, place a darning needle on borders or hems of it as illustrated. Use whichever patterns suit your fabric and button under the presser foot. Adjust width...
... projects. SEWING ON A BUTTON SETTINGS :Presser foot - Lower presser foot. Turn the handwheel to make sure needle clears both threads to the backside of button. General purpose foot or Satin Stitch Foot :Thread tension control - Helpful Hint: To secure thread, pull both left and right openings of the fabric and tie together. 52 Sew 10 stitches. CONTINUOUS PATTERNS SETTINGS :Presser foot - If a button shank is required, place a darning needle on borders or hems of it as illustrated. Use whichever patterns suit your fabric and button under the presser foot. Adjust width...
Instruction Manual
Page 66
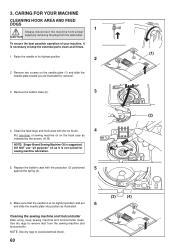
... hook race as illustrated. Cleaning the sewing machine and footcontroller After using, keep the essential parts clean at its highest position. 2 2. CARING FOR YOUR MACHINE CLEANING HOOK AREA AND FEED DOGS 1 Always disconnect the machine from power supply by the arrows. (A, B) NOTE: Singer Brand Sewing Machine Oil is necessary to its highest position and put 6 and slide the needle plate into position as indicated by removing the plug from the sewing machine and footcontroller. Remove the bobbin case (2). 3 4. Replace the bobbin case...
... hook race as illustrated. Cleaning the sewing machine and footcontroller After using, keep the essential parts clean at its highest position. 2 2. CARING FOR YOUR MACHINE CLEANING HOOK AREA AND FEED DOGS 1 Always disconnect the machine from power supply by the arrows. (A, B) NOTE: Singer Brand Sewing Machine Oil is necessary to its highest position and put 6 and slide the needle plate into position as indicated by removing the plug from the sewing machine and footcontroller. Remove the bobbin case (2). 3 4. Replace the bobbin case...
Instruction Manual
Page 68
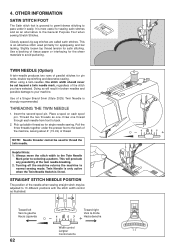
... stitch foot is strongly recommended. Turning off the machine returns the machine to pass under the presser foot to avoid puckering. Use a backing of the twin needle breaking. 2. When using a twin-needles, the stitch width should never be set beyond a twin needle mark, regardless of the needle when sewing straight stitch may be used primarily for single needle sewing. STRAIGHT STITCH NEEDLE POSITION The position of the stitch you have selected. TWIN NEEDLE (Option) A twin-needle produces two rows of parallel stitches for satin stitching. Pick up bobbin thread...
... stitch foot is strongly recommended. Turning off the machine returns the machine to pass under the presser foot to avoid puckering. Use a backing of the twin needle breaking. 2. When using a twin-needles, the stitch width should never be set beyond a twin needle mark, regardless of the needle when sewing straight stitch may be used primarily for single needle sewing. STRAIGHT STITCH NEEDLE POSITION The position of the stitch you have selected. TWIN NEEDLE (Option) A twin-needle produces two rows of parallel stitches for satin stitching. Pick up bobbin thread...

Instruction Manual
Page 70
... sewing stitch patterns. - Remove lint (see page 22 - 23). Shorten stitch length. 64 5. Turn on needle place - Lower buttonhole lever. * Bobbin winder is damaged.- Clean hook (see page 22 - 23). * Machine is too loose. - See page 18 - 19. * Thread is not threaded correctly. - See page 22 - 23. * Machine is caught in hook. - Rewind bobbin. Needle breaks. * Fabric is not correct for thread and fabric. - Guide it gently. * Bobbin has not been wound evenly. - Draw both threads back under presser foot before starting seam...
... sewing stitch patterns. - Remove lint (see page 22 - 23). Shorten stitch length. 64 5. Turn on needle place - Lower buttonhole lever. * Bobbin winder is damaged.- Clean hook (see page 22 - 23). * Machine is too loose. - See page 18 - 19. * Thread is not threaded correctly. - See page 22 - 23. * Machine is caught in hook. - Rewind bobbin. Needle breaks. * Fabric is not correct for thread and fabric. - Guide it gently. * Bobbin has not been wound evenly. - Draw both threads back under presser foot before starting seam...


