
Singer 7363 CONFIDENCE Support Question
Singer 7363 CONFIDENCE Support Question
Find answers below for this question about Singer 7363 CONFIDENCE.Need a Singer 7363 CONFIDENCE manual? We have 1 online manual for this item!
Question posted by Anonymous-165169 on December 20th, 2018
I Have Threaded And Retreaded This Machine Dozens Of Times And Tension Is Still
the tension is a mess - creates a birds nest mess on underside of fabric- it will work for a few stitches then not. The thread is loose off of the spool while I am sewing but I cannot get it right - have made sure I am following steps exactly and watched videos to be sure. It worked for a few days then stopped - this machine is brand new thabja
Current Answers

Related Singer 7363 CONFIDENCE Manual Pages
Instruction Manual - Page 2
... needle, threading bobbin, or changing presser foot, etc. • Never drop or insert any air openings blocked. To reduce the risk of Double-Insulated Appliances. Special care is designed to break. • Do not use bent needles. • Do not pull or push fabric while stitching. This household sewing machine is required around the sewing machine needle...
Instruction Manual - Page 9
... 8 - 9 Setting up your machine 10 - 11 Spool pins 12 - 13 Presser foot lifter, Darning plate 12 - 13 Converting to free-arm sewing 12 - 13 Winding the bobbin 14 - 15 Threading the bobbin thread 16 - 17 Threading the top thread 18 - 19
Using automatic needle threader 20 - 21 Needle, thread and fabric chart 22 - 23 Adjusting top thread tension 24 - 25 Changing...
Instruction Manual - Page 12
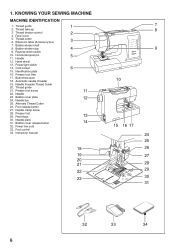
.... Thread take-up 3. Bobbin winder stop 9. Presser foot lifter 17. Presser foot screw 22. Bobbin cover release button 32. KNOWING YOUR SEWING MACHINE
MACHINE IDENTIFICATION
1. Hand wheel 13. Power/light switch 14. Reverse stitch switch 10. Needle 23. Automatic needle threader 19. Foot release button 27. Foot control 34. Feed dogs 30. Thread cutter 6. Horizontal spool pin...
Instruction Manual - Page 14
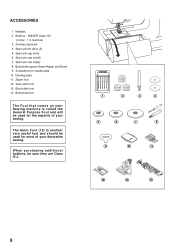
Bobbins - Buttonhole opener/Seam Ripper and Brush 9. Satin stitch foot 13.
SINGER Class 15J
(4 total - 1 in machine) 3. Auxiliary spool pin 4. Spool pin cap (small) 7. Buttonhole foot
The Foot that comes on your Sewing machine is another very useful foot and should be used for the majority of your sewing.
When purchasing additional bobbins, be used for needle plate...
Instruction Manual - Page 16
... "ON"
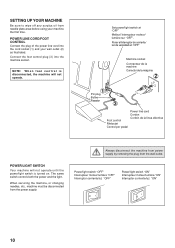
10 Connect the foot control plug (3) into the cord socket (1) and your machine the first time. Always disconnect the machine from power supply by removing the plug from the power supply.
When servicing the machine, or changing needles, etc., machine must be disconnected from the wall-outlet. POWER LINE CORD/FOOT CONTROL
Connect the...
Instruction Manual - Page 18
... plate onto the needle plate with a spool cap to control fabric feeding for normal thread spools
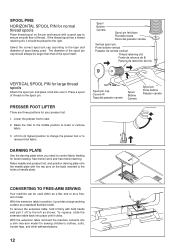
Place thread spool on the pin and secure with the two pins on the spool pin. SPOOL PINS
HORIZONTAL SPOOL PIN for button sewing, free motion work and free motion darning. If the thread spool has a thread retaining slit, it provides a large working surface as shown.
PRESSER FOOT LIFTER...
Instruction Manual - Page 20

... left position, if it clicks. Start machine and the bobbin starts to use Class 15 J bobbins.
1. Put end of bobbin. Push
4
shaft to the
right until it is not already there. Place bobbin onto shaft with the spool pin cap. Hold the end of thread on the spool pin, and secure it with end of...
Instruction Manual - Page 24

.... Raise the presser foot lifter. C. This time you until the needle is in the
following page for instructions on operation of the Automatic Needle Threader.)
IMPORTANT:
To verify that the machine is not raised, correct thread tension cannot be sure to the left of the needle (6) from right to left hand while firmly gripping the...
Instruction Manual - Page 28

... you .
2. Always disconnect the machine from power supply by turning the ...by pulling it before a new sewing project. FABRICS
The fabrics below can go. 6. Changing...thread.
NOTE: Tighten snugly, but do not over tighten. Always refer to needle and thread selection.
The following table is a practical guide to it downward. 4.
NEEDLE, THREAD AND FABRIC CHART
Your fabric...
Instruction Manual - Page 30
... trop tendu
Puntada superior demasiado apretada
Top stitch too loose Fil supérieur trop lâche
Puntada superior demasiado floja
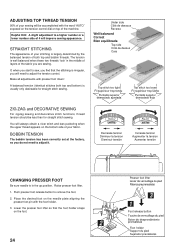
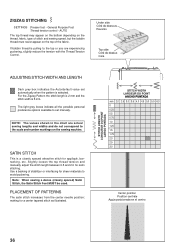
ZIG ZAG and DECORATIVE SEWING
For zigzag sewing and decorative stitch functions, thread tension should be accomplished with the word "AUTO" exposed on the tension control dial on top of the machine.
Raise presser foot lifter. 1. Helpful Hint...
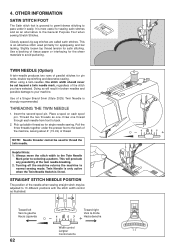
Instruction Manual - Page 32
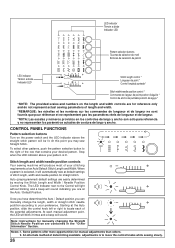
...right of your stitching requirements at the Auto position, slide the control knob left or right to locate each manual adjustment point, the LED will blink 3 times and a beep will be lit.
When a pattern is selected, it will automatically sew... y ancho. Stitch length and width/needle position controls
Your sewing machine will sound indicating you may sew Straight Stitch.
Notes: 1....
Instruction Manual - Page 38
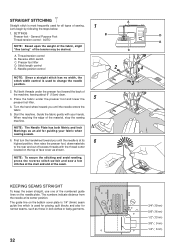
... cut off excess threads with your fabric when sewing a seam.
6.
When reaching the edge of
the machine, leaving about ...threads under the presser foot and lower the
5
presser foot lifter.
4.
General Purpose Foot
D
Thread tension control - Thread tension control B. Start the machine. Needle position control
2
4
NOTE: Since a straight stitch has no width, the
stitch...
Instruction Manual - Page 40
...the piping may be accomplished with invisible or lightweight thread that the needle passes through the opening on the right side of zipper foot to sew.
Thread machine with the Stitch Width Control. NOTE: For a dramatic appearance, experiment with different tension and stitch length combinations.
34
HAND-LOOK QUILT STITCH
This stitch is designed to the top. 2.
Start to presser...
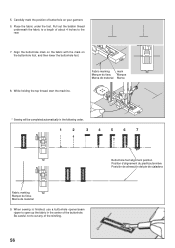
Instruction Manual - Page 42
... the tension with the Thread Tension Control.
For the Zigzag Pattern the stitch length is 2 mm and the stitch width is a closely spaced attractive stitch for sheer materials to set automatically when the pattern is pulling to the scale and number markings on the top of stitch and sewing speed, but the bobbin thread must never appear on the sewing machine...
Instruction Manual - Page 48

... three times -
HONEYCOMB STITCH
The Honeycomb stitch is primarily used by the garment industry in areas of garments.
42
It is the same type stitch used for use on knit, or stretchable fabrics, but can be a series of strain. It's very effective for a decorative top-stitch.
forwards, backwards and forwards. General Purpose Foot or Satin Stitch Foot :Thread tension...
Instruction Manual - Page 56

... linen edges, first sew the stitch and then trim the edge of the fabric along the edge of pockets.
50
Sew the pyramid pattern on a scrap of ladies' and children's clothes, and also for sewing both edges of the stitch. This is particularly useful for table linen edges. Satin stitch foot :Thread tension control - When using this time. Be careful...
Instruction Manual - Page 62
... thread, start the machine. Carefully mark the position of about 4 inches to the rear.
7. Place the fabric under the foot. When sewing is finished, use a buttonhole opener/seam ripper to cut any of the buttonhole. Fabric marking
Marque du tissu Marca de material
mark
Marque Marca
* Sewing will be completed automatically in the center of the stitching...
Instruction Manual - Page 66
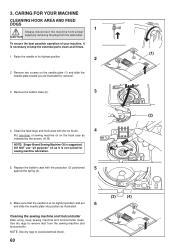
... on the needle plate (1) and slide the needle plate toward you as it is suggested. Use dry rags to keep sewing machine and footcontroller clean. DO NOT use "all times.
(1)
1. Make sure that the needle is not suited for removal.
3. NOTE: Use dry rags to its highest position and put
6
and slide the...
Instruction Manual - Page 68
...
Place a spool on each needle from front to the General Purpose Foot when sewing Stretch Stitches. Use a backing of parallel stitches for appliqueing and bar tacking.
Pick up bobbin thread as an alternative to back.
2. Turning off the machine returns the machine to selecting a pattern. Slightly loosen top thread tension for single needle sewing. Thread the two threads as...
Instruction Manual - Page 70

... (see page 22 - 23). See page 18 - 19. * Top thread tension is being pulled or pushed against machine feeding
action. - Needle breaks. * Fabric is too loose. - THREAD PROBLEMS Thread bunches. * Top and bobbin threads are not drawn back under presser foot about 6 inches (10 cm) and hold until a few stitches are irregular. * Needle size is set too wide.
- See...
Similar Questions

My Brand New Machine Has Totally Jammed Up. There Is No Thread In Needle Or Bobb
The machine jammed. Light works. Currently upper thread and bobbin removed. No thread jams. How can ...
The machine jammed. Light works. Currently upper thread and bobbin removed. No thread jams. How can ...
(Posted by pturteal 4 years ago)

Brand New Singer 7640 And Back Stitch Don't Work.
just got a brand new singer 7640 and the back stitch button does nothing but beep why? And how do I ...
just got a brand new singer 7640 and the back stitch button does nothing but beep why? And how do I ...
(Posted by Kcchiefs61146 6 years ago)

How Do You Oil This Machine.? It's Completely Jammed And Brand New.
Singer 3232
Singer 3232
(Posted by Kmdigiacomo 7 years ago)

How Adjust Tension Was Getting Stitches On Top Of Fabric. Thread Bunched On
Thread not sewing into fabric. Comes apart immediately.GM
Thread not sewing into fabric. Comes apart immediately.GM
(Posted by gerriej 8 years ago)
C4 Error On Brand New Machine
This is a brand new machine. It keeps saying C4. Motor runs but no action. I cannot load my bobbin, ...
This is a brand new machine. It keeps saying C4. Motor runs but no action. I cannot load my bobbin, ...
(Posted by skalvig 10 years ago)