Singer 5523 SCHOLASTIC Support Question
Singer 5523 SCHOLASTIC Support Question
Find answers below for this question about Singer 5523 SCHOLASTIC.Need a Singer 5523 SCHOLASTIC manual? We have 1 online manual for this item!
Question posted by pturteal on January 8th, 2020
My Brand New Machine Has Totally Jammed Up. There Is No Thread In Needle Or Bobb
The machine jammed. Light works. Currently upper thread and bobbin removed. No thread jams. How can I get machine working again
Current Answers
Answer #1: Posted by Odin on January 9th, 2020 11:07 AM
Odin

Member since:
April 10th, 2010 Points: 41,236,680

Member since:
April 10th, 2010 Points: 41,236,680
If you haven't already done so, review the suggestions at https://www.manualslib.com/manual/453844/Singer-5523.html?page=64&term=jam&selected=8. If the issue persists or if you require further advice, or if those instructions do not seem to apply to your model, you'll have to consult the manufacturer, for which use the contact information at https://www.contacthelp.com/singer/customer-service.
Hope this is useful. Please don't forget to click the Accept This Answer button if you do accept it. My aim is to provide reliable helpful answers, not just a lot of them. See https://www.helpowl.com/profile/Odin.
Related Singer 5523 SCHOLASTIC Manual Pages
Instruction Manual - Page 2
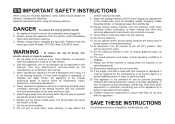
... care is not working properly, if it is required around the sewing machine needle. 6. Always use...threading needle, changing needle, threading bobbin, or changing presser foot, and the like. 10.
Never drop or insert any object into water. Do not pull or push fabric while stitching. Switch the sewing machine off ("O") position, then remove plug from the electrical outlet when removing...
Instruction Manual - Page 6
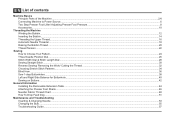
......10
Threading the Machine Winding the Bobbin...12 Inserting the Bobbin ...14 Threading the Upper Thread...16 Automatic Needle Threader ...18 Raising the Bobbin Thread ...20 Thread Tension ...22
Sewing How to Choose Your Pattern...24 Three Needle Position Dial ...26 Stitch Width Dial & Stitch Length Dial ...28 Sewing Straight Stitch...30 Reverse Sewing/ Removing the Work/ Cutting the Thread ...32...
Instruction Manual - Page 9
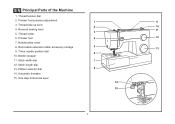
...-up lever 2
10
4. Reverse sewing lever
11
3
5. Needle plate cover
8. Stitch length dial
13. Automatic threader 15. EN Principal Parts of the Machine
1. One step buttonhole lever
14
15
2 Bobbin stopper
11. Presser foot pressure adjustment
1
9
3. Three needle position dial
6
10. Thread cutter
6. Presser foot
4
12
7. Removable extension table/ accessory storage...
Instruction Manual - Page 11

... spindle
16
18. Face plate
20
26. Bobbin thread guide
24. Presser foot lifter 22
28. Drop feed control
29. EN Principal Parts of the Machine
16. Power cord
4
23 24 25 26 27
29 30
28 Upper thread guide
25. Foot speed control 30. Power and light switch 19
22. Hole for second spool pin...
Instruction Manual - Page 17
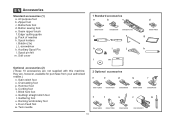
Spool holders i. Auxiliary Spool Pin l. they are not supplied with this machine; Cording foot r. EN Accessories
Standard accessories (1) a. Spool pin felt m. Soft ...needles h. Even Feed foot w. Edge/ quilting guide g. Gathering foot u. Bobbin (3x) j. Blind hem foot s. Satin stitch foot o. Hemmer foot q. Button sewing foot e. Overcasting foot p. Twin needle...
Instruction Manual - Page 19

...left (10) and remove. To start sewing, push the bobbin winder spindle to left
(sewing position).
4
3
5
6
7
8
9
10
12 Place thread and corresponding spool holder on to right. (6)
-
Wind thread clockwise around bobbin winder tension discs. (4)
- Cut thread. (9) 2
- Please Note:
When the bobbin winder spindle is in "bobbin winding"
position, the machine will not sew and the...
Instruction Manual - Page 21
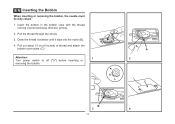
... or removing the bobbin, the needle must be fully raised.
1. Pull out about 15 cm (6 inches) of thread and attach the bobbin cover plate. (C)
Attention:
1
Turn power switch to off ("O") before inserting or
removing the bobbin. B 3
14
A 2
C
4
Pull the thread through the slit (A).
3. Draw the thread clockwise until it slips into the notch (B).
4. Insert the bobbin in the bobbin case...
Instruction Manual - Page 23
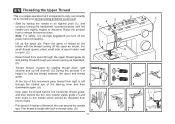
... off the spool as shown. Draw thread from front to back.
- Thread tension module by leading thread down to the needle which should be threaded from spool through the upper thread guide (3) and pulling thread through the slotted eye of the take-up the spool pin. Now pass the thread behind the horizontal thread guide, and then behind the thin...
Instruction Manual - Page 25
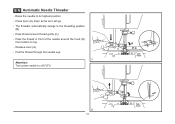
...Release lever (A). - A C
B D
A
2 18 EN Automatic Needle Threader
- The threader automatically swings to its highest position. - Pull the thread through the needle eye.
1 Attention: Turn power switch to top. -
Press lever (A) down as far as it will go. - Pass thread around the hook (D)
from bottom to off ("O")! Pass the thread in front of the needle around thread guide (C). -
Instruction Manual - Page 27
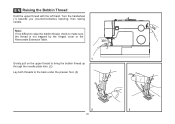
... difficult to raise the bobbin thread, check to make sure the thread is not trapped by the hinged cover or the Removable Extension Table.
1 Gently pull on the upper thread to bring the bobbin thread up through the needle plate hole. (2) Lay both threads to the back under the presser foot. (3)
2
3
20 EN Raising the Bobbin Thread
Hold the upper thread with the left...
Instruction Manual - Page 31

... the diagram are indicated on the Pattern Selector Dial in gray. Three Needle Position Dial c. Stitch Width Dial d. The blue indicates that the stitch is a stretch stitch pattern, and information on how to sew these stretch patterns is on the machine. Stitches in the top of the diagram are indicated on the Pattern...
Instruction Manual - Page 35
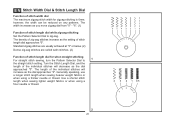
Generally speaking, use
a longer stitch length when sewing heavier weight fabrics or
when using a
finer needle or thread.
4 3 2 1 0.5
2
28 Use a shorter stitch
length when sewing lighter weight fabrics or when using a thicker needle or thread. The density of zig-zag stitches increase as the dial
approached "0". "6". (1)
Function of stitch length dial while zig-zag stitching ...
Instruction Manual - Page 37
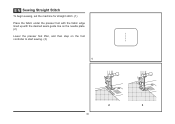
EN Sewing Straight Stitch
To begin sewing, set the machine for straight stitch. (1) Place the fabric under the presser foot with the fabric edge lined up with the desired seam guide line on the needle plate. (2) Lower the presser foot lifter, and then step on the foot controller to start sewing. (3)
1
2
3
30
Instruction Manual - Page 39
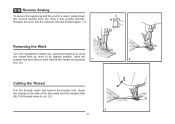
... position, raise the
presser foot and remove work behind the needle and presser 1
2
foot. (2)
Cutting the Thread
Pull the threads under and behind the presser foot. A
Release the lever and the machine will sew forward again. (1)
Removing the Work
Turn the handwheel toward you (counterclockwise) to bring
the thread take up lever to cut. (3)
32
B 3 Sew a few reverse stitches. Pull...
Instruction Manual - Page 43
... for the fabric.
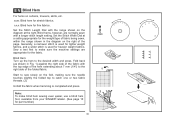
Blind Hem:
Turn up the hem to catch one or two fabric threads. (2)
Unfold the fabric when hemming is used for heavier weight fabrics.
Generally, a narrower...the machine settings are normally sewn
with
the top edge of the hem extending about 7 mm (1/4") to the
right side of the folded fabric.
1
Start to sew slowly on the fold, making sure the needle touches...
Instruction Manual - Page 45
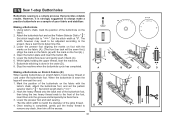
...the presser foot and start the machine. 7. a
b
A
PUSH
B
C
Making a Buttonhole on Stretch Fabrics (E)
When sewing buttonholes on the foot (b).) 4. Hook the heavy thread onto the back end of ...the buttonhole lever and gently push it is done in the order (D). 8. While lightly holding the upper thread, start sewing.
*Set the stitch width to match the diameter of the buttonhole on the ...
Instruction Manual - Page 49
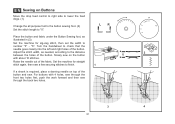
... the stitch width, as illustrated in (3). Slowly sew on the button with 4 holes, sew through the front two holes first, push the work forward and then sew through the back two holes.
3
4
42 Raise the needle out of the button.
Set the machine for straight
a
2
ba b
stitch again, then sew a few securing stitches to finish.
1
If a shank...
Instruction Manual - Page 55
... needle.)
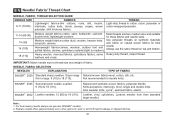
Note : 1. Replace needle often (approximately every other garment ) and/ or at first thread breakage or skipped stitches.
48
Not recommended for these fabrics and needle sizes. THREAD
Light-duty thread in... SINGER® needles. 2.
SINGER® 2045 Semi-ball point needle, scarfed. 9 (70) to 18 (110).
For best sewing results always use the same thread on natural woven...
Instruction Manual - Page 60
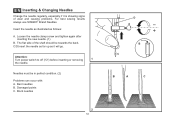
..., especially if it will go. Attention:
Turn power switch to off ("O") before inserting or removing
1
the needle. The flat side of wear and causing problems. For best sewing results always use SINGER® Brand Needles.
Insert the needle as illustrated as it is showing signs of the shaft should be in perfect condition. (2)
Problems can occur...
Instruction Manual - Page 64
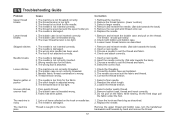
...while sewing, let the feed dogs pull
the fabric under the foot.
1. Correct the thread tension.
1. The machine is damaged. 2. The lower thread tension is not attached correctly.
1. The foot is too tight. Select a larger needle. 4. Loosen lower thread tension as illustrated. 3. Insert a new needle. 2. Select the correct foot.
1. Readjust the stitch length. 3. Remove bobbin case...
Similar Questions

New Machine Bottom Tensionproblem
Hello, New machine used 1 hour broke needle now bottom tension will not lift up or down. Replaced ne...
Hello, New machine used 1 hour broke needle now bottom tension will not lift up or down. Replaced ne...
(Posted by noblegtecnn 9 years ago)

Automatic Needle Threaded
I'm having a hard time threading my Singer 5523. Could you please show me step by step on how the au...
I'm having a hard time threading my Singer 5523. Could you please show me step by step on how the au...
(Posted by Fmkangas 9 years ago)

Needle Positions
My sewing machine needle adjustment is an 1/8" Off. It does not matter how many times I try to set t...
My sewing machine needle adjustment is an 1/8" Off. It does not matter how many times I try to set t...
(Posted by Jandjmason 9 years ago)
C4 Error On Brand New Machine
This is a brand new machine. It keeps saying C4. Motor runs but no action. I cannot load my bobbin, ...
This is a brand new machine. It keeps saying C4. Motor runs but no action. I cannot load my bobbin, ...
(Posted by skalvig 10 years ago)

How Do I Use The Serger On This Machine?
How do I use the serger on this machine?
How do I use the serger on this machine?
(Posted by margogeorge 10 years ago)