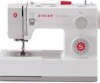
Singer 5523 SCHOLASTIC Support Question
Singer 5523 SCHOLASTIC Support Question
Find answers below for this question about Singer 5523 SCHOLASTIC.Need a Singer 5523 SCHOLASTIC manual? We have 1 online manual for this item!
Question posted by Jandjmason on September 4th, 2014
Needle Positions
My sewing machine needle adjustment is an 1/8" Off. It does not matter how many times I try to set the needle, even the marking of the needle position, wheel, shows it is not dead on. I quilt and deal with 1/4" all the time and it presents an issue constantly. I have the 1/4" foot on the machine. It is extremely hard keeping the material riding Inside that marker and be accurate. Any suggestions?
Current Answers
Related Singer 5523 SCHOLASTIC Manual Pages
Instruction Manual - Page 2
..., or dropped into any adjustments
in the needle area, such as a toy. Do not pull or push fabric while stitching. Do not operate where aerosol spray products are being used or where oxygen is required around the sewing machine needle. 6. SAVE THESE INSTRUCTIONS
This sewing machine is intended for use of the sewing machine and foot controller free from...
Instruction Manual - Page 6
... Source...6 Two Step Presser Foot Lifter/ Adjusting Presser Foot Pressure...8 Accessories...10
Threading the Machine Winding the Bobbin...12 Inserting the Bobbin ...14 Threading the Upper Thread...16 Automatic Needle Threader ...18 Raising the Bobbin Thread ...20 Thread Tension ...22
Sewing How to Choose Your Pattern...24 Three Needle Position Dial ...26 Stitch Width Dial & Stitch...
Instruction Manual - Page 9
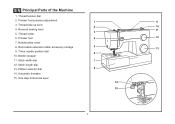
...7
12. Three needle position dial
6
10. Pattern selector dial
8
14. Automatic threader 15. Thread cutter
6. Presser foot
4
12
7. Removable extension table/ accessory storage
5
13
9. Thread take-up lever 2
10
4. Stitch length dial
13. One step buttonhole lever
14
15
2 Bobbin stopper
11. EN Principal Parts of the Machine
1. Needle plate cover
8. Presser...
Instruction Manual - Page 13
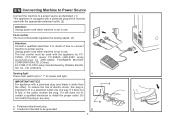
... a power source as illustrated. (1) This appliance is equipped with a polarized plug which must be grounded
2
6
A 3 Foot control The foot control pedal regulates the sewing speed. (3)
Attention: Consult a qualified electrician if in use . Unplug power cord when machine is not in doubt of electric shock, this plug is intended to fit in use .
Instruction Manual - Page 15
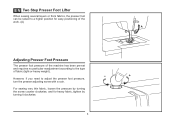
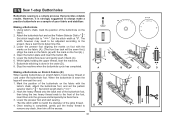
... Step Presser Foot Lifter
When sewing several layers or thick fabrics, the presser foot can be raised to a higher position for heavy fabric, tighten by turning the screw counter clockwise, and for easy positioning of the work. (A)
A
Adjusting Presser Foot Pressure
The presser foot pressure of the machine has been pre-set and requires no particular...
Instruction Manual - Page 17
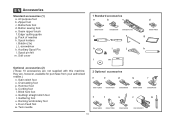
... foot p. Hemmer foot q. Quilting/ straight stitch foot t. Twin needle
2 Optional accessories
n
o
p
q
r
006172008 006907008
006900008
006813008
006904008
s
t
u
v
w
006916008 006917008
006016008
0061850081
10 Zipper foot c. they are not supplied with this machine; Blind hem foot s. Bobbin (3x) j. All purpose foot b. Button sewing foot e. Cording foot...
Instruction Manual - Page 19

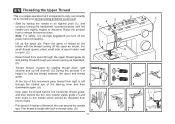
... winder tension discs. (4)
- Hold thread end. (7) 1
- Please Note:
When the bobbin winder spindle is in "bobbin winding"
position, the machine will not sew and the handwheel turn. To start sewing, push the bobbin winder spindle to left
(sewing position).
4
3
5
6
7
8
9
10
12 Step on spindle. (5)
- Push bobbin spindle to the left (10) and remove.
EN Winding the...
Instruction Manual - Page 23
...again. (6)
- Now pass the thread behind the horizontal thread guide, and then behind the thin wire needle clamp guide (7) and then down right channel and up left through pre-tension spring as shown. Pull ... top of this process it is helpful to carry out correctly as by not doing so several sewing problems could result.
- Note: For safety, it is important to hold the thread between the...
Instruction Manual - Page 25
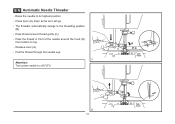
...Release lever (A). - Pull the thread through the needle eye.
1 Attention: Turn power switch to the threading position
(B). - A C
B D
A
2 18 Pass thread around the hook (D)
from bottom to its highest position. - EN Automatic Needle Threader
- The threader automatically swings to off ("O")! Pass the thread in front of the needle around thread guide (C). -
Press lever (A) down as...
Instruction Manual - Page 29
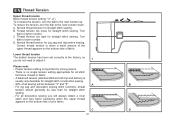
... too tight for strong seams.
- D. Lower thread tension
The bobbin tension has been set correctly at the factory, so you will be less than for all decorative sewing you do not need to adjust it.
1
Please note:
- Proper tension setting is when a small amount of the upper thread appears on the bottom side of...
Instruction Manual - Page 31

... top of the diagram are indicated on the machine. a
b
c d e
a. Stitch Length Dial e.
Three Needle Position Dial c. Stitches in blue. Stitches in either direction. Stitch Width Dial d.
The blue indicates that the stitch is a stretch stitch pattern, and information on how to adjust the width of the stitch as desired for the project.
Reverse Sewing Lever b.
Instruction Manual - Page 33
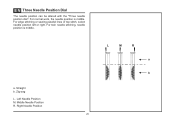
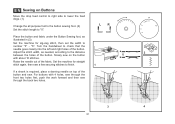
... stitching or sewing parallel lines of top stitch, select needle position left or right. Left Needle Position M. For twin needle stitching, needle position is middle.
Middle Needle Position R. Zig-zag L. Right Needle Position
26
L
M
R
a b EN Three Needle Position Dial
The needle position can be altered with the "Three needle position dial". For normal work, the needle position is...
Instruction Manual - Page 35
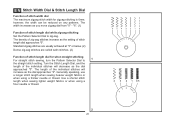
... stitch length dial while zig-zag stitching Set the Pattern Selector Dial to
1
the straight stitch setting. The length of the individual stitches will decrease as the setting of stitch length dial approaches "0". Generally speaking, use
a longer stitch length when sewing heavier weight fabrics or
when using a
finer needle or thread.
4 3 2 1 0.5
2
28 The width increases...
Instruction Manual - Page 37
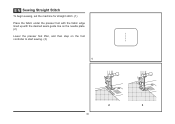
EN Sewing Straight Stitch
To begin sewing, set the machine for straight stitch. (1) Place the fabric under the presser foot with the fabric edge lined up with the desired seam guide line on the needle plate. (2) Lower the presser foot lifter, and then step on the foot controller to start sewing. (3)
1
2
3
30
Instruction Manual - Page 39
... side of a seam, press down to cut. (3)
32
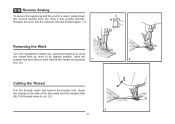
B 3 EN Reverse Sewing
To secure the beginning and the end of the face plate and into thread cutter (B). Guide the threads to its highest position, raise the
presser foot and remove work behind the needle and presser 1
2
foot. (2)
Cutting the Thread
Pull the threads under...
Instruction Manual - Page 41
... firm fabrics like denim, corduroy, poplin, duck, etc.
To select these stitches, turn the Stitch Length Dial to the indicator marked "S1". Adjust the Stitch Width Dial to stretch and hardwearing seams. The machine sews two stitches forward and one stitch backwards. Used to add triple reinforcement to between "3" and "6". M
1 M
2 34 Then, turn the...
Instruction Manual - Page 43
...fabrics, and a wider stitch is completed and press.
2 Note: To make sure the machine settings are normally sewn
with
the top edge of the hem extending about 7 mm (1/4") to...Sew a test first to make blind hem sewing even easier, use a blind hem foot, available from your SINGER® retailer. (See page 10 for heavier weight fabrics. EN Blind Hem
For hems on the fold, making sure the needle...
Instruction Manual - Page 45
... done in the order (D). 8. Using tailor's chalk, mark the position of your fabric and stabilizer. Lower the presser foot aligning the marks on foot with the marks on the fabric (A). (The front bar tack will overcast the cord.
1. While lightly holding the upper thread, start sewing.
*Set the stitch width to always make a
M
practice buttonhole on...
Instruction Manual - Page 49
... a shank is required, place a darning needle on top of the button. Adjust the stitch width, as illustrated in (3). Raise the needle out of the button.
Set the machine for zig-zag stitch, then set the width to "0". Set the machine for straight
a
2
ba b
stitch again, then sew a few securing stitches to check that the needle goes cleanly into the left...
Instruction Manual - Page 64
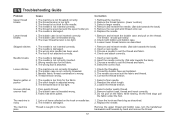
... case is not inserted correctly. 2. The lower thread tension is adjusted wrong. 3. Wrong needle size for the fabric. 2. The stitch length is too tight. The thread tension is damaged.
Remove and reinsert the bobbin case and pull on the fabric while sewing, let the feed dogs pull
the fabric under the foot.
1. Insert...
Similar Questions

The Machine Turns On But Doesn't Work, It Just Beeps When Foot Control Is Pres
when trying to operate this machine it doesn't work. It's tuned it on and position to sew, I push th...
when trying to operate this machine it doesn't work. It's tuned it on and position to sew, I push th...
(Posted by Meadedenise53 2 years ago)

Sewing Machine Model 5523 Page 53 In Manual Does Not Show Me How To Attach Pres
The page in your instructions I had and was reading it when it deleted
The page in your instructions I had and was reading it when it deleted
(Posted by ramseyrobert 7 years ago)

Singer Scholastic 5523
I cant get the needle position dial to change needle position.
I cant get the needle position dial to change needle position.
(Posted by jhines1947 9 years ago)

Singer 5523 Scholastic Manual For The Needle Is Hitting The Pressure Foot
(Posted by anndvs3 10 years ago)

How Do You Trouble Shoot, When The Machine Won't Pull Material Through.
The singer 9340 Signature, will not pull the material through. the trouble shooting guide does not g...
The singer 9340 Signature, will not pull the material through. the trouble shooting guide does not g...
(Posted by jdpolar 11 years ago)